1. Киришүү
The GVDA GD128PLUS Smart Rechargeable Digital Multimeter is an advanced, versatile tool designed for accurate and reliable electrical measurements. Featuring a 10000-count display, auto-ranging capabilities, and True RMS functionality, it is suitable for professionals and electronics enthusiasts alike. This manual provides essential information for safe and effective operation, setup, maintenance, and troubleshooting of your multimeter.
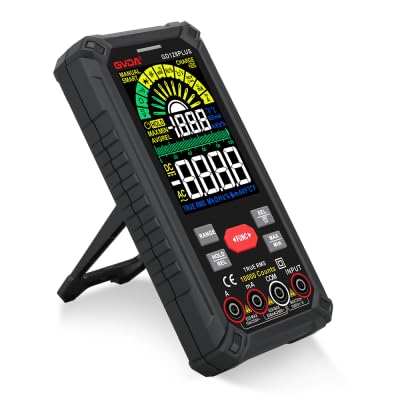
Figure 1.1: GVDA GD128PLUS Digital Multimeter with its integrated kickstand.
2. Коопсуздук маалыматы
Always adhere to the following safety precautions to prevent personal injury or damage to the multimeter:
- Өлчөө диапазону үчүн максималдуу киргизүү чегинен ашпаңыз.
- Том менен иштөөдө өтө этият болуңузtag30V AC RMS, 42V пик же 60V DC жогору. Бул томtagшок коркунучун жаратат.
- Ар дайым чынжырдагы кубатты ажыратып, бардык жогорку көлөмдү чыгарыңызtage capacitors before performing resistance, continuity, or diode tests.
- Сыноо өткөргүчтөрү жакшы абалда, эч кандай изоляциясы бузулбаганын текшериңиз.
- Мультиметр бузулгандай көрүнсө же корпусу ачык болсо, аны иштетпеңиз.
- Ар бир өлчөө үчүн туура функцияны жана диапазонду колдонуңуз.
- Өлчөө учурунда манжаларды сыноо зонддорунун манжаларынын артына кармаңыз.
- Мультиметрди нымдуу чөйрөдө же жарылуучу газдар же чаңдар бар жерде колдонбоңуз.
- The Non-Contact Voltage (NCV) function is for indication only; always verify voltagтүздөн-түз өлчөө менен e катышуусу.
3. Пакеттин мазмуну
Таңгактан чыгарганда, төмөндө көрсөтүлгөн бардык буюмдардын бар экенин жана жакшы абалда экенин текшериңиз:
- 1 x GVDA GD128PLUS Digital Multimeter
- 1 x Сыноочу линиялар (Кызыл жана Кара)
- 1 x USB заряддоо кабели
- 1 x K-типтеги термопара зонду
- 1 x кездеме көтөрүүчү баштык
- 1 х Колдонуучунун колдонмосу (бул документ)
- 1 x Белек кутусу (пакет)
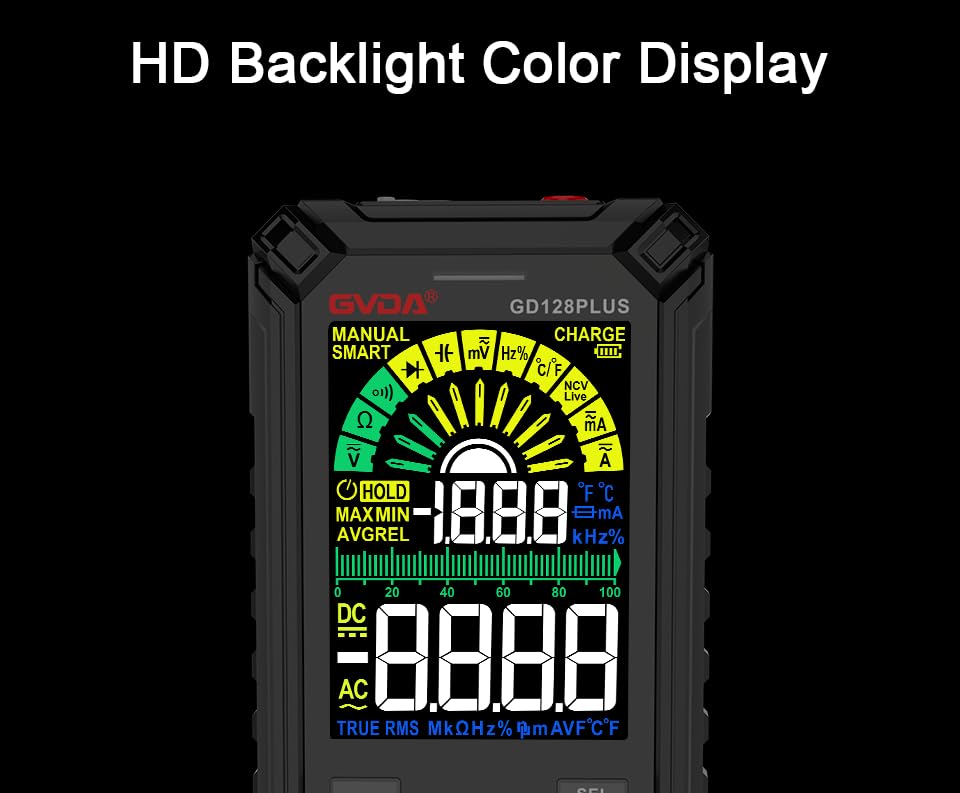
Figure 3.1: All components included in the GVDA GD128PLUS Multimeter package.
4. Продукттун өзгөчөлүктөрү жана компоненттери
The GD128PLUS multimeter is equipped with a range of features for comprehensive electrical testing:
- 10000 саны дисплей: Provides high resolution for precise measurements.
- Авто диапазон: Тиешелүү өлчөө диапазонун автоматтык түрдө тандайт, бул операцияны жөнөкөйлөтөт.
- Чыныгы RMS: Ensures accurate readings for non-sinusoidal AC waveforms.
- Кайра заряддалуучу литий батареясы: Built-in 3.7V battery for convenience and portability.
- HD Backlight Color Display: Clear and easy-to-read display in various lighting conditions.
- Байланышсыз томtage (NCV) аныктоо: AC көлөмүнүн бар экендигин коопсуз аныктайтtagд түз байланышсыз.
- LED фонарик: Integrated light for illuminating dark work areas.
- Дайындарды кармоо (ТОКТОО): Дисплейдеги учурдагы окууну токтотот.
- Салыштырмалуу өлчөө (REL): Displays the difference between a stored reference value and the current reading.
- MAX/MIN Measurement: Records the maximum and minimum values during a measurement session.
- Input Jack LED Indication: Guides correct test lead connection for selected function.
- Ашыкча жүктөн коргоо: Protects the device from damage due to excessive input.
4.1. Multimeter Layout

Figure 4.1: Key components and input jacks of the GVDA GD128PLUS Multimeter.
Refer to Figure 4.1 for the location of the following components:
- Дисплей: HD Backlight Color LCD for readings and indicators.
- Функция баскычтары: RANGE, HOLD/REL, FUNC, SEL, MAX/MIN.
- Киргизүү уячалары:
- COM Jack: Бардык өлчөөлөр үчүн жалпы (терс) киргизүү.
- VΩHzCap°C/°F Jack: Көлөм үчүн оң киргизүүtage, Каршылык, Жыштык, Сыйымдуулук жана Температураны өлчөө.
- mAμA Jack: Милли үчүн оң киргизүүampere жана микроampучурдагы өлчөөлөр.
- 10A Jack: Positive input for 10 Ampучурдагы өлчөөлөр.
- Күйгүзүү / Өчүрүү баскычы: Эң жогорку четинде жайгашкан.
- Кубат Джек: Ички батареяны кайра заряддоо үчүн USB-C порту.
- Flashlight Key: Button to activate the integrated LED flashlight.
- Эскертүү көрсөткүчү: LED light for safety alerts.
- кашаа: Integrated kickstand on the back for hands-free viewing.
5. Орнотуу
5.1. Баштапкы заряддоо
Before first use, it is recommended to fully charge the multimeter's internal lithium battery. Connect the provided USB charging cable to the multimeter's charge jack and to a standard USB power adapter (not included) or a computer USB port. The display will indicate charging status. A full charge typically takes a few hours.

Figure 5.1: The multimeter's rechargeable lithium battery can be charged directly using a USB cable.
5.2. Attaching Test Leads
For most measurements, connect the black test lead to the COM jack and the red test lead to the appropriate positive input jack (VΩHzCap°C/°F, mAμA, or 10A) depending on the desired measurement function. The input jack LED indicators will illuminate to guide correct connection.
6. Иштөө нускамалары
6.1. Күйгүзүү/өчүрүү
басып, кармап туруңуз Күйгүзүү/өчүрүү button (located on the top edge) to turn the multimeter on or off. The device features an auto-power-off function to conserve battery life after a period of inactivity.
6.2. Өлчөө режимдери
The GD128PLUS offers various measurement modes, accessible via the rotary dial and function buttons:
6.2.1. Томtage Өлчөө (AC/DC)
- Айлануучу циферблатты буруңуз V position. The multimeter will automatically detect AC or DC voltage.
- Кара сыноо тилкесин төмөнкүгө туташтырыңыз COM джек жана кызыл тест алып барат VΩHzCap°C/°F джек.
- Сыноо зонддорун текшерилип жаткан схемага же компонентке параллель туташтырыңыз.
- Томду окуңузtage мааниси дисплейде.
6.2.2. Учурдагы өлчөө (AC/DC)
- Айлануучу циферблатты буруңуз мА/мкА or 10A position depending on the expected current.
- Кара сыноо тилкесин төмөнкүгө туташтырыңыз COM jack. Connect the red test lead to the mAμA jack for small currents or the 10A jack for larger currents.
- Мультиметрди чынжыр менен катар туташтырыңыз. Туташтыруудан мурун чынжырдын энергиясы өчүрүлгөнүн текшериңиз.
- Схемага кубат бериңиз жана учурдагы маанини окуңуз.
- Абайлаңыз: Never connect the multimeter in parallel for current measurement, as this can damage the device and the circuit.
6.2.3. Каршылыкты өлчөө (Ω)
- Айлануучу циферблатты буруңуз Ω позиция.
- Кара сыноо тилкесин төмөнкүгө туташтырыңыз COM джек жана кызыл тест алып барат VΩHzCap°C/°F джек.
- Каршылыкты өлчөөдөн мурун чынжырдын энергиясы өчүрүлгөнүн жана бардык конденсаторлордун зарядсыздангандыгын текшериңиз.
- Сыноо зонддорун өлчөй турган компонентке туташтырыңыз.
- Каршылык маанисин окуңуз.
6.2.4. Сыйымдылыкты өлчөө (F)
- Айлануучу циферблатты буруңуз Кап позиция.
- Кара сыноо тилкесин төмөнкүгө туташтырыңыз COM джек жана кызыл тест алып барат VΩHzCap°C/°F джек.
- Ensure the capacitor is fully discharged before connecting the probes.
- Конденсатор аркылуу сыноо зонддорун туташтырыңыз.
- Сыйымдуулуктун маанисин окуңуз.
6.2.5. Жыштыкты өлчөө (Гц)
- Айлануучу циферблатты буруңуз Hz позиция.
- Кара сыноо тилкесин төмөнкүгө туташтырыңыз COM джек жана кызыл тест алып барат VΩHzCap°C/°F джек.
- Сыноо зонддорун сигнал булагына параллель туташтырыңыз.
- Жыштыктын маанисин окуу.
6.2.6. Diode Test and Continuity Test
- Айлануучу циферблатты буруңуз Диод/Үзгүлтүксүздүк позиция. колдонуу СЕЛ button to toggle between diode test and continuity test.
- Кара сыноо тилкесин төмөнкүгө туташтырыңыз COM джек жана кызыл тест алып барат VΩHzCap°C/°F джек.
- Диод сыноо: Connect the red probe to the anode and the black probe to the cathode of the diode. A forward voltage drop will be displayed. Reverse the probes; an open circuit (OL) should be displayed.
- Үзгүлтүксүздүк тести: Connect the probes across the circuit or component. A continuous beep indicates a low resistance (continuity).
6.2.7. Контактсыз томtage (NCV) аныктоо
- Айлануучу циферблатты буруңуз NCV позиция.
- Move the top end of the multimeter near the conductor suspected of having AC voltage.
- The multimeter will emit an audible beep and the warning indicator will flash, with the display showing signal strength, if AC voltagе аныкталат.
- Эскертүү: This function is for preliminary detection only. Always use direct contact measurement for precise voltage текшерүү.
6.2.8. Температураны өлчөө (°C/°F)
- Айлануучу циферблатты буруңуз ° C / ° F позиция.
- Connect the K-type thermocouple probe to the COM жана VΩHzCap°C/°F уюлдуулукту байкоо.
- Термопаранын учун температурасы өлчөнүүчү объекттин үстүнө же жанына коюңуз.
- Read the temperature on the display. Use the СЕЛ Цельсий менен Фаренгейттин ортосунда которулуу үчүн баскыч.
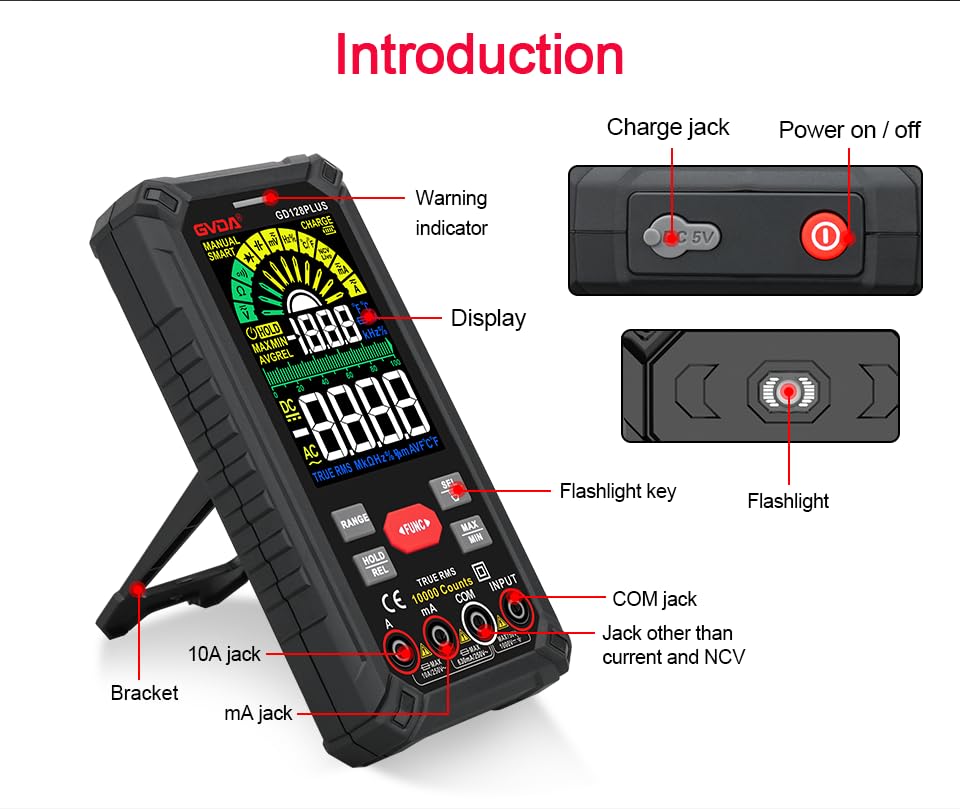
Figure 6.1: The multimeter can perform temperature tests using the included K-type thermocouple probe.
6.3. Атайын функциялар
- RANGE баскычы: In manual range mode, press to cycle through available ranges. In auto range mode, press to switch to manual range.
- КАРМАП/БОШОТУУ баскычы:
- Short press: Activates Data Hold, freezing the current reading. Press again to release.
- Long press: Activates Relative Measurement (REL). The current reading becomes the reference, and subsequent readings show the difference from this reference. Long press again to exit.
- MAX/MIN баскычы: Press to enter MAX/MIN recording mode. The display will show the maximum, minimum, and average values detected since activation. Press again to cycle through MAX, MIN, AVG. Long press to exit.
- FUNC баскычы: Used to switch between different functions within the same rotary dial position (e.g., AC/DC voltage, Диод/Үзгүлтүксүздүк).
- Кол чырак: Press the dedicated flashlight key on the side to turn the LED flashlight on or off.
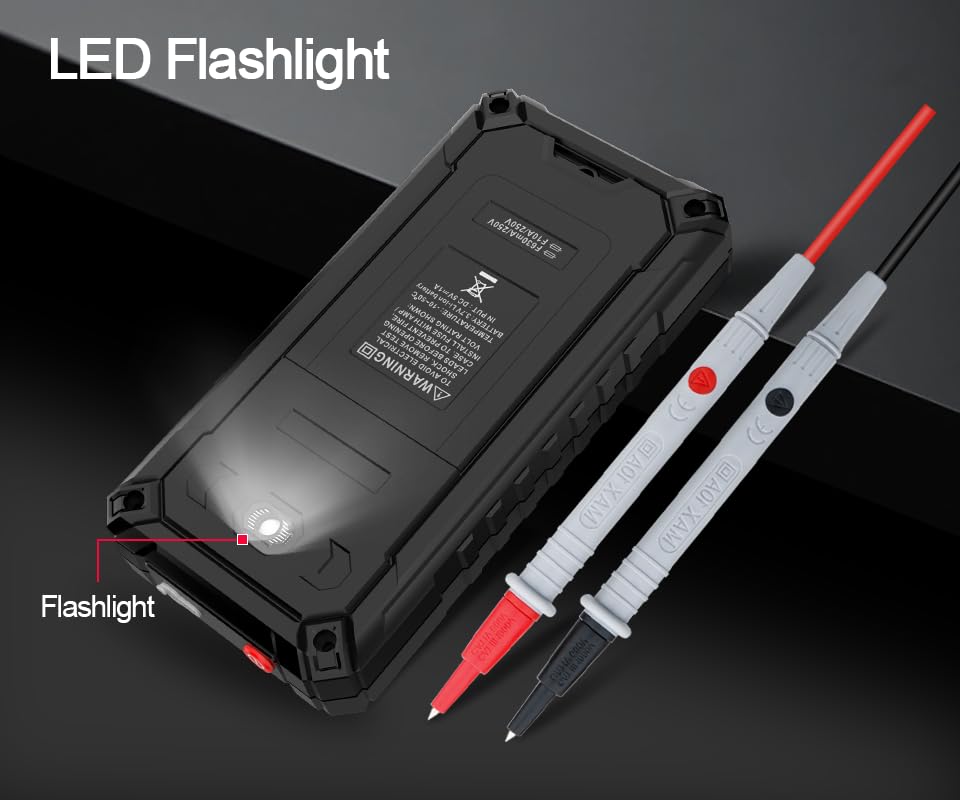
Figure 6.2: The multimeter features a convenient LED flashlight for illuminating work areas.
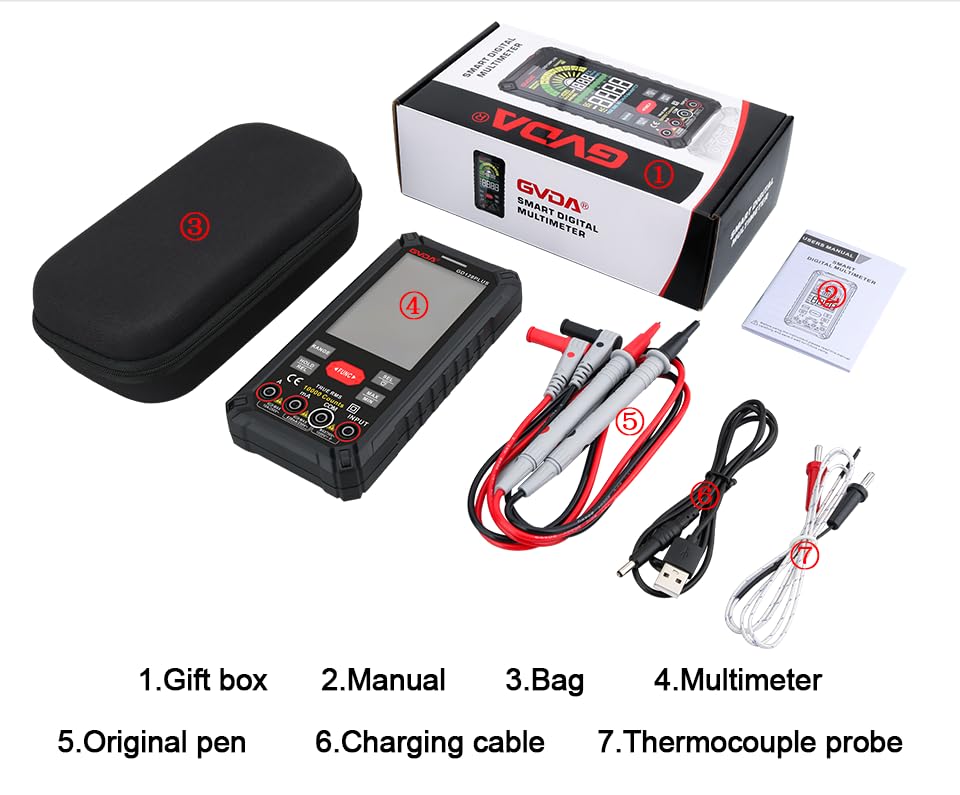
Figure 6.3: The HD Backlight Color Display provides clear and comprehensive measurement information.
7. Техникалык тейлөө
7.1. Тазалоо
Ишти жарнама менен сүртүңүзamp cloth and mild detergent. Do not use abrasives or solvents. Ensure the multimeter is off and disconnected from any circuits before cleaning.
7.2. Батареяны кубаттоо
The multimeter is equipped with a rechargeable lithium battery. When the low battery indicator appears on the display, connect the multimeter to a USB power source using the provided charging cable. Avoid fully discharging the battery frequently to prolong its lifespan.
7.3. Сактоо
When not in use for extended periods, store the multimeter in a cool, dry place, away from direct sunlight and extreme temperatures. It is advisable to charge the battery periodically (e.g., every 3-6 months) to maintain its health.
8. Кыйынчылыктарды
| Көйгөй | Мүмкүн себеп | Чечим |
|---|---|---|
| Мультиметр күйбөйт. | Батарея аз же түгөнүп калган. | Charge the multimeter using the USB cable. |
| "OL" (Ашыкча жүктөө) көрсөтүлөт. | Өлчөө тандалган диапазондон же метрдин максималдуу сыйымдуулугунан ашып кетти. | Switch to a higher range (if in manual range) or ensure the measurement is within the meter's specifications. |
| Туура эмес окуулар. | Incorrect function/range selected; poor test lead connection; external interference. | Verify function and range; ensure test leads are securely connected; move away from strong electromagnetic fields. |
| Үзгүлтүксүздүк сигналы жок. | Circuit is open; multimeter not in continuity mode. | Check the circuit for breaks; ensure the multimeter is set to continuity mode (use SEL button if necessary). |
9. Техникалык шарттар
| Параметр | Нарк |
|---|---|
| Дисплей | 10000 Counts, HD Backlight Color LCD |
| Рангинг | Auto / Manual Range |
| Чыныгы RMS | Ооба |
| DC Voltage Диапазон | 1000 В чейин |
| AC Voltage Диапазон | 750 В чейин |
| DC ток диапазону | 10А чейин |
| AC ток диапазону | 10А чейин |
| Каршылык диапазону | Yes (Ohm) |
| Кубаттуулук диапазону | Yes (Farad) |
| Жыштык диапазону | Yes (Hz) |
| Температура диапазону | -40°Cден 1000°Cге чейин / -40°Fтен 1832°Fге чейин |
| Диод сыноо | Ооба |
| Үзгүлтүксүздүк тести | Ооба (бышылдоо менен) |
| NCV (контактсыз томtage) | Ооба |
| Электр камсыздоо | 3.7V кайра заряддалуучу литий батарейка |
| Sampling Rate | Болжол менен секундасына 3 жолу |
| Өлчөмдөр | 166 мм x 83 мм x 29 мм (болжол менен 6.5 x 3.3 x 1.1 дюйм) |
| Салмагы | Болжол менен 1.26 фунт (0.57 кг) |
| Иштөө чөйрөсү | 0-40°C, relative humidity <80% |
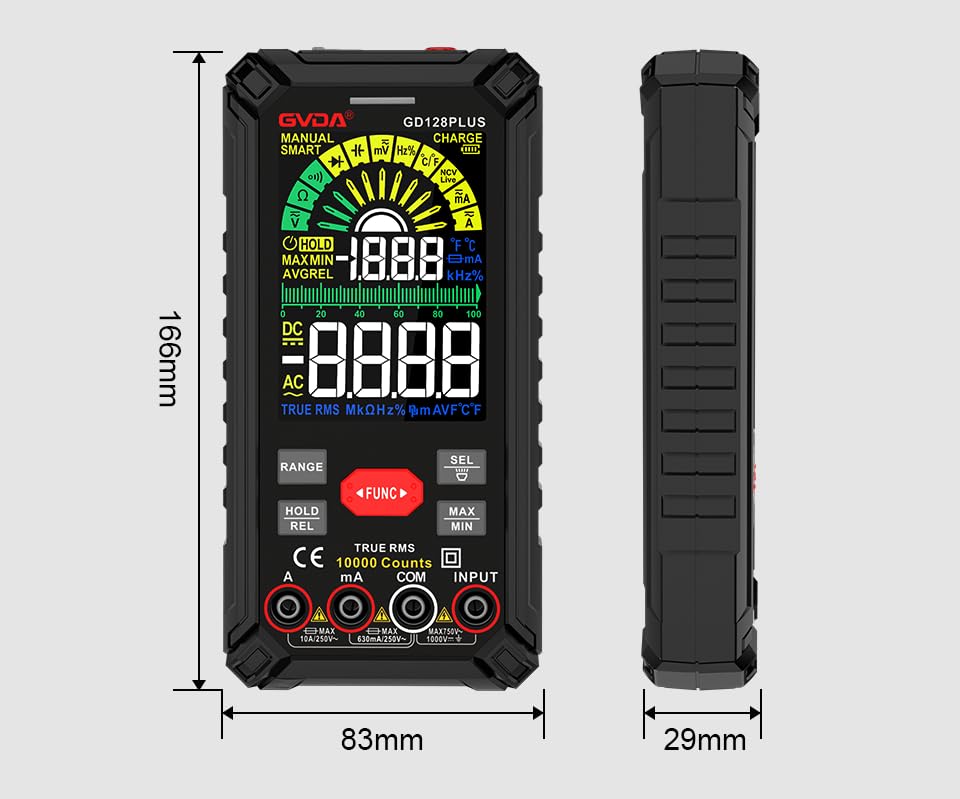
Figure 9.1: Physical dimensions of the GVDA GD128PLUS Multimeter.
10. Кепилдик жана колдоо
This GVDA GD128PLUS Digital Multimeter is designed for reliability and performance. For warranty information, technical support, or service inquiries, please refer to the contact details provided by your retailer or visit the official GVDA webсайт. Кепилдик дооматтары үчүн сатып алганыңыздын далилин сактап коюңуз.


