1. Киришүү
Thank you for choosing the Conentool 21V Cordless Impact Drill/Driver Kit. This tool is designed for various drilling and screwdriving tasks in wood, metal, plastics, and masonry. Please read this manual carefully before operating the tool to ensure safe and efficient use. Keep this manual for future reference.

Image 1.1: The Conentool 21V Cordless Impact Drill/Driver Kit, including the drill, two 2500mAh batteries, charger, and a variety of drill bits and accessories in a carrying case.
2. Жалпы коопсуздук нускамалары
ЭСКЕРТҮҮ: Бул электр куралы менен берилген бардык коопсуздук эскертүүлөрүн, нускамаларды, иллюстрацияларды жана спецификацияларды окуңуз. Төмөндө саналып өткөн бардык көрсөтмөлөрдү аткарбоо электр шокуна, өрткө жана/же олуттуу жаракатка алып келиши мүмкүн.
2.1 Жумуш аймагынын коопсуздугу
- Жумушчу жерди таза жана жакшы жарыктандырыңыз. Башаламан же караңгы жерлер кырсыкка чакырат.
- Жарылуучу чөйрөдө, мисалы, күйүүчү суюктуктар, газдар же чаң бар жерде электр шаймандарын иштетпеңиз. Электр шаймандары чаңды же түтүндү тутандыруучу учкундарды жаратат.
- Электр шайманын иштетип жатканда балдарды жана жанында тургандарды алыс кармаңыз. Алаксытуулар сизди башкара албай калышы мүмкүн.
2.2 Электр коопсуздугу
- Электр шайманынын сайгычтары розеткага дал келиши керек. Эч качан сайгычты эч кандай жол менен өзгөртпөңүз.
- Түтүктөр, радиаторлор, диапазондор жана муздаткычтар сыяктуу жерге туташтырылган же жерге төшөлгөн беттерге денеге тийбеңиз. Денеңиз жерге туташтырылган же жерге туташтырылган болсо, электр тогуна урунуп калуу коркунучу жогору.
- Электр шаймандарын жамгырга же нымдуу шарттарга тийгизбеңиз. Электр шайманына суу киргенде электр тогуна урунуу коркунучу көбөйөт.
2.3 Жеке коопсуздук
- Дайыма коргоочу көздү тагыныңыз. Коопсуздук көз айнек, көз айнек же бет калкан колдонуңуз.
- Аспапты узак убакытка иштетип жатканда угуу үчүн коргоочу каражаттарды тагыныңыз.
- Туура кийин. Бош кийимдерди же зер буюмдарды кийбеңиз. Чачыңызды жана кийимиңизди кыймылдуу бөлүктөрдөн алыс кармаңыз.
- Сергек болуңуз, эмне кылып жатканыңызды байкаңыз жана электр шайманын иштетип жатканда акыл-эстүү болуңуз.
3. Пакеттин мазмуну
Төмөндө тизмеленген нерселердин баары пакетиңизге камтылганын текшериңиз. Эгерде кандайдыр бир нерселер жок болсо же бузулса, кардарларды колдоо менен байланышыңыз.
- 1 x Conentool 21V Cordless Impact Drill/Driver
- 2 x 2500mAh Lithium-ion Batteries
- 1 батарейки х
- 1 x Flexible Shaft Extension
- Various Drill Bits (for wood, metal, masonry)
- Various Screwdriver Bits
- Сокет адаптерлери
- Ташуу кутусу
- User Manual

Image 3.1: A complete overview of the kit contents, including the drill, two batteries, charger, flexible shaft, various drill bits, screwdriver bits, and socket adapters, all neatly arranged.
4. Продукт бүтүп калдыview
Familiarize yourself with the main components of your drill/driver:
- Чак: Бургулоочу учтарды жана отвертка учтарын кармайт.
- Моментти жөндөө шакеги: Selects the desired torque setting.
- Режим тандоо шакеги: Switches between screwdriving, drilling, and impact drilling modes.
- Ылдамдыкты тандоочу которгуч: Changes between high and low-speed gears.
- Trigger Switch: Куралды иштетет жана ылдамдыкты башкарат (өзгөрүлмө ылдамдык).
- Алга/Артка тандоочу: Айлануу багытын өзгөртөт.
- LED иш жарык: Жумуш аймагын жарык кылат.
- Батарея топтому: Куралга күч берет.
- Батареяны чыгаруу баскычы: Батареяны алып салуу үчүн.
- туткасы: Ыңгайлуу колдонуу үчүн эргономикалык кармагыч.

Сүрөт 4.1: Ички view highlighting the brushless motor, which provides increased power, efficiency, and a quieter operation with no sparks.
5. Орнотуу
5.1 Батареяны заряддоо
The battery pack is not fully charged at the time of purchase. It is recommended to fully charge the battery before first use.
- Заряддоо түзүлүштү стандарттуу розеткага туташтырыңыз.
- Slide the battery pack onto the charger base. Ensure it clicks into place.
- The charger indicator light will show the charging status. A red light typically indicates charging, and a green light indicates a full charge.
- Толук заряддалгандан кийин, заряддагычты розеткадан ажыратып, батарейканы чыгарыңыз.

Image 5.1: The battery charger connected to a wall outlet, with a battery pack inserted for charging. The red light indicates charging, and the green light indicates a completed charge.
5.2 Батареяны орнотуу жана чыгаруу
- Орнотуу үчүн: Align the battery pack with the base of the tool handle and slide it in until it clicks securely into place.
- Алып салуу үчүн: Press the battery release button (usually located at the front of the battery) and slide the battery pack out of the tool.

Сүрөт 5.2: Кесилген жер view of the 2500mAh battery pack, illustrating its internal lithium-ion cells and power management system, designed for up to 90 minutes of use per battery.
5.3 Бургулоочу/браткычтын биттерин орнотуу жана алып салуу
- Орнотуу үчүн: Rotate the chuck counter-clockwise to open the jaws. Insert the desired bit into the chuck as far as it will go. Rotate the chuck clockwise to tighten the jaws firmly around the bit.
- Алып салуу үчүн: Жаактарды бошотуп, битти сууруп алуу үчүн патронду сааттын жебесине каршы айландырыңыз.
Ensure the bit is securely fastened to prevent it from slipping during operation.
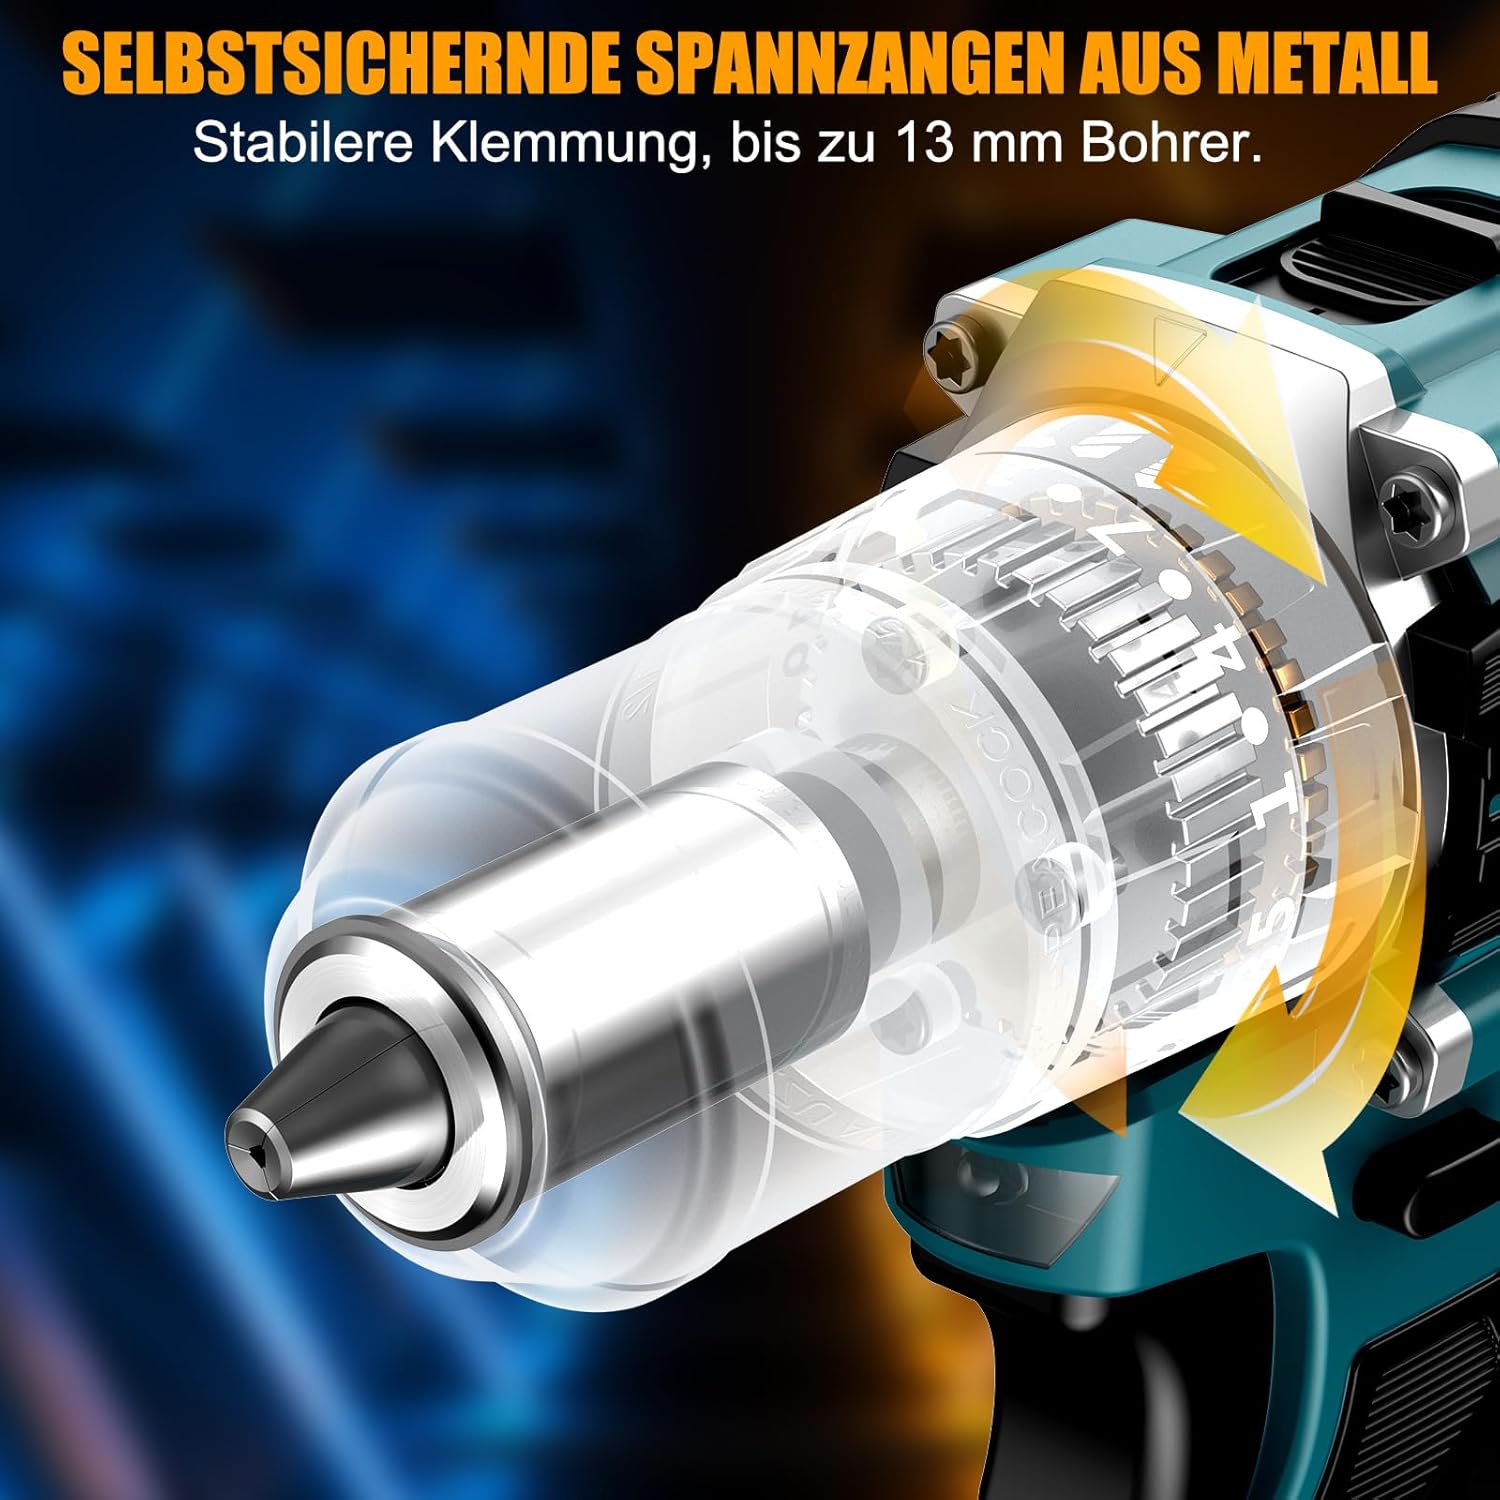
Сүрөт 5.3: деталдуу view of the self-locking metal chuck, demonstrating its stable clamping mechanism capable of holding drill bits up to 13mm securely.
6. Иштөө нускамалары
6.1 Күйгүзүү/өчүрүү жана ылдамдыкты көзөмөлдөө
- To turn the tool ON, press the trigger switch. The speed is variable; press the trigger further for higher speed.
- Куралды ӨЧҮРҮҮ үчүн, триггер баскычын коё бериңиз.
- The integrated LED work light will illuminate when the trigger is pressed, providing visibility in dimly lit areas.
6.2 Алдыга/Артка айлантуу
The forward/reverse selector switch is located above the trigger. Push it to the left for forward rotation (for screwdriving and drilling) and to the right for reverse rotation (for removing screws or freeing jammed bits). Ensure the tool is stopped before changing direction.
6.3 Speed Gear Selection
The drill features a 2-speed gear selector switch on top of the tool:
- Gear 1 (Low Speed, 0-650 RPM): Ideal for high-torque applications like driving large screws or drilling large holes.
- Gear 2 (High Speed, 0-1850 RPM): Suitable for fast drilling in softer materials and smaller diameter holes.
Always select the appropriate gear for the task. Change gears only when the tool is completely stopped.
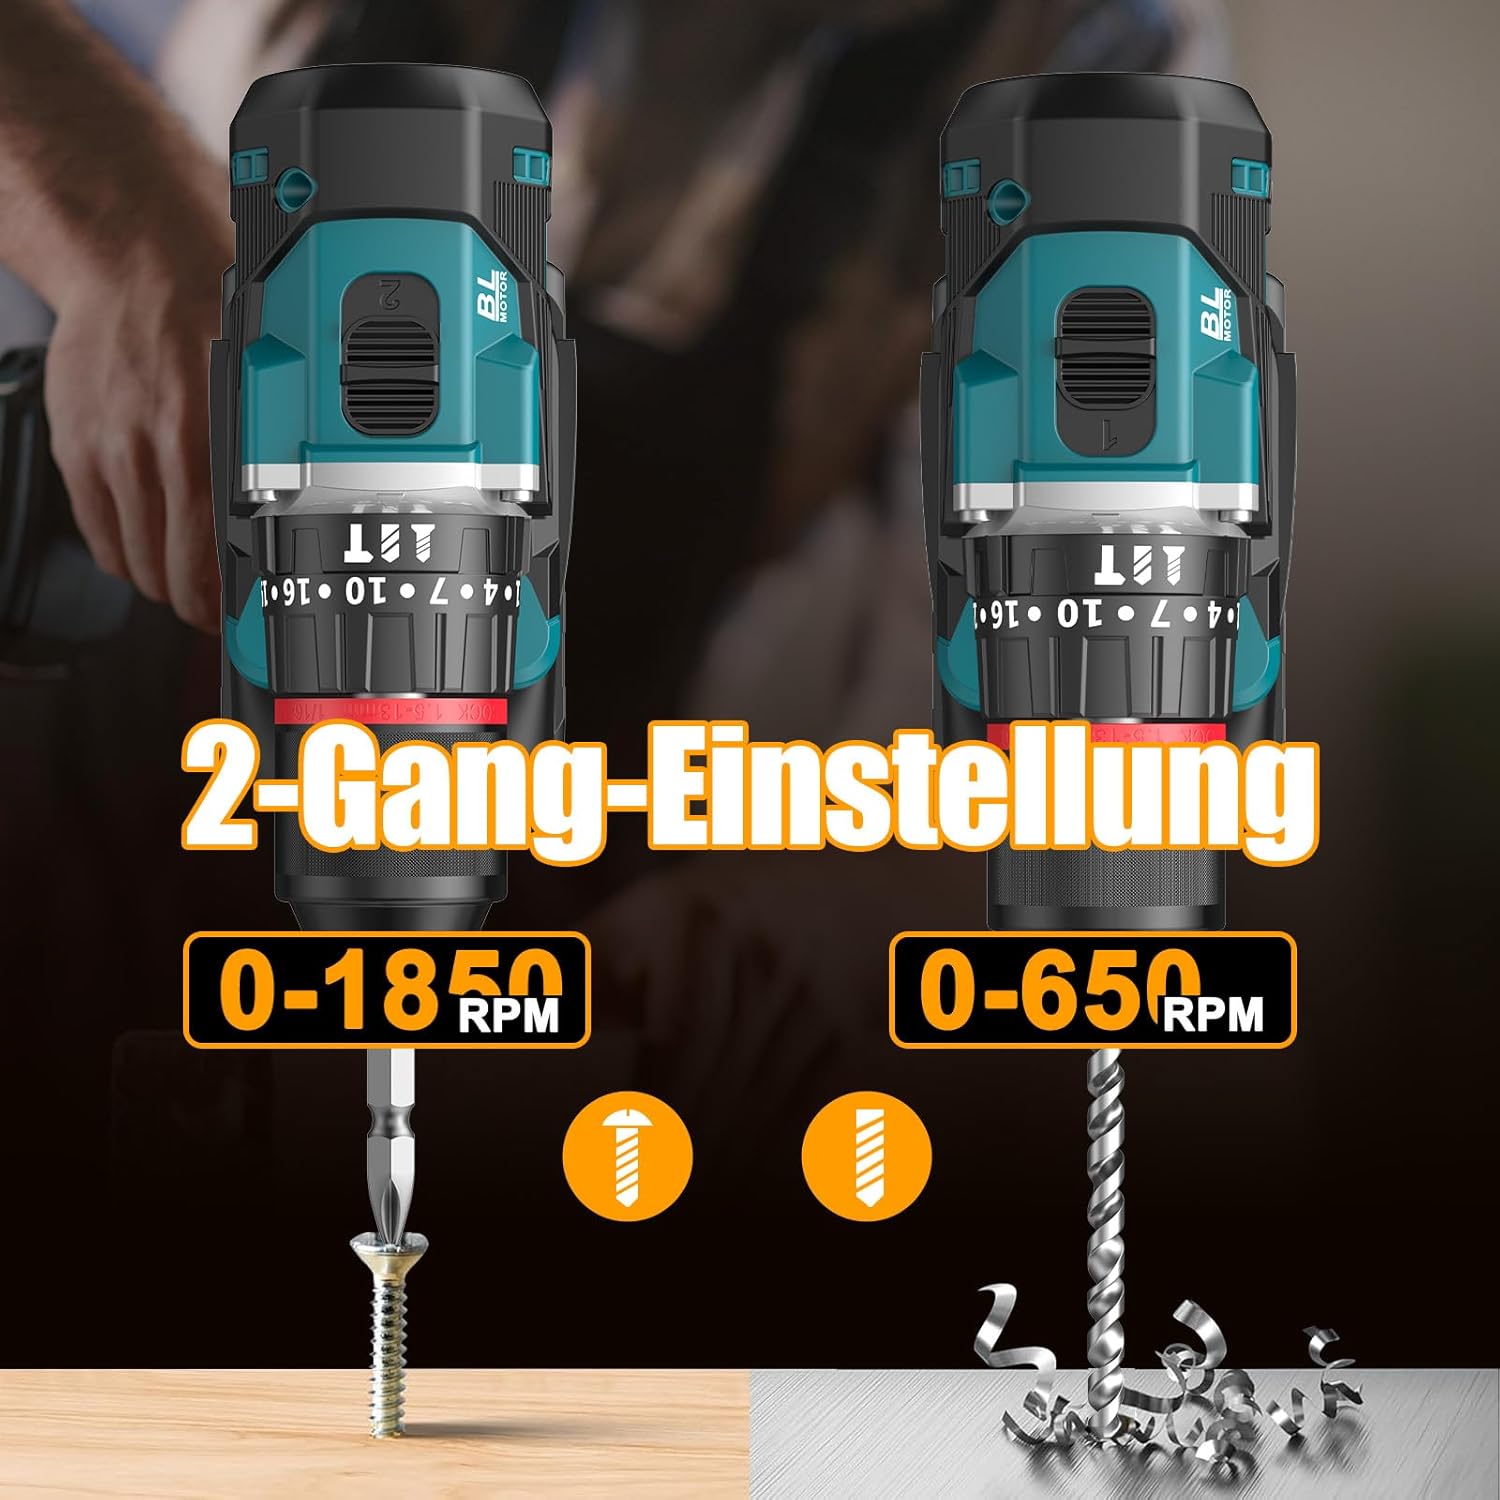
Image 6.1: An illustration demonstrating the two-speed gear settings: Gear 1 (0-650 RPM) for screwdriving and Gear 2 (0-1850 RPM) for drilling, allowing for optimal performance based on the application.
6.4 Torque Adjustment and Mode Selection
The torque adjustment ring allows you to set the desired torque for screwdriving applications, preventing overtightening or stripping screws. The mode selector ring allows you to switch between different operating modes.
- Screwdriving Mode (Torque Settings 1-35): Use these settings to match the torque to the screw size and material. Lower numbers for smaller screws/softer materials, higher numbers for larger screws/harder materials.
- Бургулоо режими (Бургулоочу учтун сүрөтчөсү): For general drilling without impact. The clutch is disengaged, providing maximum torque.
- Сокку бургулоо режими (Балка сүрөтчөсү): For drilling into masonry or concrete, providing a hammering action in addition to rotation.
The drill offers 35+3 settings, including 35 torque settings for screwdriving and 3 modes (screwdriving, drilling, impact drilling).

Image 6.2: A visual representation of the 35+3 torque and mode settings, indicating precise power control and a maximum torque of 55 N.m, suitable for various materials like wood, brick, plastic, and metal.
7. Техникалык тейлөө
7.1 Тазалоо
- Тазалоо же тейлөө иштерин жүргүзүүдөн мурун дайыма батарейканы ажыратыңыз.
- Ашыкча ысып кетүүнүн алдын алуу үчүн аспаптын желдетүүчү тешиктерин таза кармаңыз.
- жумшак колдонуу, damp аспапты тазалоо үчүн чүпүрөк сasing. Катуу химиялык заттарды же абразивдүү тазалоочу каражаттарды колдонбоңуз.
7.2 Сактоо
- Куралды жана батареяларды салкын, кургак жерде, күндүн түз нурунан жана нымдуулуктан алыс сактаңыз.
- Куралды чаңдан жана бузулуудан коргоо үчүн аны көтөрүүчү кутучасында сактаңыз.
- Балдар жетпеген жерде сактаңыз.

Image 7.1: A person carrying the Conentool drill kit in its durable black carrying case, designed for convenient storage and transport of the tool and its accessories.
7.3 Батареяга кам көрүү
- Do not store batteries in a discharged state. Recharge them regularly, especially if not used for extended periods.
- Батареяларды экстремалдык температурага тийгизүүдөн сактаңыз.
- Батарея пакетин ажыратууга же өзгөртүүгө аракет кылбаңыз.
8. Кыйынчылыктарды
| Көйгөй | Мүмкүн себеп | Чечим |
|---|---|---|
| Курал башталбайт | Батарея заряддалган эмес же туура эмес орнотулган. | Батарея толук заряддалганын жана туура салынганын текшериңиз. |
| Кыскартылган күч же ылдамдык | Батарея заряды аз. | Батареяны кайра заряддаңыз. |
| Бит патронго жылат | Чак жетиштүү тартылбаган. | Tighten the chuck firmly around the bit. Ensure the bit shank is clean. |
| Ашыкча ысып кетүү | Бөгөттөлгөн желдетүү тешиктери; үзгүлтүксүз оор колдонуу. | Желдетүү тешиктерин тазалоо. Узакка созулган колдонууда куралды муздатып туруңуз. |
9. Техникалык шарттар
| Өзгөчөлүк | Спецификация |
|---|---|
| Модель номери | ebvc-sd-de |
| Тtage | 21 вольт |
| Батарея түрү | Литий-ион |
| Батарея сыйымдуулугу | 2500 мАч (ар бири) |
| Max Torque | 55 Нм |
| Момент орнотуулары | 35 + 3 Modes (Screwdriving, Drilling, Impact Drilling) |
| No-Load Speed (Gear 1) | 0-650 RPM |
| No-Load Speed (Gear 2) | 0-1850 RPM |
| Чак Size | 13 mm (3/8 inch) Keyless |
| Продукциянын өлчөмдөрү | 35 x 31 x 10 см |
| Салмагы (батарея менен) | 1.5 килограмм |
10. Кепилдик жана колдоо
Conentool products are manufactured to high-quality standards. In the unlikely event of a defect due to material or manufacturing fault, please contact your retailer or Conentool customer service. Please retain your proof of purchase for warranty claims.
For further assistance, technical support, or to inquire about spare parts, please refer to the contact information provided with your purchase or visit the official Conentool webсайт.


