1. Киришүү
Thank you for choosing the ADE CK2310 Digital Radio Alarm Clock. This device offers precise timekeeping via DCF radio signal, dual alarm settings, temperature and humidity display, and a convenient backlight function. Its compact design makes it suitable for both home use and travel. Please read this manual carefully to ensure proper use and optimal performance of your new alarm clock.

Image 1.1: The ADE CK2310 Digital Radio Alarm Clock is designed for portability, making it an ideal travel companion.
2. Коопсуздук маалыматы
- Аппаратты суудан жана жогорку нымдуулуктан алыс кармаңыз.
- Аппаратты экстремалдык температурага же тике күн нуруна калтырбаңыз.
- Аппаратты жерге түшүрүүдөн же катуу таасирлерден сактаныңыз.
- Аппаратты өз алдынча бөлүүгө же оңдоого аракет кылбаңыз. Квалификациялуу тейлөө кызматкерлерине кайрылыңыз.
- Колдонулган батарейкаларды жергиликтүү эрежелерге ылайык жок кылыңыз.
- Батареяларды балдар жетпеген жерде сактаңыз.
3. Пакеттин мазмуну
Пакеттин мазмунун таңгактан чыгаргандан кийин текшериңиз:
- ADE CK2310 Digital Radio Alarm Clock
- 2 x AAA батареялары
- Instruction Manual

Image 3.1: The package includes the ADE CK2310 alarm clock and two AAA batteries.
4. Продукт бүтүп калдыview
Familiarize yourself with the various components and display elements of your alarm clock.
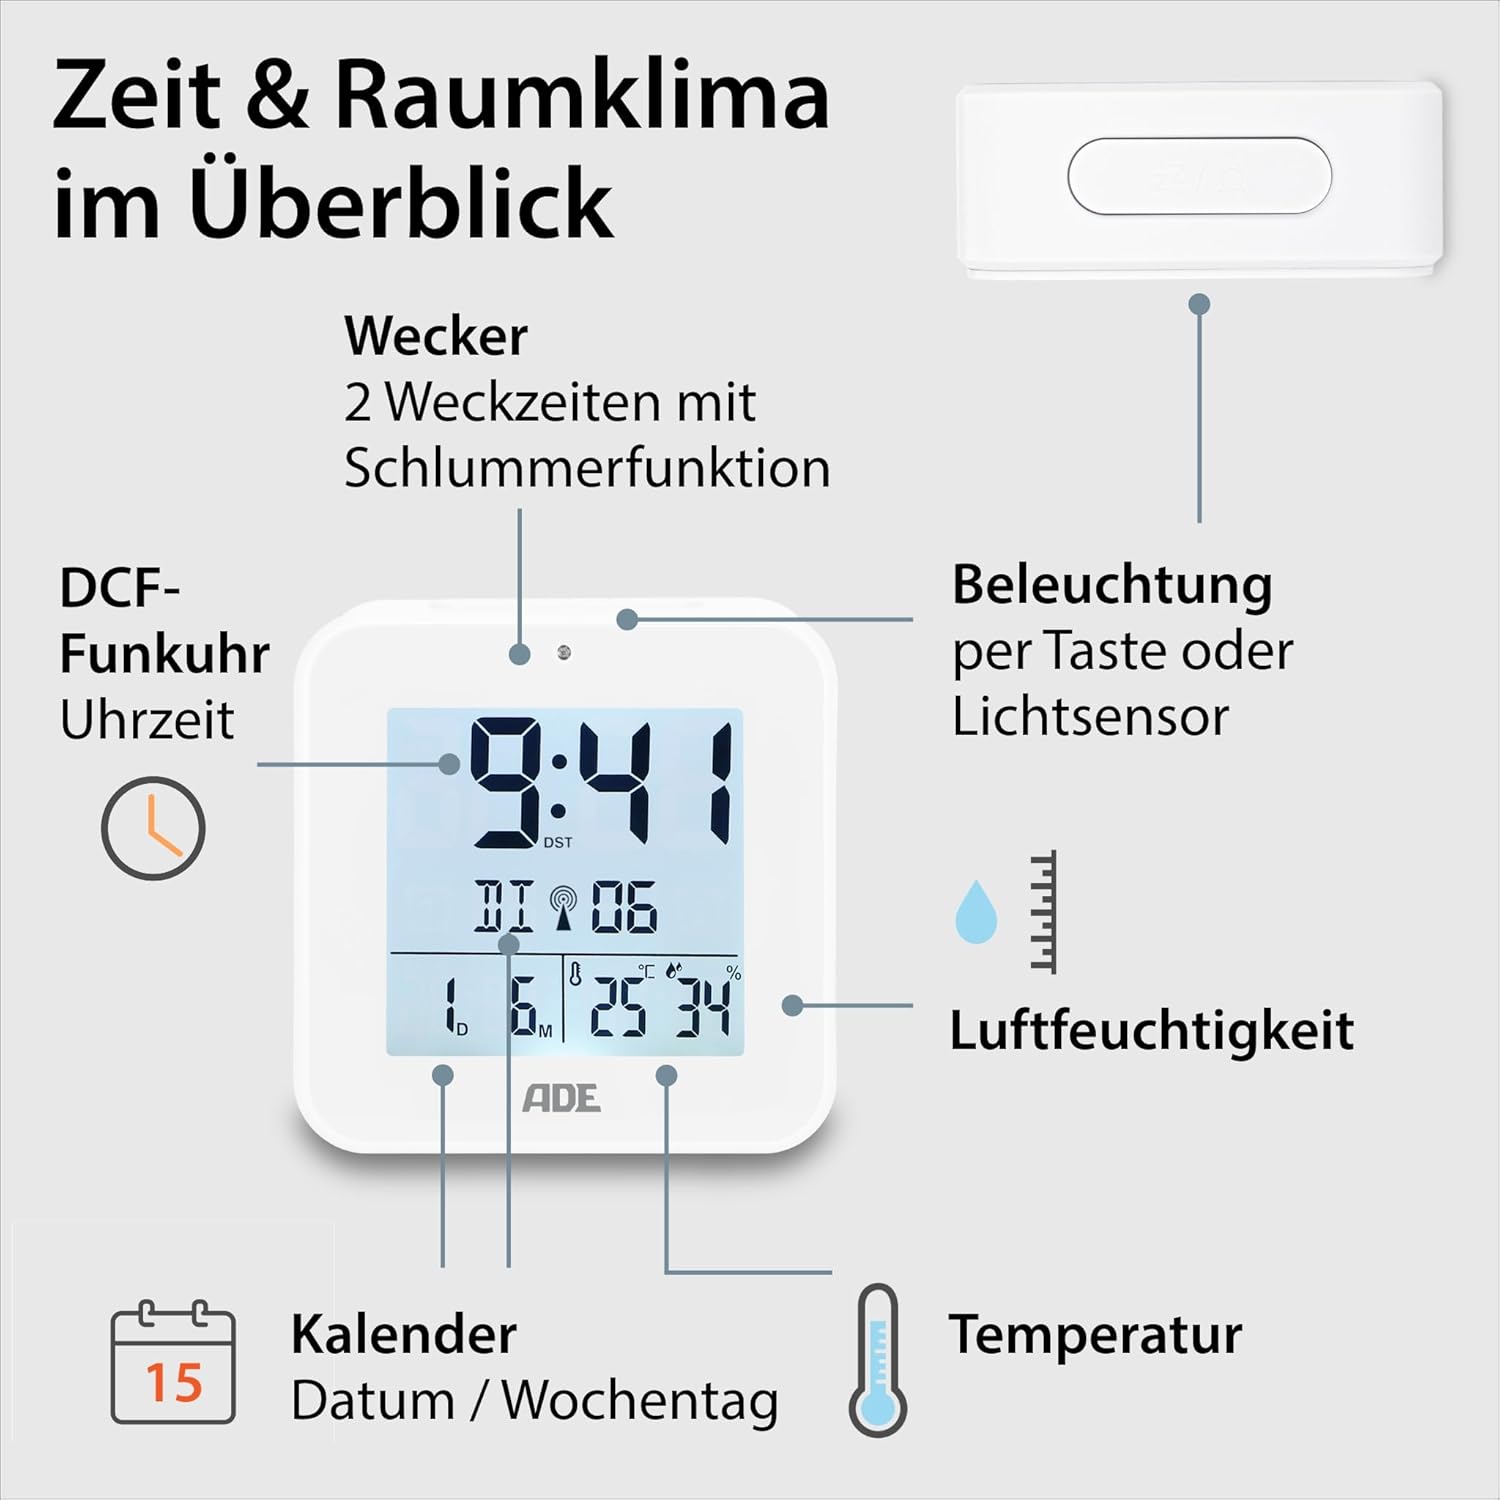
Image 4.1: Front display and key features of the ADE CK2310.
- Убакытты көрсөтүү: Учурдагы убакытты көрсөтөт (саат, мүнөт).
- DCF Signal Indicator: Indicates successful reception of the radio time signal.
- Сигнал индикаторлору: Shows if Alarm 1 or Alarm 2 is active.
- Date and Day of Week: Displays the current date and day.
- Температура дисплейи: Айлана-чөйрөнүн температурасын Цельсий же Фаренгейтте көрсөтөт.
- Нымдуулук дисплей: Shows ambient relative humidity.
- Тындырма/Жарык баскычы: Activates snooze during an alarm or backlight manually.
- Функция баскычтары: Buttons for setting time, alarms, and other functions (located on the back/side).
- Жарык сенсору: Automatically activates backlight in dark environments.

Сүрөт 4.2: Арткы view with controls and battery compartment.
The compact dimensions of the alarm clock are approximately 7.2 x 3.8 x 7.2 cm (width x depth x height).

Image 4.3: Dimensions of the ADE CK2310 alarm clock.
5. Орнотуу
5.1. Батареяны орнотуу
- Open the battery compartment cover on the back of the alarm clock (refer to Image 4.2).
- Туура полярдуулукту (+ жана -) текшерип, эки AAA батарейкасын салыңыз.
- Батарея уясынын капкагын бекем жабыңыз.
The alarm clock will power on automatically and begin searching for the DCF radio signal.
5.2. DCF Radio Signal Reception
Upon initial power-on or after battery replacement, the alarm clock will automatically attempt to receive the DCF radio time signal. This process can take several minutes. During reception, a signal icon may flash on the display. Once the signal is successfully received, the time will be set automatically, and the signal icon will appear steadily. For best reception, place the alarm clock near a window and away from electronic devices that may cause interference.
The DCF signal also ensures automatic adjustment for daylight saving time (summer/winter time).
5.3. Убакытты кол менен коюу (милдеттүү эмес)
If the DCF signal is not available or you prefer to set the time manually:
- Press and hold the "SET" button (or equivalent, refer to specific button labels on your device) for a few seconds until the time display starts flashing.
- Use the "+" or "-" buttons to adjust the hours.
- Press "SET" again to confirm the hours and move to minutes.
- Мүнөттөрдү тууралоо үчүн "+" же "-" баскычтарын колдонуңуз.
- Press "SET" to confirm and exit manual setting mode.
- Repeat similar steps to set the date and year if necessary.
6. Иштөө нускамалары
6.1. Ойготкучтарды орнотуу (ойготкуч 1 жана Ойготкуч 2)
The ADE CK2310 features two independent alarm times. This is useful for different wake-up times on weekdays and weekends.

Image 6.1: The alarm clock supports two independent alarm times.
- Press the "ALARM 1" or "ALARM 2" button (usually located on the side or back) once to display the current alarm time.
- Press and hold the respective "ALARM" button until the alarm time starts flashing.
- Use the "+" or "-" buttons to adjust the alarm hours.
- Press the "ALARM" button again to confirm hours and move to minutes.
- Use the "+" or "-" buttons to adjust the alarm minutes.
- Press the "ALARM" button to confirm and exit alarm setting mode.
- To activate or deactivate an alarm, use the dedicated ON/OFF switch for Alarm 1 and Alarm 2 (refer to Image 6.1 for typical switch location). An alarm icon will appear on the display when active.
6.2. Тындырма функциясы
When an alarm sounds, press the large "SNOOZE/LIGHT" button on top of the alarm clock. The alarm will pause for approximately 5 minutes and then sound again. To turn off the alarm completely, press any other button or let it ring for its full duration.
6.3. Температура жана нымдуулук дисплей
The alarm clock continuously displays the indoor temperature and relative humidity. You can switch between Celsius (°C) and Fahrenheit (°F) for temperature display by pressing a dedicated button (often labeled "°C/°F" or integrated with another setting button).
6.4. Арткы жарык функциясы
Арткы жарыкты эки жол менен иштетсе болот:
- Кол менен активдештирүү: Press the "SNOOZE/LIGHT" button on top. The backlight will illuminate for approximately 8 seconds.
- Automatic Activation (Light Sensor): Slide the "AUTO LIGHT" switch on the back of the device to the "ON" position (refer to Image 4.2). The built-in light sensor will detect low ambient light conditions and automatically activate a soft backlight, making the display visible in the dark. Slide the switch to "OFF" to disable this feature.
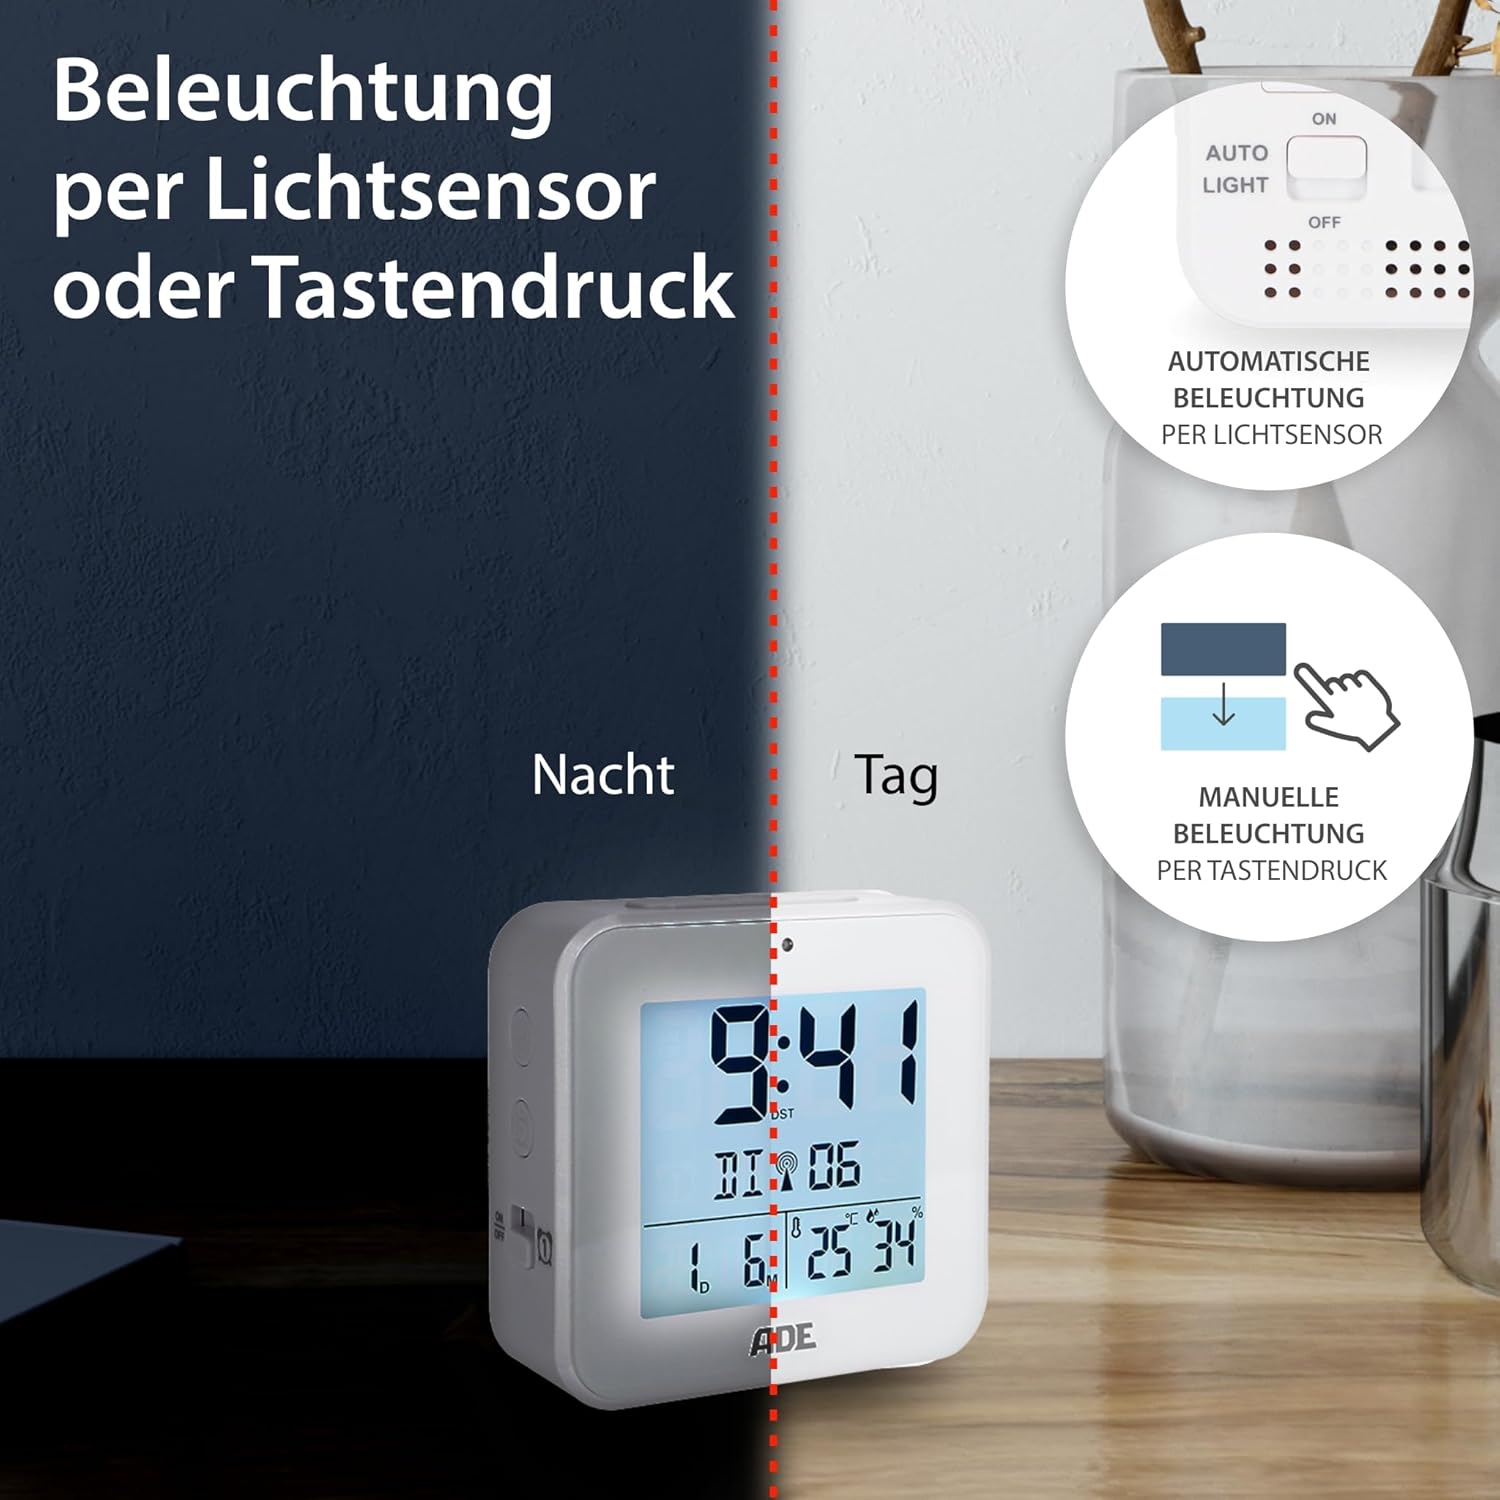
Image 6.2: Backlight can be activated manually or automatically via the light sensor.
7. Техникалык тейлөө
- Тазалоо: Аппаратты жумшак, кургак чүпүрөк менен сүртүңүз. Абразивдүү тазалагычтарды же эриткичтерди колдонбоңуз.
- Батареяны алмаштыруу: When the display becomes dim or functions are erratic, replace both AAA batteries. Ensure correct polarity. If the device will not be used for an extended period, remove the batteries to prevent leakage.
8. Кыйынчылыктарды
| Көйгөй | Мүмкүн себеп | Чечим |
|---|---|---|
| Дисплей бош же күңүрт. | Батареялар аз же туура эмес салынган. | Туура полярдуулукту камсыз кылуу менен батарейкаларды жаңысына алмаштырыңыз. |
| Убакыт туура эмес же автоматтык түрдө коюлбай жатат. | Poor DCF signal reception or interference. | Move the alarm clock to a location with better reception (e.g., near a window, away from electronics). Allow time for signal acquisition. Manually set the time if necessary. |
| Ойготкуч угулбайт. | Ойготкуч иштетилген эмес же туура эмес орнотулган. | Ensure the alarm is switched "ON" and the alarm time is set correctly. Check for the alarm icon on the display. |
| Арткы жарык иштебейт. | AUTO LIGHT switch is OFF, or batteries are low. | Check if the "AUTO LIGHT" switch is in the "ON" position. Press the SNOOZE/LIGHT button manually. Replace batteries if needed. |
9. Техникалык шарттар
- Модел: CK2310
- Өлчөмдөрү: 8 x 3.81 x 8 cm (approx. W x D x H)
- Салмагы: 100 г
- Кубат булагы: 2 x AAA Батареялар (кошулган)
- Дисплей түрү: Санарип
- Материал: ABS пластик
- Өзгөчөлүктөр: DCF Radio Signal, 2 Alarm Times, Snooze Function, Temperature Display (°C/°F), Humidity Display, Calendar Display, Automatic Backlight (Light Sensor), Manual Backlight.
- Ички/тышкы колдонуу: Indoor
10. Кепилдик жана колдоо
ADE products are manufactured with quality and reliability in mind. For information regarding warranty terms and conditions, please refer to the warranty card included with your purchase or visit the official ADE website. For technical support or service inquiries, please contact your retailer or the ADE customer service department.
Өндүрүүчү: ADE


