1. Киришүү
Сатып алганыңыз үчүн рахматasing the Singer SN777αIII Computerized Sewing Machine. This machine is designed for ease of use and versatility, offering 100 stitch patterns, including alphanumeric characters, to support a wide range of sewing projects. Please read this manual thoroughly before operating your machine to ensure safe and efficient use.

Image: The Singer SN777αIII sewing machine is available in white, pink, and a white and pink combination, allowing users to choose a color that suits their preference or room decor.
2. Орнотуу
2.1 Пакеттен чыгаруу жана жайгаштыруу
- Машинаны жана бардык аксессуарларды таңгактан этияттык менен алып салыңыз.
- Машинаны туруктуу, тегиз жерге коюңуз. Ыңгайлуу иштеши үчүн машинанын айланасында жетиштүү орун бар экенин текшериңиз.
2.2 Кубат туташтыруу
- Кубат өчүргүч 'OFF' абалында экенин текшериңиз.
- Кубат шнурун машинага, андан кийин тиешелүү электр розеткасына туташтырыңыз.
2.3 Бобинди ороо
- Спулдун төөнөгүчтүн үстүнө жиптин катушкасын коюңуз.
- Машинада көрсөтүлгөн ийрүү жолун ээрчиңиз.
- Бош шпильканы шпильканын спиралына салып, аны оңго түртүңүз.
- Start winding by pressing the foot controller or start/stop button. Stop when the bobbin is full.
2.4 Үстүнкү жипти жип салуу
- Басуу бутунун рычагын көтөрүңүз.
- Follow the numbered threading path on the machine, ensuring the thread is correctly seated in all guides and the tension discs.
- Ийненин көзүн оңой жип менен өткөрүү үчүн автоматтык ийне жип өткөргүчтү колдонуңуз.
2.5 Setting the Lower Thread (Bobbin)
- Бобин капкагын ачыңыз.
- Insert the wound bobbin into the bobbin case, ensuring the thread unwinds in the correct direction.
- Guide the bobbin thread through the tension spring and out the bobbin case opening.
- Close the bobbin cover. The easy bobbin setting feature allows you to start sewing without pulling up the bobbin thread manually.
2.6 Аксессуарларды тиркөө
- Кең стол: Attach the wide table to the machine to expand your work area, especially useful for larger projects.
- Бут башкаруучусу: Connect the foot controller to the designated port on the machine for hands-free speed control.
3. Иштөө нускамалары
3.1 Башкаруу панелинин үстүнөview
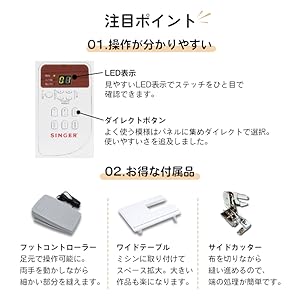
Image: The control panel features a clear LED display to show the selected stitch and direct buttons for frequently used patterns, simplifying operation.
- LED дисплей: Shows the selected stitch pattern number and other relevant settings.
- Direct Buttons: Allows quick selection of commonly used stitch patterns.
- Тигүү тандоо баскычтары: Use these to navigate and select from the 100 available stitch patterns.
3.2 Тигүү үлгүлөрүн тандоо

Image: The machine offers 100 stitch patterns, including utility stitches, decorative stitches, buttonholes, satin stitches, cross stitches, patchwork quilt stitches, and alphanumeric characters (numbers and alphabets).
- Refer to the stitch chart on the machine or in the manual.
- Use the stitch selection buttons to choose the desired pattern. The selected pattern number will appear on the LED display.
- For alphanumeric stitches, select the corresponding pattern and then use the adjustment buttons to choose specific letters or numbers.
3.3 Тигүү боюнча негизги операциялар

Image: This illustration highlights key operational features such as hand-focused controls for start/stop, automatic buttonhole creation, the free arm for cylindrical sewing, stepless speed adjustment, drop feed for free-motion quilting, and the presser foot lifter button for smooth sewing over varying fabric thicknesses.
- Баштоо/токтотуу баскычы: Press to start and stop sewing.
- Ылдамдыкты жөндөө: Use the slide control for stepless speed adjustment from low to high.
- Тескери тигүү баскычы: Press and hold to sew in reverse for securing stitches.
- Ийнени өйдө/ылдый баскычы: Positions the needle up or down.
- Presser Foot Lifter Button: Automatically keeps the presser foot horizontal, making it easy to start sewing thick fabrics.
3.4 Өзгөчөлүктөр
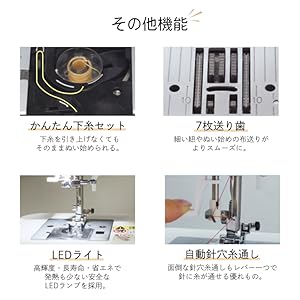
Image: This illustration details the easy bobbin setting for quick starts, the 7-point feed dog for smooth fabric feeding, the bright LED light for clear visibility, and the automatic needle threader for effortless threading.
- Автоматтык ийне сайгыч: A lever-operated system that threads the needle automatically.
- 7-Point Feed Dog: Ensures smooth and consistent fabric feeding, especially for delicate or thick materials.
- LED жарык: Provides bright, long-lasting, and energy-efficient illumination of the sewing area.
- Эркин кол: Remove the accessory box to reveal the free arm, ideal for sewing cuffs, sleeves, and other cylindrical items.
- Fully Automatic Buttonhole: Simply set the button, and the machine automatically creates a perfectly sized buttonhole.
- Түрмөктү түшүрүү: Lower the feed dogs for free-motion quilting or darning.
4. Техникалык тейлөө
4.1 Тазалоо
- Тазалоодон мурун ар дайым машинаны өчүрүп, розеткадан ажыратыңыз.
- Regularly clean lint and dust from the bobbin case area and under the needle plate using the brush provided.
- Машинанын сыртын жумшак, кургак чүпүрөк менен сүртүңүз. Күчтүү химиялык заттарды колдонбоңуз.
4.2 Ийне алмаштыруу
- Машинаны өчүрүп, розеткадан ажыратыңыз.
- Ийне клинасын бошотуңузamp бурап, эски ийнени алып салыңыз.
- Insert a new needle with the flat side facing the back, pushing it up as far as it will go.
- Ийне clamp коопсуз бураңыз.
5. Кыйынчылыктарды
This section addresses common issues you might encounter. For problems not listed here, please consult the full instruction DVD or contact customer support.
| Көйгөй | Мүмкүн себеп | Чечим |
|---|---|---|
| Машина иштебейт | Power cord not connected; Power switch off; Foot controller not connected. | Check power connections; Turn on power switch; Ensure foot controller is plugged in. |
| Өткөрүлгөн тигиштер | Incorrect needle; Bent needle; Incorrect threading. | Use correct needle type for fabric; Replace bent needle; Re-thread machine carefully. |
| Жип үзүлөт | Incorrect tension; Poor quality thread; Improper threading; Needle bent or dull. | Adjust tension; Use good quality thread; Re-thread machine; Replace needle. |
| Кездеме азыктанбайт | Feed dogs lowered; Presser foot pressure too low. | Raise feed dogs; Adjust presser foot pressure. |
6. Техникалык шарттар

Image: The Singer SN777αIII machine's dimensions are 404mm width x 188mm depth x 298mm height, with a weight of 5.8 kg.
- Модел: SN777αIII
- Өндүрүүчү: Ырчы
- Өлчөмдөрү (Продукт): 40.4 см (туурасы) x 18.8 см (тереңдик) x 29.8 см (бийиктик)
- Салмагы (продукт): 5.8 кг
- Материал: Акрилонитрил бутадиен стирол (ABS)
- Тигүү үлгүлөрү: 100 types (including numbers and alphabets)
6.1 Кошумча жабдуулар

Image: A comprehensive diagram illustrating all standard accessories, including various presser feet, bobbins, screwdrivers, a seam ripper, needle set, seam guide, spool caps, auxiliary spool pin, spool pin felt, soft cover, power cord, instruction manual, and instruction DVD.
- Zigzag Foot
- Сыдырма буту
- Buttonhole Foot
- Баскычты тигүү буту
- Буу каптап турган бут
- Blind Stitch Foot
- Satin Stitch Foot
- Bobbins
- Triangular Screwdriver
- Кичинекей бурагыч
- Seam Ripper with Brush
- Ийне топтому
- Тигүүчү жол
- Spool Cap (Large)
- Spool Cap (Small)
- Көмөкчү Spool Pin
- Катушка төөнөгүч кийиз
- Soft Cover
- Электр кабели
- Instruction Manual
- Көрсөтмө DVD
- Foot Controller
- Кең стол
- Side Cutter
7. Кепилдик жана колдоо
For warranty information, please refer to the warranty card included with your product or contact your retailer. For technical support or service inquiries, please refer to the contact information provided in your purchase documentation or visit the official Singer webсайт.


