1. Киришүү
This manual provides comprehensive instructions for the installation, operation, and maintenance of your VPFET HDMI KVM USB Extender, model CMST-US-EX709. This device allows for the extension of HDMI video and USB keyboard/mouse signals over a single Cat5e/6/7 Ethernet cable up to 120 meters (394 feet).
The extender supports 1080P Full HD resolution at 60Hz and includes a local HDMI loop-out port on the Transmitter (TX) unit for convenient monitoring. It is designed for applications requiring remote control of a computer, such as classrooms, conference rooms, and home theaters.
2. Пакеттин мазмуну
Төмөндө тизмеленген нерселердин баары пакетиңизде бар экенин текшериңиз:
- 1x HDMI KVM USB Extender Transmitter (TX) Unit
- 1x HDMI KVM USB Extender Receiver (RX) Unit
- 2x 5V DC Power Adapters
- 1x USB A-A Cable
- 1x Колдонуучунун колдонмосу

Image: Contents of the VPFET HDMI KVM USB Extender package, including the transmitter and receiver units, two power adapters, a USB A-A cable, and the instruction manual.
3. Продукт бүтүп калдыview
The VPFET HDMI KVM USB Extender consists of two main units: a Transmitter (TX) and a Receiver (RX). Each unit features specific ports and indicators for proper functionality.
3.1 Transmitter (TX) Unit
- HDMI IN: Connects to the HDMI output of your source device (e.g., PC).
- HDMI OUT (Loop Out): Connects to a local monitor for direct monitoring of the source signal.
- USB PC IN: Connects to the USB port of your source PC for KVM functionality.
- CAT5e/6/7: Connects to the Receiver (RX) unit via an Ethernet cable.
- RST (Reset Button): Resets the unit.
- DC 5V: Кубат киргизүү порту.
3.2 Receiver (RX) Unit
- HDMI OUT: Connects to the remote display.
- K/M (USB Ports): Connects to your USB keyboard and mouse. Note: Supports USB 1.1 standard keyboards and mice only.
- CAT5e/6/7: Connects to the Transmitter (TX) unit via an Ethernet cable.
- RST (Reset Button): Resets the unit.
- DC 5V: Кубат киргизүү порту.

Сүрөт: алдыңкы view of the VPFET HDMI KVM USB Extender units, highlighting the various input and output ports.
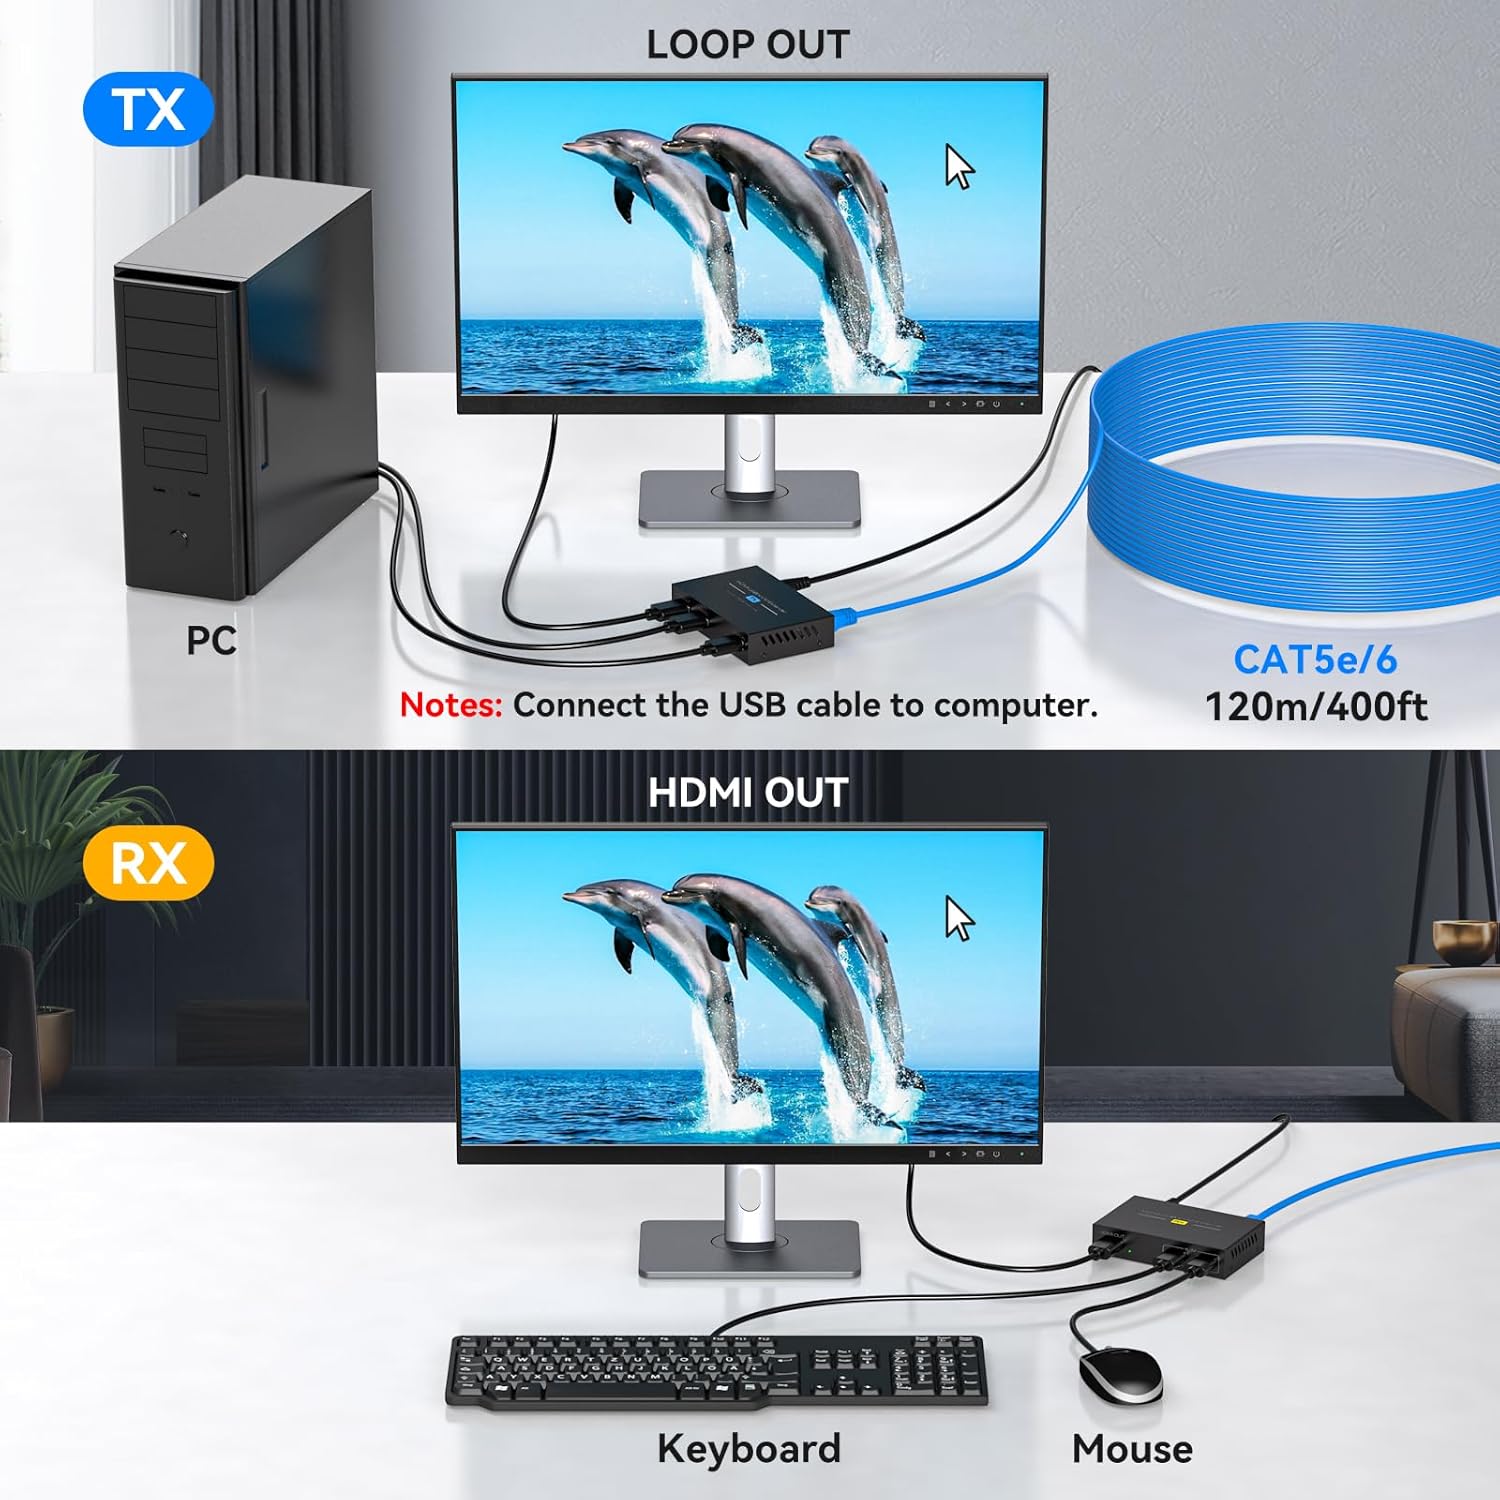
Image: Close-up of the VPFET Extender ports, illustrating the USB ports for keyboard/mouse, the HDMI loop-out, and the DC 5V power input.
4. Орнотуу нускамалары
Follow these steps to properly set up your VPFET HDMI KVM USB Extender:
- Өткөргүчтү (TX) туташтырыңыз:
- Connect an HDMI cable from your source device (e.g., PC, DVR) to the HDMI-IN port on the TX unit.
- (Optional) Connect an HDMI cable from the HDMI OUT (Loop Out) port on the TX unit to a local monitor if you wish to view the source signal locally.
- Connect the provided USB A-A cable from a USB port on your source PC to the USB PC IN port on the TX unit.
- Connect one of the 5V DC power adapters to the DC 5V port on the TX unit and plug it into a power outlet.
- Кабыл алгыч (RX) блогун туташтырыңыз:
- HDMI кабелин түзмөктөн туташтырыңыз HDMI OUT port on the RX unit to your remote display (e.g., monitor, TV).
- Connect your USB keyboard and mouse to the K/M (USB) ports on the RX unit. Ensure these are standard USB 1.1 devices.
- Connect the second 5V DC power adapter to the DC 5V port on the RX unit and plug it into a power outlet.
- Connect TX and RX Units with Ethernet Cable:
- Use a single, high-quality Cat5e, Cat6, or Cat7 Ethernet cable (UTP, oxygen-free copper, following IEEE-568B standard) to connect the CAT5e/6/7 port on the TX unit to the CAT5e/6/7 port on the RX unit.
- The maximum recommended cable length is 120 meters (394 feet).
- Күйгүзүү: Ensure both TX and RX units are powered on. The indicator lights should illuminate, signifying a normal connection.
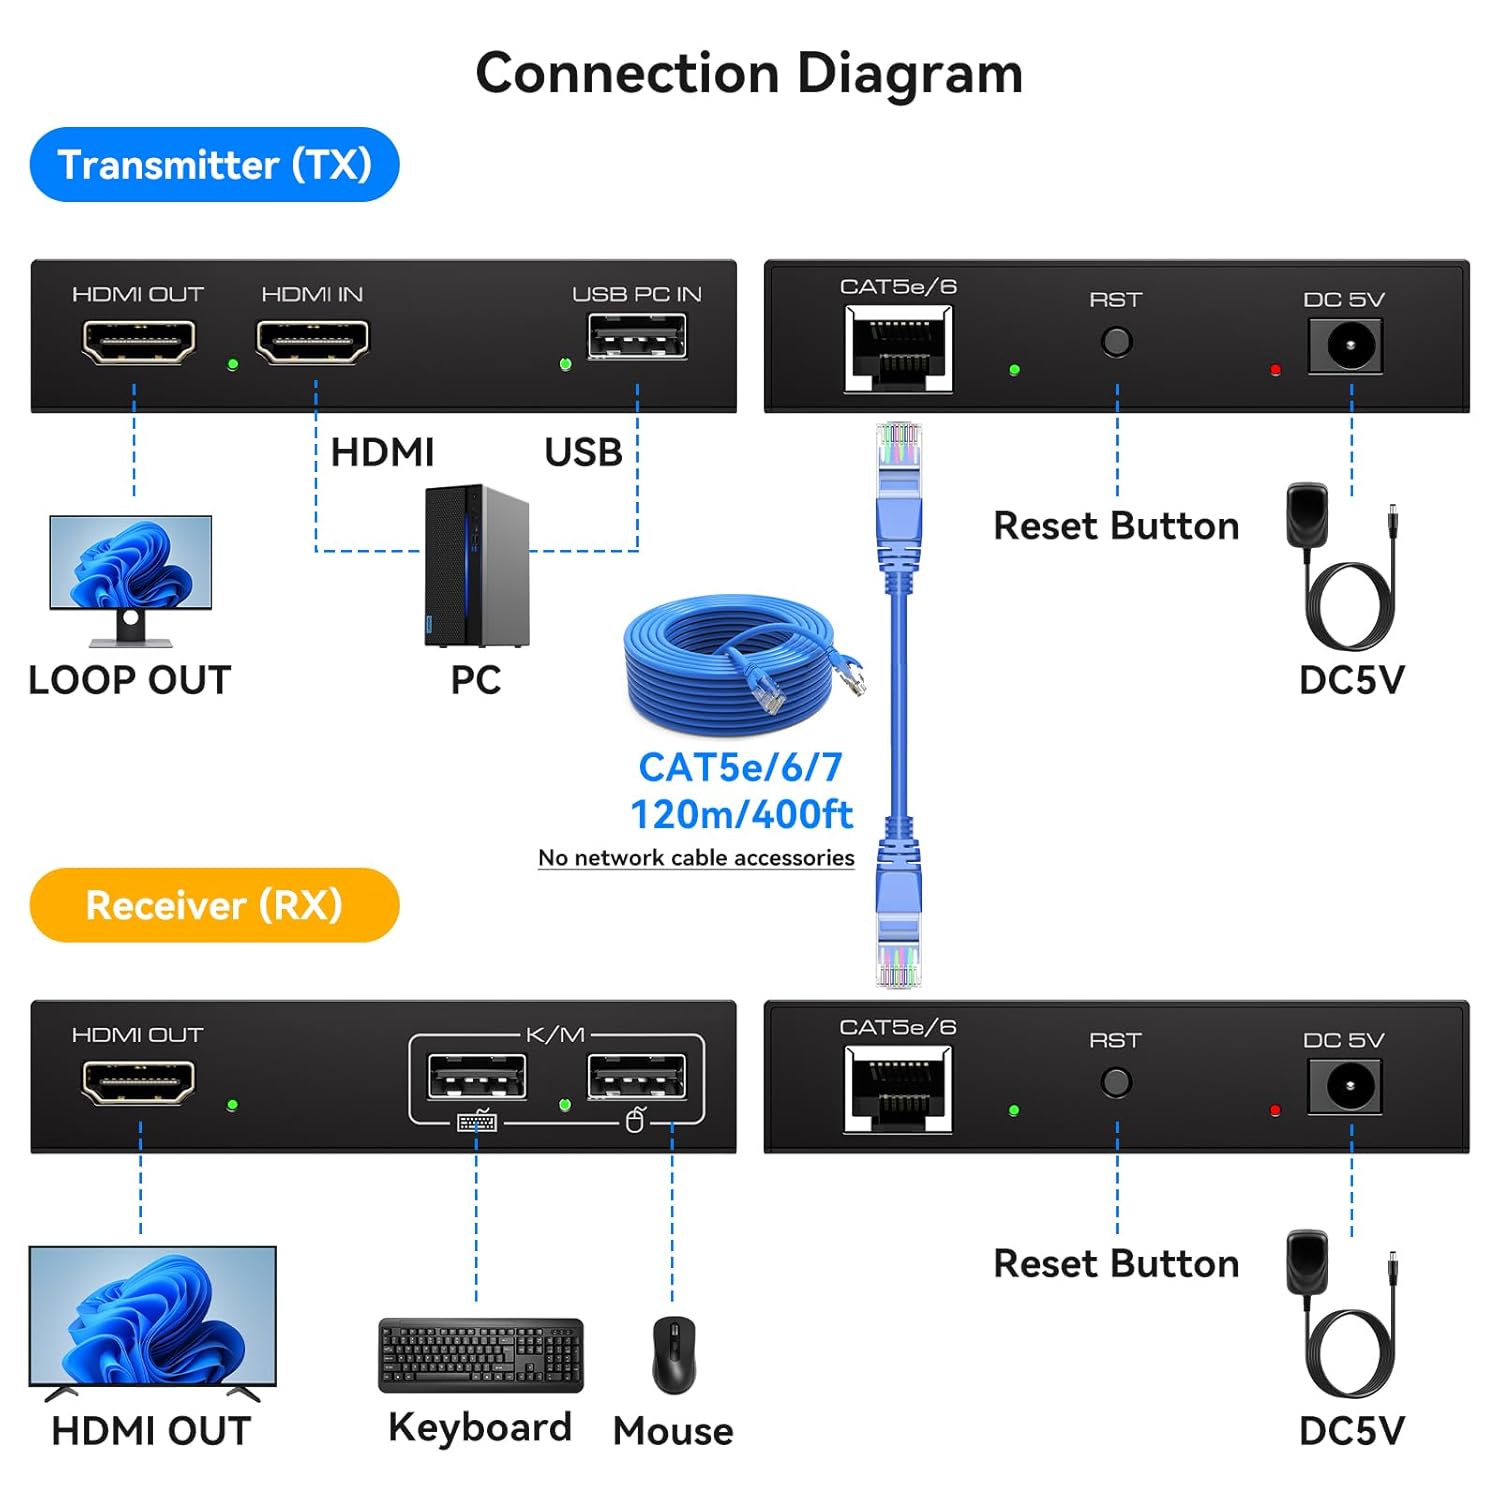
Image: Detailed connection diagram illustrating the setup process for the VPFET HDMI KVM USB Extender, including all necessary cable connections.

Image: A visual representation of a typical setup, demonstrating the connection flow from the source PC to both local and remote displays and peripherals.
5. Иштөө нускамалары
Once all connections are made and both units are powered, the extender should operate automatically.
- Video КПП: The HDMI signal from your source will be transmitted to the remote display and, if connected, to the local loop-out display. The system supports 1080P Full HD at 60Hz.
- KVM Control: Your keyboard and mouse connected to the RX unit will control the source PC connected to the TX unit. Remember that only standard USB 1.1 keyboards and mice are supported.
- Индикатор жарыктары: Observe the indicator lights on both units. A steady light typically indicates a successful connection and signal transmission.
- Кайра орнотуу функциясы: If you experience any issues with video or KVM control, press the RST button on both the TX and RX units to restart them.

Image: Visual confirmation of 1080P 60Hz Full HD video quality, demonstrating the extender's capability for synchronized audio and video transmission.
6. Техникалык тейлөө
To ensure the longevity and optimal performance of your VPFET HDMI KVM USB Extender, follow these maintenance guidelines:
- Тазалоо: Use a soft, dry cloth to clean the units. Do not use liquid or aerosol cleaners.
- Курчап турган чөйрө: Keep the extender in a cool, dry place, away from direct sunlight, heat sources, and excessive moisture.
- Кабелдик башкаруу: Ensure all cables are properly routed and not under strain to prevent damage to the ports or cables themselves.
- Күч: Always use the provided 5V DC power adapters. Disconnect power during electrical storms or when unused for long periods.
7. Кыйынчылыктарды
If you encounter issues with your extender, please refer to the following common problems and solutions:
- No Video Signal on Remote Display:
- Verify that both the TX and RX units are powered on and their indicator lights are active.
- Check all HDMI cable connections between the source, TX, RX, and display.
- Ensure the Ethernet cable connecting the TX and RX units is securely plugged in and undamaged. Try a different Cat5e/6/7 cable if possible.
- Confirm the Ethernet cable length does not exceed 120 meters (394 feet).
- басыңыз RST button on both TX and RX units to reset them.
- Ensure your display supports 1080P resolution.
- KVM (Баскычтоп/Чычкан) жооп бербей жатат:
- Ensure the USB A-A cable is correctly connected from your PC to the TX unit.
- Verify that your keyboard and mouse are standard USB 1.1 devices. Gaming peripherals or devices requiring higher USB versions are not supported.
- Try connecting the keyboard and mouse directly to the PC to confirm they are functional.
- Reset both TX and RX units using the RST баскычы.
- Intermittent Signal or Poor Quality:
- Check the quality and integrity of your Cat5e/6/7 Ethernet cable. A high-quality, oxygen-free copper cable following the IEEE-568B standard is recommended.
- Ensure there are no strong electromagnetic interference sources near the Ethernet cable.
- Verify both TX and RX units are receiving stable power.
Бул чечимдерди колдонууга аракет кылгандан кийин көйгөйлөр чечилбесе, кардарларды колдоо кызматына кайрылыңыз.
8. Техникалык шарттар
| Модель номери | CMST-US-EX709 |
| Бренд | VPFET |
| HDMI Resolution | Up to 1080P @ 60Hz (backward compatible with 1080i/720P/720i/480P/480i) |
| Өткөрмө аралык | Up to 120 meters (394 feet) over Cat5e/6/7 Ethernet cable |
| USB стандарты | USB 1.1 (for standard keyboard and mouse) |
| Электр камсыздоо | DC 5V (Dual power supply required for TX and RX units) |
| Шайкеш системалар | Windows 2000/XP/Vista/7/8/8.1/10, Mac OS 9.1 and above, Linux 2.4 and above |
| Продукциянын өлчөмдөрү | 3.78 x 2.4 x 0.83 inches (each unit) |
| Элемент Салмагы | 1.26 фунт (жалпысынан) |
| Түс | Кара |

Image: Illustration emphasizing the extender's ability to transmit signals over ultra-long distances, up to 120 meters or 400 feet.
9. Кепилдик жана колдоо
VPFET provides a one-year replacement service for products damaged or experiencing other issues within the warranty period. If you encounter any problems during the use of this product, please contact VPFET customer support. We are committed to assisting you until the issue is resolved.
For support, please refer to the contact information provided in the packaging or on the official VPFET webсайт.


