Introduction
This manual provides detailed instructions for the installation, operation, and maintenance of your ARES WING Desk Monitor Mount (Model GDT1003LWH). Please read this manual thoroughly before installation and use to ensure proper function and safety. This monitor mount is designed to support a single monitor, compatible with screens ranging from 17 to 49 inches and weighing between 4.4 to 44 lbs.
Коопсуздук маалыматы
- Монтаждоодон мурун бардык компоненттер бар экенин жана бузулбаганын текшериңиз. Эгерде кандайдыр бир бөлүктөрү жок же бузулган болсо, колдонбоңуз.
- Verify that your monitor's weight and size are within the specified limits (4.4-44 lbs, 17-49 inches). Exceeding these limits can result in instability and damage.
- Confirm your monitor has compatible VESA mounting holes (75x75mm or 100x100mm). If not, a separate VESA adapter is required.
- Ensure your desk thickness is compatible with the chosen mounting method (C-clamp: 0.39-3.34 inches; Grommet: 0.39-1.8 inches).
- Adjust the gas spring tension according to your monitor's weight мурун attaching the monitor to prevent sudden drops or difficulty in adjustment.
- Орнотуу учурунда балдарды жана үй жаныбарларын алыс кармаңыз.
- Do not overtighten screws, as this may cause damage.
- For any issues or concerns, contact ARES WING customer support.
Пакеттин мазмуну
Please check the package to ensure all the following components are included:
- Монитор курал ассамблеясы
- Desk Clamp (C-clamp)
- Grommet Mount Base
- VESA плитасы
- Аппараттык комплект (буроолор, шайбалар, бөлгүчтөр)
- Аллен ачкычтары
- Колдонуучунун Колдонмосу (бул документ)
Орнотуу жана орнотуу
1. Check Monitor Compatibility
Before proceeding, ensure your monitor meets the following criteria:
- VESA үлгүсү: 75x75mm or 100x100mm.
- Экрандын өлчөмү: 17" to 49".
- Салмак сыйымдуулугу: 4.4 lbs to 44 lbs.

Figure 1: Monitor and Desktop Compatibility Check
For monitors without VESA holes, a separate VESA adapter is required. Some Samsung G9 monitors may come with a VESA adapter; please check your monitor's documentation.

Figure 2: VESA Hole Check and Adapter Preparation
2. Монтаждоо ыкмасын тандаңыз
The ARES WING monitor mount supports two installation methods: C-clamp and Grommet mount.
- C-Clamp: Suitable for desk thickness between 0.39 inches (10mm) and 3.34 inches (85mm).
- Grommet Mount: Suitable for desk thickness between 0.39 inches (10mm) and 1.8 inches (45mm). Requires an existing hole in your desk.
3. Install the Desk Mount
Follow the instructions provided with your mount to securely attach the base to your desk using either the C-clamp or grommet method. Ensure the mount is stable before proceeding.
4. Газдын жазгы чыңалуусун жөнгө салуу
It is crucial to adjust the gas spring tension to match your monitor's weight мурун attaching the monitor. This prevents the arm from springing up or sagging.
- Use the provided Allen wrench to adjust the tension screw on the arm.
- Бурул сааттын жебесине каршы for heavier monitors (to increase tension).
- Бурул саат жебеси боюнча for lighter monitors (to decrease tension).
- Adjust until the arm can hold its position freely when moved without a monitor attached.

3-сүрөт: Газ жазыгынын чыңалуусун жөндөө
5. Attach Monitor to VESA Plate
Secure the VESA plate to the back of your monitor using the appropriate screws and spacers from the hardware kit. Ensure the screws are tightened securely but do not overtighten.
6. Mount Monitor to Arm
Carefully slide the VESA plate with the attached monitor onto the monitor arm's VESA head. Ensure it clicks into place or is secured with any locking mechanism provided.
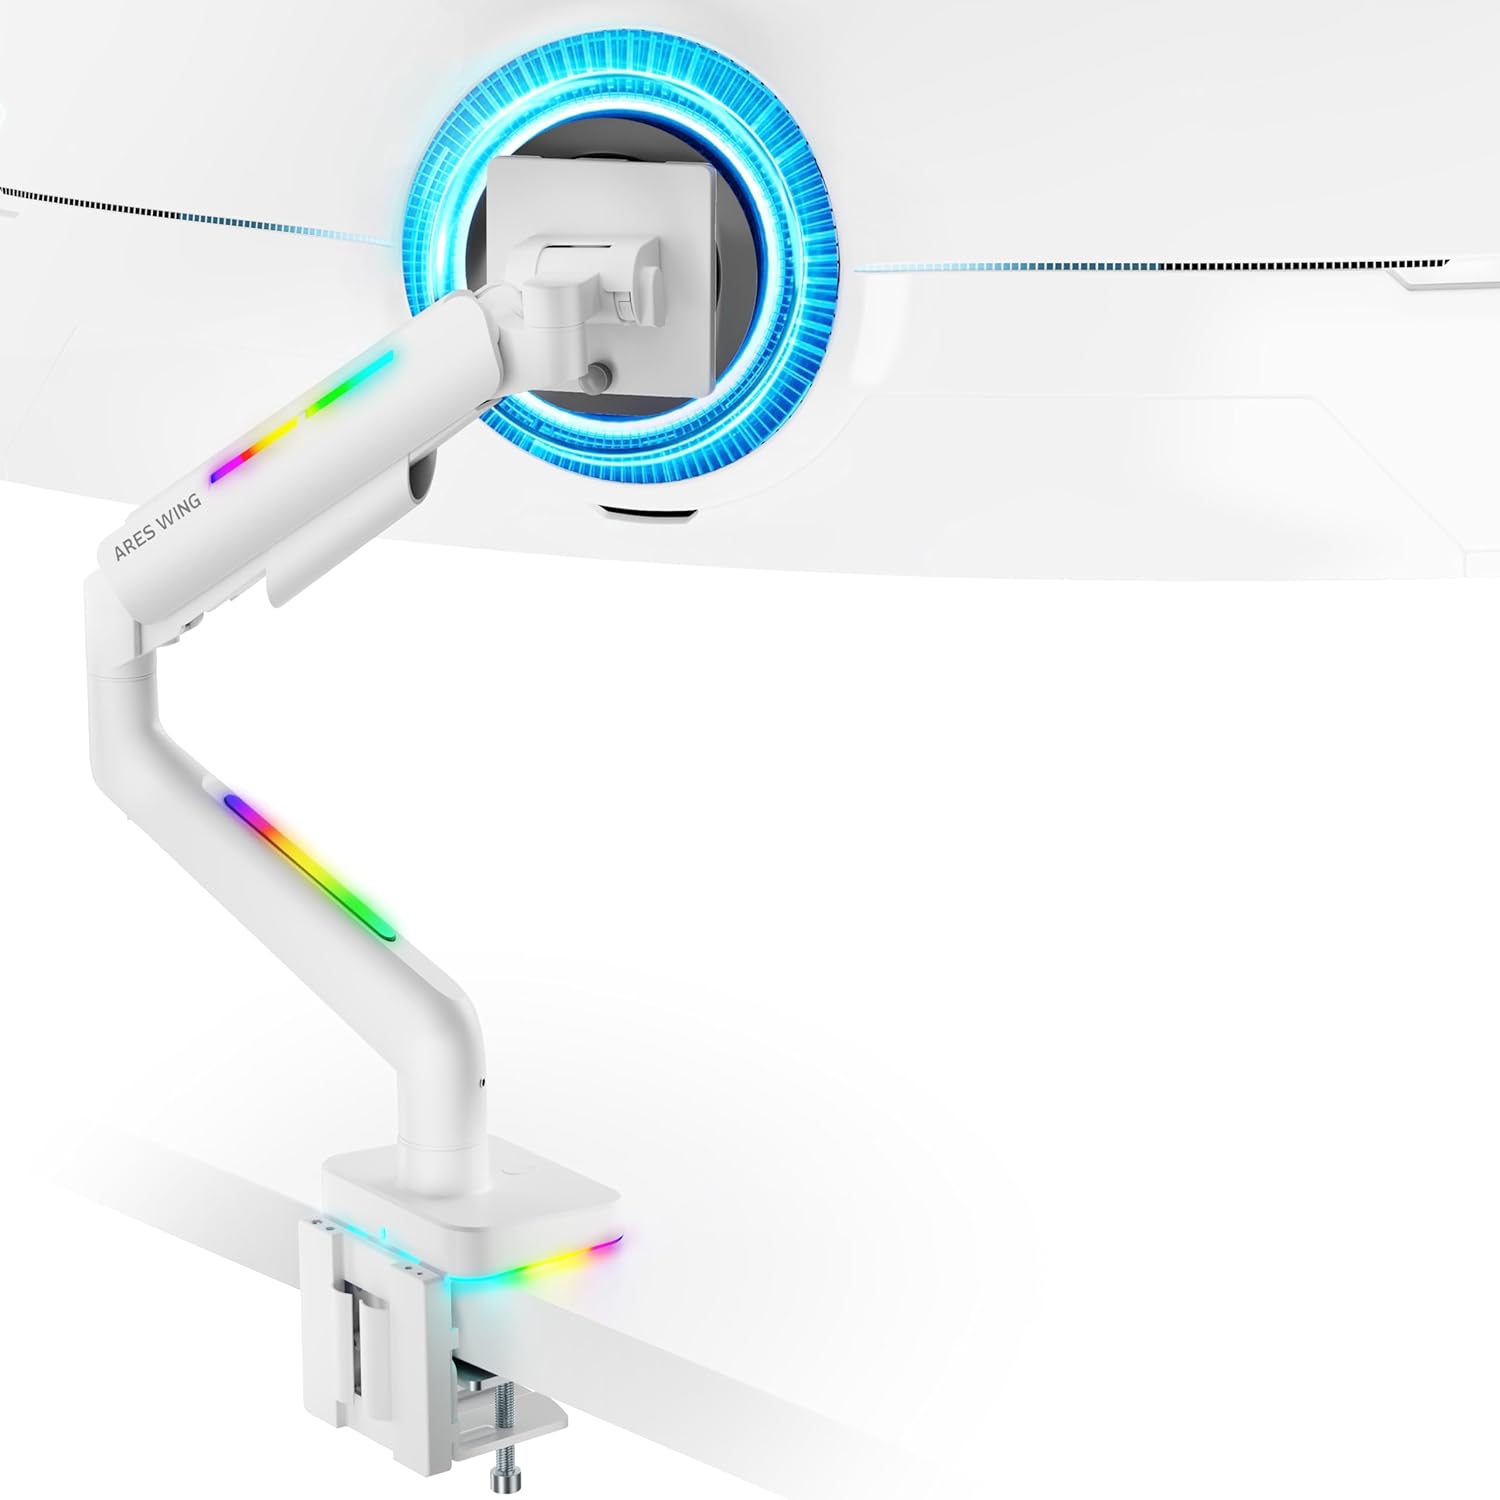
Figure 4: Monitor Mounted on ARES WING Arm
Иштөө нускамалары
1. Монитордун абалын тууралоо
The ARES WING monitor arm offers full motion capabilities for optimal ergonomic positioning:
- Бийиктигин тууралоо: The arm allows vertical movement to raise or lower your monitor to the desired eye level. The height can be adjusted from 8.5 inches to 19.7 inches.
- Россия: Tilt your monitor +50° upwards or -20° downwards to reduce glare and find the perfect viewбурч.
- Айлануучу: Swivel the monitor ±90° left or right to share your screen or adjust for different tasks.
- Айлануу: Пейзаждык жана тигинен багыттардын ортосунда которулуу үчүн мониторду 360° буруңуз.

Figure 5: Full Motion Adjustment Capabilities
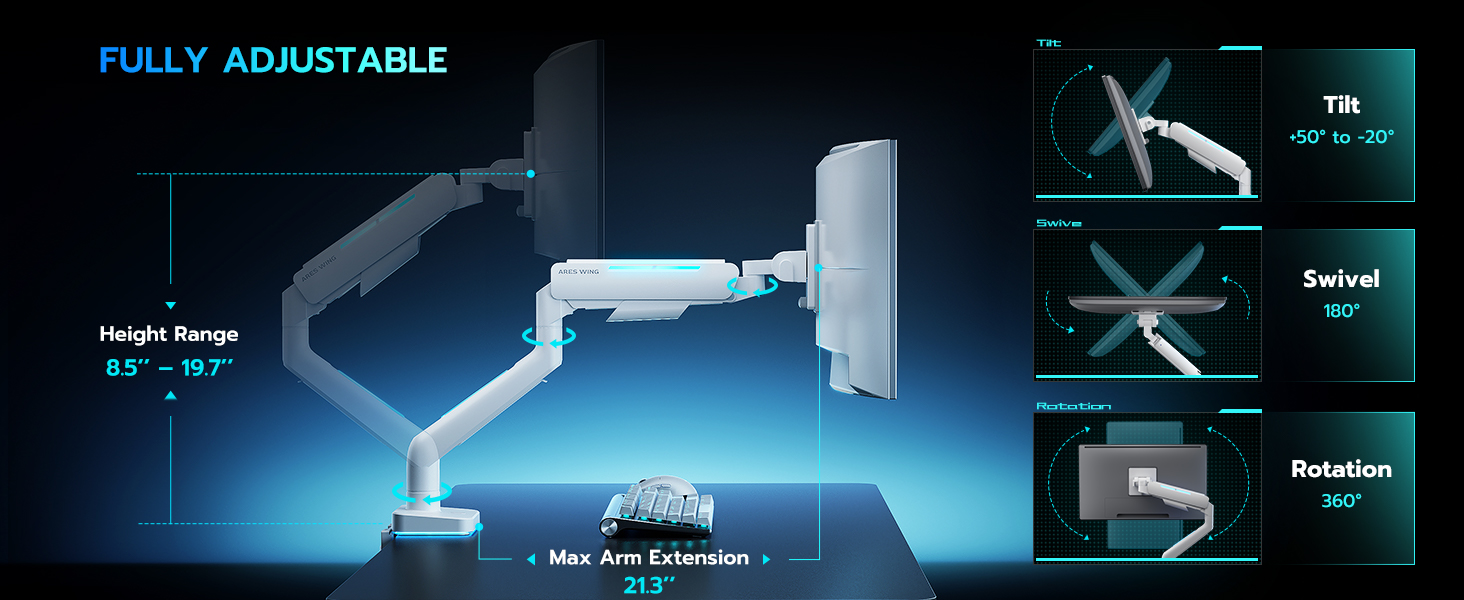
Figure 6: Tilting Ultrawide Monitors
2. RGB жарыкты башкаруу
The monitor arm features integrated RGB lighting with 20 dynamic lighting effects. To control the lighting:
- Connect the USB cable from the monitor arm to a USB port on your computer or a USB power adapter.
- Locate the light control button on the base of the monitor arm.
- Басып кармап туруңуз the button for approximately 2-3 seconds to turn the RGB lighting ON or OFF.
- Кыскача басыңыз to cycle through the 20 different lighting modes (Color Cycle, Chasing, Static, Wave, etc.).
- The lighting will remember the last mode used when turned back on.

Figure 7: RGB Lighting Control
3. Кабелдик башкаруу
Utilize the integrated cable management channels on the arm to route your monitor and power cables. This helps maintain a clean and organized workspace.
Техникалык тейлөө
- Тазалоо: Монитордун колун жумшак менен сүртүңүз, damp кездеме. Финишке зыян келтирүүчү абразивдүү тазалагычтардан же эриткичтерден качыңыз.
- Мезгилдүү текшерүүлөр: Мезгил-мезгили менен бардык бурамалар менен байланыштарды текшерип туруңуз, алар бекем жана бекем бойдон калууда. Керек болсо кайра тартыңыз.
- Газ булагы: The internal gas spring is designed for long-term durability (fatigue tested 20,000+ times). No specific maintenance is required for the gas spring itself, but ensure its tension is correctly set for your monitor's weight.
Проблемаларды чечүү
| Көйгөй | Мүмкүн себеп | Чечим |
|---|---|---|
| Монитордун колу салбырап кетет же өйдө турбайт. | Монитордун салмагы үчүн газ пружинанын чыңалуусу өтө төмөн. | Increase gas spring tension by turning the adjustment screw counter-clockwise. Refer to "Adjust Gas Spring Tension" section. |
| Монитордун колу өтө катуу же ылдый жылбайт. | Монитордун салмагы үчүн газ пружинасы өтө жогору. | Decrease gas spring tension by turning the adjustment screw clockwise. Refer to "Adjust Gas Spring Tension" section. |
| RGB жарыгы күйбөйт. | USB cable not connected or button not pressed correctly. | Ensure USB cable is securely connected. Press and кармоо the light control button for 2-3 seconds to activate. |
| Монитор солкулдап же туруксуз. | Mount not securely fastened to desk or VESA plate not tight. | Check desk clamp/grommet mount for tightness. Ensure VESA plate screws are securely fastened to the monitor and the plate is properly seated on the arm. |
| Monitor cannot tilt smoothly. | Tilt mechanism screw is too tight. | Loosen the tilt adjustment screw slightly until smooth tilting is achieved. Refer to Figure 6. |
Техникалык шарттар
| Модель номери | GDT1003LWH |
| Материал | Алюминий, темир |
| VESA шайкештиги | 75x75мм, 100x100мм |
| Экрандын өлчөмүнүн шайкештиги | 17 - 49 inches (flat and curved monitors) |
| Салмак сыйымдуулугу | 4.4 - 44 фунт (2 - 20 кг) |
| Бийиктигин тууралоо диапазону | 8.5 - 19.7 дюйм |
| Тит бурч | +50° / -20° |
| Swivel Angle | ±90° |
| Айлануу | 360° |
| Desktop Thickness (C-Clamp) | 0.39 - 3.34 дюйм (10 - 85 мм) |
| Desktop Thickness (Grommet) | 0.39 - 1.8 дюйм (10 - 45 мм) |
| RGB жарыктандыруу | 20 dynamic lighting effects |
Кепилдик жана колдоо
ARES WING provides a 3 жылдык Өндүрүүчүнүн Кепилдиги for this product. For any questions, technical assistance, or warranty claims, please contact ARES WING customer support through the retailer where you purchased the product or visit the official ARES WING webбайланыш маалыматы үчүн сайт.
Көбүрөөк маалымат алуу жана колдоо алуу үчүн, сиз төмөнкү дарекке кайрылсаңыз болот ARES WING Store on Amazon.


