1. Киришүү
This manual provides detailed instructions for the Yottamaster USB C Docking Station with M.2 NVMe SSD Enclosure. This device is designed to expand connectivity options for your computer and provide integrated storage capabilities. Please read this manual thoroughly before use to ensure proper operation and to maximize the product's potential.

Image 1.1: Yottamaster USB C Docking Station with M.2 NVMe SSD Enclosure. This image shows the docking station in an exploded view, highlighting the M.2 SSD slot and various ports.
2. Коопсуздук маалыматы
- Аппаратты сууга, нымдуулукка же экстремалдык температурага тийгизбеңиз.
- Аппаратты түшүрүүдөн же катуу таасирлерден сактаныңыз.
- Аппаратты өз алдынча бөлүүгө же оңдоого аракет кылбаңыз. Тейлөө үчүн квалификациялуу кызматкерлерге кайрылыңыз.
- Иштеп жаткан учурда аппараттын айланасында туура желдетүүнү камсыз кылыңыз.
- Use only the provided or recommended cables and power adapters.
3. Пакеттин мазмуну
Пакетте бардык буюмдар бар экенин текшериңиз:
- 10-in-1 USB C Hub with NVMe SSD Enclosure
- Сактоочу баштык
- USB-C to C 10G cable (0.5M)
- Пластик сайгыч
- Thermal silicone pad
- Heatsink with Copper Heatpipe
- Колдонуучунун колдонмосу
- Packaging кутуча

Image 3.1: Package contents. This image displays all items included in the product packaging, numbered for easy identification.
4. Продукт бүтүп калдыview
The Yottamaster USB C Docking Station is a versatile 10-in-1 hub featuring an integrated M.2 NVMe SSD enclosure. It provides extensive connectivity and data storage solutions for various devices.
Негизги өзгөчөлүктөрү:
- 10-ин-1 туташуусу: Includes USB3.0-A ×2, USB3.2 Gen2-A ×1, PD100W Type-C ×1, Type-C 10 Gbps ×2, Gigabit RJ45 ×1, HDMI 4K@60Hz ×1, and USB SD/TF port ×1.
- M.2 NVMe/SATA Enclosure: Supports M.2 NVMe and SATA SSDs (sizes 2230, 2242, 2260, 2280) for expanded storage.
- Жогорку ылдамдыктагы маалыматтарды өткөрүп берүү: Up to 10Gbps via Type-C and USB-A ports.
- 4K@60Hz HDMI чыгышы: Delivers high-definition video output with dynamic HDR.
- 100 Вт кубаттуулукту жеткирүү (PD): Шайкеш келген түзмөктөр үчүн тез кубаттоо.
- Гигабит Ethernet: Stable and fast wired network connection.
- SD/TF 3.0 Card Reader: Simultaneous reading of SD and TF cards at up to 104MB/s.
- Натыйжалуу муздатуу: Aluminum alloy + ABS material with M.2 aluminum heatsink, nano silicone thermal pad, and 5mm copper heatpipe for optimal heat dissipation.

Image 4.1: Port layout of the 10-in-1 USB Hub Enclosure. This diagram illustrates the various input and output ports available on the docking station, including USB-C, USB-A, HDMI, Ethernet, and card reader slots.
5. Орнотуу
5.1 M.2 SSD орнотуу
Follow these steps to install an M.2 NVMe or SATA SSD into the enclosure:
- Remove the enclosure's cover: The cover is magnetically attached for easy access.
- Attach thermal components: Place the silicone thermal pad onto the SSD, then secure the heatsink vest on top.
- Insert plastic plug: Insert the small plastic plug into the SSD's end groove.
- SSD салыңыз: Gently insert the SSD into the M.2 slot at a 30-degree angle for proper alignment.
- Коопсуз SSD: Rotate the plastic plug to firmly secure the SSD in place.
- Капкагын жабуу: Close the top cover until it magnetically snaps into place.

Image 5.1: Step-by-step M.2 SSD installation guide. This diagram illustrates the six steps required to correctly install an M.2 SSD into the docking station's enclosure, including thermal pad and heatsink placement.
5.2 Connecting to Host Device
Connect the docking station to your computer using the provided USB-C to C 10G cable. Ensure your computer has a compatible USB-C port (preferably USB 3.2 Gen2 or Thunderbolt 3/4) for optimal performance.
5.3 Кубат туташтыруу
For stable operation, especially when using multiple peripherals or charging, connect a power adapter to the PD100W Type-C port on the docking station. This port supports up to 100W power delivery to your host device.
6. Иштөө нускамалары
6.1 USB Data Ports
The docking station features multiple USB ports:
- USB3.2 Gen2-A (10Gbps) x1: For high-speed peripherals like external SSDs.
- USB3.0-A (5Gbps) x2: For standard USB devices such as keyboards, mice, or USB flash drives.
- Type-C (10Gbps) x2: For connecting USB-C peripherals or for high-speed data transfer.
Simply plug your USB devices into the corresponding ports. The docking station supports simultaneous use of these ports.

Image 6.1: Data transfer speed demonstration. This image shows a laptop connected to the docking station, with a graphical representation of 10Gbps transfer speeds, indicating efficient data handling.
6.2 HDMI дисплей чыгышы
Connect an external monitor or TV to the HDMI port. The docking station supports 4K resolution at 60Hz, providing a clear and vibrant display. Ensure your display and HDMI cable support 4K@60Hz for optimal performance.

Image 6.2: Laptop connected to an external 4K@60Hz display via the docking station. This image demonstrates the high-resolution video output capability of the device.
6.3 Гигабит Ethernet
For a stable and high-speed internet connection, connect an Ethernet cable to the RJ45 port on the docking station. This provides a reliable 1000Mbps wired connection, ideal for gaming or streaming.
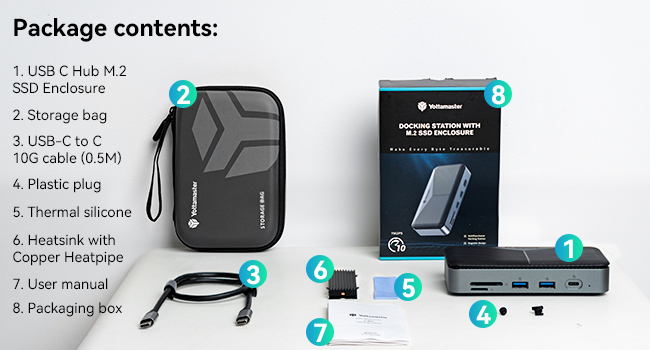
Image 6.3: Laptop connected to a wired network via the docking station's 1000Mbps Ethernet port. This highlights the stable internet connectivity feature.
6.4 SD/TF картаны окугуч
Insert your SD or TF (MicroSD) cards into the respective slots. The docking station supports simultaneous reading of both card types at speeds up to 104MB/s, facilitating quick transfer of photos and videos.

Image 6.4: User processing photos with the SD/TF 3.0 Dual Card Reader. This image shows a person using the card reader slots on the docking station to transfer media from a camera to a laptop.
6.5 Power Delivery (PD) Charging
The dedicated PD100W Type-C port allows you to charge your laptop or other compatible devices while using the docking station. Connect your laptop's power adapter to this port to enable pass-through charging.

Image 6.5: Laptop receiving 100W PD fast charging through the docking station. This image illustrates the power delivery capability, showing a laptop charging while connected to the hub.
7. Шайкештик
The Yottamaster USB C Docking Station is compatible with a wide range of operating systems and devices:
- Операциялык системалар: Windows, macOS, Linux
- Шайкеш түзмөктөр: Laptops, Desktops, Mini PCs, and other devices with a compatible USB-C port.

Image 7.1: Device and operating system compatibility. This image shows the docking station's compatibility with various operating systems (Mac OS, Windows, Linux) and devices (Laptops, TVs, Xbox, Switch, PC, PS5, Phone).
8. Техникалык тейлөө
- Тазалоо: Use a soft, dry cloth to clean the device. Avoid liquid cleaners or solvents.
- Сактагыч: When not in use, store the docking station in a cool, dry place, preferably in its protective storage bag.
- Жылуулук таркатылышы: Ensure the device's ventilation grooves are not obstructed to maintain optimal cooling performance.

Image 8.1: Internal cooling design of the docking station. This diagram illustrates the components contributing to efficient heat dissipation, including the M.2 aluminum heatsink, thermal pad, copper heatpipe, and air convection design.
9. Кыйынчылыктарды
- Түзмөк аныкталган жок:
- USB-C кабели док станциясына жана хост түзмөгүңүзгө бекем туташтырылганын текшериңиз.
- Try connecting the docking station to a power source via the PD100W port.
- Test with a different USB-C cable, as some cables may be defective or not support the required bandwidth.
- Ensure your computer's USB-C port supports data transfer and display output.
- SSD аныкталган жок:
- Verify the SSD is correctly installed according to the instructions in Section 5.1.
- Ensure the SSD is properly seated and secured with the plastic plug.
- Check if the SSD is initialized and formatted in your operating system's Disk Management (Windows) or Disk Utility (macOS).
- Confirm the SSD is compatible (M.2 NVMe or SATA, sizes 2230/2242/2260/2280).
- HDMI аркылуу дисплей чыгаруу жок:
- Ensure the HDMI cable is securely connected to both the docking station and the monitor.
- Verify the monitor input source is set correctly to the HDMI port.
- Башка HDMI кабелин колдонуп көрүңүз.
- Ensure your host device's USB-C port supports DisplayPort Alternate Mode (DP Alt Mode).
- Жай берилиштерди өткөрүү ылдамдыгы:
- Ensure your host device's USB-C port is USB 3.2 Gen2 (10Gbps) or Thunderbolt.
- Use the provided USB-C to C 10G cable.
- Verify the connected SSD or USB device supports 10Gbps speeds.
- Avoid using excessively long or low-quality cables.
- кубаттоо маселелери:
- Ensure a compatible PD power adapter (e.g., 100W) is connected to the docking station's PD port.
- Verify your laptop supports USB-C PD charging.
10. Техникалык шарттар
| Өзгөчөлүк | Спецификация |
|---|---|
| Модел | B0CTHLD7CF |
| Бренд | Yottamaster |
| Өлчөмдөр | 4.33 x 1.97 x 1.18 дюйм |
| Элемент Салмагы | 1.06 унция |
| Түс | Боз |
| Аппараттык интерфейс | Ethernet, HDMI, MicroSD, USB 3.0, USB Type C |
| Өзгөчөлүктөр | Fast Charging, Fast Data Transfer, Pass Through Charge, Plug and Play, Portable |
| Шайкеш түзмөктөр | Desktops, Laptops, Mini PC |
| M.2 SSD Compatibility | NVMe/SATA protocols, sizes 2230, 2242, 2260, 2280 |
| HDMI Resolution | 4K@60Hz чейин |
| Power Delivery | 100 Вт чейин |
| Ethernet ылдамдыгы | 1000 Мбит/сек (Гигабит) |
| Card Reader Speed | Up to 104MB/s (SD/TF 3.0) |
11. Кепилдик маалыматы
Yottamaster products typically come with a standard manufacturer's warranty. Please refer to the warranty card included in your product packaging or visit the official Yottamaster webКепилдиктин белгилүү бир шарттары жана эрежелери үчүн сайтты караңыз. Кепилдик боюнча дооматтар үчүн сатып алуунун далили катары сатып алуу квитанцияңызды сактап коюңуз.
12. Колдоо
For technical assistance, troubleshooting, or product inquiries, please contact Yottamaster customer support through their official website or the contact information provided in your product documentation. When contacting support, please have your product model (B0CTHLD7CF) and purchase details ready.


