1. Киришүү
This manual provides detailed instructions for the installation, operation, and maintenance of your OOYCYOO MPPT Solar Charge Controller. Please read this manual thoroughly before using the product to ensure proper function and safety.
Негизги өзгөчөлүктөрү:
- Automatic detection of 12V or 24V DC system voltages.
- Compatible with various deep cycle battery options: sealed, gel, flooded, and lithium.
- Innovative MPPT technology with high tracking efficiency up to 99% and maximum conversion efficiency of 98%.
- Electronic protection against reverse polarity, overcharge, over-discharge, short circuits, and reverse current.
- LCD screen and multiple LED indicators for displaying system operation information.
- User parameters can be reset.
- One key function to open and close the load.
- One key function to restore factory settings.
- Easy to use and program interface.

Сүрөт 1.1: Алдыңкы view of the OOYCYOO MPPT Solar Charge Controller, showing the LCD display and control buttons.
2. Пакеттин мазмуну
Таңгактан чыгарганда таңгактын ичиндегисин текшериңиз. Эгерде кандайдыр бир буюмдар жок болсо же бузулуп калса, сатуучуга кайрылыңыз.
- 1 x OOYCYOO MPPT Solar Charge Controller
- 1 x Температура сенсору
- 1 x Англис колдонуучу колдонмо
3. Коопсуздук маалыматы
Please observe the following safety precautions during installation and operation:
- Ensure all wiring is correctly polarized and securely connected to prevent damage to the controller or other components.
- Максималдуу киргизүү көлөмүн ашпаңызtage or current ratings of the controller.
- Контроллерди күйүүчү материалдардан жана тике күндүн нурунан алыс, жакшы желдетилген жерге орнотуңуз.
- Суу же башка суюктуктар менен байланышуудан алыс болуңуз.
- Контроллерди өз алдынча бөлүктөргө бөлүүгө же оңдоого аракет кылбаңыз. Тейлөө үчүн квалификациялуу адистерге кайрылыңыз.
- Always disconnect power from the solar panel and battery before performing any maintenance or wiring.
- Орнотуу учурунда кол кап жана көздү коргоо сыяктуу тиешелүү жеке коргонуу шаймандарын (ЖКБ) кийиңиз.
4. Продукт бүтүп калдыview
The OOYCYOO MPPT Solar Charge Controller features a clear LCD display and various terminals for connecting your solar power system components. Refer to the diagram below for an overview of the controller's parts.

Figure 4.1: Labeled components of the OOYCYOO MPPT Solar Charge Controller.
Компоненттин сүрөттөмөлөрү:
- LCD дисплей: Shows real-time system data, operating status, and settings.
- 5S Reset Button: Used to restore factory settings by long-pressing for 5 seconds.
- Күн панелинин терминалы: Connects to the positive and negative terminals of your solar panel array.
- Батарея терминалы: Connects to the positive and negative terminals of your battery bank.
- Жүктөө терминалы: Connects to the positive and negative terminals of your DC load.
- 2*USB 5V 2.4A Ports: Provides 5V DC power for charging USB devices.
- Remote Temp Sensor Port: Connects the included temperature sensor for accurate battery temperature compensation.
- Тандоо баскычы: Used to navigate through menu options and confirm selections.
- RS485 байланыш порту: For advanced communication and monitoring (requires additional purchase of compatible display/module).
- Монтаждык тешиктер: Five holes for secure installation of the controller.
5. Орнотуу жана орнотуу
Follow these steps for proper installation of your MPPT solar charge controller. Adhering to the connection order is critical to prevent damage.
Туташуу диаграммасы:
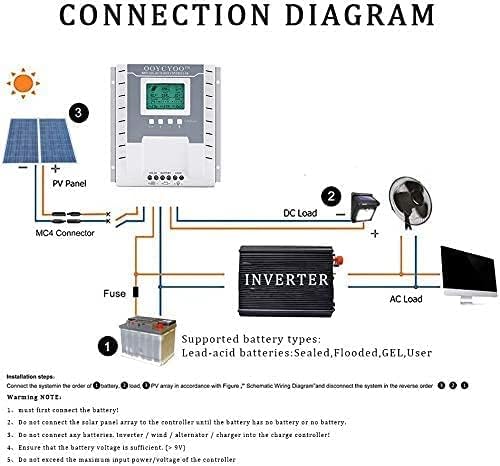
Figure 5.1: Schematic wiring diagram for the solar charge controller system.
Орнотуу кадамдары:
- Монтаждоо: Securely mount the controller to a flat, vertical surface using the five mounting holes. Ensure adequate ventilation around the unit.
- Батареяны туташтыруу: First, connect the battery to the controller's Battery Terminal (positive to positive, negative to negative). Ensure the battery voltage is sufficient (greater than 9V). The controller will automatically detect 12V or 24V system voltage.
- Connect DC Load: Next, connect your DC load to the controller's Load Terminal (positive to positive, negative to negative).
- Күн панелин туташтыруу: Finally, connect the solar panel array to the controller's Solar Panel Terminal (positive to positive, negative to negative). Do not connect the solar panel array until the battery is properly connected.
- Температура сенсорун туташтыруу: Plug the included temperature sensor into its dedicated port. This ensures accurate battery charging based on ambient temperature.
- Байланыштарды текшерүү: Double-check all connections for polarity and tightness before powering on the system.
Маанилүү эскертүүлөр:
- Always connect the battery first and disconnect the solar panel first when disassembling the system.
- Do not connect any other charging sources (e.g., inverters, wind alternators, or other chargers) directly to the charge controller's terminals.
- Ensure that the maximum input power and voltage from the solar panels do not exceed the controller's specifications.
Колдоого алынган батареянын түрлөрү:
The controller is compatible with the following lead-acid battery types:
- Мөөр басылган
- Суу каптады
- GEL
- User-defined (for custom settings)
6. Иштөө нускамалары
The OOYCYOO MPPT Solar Charge Controller features an intuitive LCD display for monitoring system status and adjusting settings.
LCD дисплей бүттүview:

6.1-сүрөт: Детальдуу view of the LCD display and button functions.
The LCD display provides real-time data on a single screen, allowing for convenient monitoring of your system. Key indicators include:
- PV (Solar Panel) Voltagд жана Ampкарылык: Current output from your solar panels.
- Батарея Voltagд жана Ampкарылык: Current battery charge status and current flow.
- Load Voltagд жана Ampкарылык: Power consumption of your connected DC load.
- Батарея сыйымдуулугу: Персенtagбатареянын заряды.
- Charging/Discharging Fault Indicators: Alerts for system issues.
- Evening/Dawn Status: Indicates day/night cycle for load control.
- Load Stop Working Hours: Configured hours for load operation.
- Float Charging Voltage: Тtage at which the battery is maintained after full charge.
- Low Voltage Disconnect/Reconnect Voltage: Thresholds for battery protection.
Баскыч функциялары:
- Toggle Key (Left Arrow): Used to cycle through different display screens or menu options.
- "+" баскычы: Increases values or moves forward in menu settings.
- "-" баскычы: Decreases values or moves backward in menu settings.
- Light Bulb / Manual Load Switch Button: This button can be used to manually open or close the DC load.
- 5S Reset Button: Long press and hold this button for 5 seconds to restore the controller to its factory default settings.
- Troubleshooting/Eliminate 'X' Button: If an 'X' error or system failure is displayed, click this button to attempt troubleshooting or clear the error.
Network Line Interface (RS485) Indicator:
- Жашыл жарык: Represents the battery status.
- Green Light Flashes: Indicates that the load is working properly.
- Сары жарык: Indicates solar energy availability.
- Yellow Light Flashes: Indicates active solar charging.
- Тармак интерфейси интерфейс үчүн сакталган жана аны атайын дисплейге туташтырууга болот (кошумча сатып алуу).
7. Техникалык тейлөө
Үзгүлтүксүз тейлөө сиздин күн зарядын контроллериңиздин узак мөөнөттүү жана оптималдуу иштешин камсыз кылат.
- Тазалоо: Periodically clean the controller's exterior with a dry, soft cloth. Do not use abrasive cleaners or solvents. Ensure ventilation openings are free from dust and debris.
- Туташуу текшерүүлөрү: Annually inspect all wiring connections for tightness and corrosion. Loose connections can lead to power loss or overheating.
- Экологиялык шарттар: Ensure the controller remains within its specified operating temperature and humidity ranges. Protect it from direct sunlight, rain, and excessive dust.
- Батареянын ден соолугу: Батареяңыздын ден соолугуна жана көлөмүнө көз салыңызtage regularly. Ensure it is not overcharged or deeply discharged, as this can shorten its lifespan.
8. Кыйынчылыктарды
If you encounter issues with your OOYCYOO MPPT Solar Charge Controller, refer to the following common problems and solutions:
| Көйгөй | Мүмкүн себеп | Чечим |
|---|---|---|
| Controller not powering on / LCD blank | No battery connected or battery voltage too low. Reverse polarity connection. Loose battery connection. | Ensure battery is connected first and has sufficient voltage (>9V). Check battery polarity. Tighten battery terminal connections. |
| No charging current from solar panels | Solar panel not connected. Reverse polarity of solar panel. Insufficient sunlight. PV input voltagөтө төмөн/бийик. | Connect solar panels. Check PV polarity. Ensure adequate sunlight. Verify PV voltage is within specifications (18-96V for 12V system, 36-96V for 24V system). |
| Жүк иштебейт | Load not connected. Load switch off. Battery voltage too low (low voltage disconnect). Overload/short circuit on load. | Connect load. Press the manual load switch button. Charge battery. Reduce load or check for short circuits. |
| Error 'X' displayed on LCD | System fault or specific error code. | Press the 'X' button to attempt troubleshooting or clear the error. Refer to the manual for specific error code meanings if available. If persistent, contact support. |
| Температураны туура эмес көрсөткүчтөр | Температура сенсору туташкан эмес же туура эмес. | Ensure the temperature sensor is securely plugged in. Replace if faulty. |
9. Техникалык шарттар
The following table outlines the technical specifications of the OOYCYOO MPPT Solar Charge Controller (Model K):
| Параметр | Нарк |
|---|---|
| Модел | MPPT 40A |
| System Voltage | 12V / 24V Автоматтык түрдө аныктоо |
| Максималдуу кубаттуулук ток | 40A |
| Максималдуу PV киргизүү көлөмүtage (Vc) | 18V ~ 96V (12V system) 36V ~ 96V (24V system) Overall Max: ≤ 96V |
| Max Solar Panel Power (Wp) | 520W (12V system) 1040W (24V system) |
| Battery Capacity Configuration | 300 Ah чейин |
| Battery Float Voltage | 13.8V (12V системасы) 27.6V (24V системасы) |
| Battery Protection (Undervoltage) | 10.6V (12V системасы) 21.2V (24V системасы) |
| Battery Recovery Voltage (Төмөнкү томtage) | 12.6V (12V системасы) 25.2V (24V системасы) |
| System No-Load Loss | ≤ 13 мА |
| Buck Loop Drop | ≤ 100 мВ |
| Иштөө температурасы | -10 °C ~ 60 °C |
| Сактоо температурасы | -30 °C ~ -70 °C |
| Иштөө нымдуулугу | ≤ 90%, конденсацияланбайт |
| Температураны компенсациялоо | -4 mV/cell/°C |
| Дисплей түрү | LCD |
| Installation Wire Size (mm²) | 12 мм² |
| Installation Wire Size (AWG) | 8 # (AWG) |
| Өлчөмдөрү (L x W x Y) | 21 x 20.9 x 8.4 см |
| Салмагы | 1.24 килограмм |
| Материал | Пластик |
| Түс | Ак |
| UPC | 768561407224 |
| ASIN | B0CW6468P2 |
10. Кепилдик жана колдоо
For warranty information and technical support, please refer to the documentation provided with your purchase or contact your retailer. Keep your proof of purchase for warranty claims.
If you require further assistance or have questions not covered in this manual, please reach out to OOYCYOO customer support through the contact information provided on the product packaging or the official OOYCYOO webсайт.


