1. Киришүү
The Linkvil (Fanvil) W712 is a Radio over IP (RoIP) gateway designed to bridge analog/digital two-way radio systems with SIP communication devices. This device integrates a 400-470MHz radio module and a SIP module, facilitating interconnected communication across various platforms.
The W712 is compact, portable, and compatible with mainstream analog and DMR II digital two-way radios, including Motorola and Hytera. It supports easy deployment and management, enabling the creation of a unified communication system without requiring extensive changes to existing infrastructure. This gateway is suitable for internal communication in diverse environments such as community security, industrial parks, supermarkets, hospitality, and campus security.
Негизги өзгөчөлүктөрү:
- Integrated 400-470 MHz radio module for connecting analog/DMR II digital radios.
- SIP protocol compatibility for connecting SIP communication devices.
- High compatibility with Motorola, Hytera, and other mainstream analog/digital radios.
- Supports HD audio with G.722 and Opus codecs.
- Includes USB 2.0 and TF card interfaces for data storage or offline firmware upgrades.
- Supports call recording and call logs for both two-way radios and SIP phones.
- Dual Megabit Ethernet ports for network transmission.
- Power supply via DC 12V PSU and Power over Ethernet (PoE+).
- Web-based management interface for device configuration.
- Supports both desktop and wall-mounted installation.
2. Пакеттин мазмуну
Пакетте бардык буюмдар бар экенин текшериңиз:
- Linkvil (Fanvil) W712 RoIP Gateway Unit
- Кубат адаптери (DC 12V)
- Антенна
- Ethernet кабели
- Ыкчам орнотуу колдонмосу
Note: The "Included Components" specification states "not apply", which is likely an error or refers to additional accessories not bundled. The above list is based on typical gateway packages.
3. Физикалык бүтүрүүview
Familiarize yourself with the ports and indicators on the W712 gateway.
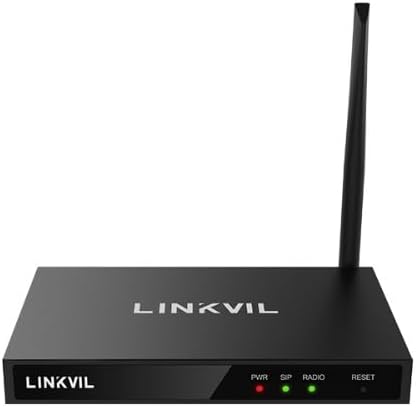
1-сүрөт: Фронт view of the Linkvil W712 RoIP Gateway. Shows the device with its antenna attached, displaying the "LINKVIL" logo and indicator lights for PWR (Power), SIP, RADIO, and a RESET button.

2-сүрөт: Бурчтуу view of the Linkvil W712 RoIP Gateway. This perspective highlights the compact design and the side ventilation, along with the front panel indicators.

3-сүрөт: Дагы бир бурч view of the Linkvil W712 RoIP Gateway, providing a slightly different perspective of the device's form factor and antenna placement.
Алдыңкы панелдин көрсөткүчтөрү:
- PWR (кубат): Кубаттын абалын көрсөтөт.
- SIP: Indicates SIP module status and activity.
- РАДИО: Indicates radio module status and activity.
- КАЛТЫРУУ: Button to reset the device to factory defaults (press and hold).
Rear Panel Ports (Typical):
- DC 12V кубат киргизүү: Кубат адаптерин туташтыруу үчүн.
- Ethernet Ports (LAN/WAN): Dual Megabit Ethernet ports for network connection.
- USB 2.0 порт: For data storage or other peripherals.
- TF карта уячасы: For TF card insertion, used for data storage or offline firmware upgrades.
- Антенна туташтыргычы: For attaching the external antenna.
4. Орнотуу жана орнотуу
4.1. Физикалык орнотуу
- Монтаждоо: The W712 supports both desktop and wall-mounted installation. Choose a stable location with good ventilation and away from direct heat sources or moisture. For wall mounting, use appropriate screws and anchors (not included) to secure the device.
- Антеннаны тиркөө: Carefully screw the provided antenna onto the antenna connector on the rear panel of the W712. Ensure it is securely fastened but do not overtighten.
- Кубат туташуу:
- Кубат адаптерин колдонуу: Connect the DC 12V power adapter to the power input port on the W712, then plug the adapter into a standard electrical outlet.
- PoE+ колдонуу: If your network switch supports PoE+, connect an Ethernet cable from the PoE+ enabled port on your switch to one of the Ethernet ports on the W712. The device will power on automatically.
- Тармак туташуусу: Connect an Ethernet cable from your network router or switch to one of the Ethernet ports on the W712. The device features dual Megabit Ethernet ports.
- TF картасын салыңыз (милдеттүү эмес): If you plan to use a TF card for data storage or offline firmware upgrades, insert it into the TF card slot.
- Connect USB Device (Optional): If needed, connect a USB device to the USB 2.0 port.
4.2. Баштапкы конфигурацияга кирүү
Once powered on and connected to the network, the W712 can be configured via its web башкаруу интерфейси.
- IP дарегин алуу: The W712 will typically obtain an IP address automatically via DHCP. You may need to check your router's DHCP client list to find the assigned IP address of the device. Alternatively, use a network scanning tool.
- Мүмкүнчүлүк Web Интерфейс: ачуу а web browser on a computer connected to the same network as the W712. Enter the device's IP address into the browser's address bar and press Enter.
- Кирүү: You will be prompted for a username and password. Refer to the Quick Installation Guide for default login credentials. It is highly recommended to change the default password immediately after the first login for security purposes.
5. Иштөө нускамалары
The W712 gateway functions by integrating radio communication with SIP-based communication. Configuration is primarily done through the web башкаруу интерфейси.
5.1. Radio Module Configuration
ичинде web interface, navigate to the radio settings to configure the 400-470MHz radio module. This includes:
- Жыштык орнотуулары: Set the operating frequencies for communication with two-way radios.
- Канал конфигурациясы: Define radio channels and associated parameters.
- Compatibility Settings: Adjust settings for compatibility with specific analog or DMR II digital radio models (e.g., Motorola, Hytera).
- Аудио жөндөөлөрү: Configure audio input/output levels for the radio interface.
5.2. SIP Module Configuration
Access the SIP settings in the web interface to integrate the W712 with your SIP communication system:
- SIP каттоо эсеби: Register the W712 with your SIP server by entering SIP account details (username, password, server address).
- Codec Preferences: Select preferred audio codecs, including G.722 and Opus for HD audio.
- Тармак орнотуулары: Configure network parameters relevant to SIP communication (e.g., NAT traversal).
5.3. RoIP Link Configuration
This section defines how radio channels are mapped to SIP extensions or groups, enabling cross-platform communication.
- Mapping Rules: Create rules to link specific radio channels to SIP endpoints or vice versa.
- Group Calls: Configure group call functionalities between radio users and SIP users.
- Артыкчылыктуу жөндөөлөр: Assign priorities for different communication paths if necessary.
5.4. Call Recording and Logs
The W712 supports recording calls and maintaining call logs for both two-way radios and SIP phones. These features can be configured and accessed via the web interface. Ensure sufficient storage is available on the TF card or connected USB device if local storage is used for recordings.
6. Техникалык тейлөө
6.1. Микропрограмманы жаңыртуу
Дайыма өндүрүүчүнүн текшерүү website for firmware updates. Firmware updates can provide new features, performance improvements, and security enhancements. The W712 supports offline firmware upgrades via the TF card interface.
6.2. Тазалоо
Keep the device clean by wiping it with a soft, dry cloth. Do not use liquid cleaners or aerosols, as they may damage the device.
6.3. Заводдук демейки жөндөөлөргө кайтаруу
If the device is not functioning correctly or you need to clear all configurations, you can perform a factory reset. Locate the RESET button on the front panel. With the device powered on, press and hold the RESET button for approximately 5-10 seconds until the indicator lights change, then release. The device will restart with factory default settings.
7. Кыйынчылыктарды
This section addresses common issues you might encounter with the W712 RoIP Gateway.
7.1. No Power Indicator
- кубат туташуу текшерүү: Ensure the DC 12V power adapter is securely connected to the device and a working power outlet.
- Check PoE+ (if applicable): Verify that the Ethernet cable is connected to a PoE+ enabled port on your switch and that the switch is providing power.
- Test Power Adapter: If possible, test the power adapter with another compatible device or use a multimeter to check its output.
7.2. Кирүү мүмкүн эмес Web Интерфейс
- Тармак туташуусу: Ensure the Ethernet cable is properly connected to both the W712 and your network. Check the network status indicators on the device and your switch.
- IP дареги: Verify that you are using the correct IP address for the W712. Check your router's DHCP client list.
- Тармак конфигурациясы: Ensure your computer is on the same network segment as the W712. Temporarily disable any firewalls on your computer that might be blocking access.
- Заводдун баштапкы абалга келтирүү: If all else fails, perform a factory reset to revert to default network settings, then try accessing again.
7.3. Radio Communication Issues
- Антенна: Ensure the antenna is securely attached and positioned correctly.
- Жыштык орнотуулары: Double-check that the radio module's frequency and channel settings in the web interface match those of your two-way radios.
- Шайкештик: Verify that the W712's settings are configured for compatibility with your specific radio models (analog/DMR II).
- RADIO Indicator: Observe the RADIO indicator light for activity.
7.4. SIP Communication Issues
- SIP каттоо: Confirm that the SIP account is successfully registered with your SIP server. Check the SIP status in the web интерфейс.
- Тармакка туташуу: Ensure stable network connectivity to the SIP server.
- SIP Орнотуулары: Verify all SIP account details, server addresses, and codec preferences are correctly configured.
- SIP Indicator: Observe the SIP indicator light for activity.
8. Техникалык шарттар
| Өзгөчөлүк | Деталь |
|---|---|
| Модель аты | W712 |
| Бренд | Фанвил (Линквил) |
| Өзгөчө өзгөчөлүк | RoIP Gateway with Built-in Radio & SIP, UHF 400–470 MHz Radio Integration |
| Жыштык тилкесинин классы | Single-Band (UHF 400-470 MHz) |
| Зымсыз байланыш стандарты | 802.11a (Note: This might refer to internal Wi-Fi for management or is a generic spec. The primary connectivity is Ethernet.) |
| Шайкеш түзмөктөр | Motorola, Hytera, and other mainstream analog/DMR II digital two-way radios |
| Байланыш технологиясы | Ethernet, USB |
| Ethernet порттору | Dual Megabit Ethernet |
| USB интерфейси | USB 2.0 |
| TF карта интерфейси | Yes, for data storage or offline upgrade |
| Аудио кодектер | G.722, Opus (HD Audio Support) |
| Электр камсыздоо | DC 12V PSU, PoE+ (802.3at) |
| Орнотуу | Desktop, Wall-mounted |
| Түс | Кара |
| Элемент Салмагы | 2.02 фунт (болжол менен 0.92 кг) |
| Пакеттин өлчөмдөрү | 9.02 x 8.19 x 2.44 дюйм (болжол менен 22.9 x 20.8 x 6.2 см) |
| Өндүрүүчү | Fanvil |
| Дата биринчи жеткиликтүү | 1-март, 2024-жыл |
9. Кепилдик жана колдоо
For warranty information and technical support, please refer to the official Fanvil (Linkvil) webсайтына кириңиз же ыйгарым укуктуу сатуучуга кайрылыңыз. Кепилдик талаптары үчүн сатып алуунун далили катары сатып алуу дүмүрчөгүңүздү сактап коюңуз.
Online resources, including FAQs, updated manuals, and firmware downloads, may be available on the manufacturer's support portal.