1. Киришүү
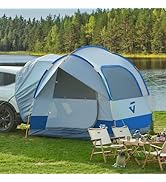
Thank you for choosing the JOYTUTUS Vehicle Awning. This manual provides essential information for the correct installation, operation, and maintenance of your 6.6'x8.2' vehicle awning. Designed for camping and outdoor activities, this awning offers UV50+ sun protection and is weatherproof, ensuring comfort and reliability. Please read these instructions thoroughly before use to ensure optimal performance and safety.
2. Коопсуздук маалыматы
- Always ensure the awning is securely mounted to your vehicle's roof rack or crossbars before deployment.
- Do not use the awning in strong winds or severe weather conditions. Retract and secure the awning immediately if adverse weather is anticipated or occurs.
- Ensure all poles are properly extended and locked, and guy ropes are securely staked to the ground to prevent collapse.
- Keep children and pets away from the awning during setup and takedown to prevent injury.
- Regularly inspect all components for wear, damage, or loose connections. Do not use if any part is compromised.
- Avoid placing heat sources or open flames directly under or near the awning fabric.
3. Пакеттин мазмуну
Төмөндө тизмеленген нерселердин баары пакетиңизге камтылганын текшериңиз:
- Sunshade (Awning Fabric) x 1
- Wind Ropes x 2
- L-shaped Brackets x 2
- Back Plates x 2
- L-shaped Ground Nails x 2
- Wrenches x 2 (13mm and 10mm)
- Some Bolts and Nuts (for installation)
- L-shaped Tool x 2
- M8*55 Long Screws x 4
- M8*20 Short Screws x 4
- M8 гайкалар x 8

4. Орнотуу жана орнотуу
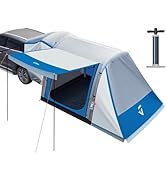
4.1 Mounting the Awning to Your Vehicle
The JOYTUTUS Vehicle Awning is designed for quick installation and can be adapted to most roof racks and roof rails using the provided hardware. Brackets feature a porous design for adjustable fitting.
- Орнотуу вариантын тандаңыз: Depending on your vehicle's roof rack type (rooftop rack, rooftop basket, or crossbar), select the appropriate mounting method. Refer to the diagrams below for guidance.
- Кашаларды тиркөө: Secure the L-shaped brackets and back plates to your roof rack using the provided bolts and nuts. Ensure all connections are tight and stable. For crossbar installation, drilling might be necessary if no pre-existing holes align.
- Mount Awning: Slide the short screws into the grooves on the awning's aluminum rail. Align the awning with the attached brackets and secure it using the remaining nuts and bolts. Tighten all fasteners with the provided wrenches.

4.2 Deploying the Awning
The awning features a quick set-up design, allowing for deployment in approximately 1 minute.
- Unlock and Unzip: Unbuckle the straps securing the awning bag and unzip the bag completely.
- Pull Out Sunshade: Gently pull the sunshade fabric outwards from the aluminum casing.
- Extend Vertical Support Poles: Unfold the integrated vertical support poles. Extend each pole to the desired height and rotate the bottom section clockwise to tighten and lock it in place.
- Open Side Support Bars: Pull out the side support bars from the awning casing. Insert the tip of each bar into the corresponding round hole on the awning's frame.
- Secure Sunshade: Use the velcro straps to fix the sunshade fabric to the support rods.
- Tie Down with Ropes and Stakes: Tie the wind ropes through the support rod holes. Tighten the ropes and insert the L-shaped ground nails into the ground to secure the awning. Adjust rope length as needed.

Орнотуу процесси боюнча визуалдык көрсөтмө алуу үчүн, төмөндөгү видеону караңыз:
Video: This video demonstrates the step-by-step setup process of the JOYTUTUS Vehicle Awning, from unzipping the bag to securing the poles and ropes.
5. Иштөө нускамалары
5.1 Бийиктикти жана бурчту тууралоо
The telescopic support poles allow for height adjustment to cope with different terrains and sun angles. To adjust, loosen the twist lock on the pole, extend or retract to the desired height, and then rotate the bottom section clockwise to tighten and lock it in place. This feature also allows for angling the awning to shed water effectively during rain.
5.2 Securing in Weather Conditions
The awning is designed to be weatherproof and UV50+ protected. However, proper securing is crucial:
- Шамал: Always use the provided wind ropes and ground nails to secure the awning, especially in breezy conditions. For strong winds, it is recommended to retract the awning completely.
- Жамгыр: The fabric is waterproof, and all four corners are glued for extra protection. To prevent water pooling, angle one side of the awning slightly lower than the other to allow water to run off.


5.3 Retracting the Awning
Retracting the awning is a quick and easy process, similar to deployment.
- Remove Stakes and Ropes: Detach the wind ropes from the ground nails and poles.
- Collapse Support Poles: Loosen the twist locks on the vertical support poles and retract them fully. Fold the side support bars back into the casing.
- Roll Up Sunshade: Carefully roll the sunshade fabric back into its aluminum casing. Ensure it is rolled tightly and evenly to fit into the storage bag.
- Secure with Velcro and Zip: Use the integrated Velcro straps to hold the rolled fabric in place. Zip up the storage bag completely to protect the awning during travel.
6. Техникалык тейлөө
- Тазалоо: Clean the awning fabric with mild soap and water. Do not use harsh chemicals or abrasive cleaners. Ensure the fabric is completely dry before rolling it up for storage to prevent mold and mildew.
- Сактагыч: Store the awning in its protective bag when not in use. Keep it in a cool, dry place away from direct sunlight and extreme temperatures.
- Текшерүү: Periodically check all bolts, nuts, and moving parts for tightness and wear. Replace any damaged components immediately.
- Кездемеге кам көрүү: The polyester fabric is UV50+ and waterproof. Avoid prolonged exposure to direct sunlight when not in use to extend its lifespan.
7. Кыйынчылыктарды
| Көйгөй | Мүмкүн себеп | Чечим |
|---|---|---|
| Жеңил шамалда чатыр туруксуз. | Insufficiently secured ropes/stakes. | Ensure wind ropes are taut and ground nails are firmly inserted. Adjust pole angles for better stability. |
| Water pooling on awning fabric during rain. | Awning is too flat. | Adjust one side of the vertical support poles to be slightly lower, creating a slope for water runoff. |
| Difficulty extending/retracting poles. | Twist locks are too tight or poles are dirty. | Loosen twist locks counter-clockwise. Clean poles if dirt or debris is obstructing movement. |
| Awning not fitting properly on roof rack. | Incorrect bracket placement or incompatible rack type. | Review installation instructions and diagrams. Ensure brackets are correctly positioned and tightened. Drilling may be required for some crossbars. |
8. Техникалык шарттар
- Модель номери: H1201-01008-YL
- Бренд: JOYTUTUS
- Өлчөмү: 6.6' x 8.2' Vehicle Awning
- Түсү: Ачык күрөң
- Материал: Aluminum (frame), Polyester (fabric)
- Кездеме түрү: Полиэстер пахта
- UV коргоо: UV50+
- Суу каршылык: Waterproof (glued corners)
- Элемент Салмагы: 10.43 килограмм (болжол менен 23 фунт)
- Product Dimensions (Packed): 5.9"D x 3.94"W x 82.68"H
- Min. Clearance: 48 дюйм
- Иштөө режими: Manual
- Ассамблея талап кылынат: Ооба
9. Кепилдик жана колдоо
For warranty information, product support, or to purchase replacement parts, please contact JOYTUTUS customer service through the retailer where the product was purchased. Keep your purchase receipt as proof of purchase.
You can also visit the official JOYTUTUS store for more products and information: JOYTUTUS Store


