1. Продукт бүтүп калдыview
The OLIGHT Odin S is a high-performance tactical weaponlight designed for reliable illumination in demanding environments. It boasts a powerful 1500-lumen output and a beam distance of 250 meters, providing both a bright hotspot and ample spill for situational awareness. Its robust construction and versatile mounting options make it an ideal choice for various tactical applications.

Figure 1: OLIGHT Odin S 1500 Lumens MLOK Rail Mounted Weaponlight in Desert Tan with Remote Pressure Switch.
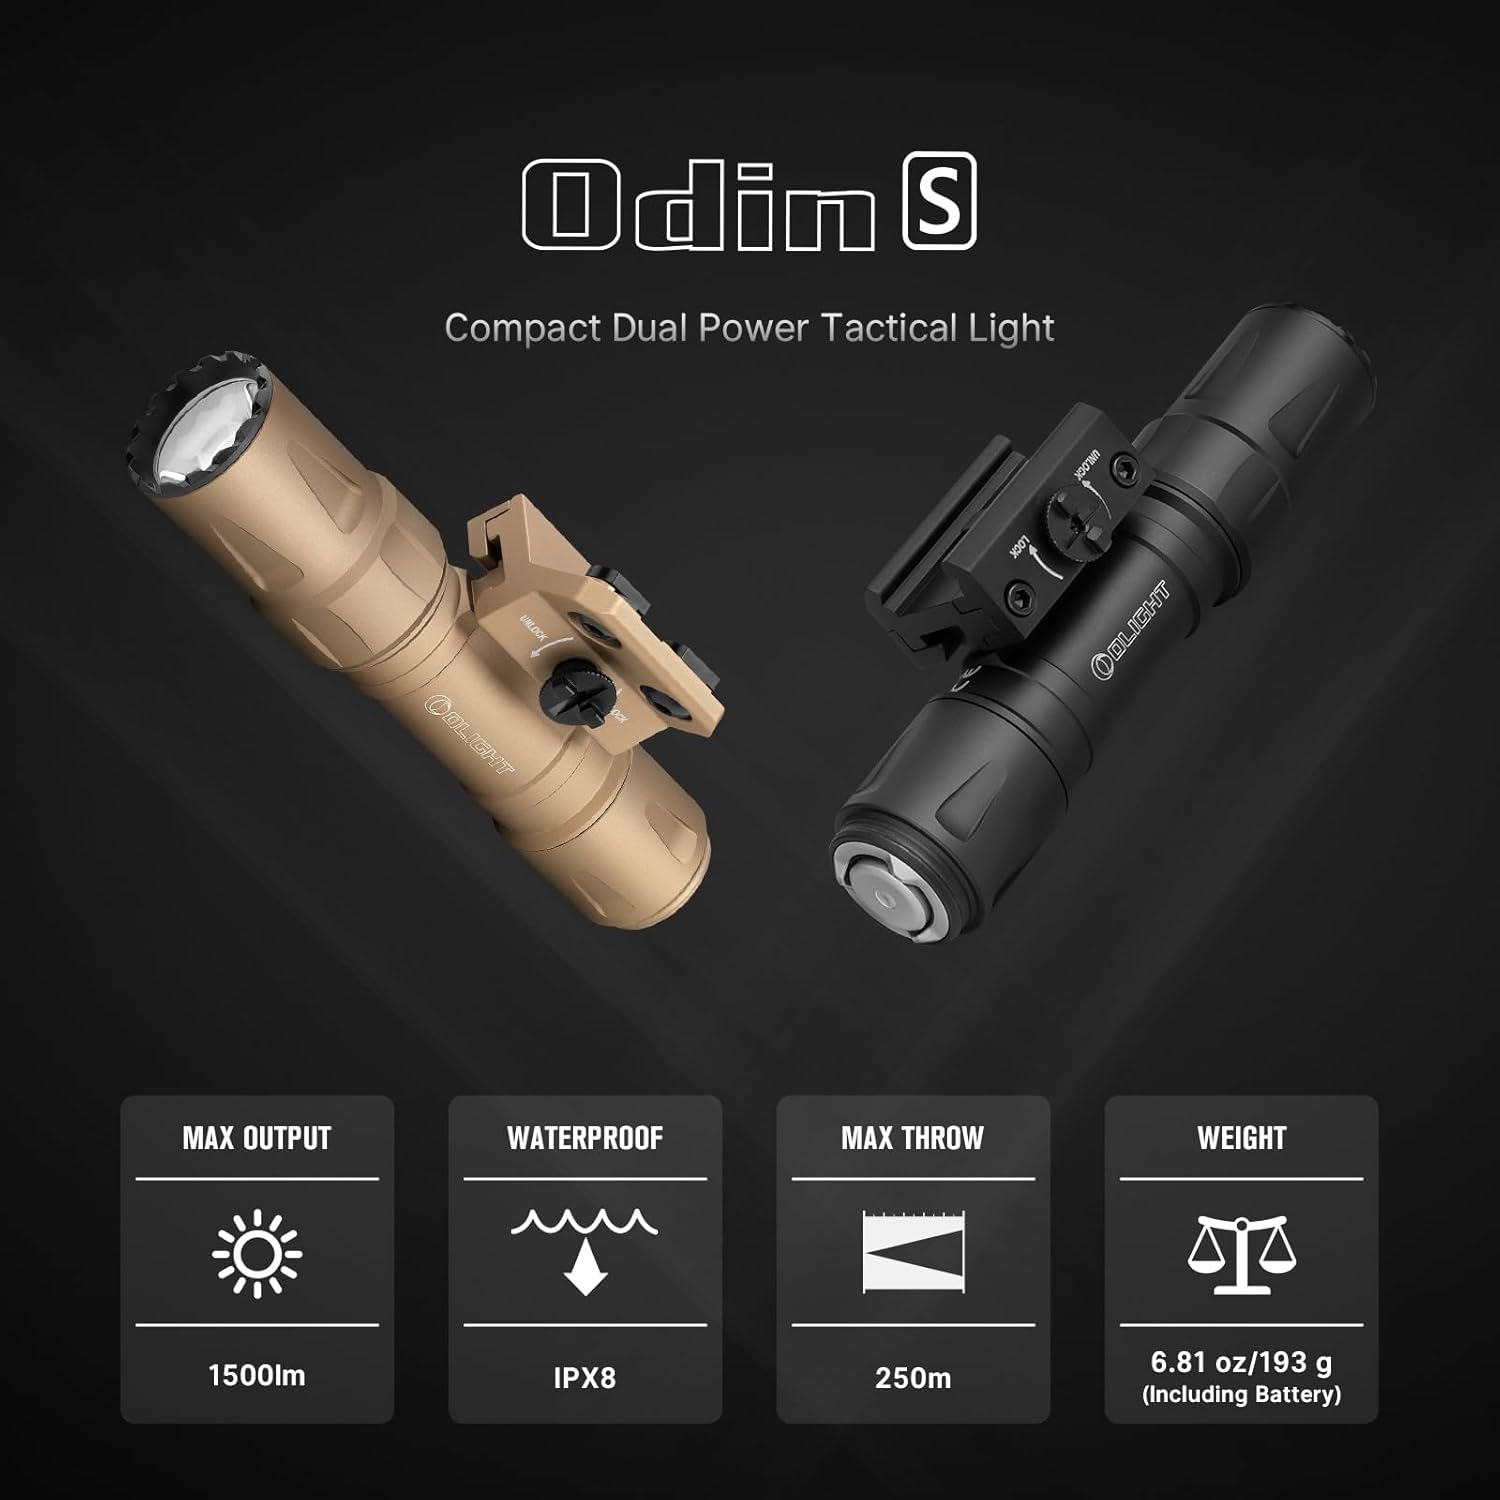
Figure 2: ашыкview of Odin S key features including 1500lm max output, IPX8 waterproof rating, 250m max throw, and 6.81 oz weight.

Figure 3: The Odin S is available in both MLOK and Picatinny rail versions to suit different user preferences.

Figure 4: The robust design of the Odin S includes an integrated mounting bracket, screw-locking mechanism, and screw-cap design for enhanced durability.

Figure 5: The enhanced screw cap design provides fast locking and maintains secure control of the light.

Figure 6: The Odin S features aerospace-grade aluminum alloy, Type III hard anodized finish, and 1.5-meter impact resistance, ensuring durability and IPX8 waterproofing.

Figure 7: Detailed output specifications for the Odin S, including lumens, runtime, and throw distance for both included rechargeable and non-rechargeable batteries.
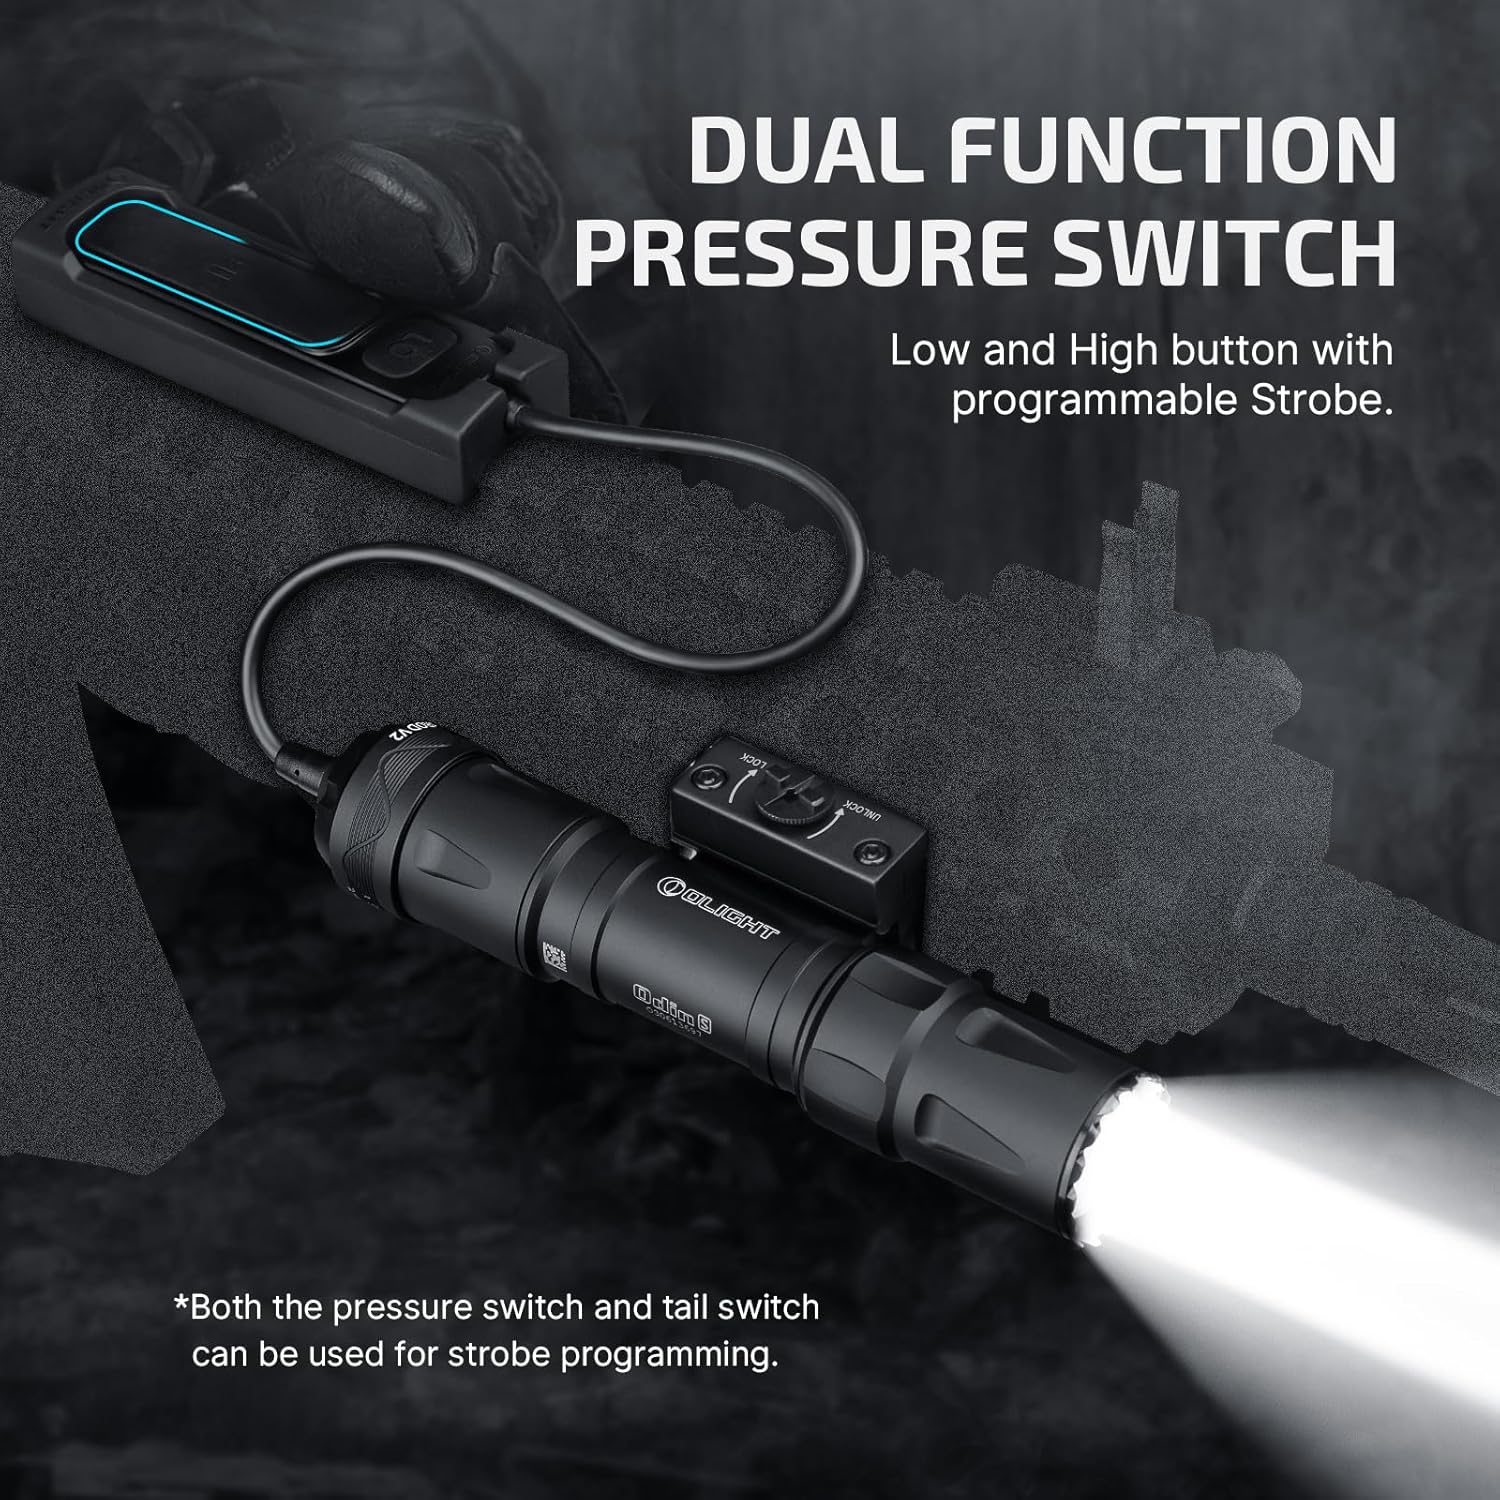
Figure 8: The dual function pressure switch offers low and high button control with a programmable Strobe function.
2. Кутуда эмне бар
- Odin S (Battery Included) x 1
- Rail Mount x 1
- Заряддоо кабели x 1
- H3.0 Wrench x 1 (For M-LOK version)
- Nuts x 2 (For M-LOK version)
- H2.5 Wrench x 1
- Бурамалар x 2
- Self-Locking Band x 4
- Battery Holder x 1
- Колдонуучунун колдонмосу x 1
- Pressure Switch x 1
- Pressure Switch Mount x 1
3. Орнотуу
3.1 Батареяны орнотуу жана заряддоо
The Odin S comes with a standard 3500 mAh rechargeable battery. To install or replace the battery, unscrew the tail cap of the flashlight. Insert the battery with the positive (+) end facing towards the head of the light. Securely screw the tail cap back on.
To charge the light, connect the magnetic charging cable to the tail cap. The indicator light on the charging cable will show the charging status. It will be red while charging and turn green when fully charged. Note: When using non-rechargeable batteries, do not attempt to charge the light with the magnetic charging cable.

Figure 9: The Odin S features convenient magnetic charging via the tail cap.
3.2 Mounting the Weaponlight
The Odin S is designed for secure attachment to MLOK rails. Use the included rail mount and screws to firmly attach the weaponlight to your desired position on the rail. Ensure the screw-locking rail clamp is tightened for secure support, especially under heavy recoil.

Figure 10: Close-up of the secure mounting bracket for the Odin S.
3.3 Attaching the Remote Pressure Switch
The upgraded magnetic remote pressure switch connects to the tail cap of the Odin S. Align the magnetic end of the pressure switch with the tail cap and allow it to snap into place. Then, push the screw cap design forward to securely lock the switch, ensuring stable light control during use.
4. Иштөө нускамалары
4.1 Негизги операция (куйрукту которуу)
The tail switch allows for both momentary and constant on/off functions, as well as mode selection.
- Туруктуу күйгүзүү/өчүрүү: Press the tail switch lightly or hard and quickly for Low/High mode. Press again to turn it off.
- Убактылуу күйгүзүү: Press the tail switch lightly or hard and hold for Low/High mode. Release to turn it off.
Video 1: This video demonstrates how to operate the OLIGHT Odin S in different modes using the tail switch, including constant on and momentary on functions.
4.2 Basic Operation (Pressure Switch)
The remote pressure switch offers similar functionality to the tail switch for convenient remote control.
- Туруктуу күйгүзүү/өчүрүү: Press the LO/HI button quickly for Low/High mode. Press again to turn it off.
- Убактылуу күйгүзүү: Press and hold the LO/HI button for Low/High mode. Release to turn it off.
Video 2: This video demonstrates how to operate the OLIGHT Odin S in different modes using the remote pressure switch, including constant on and momentary on functions.
4.3 Strobe Function
The Odin S features a customizable strobe function. By default, the strobe function is disabled.
- Enable/Disable Strobe: When the light is off, quickly press the tail switch or HI button of the remote switch five times or more, and hold it for more than 1 second at the last press to enable or disable the Strobe function.
- Strobe иштетүү: Once the Strobe function is enabled, double pressing the tail switch or remote switch can activate it.
Video 3: This video demonstrates how to enable, disable, and activate the Strobe function on the OLIGHT Odin S using both the tail switch and remote pressure switch.
4.4 Power Output Modes
The Odin S offers different power output levels depending on the battery type used. Refer to the specifications table for detailed information on lumens, throw distance, and runtime for both rechargeable and non-rechargeable batteries.
5. Техникалык тейлөө
5.1 Тазалоо
Regularly clean the lens and body of the flashlight with a soft, clean cloth. Avoid using abrasive materials or harsh chemicals that could damage the finish or optical components.
5.2 Батареяга кам көрүү
To maximize battery life, store the rechargeable battery in a cool, dry place when not in use. If the light will not be used for an extended period, it is recommended to remove the battery. The light will vibrate to indicate low battery levels during use.
5.3 Гидроизоляция
The Odin S is IPX8 waterproof, meaning it can be continuously submerged in water up to 2 meters. Ensure all parts are securely tightened before exposing the light to water. After exposure to saltwater, rinse the light with fresh water and dry thoroughly.
6. Кыйынчылыктарды
6.1 Жарык күйбөй жатат
- Check if the battery is correctly installed with the positive (+) end facing the head.
- Ensure the battery is charged. Connect the magnetic charging cable to verify charging status.
- Verify that the tail cap is fully tightened. A loose tail cap can prevent electrical contact.
6.2 Dim Light or Short Runtime
- Батареяны толук заряддаңыз.
- Clean the contact points on the battery and inside the flashlight with a clean cloth.
- Ensure the correct battery type is being used.
6.3 Strobe Function Not Working
- Ensure the strobe function has been enabled as per section 4.3.
- Double-press the tail switch or remote switch quickly to activate the strobe.
7. Техникалык шарттар
| Өзгөчөлүк | Деталь |
|---|---|
| Өзгөчө өзгөчөлүк | Waterproof, Strobe, Rechargeable |
| Түс | Desert Tan |
| Power Source | Батарея менен иштейт |
| Жарык булагы түрү | LED |
| Материал | Алюминий |
| White Brightness | 1500 Lumens |
| Продукциянын өлчөмдөрү | 1.14"D x 1.14"W x 5.02"H |
| Жарык жол аралык | 250 метр |
| Батарея клеткасынын курамы | Литий ион |
| Батареялардын саны | 1 литий-иондук батарейкалар талап кылынат. (камтылган) |
| Сууга туруктуулук деңгээли | Суу өткөрбөйт |
| Кепилдик түрү | өмүр бою кепилдик |
| Стиль | Mlok Rail |
| Элемент Салмагы | 1.12 фунт |
| Келип чыккан өлкө | Кытай |
| Элементтин моделинин номери | O-ODINS-DT-300000 |
| Дата биринчи жеткиликтүү | 18-май, 2024-жыл |
8. Кепилдик жана колдоо
The OLIGHT Odin S comes with a өмүр бою кепилдик, ensuring long-term reliability and customer satisfaction. For any support inquiries, technical assistance, or warranty claims, please visit the official OLIGHT store or contact their customer service directly.
Official OLIGHT Store: https://www.amazon.com/stores/OLIGHT/page/098E844F-88E8-45DC-901F-203F35540649


