1. Киришүү
This manual provides detailed instructions for the safe and effective use of your GOYOJO Digital Torque Wrench (Model GM200-JP). Please read this manual thoroughly before operation and retain it for future reference. This high-precision, durable digital torque wrench offers three measurement modes and four unit options, making it suitable for various applications including automotive, motorcycle, and bicycle maintenance.

Image 1.1: GOYOJO Digital Torque Wrench (Model GM200-JP)
2. Коопсуздук маалыматы
Always observe the following safety precautions to prevent injury or damage to the tool and workpiece:
- Wear appropriate personal protective equipment, such as safety glasses and gloves, during operation.
- Моментти колдонуудан мурун, жумуш бөлүгүнүн бекем бекитилгенин текшериңиз.
- Do not exceed the maximum torque capacity of the wrench (200 Nm).
- Avoid dropping the wrench or subjecting it to strong impacts, as this may affect its accuracy.
- Keep the wrench clean and dry. Do not expose it to water or corrosive substances.
- Колдонулбаган учурда ачкычты коргоочу кутучасында сактаңыз.
- Do not attempt to disassemble or modify the wrench. Repairs should only be performed by qualified personnel.
3. Продукциянын компоненттери
The GOYOJO Digital Torque Wrench package includes the following items:
- Digital Torque Wrench Body (Model GM200-JP) x 1
- Protective Storage Case x 1
- AAA батареялары x 2
- Instruction Manual (Japanese) x 1
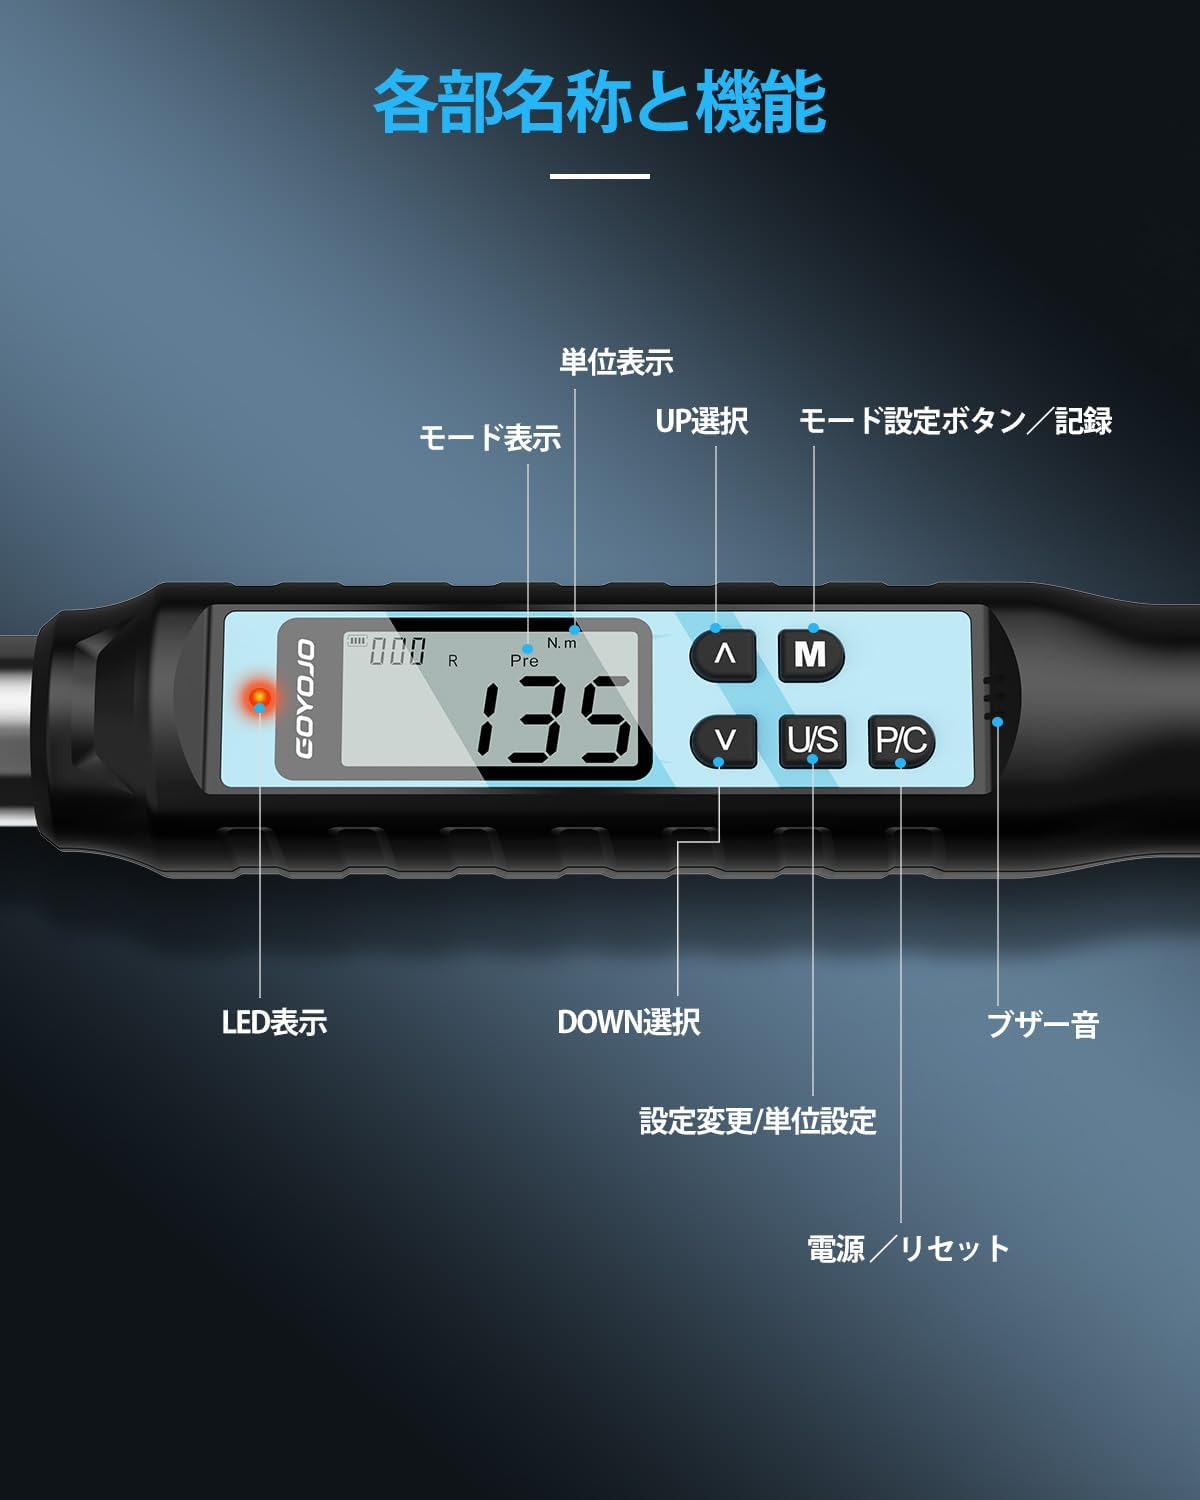
Image 3.1: Diagram showing the main parts and functions of the digital torque wrench.
Негизги компоненттер:
- Шторчтук башы: Bidirectional, 72-tooth mechanism for tightening and loosening. Features a push-button for easy socket attachment and detachment.
- Санариптик дисплей: LCD screen showing torque values, measurement modes, and units.
- Башкаруу баскычтары:
- ЖОГОРУ/ТӨМӨН баскычтары: Adjust target torque values and navigate menus.
- M (режим) баскычы: Selects measurement modes (Track, Peak Hold, Preset) and saves data.
- U/S (Unit/Setting) Button: Switches between torque units (N.m, ft.lbf, in.lbf, kgf.cm) and enters setting mode.
- P/C (Кубат/Өчүрүү) баскычы: Powers the device ON/OFF and clears data.
- LED көрсөткүчү: Provides visual alerts for target torque status.
- Коңгуроо: Provides audible alerts for target torque status.
4. Орнотуу
4.1 Батареяны орнотуу
- Батарея бөлүмүн тутканын түбүнөн табыңыз.
- Бөлүмдүн капкагын ачыңыз.
- Туура полярдуулукту (+/-) камсыз кылуу менен эки AAA батарейкасын салыңыз.
- Батарея уясынын капкагын бекем жабыңыз.
4.2 Баштапкы күйгүзүү
- басыңыз P/C button to power on the device. The display will light up.
- The wrench will perform a self-check and display the current torque value and mode.
Video 4.1: Demonstration of powering on the digital torque wrench and setting torque values.
5. Иштөө нускамалары
5.1 Setting Torque Values
- басыңыз ЖОГОРУ/ТӨМӨН buttons to select a target torque value group (P1-P9).
- басыңыз M button to activate the selected group.
- колдонуу ЖОГОРУ/ТӨМӨН buttons to adjust the specific torque value. Long-press for 2 seconds to enter rapid adjustment mode.
- Once the desired torque value is set, press the P/C ырастоо үчүн баскыч.
Video 5.1: Detailed guide on how to set torque values and use the digital torque wrench.
5.2 Өлчөө режимдерин тандоо
басыңыз M button to cycle through the three measurement modes:
- Track (T) Mode: Displays the real-time torque value as it is applied.
- Peak Hold (P) Mode: Иштөө учурунда колдонулган максималдуу момент маанисин тартып алат жана көрсөтөт.
- Preset (Pre) Mode: Allows setting a target torque value. The wrench will alert you when 80% of the target is reached (intermittent buzzer and flashing LED) and when the target is reached or exceeded (continuous buzzer and solid LED).

Image 5.2: Illustration of the three measurement modes: Track, Peak Hold, and Preset.

Image 5.3: Visual representation of the buzzer and LED alerts when approaching and reaching the target torque in Peak/Preset modes.
5.3 Switching Torque Units
басыңыз U/S жеткиликтүү момент бирдиктерин айландыруу үчүн баскыч:
- N.m (Newton-meter)
- ft.lbf (Foot-pound force)
- in.lbf (Inch-pound force)
- kgf.cm (Kilogram-force centimeter)

Image 5.4: Display showing the four selectable torque units.
5.4 Attaching and Detaching Sockets
The wrench features a 1/2-inch drive ratcheting head with a push-button mechanism for secure socket attachment and easy release. Simply press the button to insert or remove a socket.

Image 5.5: Demonstration of the bidirectional ratcheting head and push-button socket release.
5.5 Data Recording and Retrieval
The wrench can store up to 999 torque measurement records.
- Дайындарды сактоо: After a torque measurement, press the M button to save the reading.
- Retrieving Data: көпкө басыңыз M button to enter data retrieval mode. Use the ЖОГОРУ/ТӨМӨН buttons to browse through saved records.
- Маалыматтарды жок кылуу: In data retrieval mode, press the U/S button to access deletion options ("ALL" for all data, "ONE" for individual records). Confirm deletion by pressing the M button. A "SUCC" message indicates successful deletion.
Video 5.6: Demonstration of data saving, retrieval, and deletion functions.
6. Техникалык тейлөө
- Тазалоо: Ар бир колдонгондон кийин ачкычты жумшак, кургак чүпүрөк менен сүртүңүз. Абразивдүү тазалоочу каражаттарды же эриткичтерди колдонбоңуз.
- Сактагыч: Ачкычты коргоочу кутучасында кургак, салкын жерде, күн нуру түз тийбеген жана өтө жогорку температурадан алыс сактаңыз.
- Батареяны алмаштыруу: Replace batteries when the low battery indicator appears on the display. Remove batteries if the wrench will not be used for an extended period.
- Калибрлөө: Digital torque wrenches require periodic calibration to maintain accuracy. Refer to a professional calibration service for this procedure.
7. Кыйынчылыктарды
| Көйгөй | Мүмкүн себеп | Чечим |
|---|---|---|
| Ачкыч күйбөйт. | Батареялар аз же түгөндү. Батарея туура эмес орнотулган. | Replace batteries with new ones. Ensure batteries are inserted with correct polarity. |
| Туура эмес момент окуулары. | Wrench needs calibration. Damage from impact. | Contact a professional calibration service. Avoid dropping the wrench. |
| Дисплей күңүрт же бүлбүлдөп турат. | Батареянын кубаттуулугу төмөн. | Батареяларды алмаштырыңыз. |
| Buzzer/LED alerts not working. | Settings may be disabled or faulty. | Check settings in the manual. If problem persists, contact support. |
8. Техникалык шарттар
| Өзгөчөлүк | Деталь |
|---|---|
| Модел | GM200-JP |
| Өлчөө диапазону | 6-200 Нм |
| Drive Size | 1/2 дюйм |
| Тактык | Clockwise: ±2%, Counter-clockwise: ±2.5% |
| Ratcheting Head | 72-tooth, Bidirectional |
| Өлчөө режимдери | Track (T), Peak Hold (P), Preset (Pre) |
| Бирдиктер | Нм, фут.фунт.фунт, дюйм.фунт.фунт, кгс.см |
| Маалыматтарды сактоо | 999 XNUMX жазууга чейин |
| Дисплей | Арткы жарык менен санарип LCD |
| Power Source | 2 x AAA батареялары |
| Авто өчүрүү | 2 мүнөт аракетсиздиктен кийин |
| Материал | Carbon Steel |
| Узундук | 53.5 см |
| Салмагы (пакет) | 1.8 кг |

Image 8.1: Detailed specifications table for various GOYOJO digital torque wrench models.
9. Кепилдик жана колдоо
Your GOYOJO Digital Torque Wrench comes with a 1 жылдык сапат кепилдиги from the date of purchase. In the event of an initial defect, we offer free exchange or refund.
For any issues or inquiries during use, please contact our customer support with your order number and product model number. Our specialized staff will provide assistance.
For further support, you may visit the official GOYOJO Store on Amazon: GOYOJO Japan Store


