1. Киришүү
This manual provides detailed instructions for the installation, operation, and maintenance of your autoabc 12.3 Inch Wireless CarPlay/Android Auto Multimedia Linux Touchscreen. This device is designed to enhance your in-car experience by integrating modern connectivity features while retaining your vehicle's original functionalities.
2. Шайкештик
This product is compatible with specific Mercedes Benz models equipped with NTG5.0, NTG5.1, and NTG5.2 systems. Please verify your vehicle's system before installation.
- Mercedes Benz GLC Class X253 (2015-2018)
- Mercedes Benz GLA Class X156 (2016-2018)
- Mercedes Benz CLA Class C117 (2016-2018)
- Mercedes Benz A Class (2016-2018)
- Mercedes Benz C Class W205 (C180, C200, C220, C250, C320, C43 AMG, C63 AMG, C63 GLS, C650)
Маанилүү эскертүү:
Бул аппарат болуп саналат туура келбейт with NTG4.0, NTG4.5, or NTG4.7 systems. Please ensure your original car system matches the compatible versions. If unsure, consult a professional or contact customer support.

Image: Compatibility chart for Mercedes Benz NTG systems. The image displays examples of NTG5.0/5.1/5.2 as compatible and NTG4.5/4.7 and NTG4.0 as incompatible, with corresponding screen visuals.
3. Продукт бүтүп калдыview жана өзгөчөлүктөрү
The autoabc 12.3 Inch Multimedia Linux Touchscreen upgrades your vehicle's display with a high-definition screen and integrated smart features.
- Зымсыз CarPlay/Android Auto: Seamlessly integrate your smartphone for navigation, calls, messages, and music via voice assistant.
- HD 12.3 Inch Screen: Features a 1920x720 resolution LED display for an enhanced visual experience. Supports screen projection for photos and videos.
- Original Car Function Retention: Maintains all original vehicle functions, including radio, booster, joystick controls, rear view camera, and display of speed, fuel level, oil pressure, and safety warnings.
- Камера функциясы: Supports factory original reverse camera parking radar, aftermarket reverse cameras, and 360-degree cameras. Includes support for front view камера DVR (CVBS киргизүү).

Image: Comparison of the car's dashboard before and after installing the autoabc 12.3-inch touchscreen, highlighting the larger display and new interface.

Image: Four-panel display showing the screen's capabilities with CarPlay, Android Auto, Airplay, and Autolink, demonstrating smartphone integration.

Image: Illustration of the camera functions, including front camera view, parking assist lines, and a 360-degree overhead view of a car, indicating support for various camera systems.

Image: Six panels demonstrating the retention of original car functions: car system, CD/DVD player, steering wheel control, horn speaker sound output, reversing camera, and iDrive rotation button.
4. Орнотуу жана орнотуу
Installation of this unit typically involves replacing the original screen and connecting the provided cables. While designed for ease of installation, professional assistance is recommended if you are unfamiliar with car electronics.
4.1. Орнотууга чейинки текшерүү
- Confirm your vehicle's NTG system version (NTG5.0, NTG5.1, or NTG5.2).
- Ensure all components listed in the "What's in the Box" section are present.
- Орнотууну баштоодон мурун унаанын аккумуляторун ажыратыңыз.
4.2. General Installation Steps (Consult a professional or installation video for detailed steps)
- Carefully remove the original car screen and trim panels.
- Connect the provided power cable and LVDS/USB cable to the new unit and the vehicle's wiring harness.
- If applicable, install the bracket for the new screen.
- Route all cables neatly to avoid interference.
- Mount the new 12.3-inch touchscreen in place.
- Reconnect the vehicle's battery and test all functions before reassembling the trim.
Эскертүү:
If you are unsure about the installation process, it is highly recommended to seek assistance from a qualified car workshop or refer to official installation videos provided by the manufacturer.
5. Иштөө нускамалары
5.1. Системалардын ортосунда которулуу
The unit allows seamless switching between the new Linux system and the original car system.
- To access the Linux system (CarPlay, Android Auto, AirPlay, Autolink), select the corresponding icon on the main interface.
- To return to the original car system, select the "Original car" icon or use the designated button/control as per your vehicle's original setup.
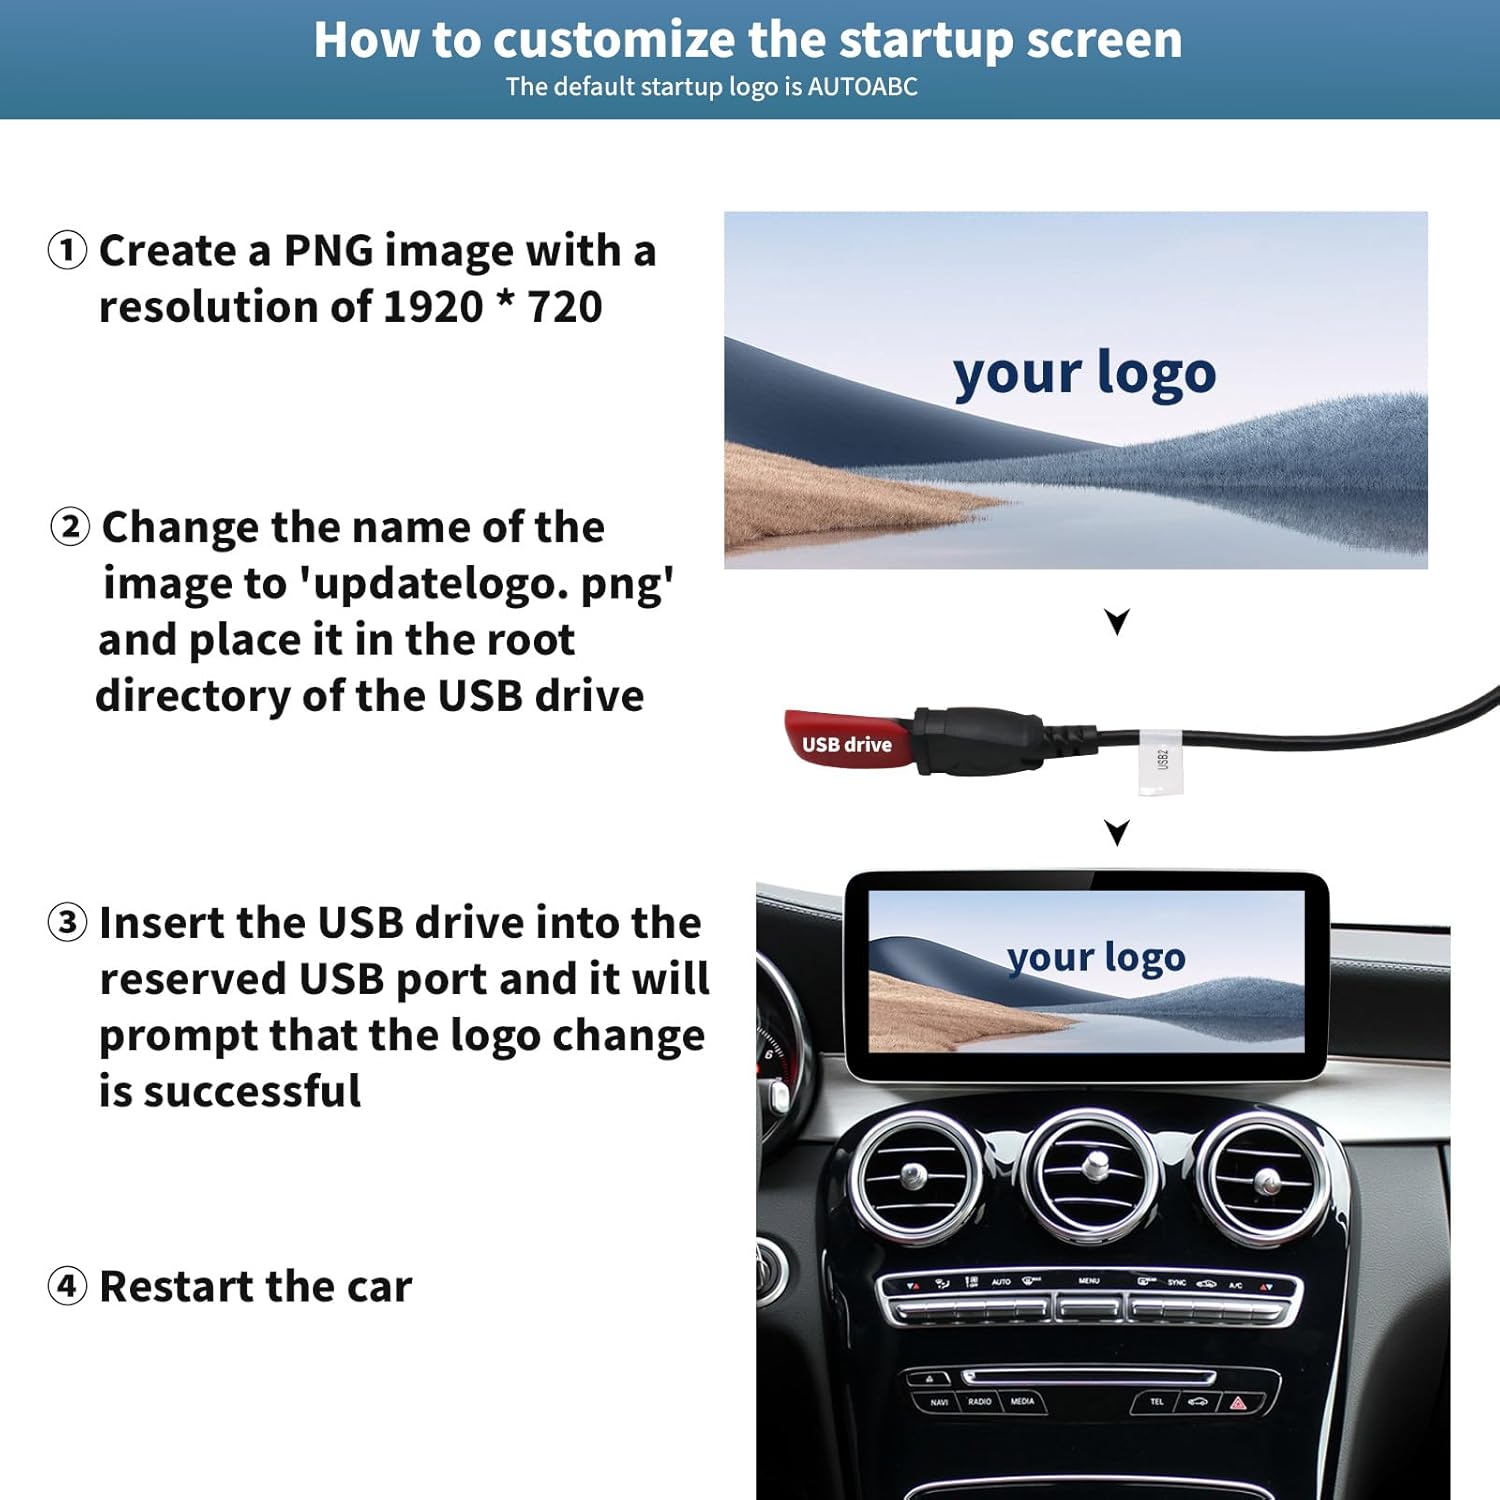
Image: Flowchart illustrating the process of switching between the new Linux system interface (showing CarPlay, Android Auto, AirPlay, Autolink icons) and the original car system interface (showing radio frequencies).
5.2. Зымсыз CarPlay / Android Auto
Wireless CarPlay же Android Auto колдонуу үчүн:
- Смартфонуңузда Bluetooth иштетилгенин текшериңиз.
- On the car screen, navigate to the CarPlay or Android Auto section.
- Издөө and connect to the device's Bluetooth name from your phone's Bluetooth settings.
- Follow any on-screen prompts on both your phone and the car display to establish the connection.
Once connected, you can access navigation, phone contacts, email, notifications, and music directly on the touchscreen.
5.3. Камеранын функциялары
Система автоматтык түрдө арткы жагын көрсөтөт view when the vehicle is in reverse gear. You can also access front camera or 360-degree camera views if installed and configured.
5.4. Башкаруу ыкмалары
Система бир нече башкаруу ыкмаларын колдойт:
- Сенсордук экран: Directly interact with the 12.3-inch display.
- Original Joystick Controls: Utilize your vehicle's existing joystick or rotary controller.
- Рулдун башкаруу элементтери: Use your steering wheel buttons for audio control and other functions.
6. Ыңгайлаштыруу
6.1. Customizing the Startup Screen Logo
You can personalize the startup screen with a custom logo.
- 1920 x 720 пиксел чечилишиндеги PNG сүрөтүн түзүңүз.
- Сүрөттүн атын өзгөртүү file чейин 'updatelogo.png'.
- Муну кой file in the root directory of a USB drive.
- Insert the USB drive into the reserved USB port on the unit. The system will prompt you when the logo change is successful.
- Жаңы ишке киргизүү логотибин колдонуу үчүн унааны өчүрүп-күйгүзүңүз.

Image: Step-by-step visual guide on how to customize the startup screen logo using a USB drive with a 1920x720 PNG image named 'updatelogo.png'.
7. Продукт жөнүндө маалымат жана спецификациялар
7.1. Кутуда эмне бар
- autoabc 12.3 Inch Multimedia Linux Touchscreen
- Электр кабели
- LVDS/USB Cable
- Bracket (for specific models, if required)
- Колдонуучунун Колдонмосу (бул документ)

Image: Display of the product components: the main screen unit (front and back views), power cable, LVDS/USB cable, and mounting bracket.
7.2. Техникалык шарттар
- Модель номери: AR-X123
- Экрандын өлчөмү: 12.3 дюйм
- Чечим: 1920 x 720 HD LED
- Операция системасы: Linux
- Байланыш: Wireless CarPlay, Android Auto, AirPlay, Autolink, Bluetooth, USB
- Аудио чыгаруу режими: Стерео
- Көлөмдүү үн каналынын конфигурациясы: 4.0
- Video Encoding Support: H.264, H.265/HEVC, VP9, AV1, MPEG-4
- Элемент Салмагы: 2.2 фунт
- Өндүрүүчү: автоабк
8. Техникалык тейлөө
To ensure the longevity and optimal performance of your autoabc touchscreen, follow these maintenance guidelines:
- Тазалоо: Экранды тазалоо үчүн жумшак, түксүз чүпүрөктү колдонуңуз. өжөр тактар үчүн, жеңил гampчүпүрөккө суу же экранды тазалоочу каражат. Катуу химиялык заттардан же абразивдүү материалдардан алыс болуңуз.
- Температура: Түзмөктү узак убакыт бою өтө жогорку температурага дуушар кылбаңыз.
- Программалык камсыздоо жаңыртуулары: Мезгил-мезгили менен өндүрүүчүнүн текшерүү website or contact support for any available software updates to ensure optimal performance and compatibility.
- Кабелдик байланыштар: Ensure all cables remain securely connected. Avoid pulling on cables forcefully.
9. Кыйынчылыктарды
If you encounter issues with your autoabc touchscreen, refer to the following common troubleshooting steps:
- Кубат жок:
- Бардык электр кабелдеринин туташууларынын бекем экенин текшериңиз.
- Унаанын аккумулятору туура туташтырылганын жана заряддалганын текшериңиз.
- Check relevant fuses in your vehicle's fuse box.
- Үн жок:
- Ensure the volume on both the unit and your vehicle's original audio system is turned up.
- Confirm the audio input source is correctly selected (e.g., AUX, Bluetooth).
- If using Bluetooth, ensure your phone is properly paired and connected.
- CarPlay/Android Auto туташпай жатат:
- Смартфонуңузда Bluetooth жана Wi-Fi иштетилгенин текшериңиз.
- Телефонуңуздун Bluetooth жөндөөлөрүнөн түзмөктү унутуп, кайра жупташтырыңыз.
- Restart both your phone and the car's multimedia system.
- Check for any software updates for your phone's operating system or the car unit.
- Экран тийүүгө жооп бербей жатат:
- Бөлүктү өчүрүп-күйгүзүңүз.
- Экран таза жана таштандылардан таза экенин текшериңиз.
- Original Car Functions Not Working:
- Verify all original wiring harness connections are correctly made.
- Ensure the unit is properly switched to the "Original car" system mode.
If these steps do not resolve the issue, please contact autoabc customer support for further assistance.
10. Кепилдик жана колдоо
autoabc provides a one-year global warranty for this product, covering manufacturing defects and malfunctions under normal use. Additionally, lifetime technical service support is available.
- Кепилдик мөөнөтү: Сатып алган күндөн тартып 1 жыл.
- Техникалык колдоо: Lifetime online technical support via Amazon email.
For any questions, problems, or technical assistance, please contact autoabc customer support through Amazon's messaging system. Please have your product model number (AR-X123) and purchase details ready when contacting support.

Image: Graphic detailing customer support availability, including 24-hour response, 60-day return policy, 12-month replacement, and lifetime technical support.


