1. Киришүү
This manual provides essential information for the safe and effective operation of your VICTOR 8145C Digital Bench Multimeter. The VICTOR 8145C is a high-precision, 4½-digit (22000 count) bench-type multimeter featuring True RMS measurement, auto-ranging capabilities, and a large LCD display with backlight. It is designed for accurate electrical measurements in both laboratory and mobile service environments, offering a wide range of functions including DC/AC voltage and current, resistance, capacitance, frequency, and temperature.
Please read this manual thoroughly before using the device to ensure proper handling, optimal performance, and safety.
2. Коопсуздук маалыматы
WARNING: To avoid electric shock or personal injury, please read and understand all safety information before using this multimeter.
- Мультиметрди колдонуудан мурун, анын жакшы абалда экенин жана эч кандай бузулуулары жок экенин текшериңиз.
- Колдонбоңуз томtage or current that exceeds the maximum specified limits for the selected range. The device is rated CAT III 600V.
- Use only the test leads provided or approved replacements. Ensure test leads are fully seated into the input jacks.
- Never use the multimeter if the test leads are damaged or if the meter itself appears damaged.
- Том менен иштөөдө этият болуңузtag30V AC RMS, 42V пик же 60V DC жогору. Бул томtagшок коркунучун жаратат.
- Электр чынжырын электр кубатынан ажыратып, бардык жогорку вольттогу чыңалуудагы розеткаларды разряддаңызtagкаршылыкты, үзгүлтүксүздүктү, диодду же сыйымдуулукту өлчөөдөн мурун e конденсаторлор.
- Мультиметрди жарылуучу газ, буу же чаңдуу чөйрөдө иштетпеңиз.
- Always select the correct function and range before making a measurement.
- Өлчөө учурунда манжаларды сыноо зонддорунун манжаларынын артына кармаңыз.
3. Пакеттин мазмуну
Carefully unpack the VICTOR 8145C Digital Bench Multimeter and check for the following items:
- VICTOR 8145C Digital Bench Multimeter
- Сыноочу (Кызыл жана Кара)
- Электр кабели
- USB байланыш кабели
- PC Software CD
- User Manual
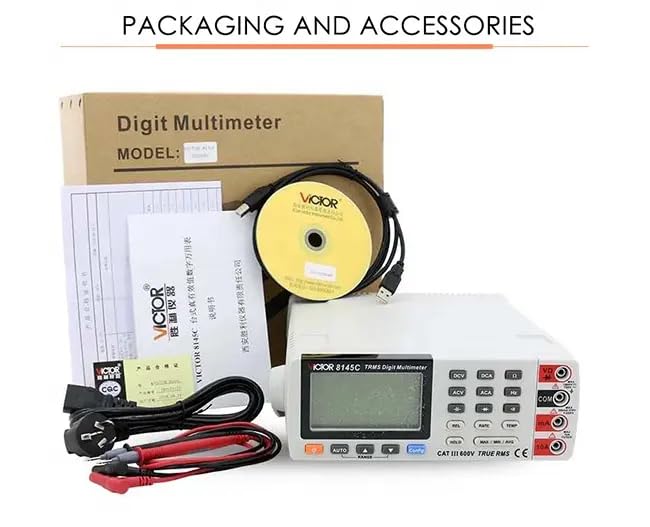
Figure 3.1: The image displays the product packaging and the accessories that come with the VICTOR 8145C, including the multimeter, test leads, power cord, USB cable, software CD, and user manual.
4. Продукт бүтүп калдыview
4.1 алдыңкы панели
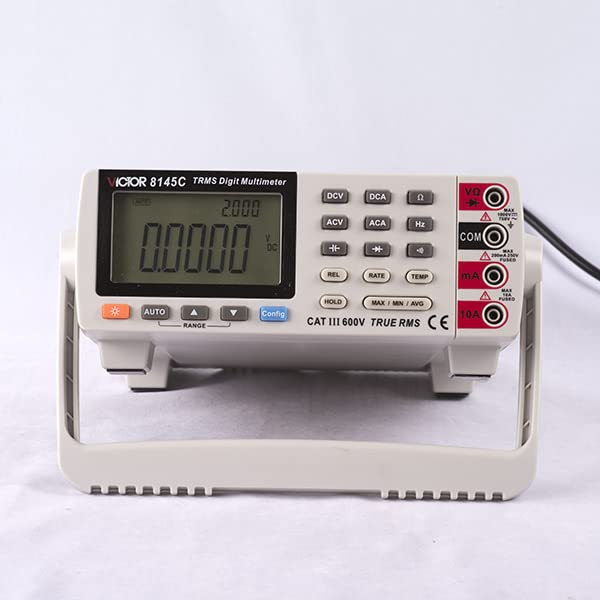
Figure 4.1: This image shows the front panel of the VICTOR 8145C Digital Bench Multimeter, highlighting its large LCD screen, function buttons, and input terminals.
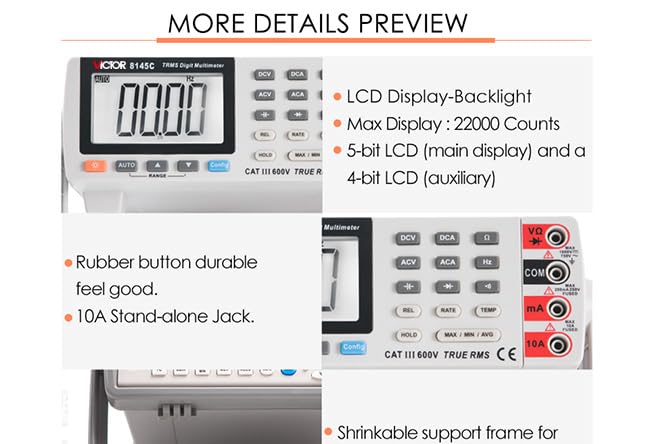
Сүрөт 4.2: Жакын пландан view highlighting the multimeter's LCD display with backlight, 22000 count capability, durable rubber buttons, and the 10A stand-alone input jack.
- LCD дисплей: Large, backlit display with a maximum count of 22000. Features a 5-bit main display for primary readings and a 4-bit auxiliary display for secondary information.
- Функция баскычтары: Dedicated buttons for selecting measurement types (DCV, DCA, ACV, ACA, Hz, TEMP) and special functions (REL, RATE, HOLD, MAX/MIN/AVG, Config).
- AUTO/RANGE Buttons: For automatic or manual range selection.
- Киргизүү уячалары:
- VΩ: Том үчүн киргизүүtagд, каршылык, сыйымдуулук, жыштык, диод жана үзгүлтүксүздүк өлчөө.
- COM: Бардык өлчөөлөр үчүн жалпы (жерге орнотулган) киргизүү.
- mA: Milli үчүн киргизүүampучурдагы өлчөөлөр.
- 10A: Жогорку ток (10А чейин) өлчөө үчүн киргизүү.
4.2 Арткы панель
The rear panel typically includes the main power switch, AC power input, and a USB port for PC connectivity.
4.3 Негизги өзгөчөлүктөрү
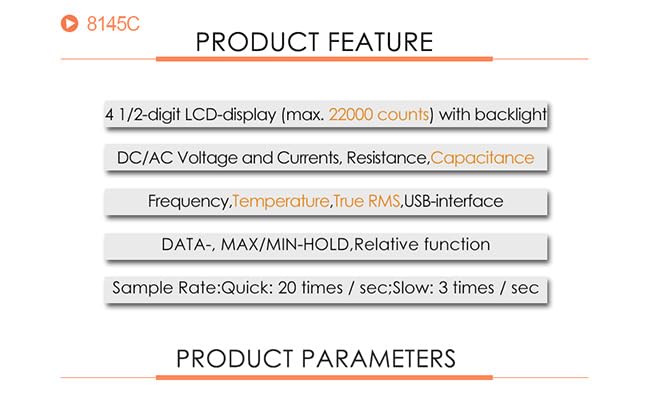
Figure 4.3: This graphic summarizes the main features of the VICTOR 8145C, including its 4 1/2-digit LCD, measurement capabilities (DC/AC Voltage, Current, Resistance, Capacitance, Frequency, Temperature, True RMS), USB interface, and data functions.
- 4½-digit LCD display (max. 22000 counts) with backlight.
- Чаралар DC/AC Voltage and Currents, Resistance, Capacitance, Frequency, and Temperature.
- Синусоидалык эмес толкун формаларын так окуу үчүн чыныгы RMS өлчөө.
- USB interface for PC connectivity and data logging.
- DATA HOLD, MAX/MIN/AVG, and Relative function.
- Sample Rate: Quick (20 times/sec) and Slow (3 times/sec).
5. Техникалык шарттар

Figure 5.1: A detailed table outlining the technical specifications of the VICTOR 8145C Digital Bench Multimeter, including measurement ranges, basic accuracy, display words, and special functions.
| Өзгөчөлүк | Description |
|---|---|
| Дисплей | 22000 Counts, 4½-digit LCD with backlight |
| DC Voltage Диапазон | 200 мВ / 2 В / 20 В / 200 В / 1000 В |
| DC Voltage Basic Accuracy | ±(0.05%+4dgt) |
| AC Voltage Диапазон | 200 мВ / 2 В / 20 В / 200 В / 750 В |
| AC Voltage Basic Accuracy | ±(0.5%+40dgt) |
| DC ток диапазону | 0.2mA / 2mA / 20mA / 200mA / 10A |
| DC Current Basic Accuracy | ±(0.2%+10dgt) |
| AC ток диапазону | 0.2mA / 2mA / 20mA / 200mA / 10A |
| AC Current Basic Accuracy | ±(0.8%+30dgt) |
| Каршылык диапазону | 200Ω / 2kΩ / 20kΩ / 200kΩ / 2MΩ / 20MΩ / 60MΩ |
| Resistance Basic Accuracy | ±(0.2%+5dgt) |
| Кубаттуулук диапазону | 10nF / 100nF / 1000nF / 10uF / 100uF / 1000uF |
| Capacitance Basic Accuracy | ±(5%+5dgt) |
| Жыштык диапазону | 10Hz ~ 10MHz |
| Frequency Basic Accuracy | ±(0.02%+4dgt) |
| Термопар диапазону | K indexing: -200.0°C ~ 1372.0°C |
| Thermocouple Basic Accuracy | ±(0.5%+5°C) |
| Ченөө чени | Quick: 20 times/sec; Slow: 2.5 times/sec |
| Automatic / Manual Range | Ооба |
| Чыныгы RMS | Ооба |
| өткөрүү жөндөмдүүлүгү | 1кГц |
| Диод сыноо | Ооба |
| Үзгүлтүксүздүк сигналы | Ооба |
| MAX / MIN / AVG | Ооба |
| Салыштырмалуу баалуулукту өлчөө | Ооба |
| Маалыматтарды кармоо | Ооба |
| Reference Junction Compensation | Ооба |
| °C / °F Conversion | Ооба |
| Power Source | AC Power (1 LR41 battery included for internal functions) |
| Продукциянын өлчөмдөрү (L x W x Y) | 20 x 15 x 18 см (7.87 x 5.91 x 7.09 дюйм) |
| Элемент Салмагы | 1 кг (2.2 фунт) |
| Өндүрүүчү | Xi'an Beicheng Electronics Co.Ltd (VICTOR and Ruoshui) |
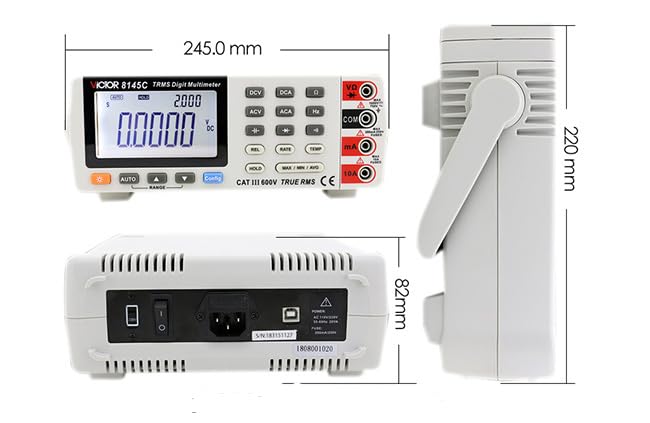
Figure 5.2: This diagram illustrates the physical dimensions of the VICTOR 8145C Digital Bench Multimeter, showing its length, width, and height in millimeters.
6. Орнотуу
6.1 Кубат туташтыруу
- Ensure the multimeter's power switch (located on the rear panel) is in the OFF position.
- Connect the provided power cord to the AC power input on the rear panel of the multimeter.
- Электр шнурунун экинчи учун ылайыктуу AC розеткага сайыңыз.
- Flip the power switch to the ON position to power on the device.
6.2 Сыноо линиясынын туташуу
Always connect the test leads to the appropriate input jacks based on the measurement you intend to perform.
- Көпчүлүк өлчөөлөр үчүн (томtage, resistance, capacitance, frequency, diode, continuity): Insert the red test lead into the VΩ Жек жана кара сыноочу жетек COM джек.
- Милли үчүнampere current measurements: Insert the red test lead into the mA Жек жана кара сыноочу жетек COM джек.
- For high current (up to 10A) measurements: Insert the red test lead into the 10A Жек жана кара сыноочу жетек COM джек.
6.3 USB Connection (Optional)
To connect the multimeter to a computer for data logging or control:
- Install the provided PC software from the CD onto your computer.
- Connect one end of the USB communication cable to the USB port on the rear panel of the multimeter.
- USB кабелинин экинчи учун компьютериңиздеги жеткиликтүү USB портуна туташтырыңыз.
- Follow the instructions in the PC software manual for establishing communication and using data logging features.
7. Иштөө нускамалары
7.1 Өлчөөнүн негизги кадамдары
- Ensure the multimeter is powered on and test leads are correctly connected for the desired measurement type.
- Select the appropriate function by pressing the corresponding button (e.g., DCV for DC Voltagжана).
- The multimeter will typically operate in auto-ranging mode. If manual ranging is desired, press the RANGE button to cycle through available ranges.
- Сыноо зонддорун текшерилип жаткан схемага же компонентке туташтырыңыз.
- LCD дисплейдеги өлчөө маанисин окуңуз.
- Disconnect the test probes from the circuit after measurement.
7.2 Өзгөчө өлчөө функциялары
- DC/AC Voltage (DCV/ACV): басыңыз DCV or ACV button. Connect probes in parallel with the circuit.
- DC/AC Current (DCA/ACA): басыңыз DCA or ACA button. Connect probes in series with the circuit. Ensure correct jack (mA or 10A) is used.
- Каршылык (Ω): басыңыз Ω button. Disconnect power from the circuit. Connect probes across the component.
- Сыйымдуулук (F): басыңыз F button. Disconnect power and discharge the capacitor before connecting probes.
- Жыштык (Гц): басыңыз Hz button. Connect probes to the signal source.
- Температура (TEMP): басыңыз ТЕМП button. Connect a K-type thermocouple (not included) to the appropriate input terminals.
- Диод сыноо: басыңыз Диод button. Connect probes across the diode. Forward bias will show a voltage drop, reverse bias will show OL.
- Үзгүлтүксүздүк тести: басыңыз Үзгүлтүксүздүк button. Connect probes across the circuit. A beep indicates continuity (low resistance).
7.3 Атайын функциялар
- КОЛДО: басыңыз БЕРҮҮ Учурдагы көрсөткүчтү дисплейде тоңдуруу үчүн баскычты басыңыз. Бошотуу үчүн кайра басыңыз.
- МАКС/МИН/ОРТОЧО: басыңыз MAX / MIN / AVG button to record the maximum, minimum, and average values over a period. Press repeatedly to cycle through MAX, MIN, AVG, and exit.
- REL (Relative Measurement): басыңыз REL button to store the current reading as a reference value. Subsequent measurements will be displayed as the difference from this reference. Press again to exit.
- Конфигурация: Used for advanced settings and configurations, refer to the detailed software manual for specific options.
8. Техникалык тейлөө
8.1 Тазалоо
Мультиметрди тазалоо үчүн корпусту жарнама менен сүртүңүзamp cloth and a mild detergent. Do not use abrasives or solvents. Ensure the device is powered off and disconnected from all power sources before cleaning.
8.2 Battery Replacement (Internal)
The multimeter includes an LR41 battery, typically for internal memory or clock functions. If the display shows signs of memory loss or incorrect time (if applicable), this battery may need replacement. This procedure should ideally be performed by qualified personnel to avoid damaging internal components.
8.3 Сактагычты алмаштыруу
If the current measurement function fails, the internal fuse may need replacement. Refer to the detailed service manual or contact customer support for fuse specifications and replacement procedures. Always replace with a fuse of the identical type and rating.
8.4 Сактоо
When not in use for extended periods, store the multimeter in a dry, dust-free environment, away from direct sunlight and extreme temperatures. Disconnect all test leads and the power cord.
9. Кыйынчылыктарды
| Көйгөй | Мүмкүн себеп | Чечим |
|---|---|---|
| Күйгүзүлгөндө дисплей жок | No AC power; Power cord loose; Power switch off | Check AC power connection; Ensure power switch is ON. |
| Туура эмес окуулар | Wrong function/range selected; Poor test lead connection; Damaged test leads | Select correct function/range; Reconnect test leads firmly; Inspect/replace test leads. |
| Учурдагы өлчөө иштебей жатат | Blown fuse; Incorrect jack used | Check/replace fuse (refer to service manual); Ensure red lead is in mA or 10A jack. |
| Continuity beeper not working | Circuit resistance too high; Beeper function not selected | Ensure circuit resistance is low; Select continuity function. |
| USB байланышы катасы | Driver not installed; Loose USB cable; Software issue | Install USB drivers from CD; Reconnect USB cable; Consult software manual. |
10. Кепилдик жана колдоо
For warranty information, please refer to the documentation provided at the time of purchase or contact your retailer. The manufacturer of this product is Xi'an Beicheng Electronics Co.Ltd (VICTOR and Ruoshui).
If you encounter any issues not covered in this manual or require technical assistance, please contact the seller or authorized service center for support.


