Продукт бүттүview
The ID-COOLING FROZN A400 ARGB is a high-performance air CPU cooler designed for efficient heat dissipation and aesthetic appeal. It features advanced cooling technology and vibrant ARGB lighting to enhance your PC build.
- Better Heat Dissipation: Equipped with 4 heat pipes and a 92mm PWM fan for excellent CPU cooling.
- Эстетикалык кайрылуу: Premium ARGB CPU air cooler designed to blend seamlessly into PC cases, especially those with dark interiors.
- ARGB жарыктандыруу: Vibrant lighting effects provided by ARGB lighting on the top cover and fan.
- RAM Compatibility: Single tower design ensures perfect compatibility with RAM modules.
- 4 Heat Pipes: Four Φ6mm copper heat pipes efficiently absorb and transfer heat from the CPU to the heatsink.
- PWM Functional: The 92mm PWM fan offers low-noise operation and automatic speed control for ultra-quiet and extreme cooling performance. Max. Air Flow: 45.8CFM; Noise Level: 25.8dB(A) Max.
- Эч кыйынчылыксыз орнотуу: Designed for straightforward installation on both Intel and AMD sockets.
- Шайкештик: Supports Intel LGA1851/1700/1200/1150/1151/1155/1156; AMD AM5/AM4.

Figure 1: ID-COOLING FROZN A400 ARGB CPU Cooler with vibrant ARGB lighting.
Кутуда эмне бар
The ID-COOLING FROZN A400 ARGB package includes the following components:
- Жылыткыч
- Cooling Fan (92x92x25mm PWM Fan)
- Mounting Hardware (for Intel LGA1851/1700/1200/115X and AMD AM5/AM4)
- Термикалык май
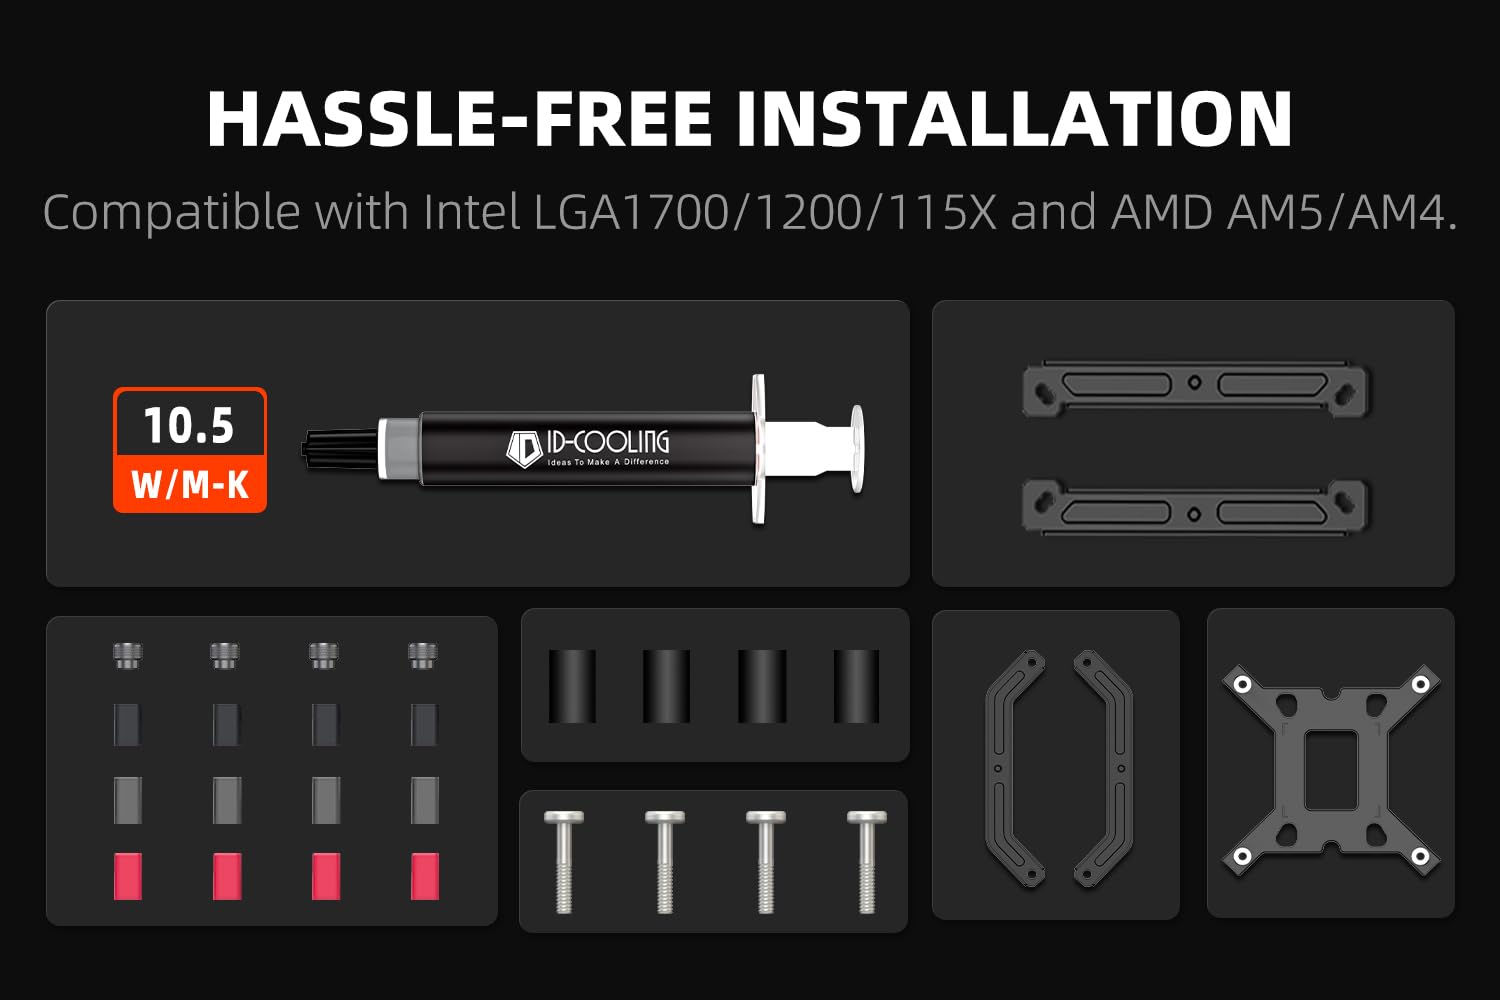
Figure 2: Included mounting hardware, thermal paste, heatsink, and fan.
Техникалык шарттар
| Өзгөчөлүк | Деталь |
|---|---|
| Продукциянын өлчөмдөрү | 3.66 x 3.07 x 4.84 дюйм |
| Салмагы | 1.76 фунт |
| Жылуулук түтүктөрү | 4 x Φ6mm Copper Heatpipes |
| Fan Size | 92x92x25мм |
| Fan Speed | 2200 RPM чейин |
| Аба агымынын кубаттуулугу | 45.8 ТЧЖЖ (Max) |
| Ызы-чуу деңгээли | 25.8 дБ(А) (макс.) |
| Power Connector | 4-пин PWM |
| Тtage | 12 вольт |
| Муздатуу ыкмасы | Аба |
| TDP | 180 Вт |
| Шайкештик | Intel LGA1851/1700/1200/1150/1151/1155/1156; AMD AM5/AM4 |
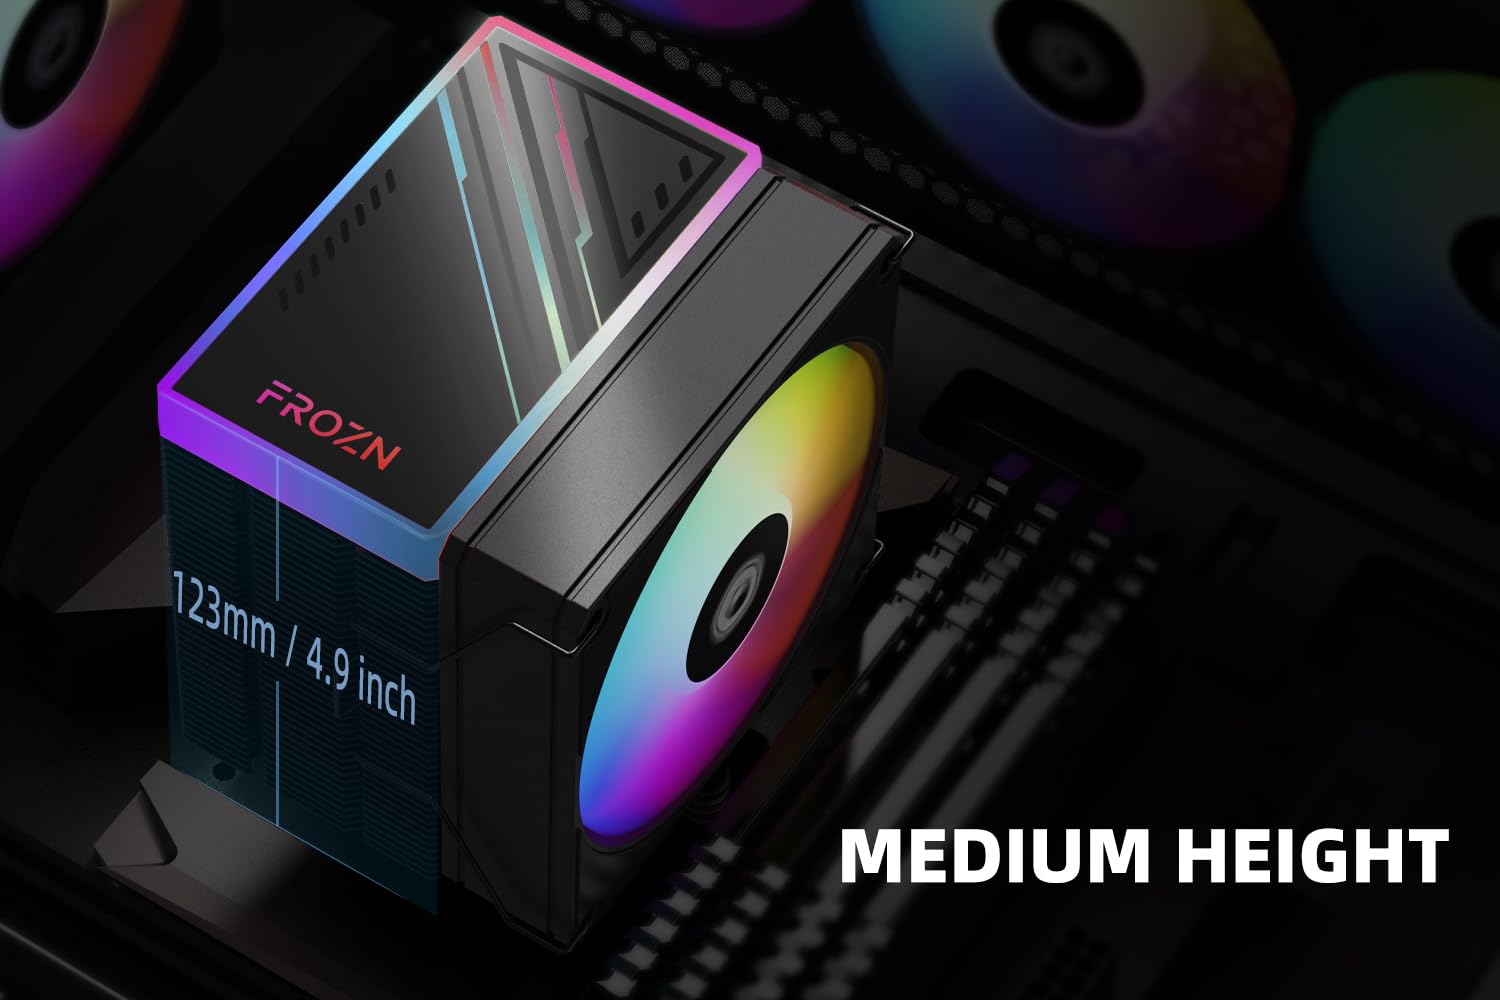
Figure 3: The compact 123mm height of the cooler ensures compatibility with most tower cases.
Орнотуу жана орнотуу
This section provides detailed instructions for installing your ID-COOLING FROZN A400 ARGB CPU Cooler. Please follow the steps carefully for proper installation.
Жалпы орнотуу видео көрсөтмөсү
Video 1: Official installation guide for FROZN Single Tower Series CPU Coolers. This video demonstrates the step-by-step process for mounting the cooler on various CPU sockets.
Installation for Intel LGA1700 Sockets
- Prepare the Backplate: Move the screws of the Intel Backplate to the outside position. Install the backplate on the back of the motherboard.
Figure 4: Position the Intel backplate correctly on the motherboard.
- Install Standoffs and Brackets: Install the rubber spacers, then the black LGA 1700 standoffs. Place the Intel brackets over the standoffs and secure them with the tightening nuts.
- Термикалык пастаны колдонуу: Clean the CPU surface thoroughly. Apply a small amount of thermal paste to the center of the CPU's integrated heat spreader (IHS).

Figure 5: Apply thermal paste to the CPU surface before mounting the heatsink.
- Жылыткычты орнотуу: Remove the protective sticker from the heatsink's base. Carefully align the heatsink with the CPU and the mounting screws, then gently lower it into place. Tighten the screws in a diagonal pattern until secure.

Figure 6: The heatsink features 4 direct-contact heat pipes for efficient heat transfer.
- Желдеткичти тиркөө: Use the provided fan clips to secure the 92mm PWM fan to the heatsink. Ensure the fan is oriented correctly for optimal airflow (usually blowing towards the rear of the case). Connect the 4-PIN fan cable to the CPU_FAN header on your motherboard.

Figure 7: The high-efficient fan provides strong airflow and low-noise operation.
Installation for Intel LGA1200/115X Sockets
- Prepare the Backplate: Move the screws of the Intel Backplate to the inside position. Install the backplate on the back of the motherboard.
- Install Standoffs and Brackets: Install the rubber spacers, then the grey LGA 1200 standoffs. Place the Intel brackets over the standoffs and secure them with the tightening nuts.
- Термикалык пастаны колдонуу: Clean the CPU surface thoroughly. Apply a small amount of thermal paste to the center of the CPU's integrated heat spreader (IHS).
- Жылыткычты орнотуу: Remove the protective sticker from the heatsink's base. Carefully align the heatsink with the CPU and the mounting screws, then gently lower it into place. Tighten the screws in a diagonal pattern until secure.
- Желдеткичти тиркөө: Use the provided fan clips to secure the 92mm PWM fan to the heatsink. Ensure the fan is oriented correctly for optimal airflow. Connect the 4-PIN fan cable to the CPU_FAN header on your motherboard.
Installation for AMD AM4/AM5 Sockets
Note: The original backplate of the motherboard is needed for AMD installations!
- Remove Plastic Retention: Remove the plastic retention module from the motherboard, but keep the stock backplate.
- Install Standoffs and Brackets: Put the AMD red standoffs onto the backplate. Then, place the AMD brackets over the standoffs and tighten them with the provided tightening screws.
- Термикалык пастаны колдонуу: Clean the CPU surface thoroughly. Apply a small amount of thermal paste to the center of the CPU's integrated heat spreader (IHS).
- Жылыткычты орнотуу: Remove the protective sticker from the heatsink's base. Carefully align the heatsink with the CPU and the mounting screws, then gently lower it into place. Tighten the screws in a diagonal pattern until secure.
- Желдеткичти тиркөө: Use the provided fan clips to secure the 92mm PWM fan to the heatsink. Ensure the fan is oriented correctly for optimal airflow. Connect the 4-PIN fan cable to the CPU_FAN header on your motherboard.

Figure 8: The FROZN A400 ARGB cooler installed within a PC case, showcasing its ARGB lighting.
Иштөө нускамалары
Once installed, the ID-COOLING FROZN A400 ARGB CPU Cooler operates automatically. The 92mm PWM fan will adjust its speed based on the CPU temperature, ensuring optimal cooling performance while minimizing noise.
- Желдеткичти автоматтык түрдө башкаруу: The PWM (Pulse Width Modulation) function allows the motherboard to precisely control the fan speed according to the CPU's thermal load. This ensures efficient cooling when needed and quiet operation during lighter tasks.
- ARGB жарыкты башкаруу: The ARGB lighting can typically be controlled via your motherboard's ARGB software (e.g., ASUS Aura Sync, MSI Mystic Light Sync, GIGABYTE RGB Fusion, ASRock Polychrome Sync) or a dedicated ARGB controller (not included). Refer to your motherboard manual for specific instructions on ARGB header connection and software usage.
Техникалык тейлөө
Үзгүлтүксүз техникалык тейлөө CPU муздаткычыңыздын узак иштөөсүн жана оптималдуу иштешин камсыз кылууга жардам берет.
- Чаңды тазалоо: Радиатордун канатчаларынан жана желдеткичтин калактарынан чаңды мезгил-мезгили менен кысылган аба же жумшак щетка менен тазалап туруңуз. Подшипниктерге зыян келтирбөө үчүн тазалоо учурунда желдеткич тез айланбай турганын текшериңиз.
- Термикалык пастаны кайра колдонуу: It is recommended to reapply thermal paste every 2-3 years, or if the cooler is removed and reinstalled. This ensures efficient heat transfer between the CPU and the heatsink.
- желдеткич текшерүү: Желдеткичтин эскирүү белгилерин, адаттан тыш үндөрдүн же майнаптуулуктун төмөндөшүн текшериңиз. Зарыл болсо, желдеткичти алмаштырыңыз.
Проблемаларды чечүү
If you encounter issues with your ID-COOLING FROZN A400 ARGB CPU Cooler, refer to the following common problems and solutions:
| Көйгөй | Мүмкүн себеп | Чечим |
|---|---|---|
| CPU ысып кетиши | Improper heatsink mounting, insufficient thermal paste, excessive dust buildup, poor case airflow. | Re-seat the cooler ensuring even pressure. Reapply thermal paste. Clean heatsink and fan. Improve case ventilation. |
| Fan Not Spinning / Noisy Fan | Fan cable disconnected, fan obstructed, fan bearing issue. | Check fan cable connection to CPU_FAN header. Clear any obstructions. If noise persists, consider replacing the fan. |
| ARGB жарыктандыруу иштебейт | ARGB cable disconnected, incompatible motherboard header, software issue. | Ensure ARGB cable is securely connected to a 3-pin 5V ARGB header (not 4-pin 12V RGB). Check motherboard's ARGB software settings. |
| Муздаткыч туура келбейт | Туура эмес монтаждоочу жабдык колдонулган, корпусту тазалоо маселелери. | Verify correct mounting hardware for your CPU socket. Check case specifications for CPU cooler height clearance (123mm). |
Кепилдик жана колдоо
ID-COOLING products come with a standard manufacturer's warranty. For specific warranty terms, technical support, or service inquiries, please visit the official ID-COOLING webсайтка же түздөн-түз кардарларды колдоо менен байланышыңыз.
Официалдуу Webсайт: www.idcooling.com
Көбүрөөк жардам алуу үчүн, сиз Amazon'догу продукт баракчасына кайрылсаңыз болот: ID-COOLING FROZN A400 ARGB on Amazon


