1. Продукт бүтүп калдыview
The 8Bitdo 18 Key Retro Mechanical Numpad is a versatile input device designed for both PC numpad functionality and standard calculator operations. It features a retro aesthetic, hot-swappable mechanical switches, and multiple connectivity options.

Сүрөт: алдыңкы view of the 8Bitdo 18 Key Retro Mechanical Numpad, C64 Edition, showcasing its retro design and LED display.
2. Пакеттин мазмуну
Орнотууну улантуудан мурун, таңгактагы бардык буюмдардын бар экенин текшериңиз:
- 8Bitdo 18 Key Retro Mechanical Numpad
- 2.4G зымсыз адаптер
- USB-C Cable
- Instruction Manual

Image: The 8Bitdo Numpad alongside its packaging and included accessories, such as the 2.4G adapter and USB-C cable.
3. Орнотуу жана туташуу
3.1 Charging the Numpad
The numpad is equipped with a rechargeable Lithium Polymer battery. A full charge takes approximately 4 hours and provides up to 160 hours of use.
- Connect the supplied USB-C cable to the numpad's USB-C port.
- Кабелдин экинчи учун USB кубат булагына туташтырыңыз (мисалы, компьютердин USB порту, USB дубал адаптери).
- LED индикатору кубаттоо абалын көрсөтүп, толук кубатталганда өчөт.

Сүрөт: каптал view of the numpad, highlighting the USB-C charging port and the magnetic compartment for the 2.4G adapter.
3.2 Байланыш параметрлери
The numpad supports three connection methods: Bluetooth, 2.4G Wireless, and Wired USB-C.
3.2.1 Bluetooth байланышы
- Set the mode switch on the numpad to 'BT'.
- On your Windows or Android device, go to Bluetooth settings and enable Bluetooth.
- Press and hold the Bluetooth pairing button on the numpad (usually indicated by a Bluetooth icon) until the LED starts blinking rapidly.
- Select '8Bitdo Retro Numpad' from the list of available devices on your computer or phone.
- The LED will become solid when connected.
3.2.2 2.4G зымсыз байланыш
- Locate the 2.4G wireless adapter stored in the magnetic compartment on the numpad's side.
- Set the mode switch on the numpad to '2.4G'.
- Plug the 2.4G wireless adapter into an available USB port on your PC.
- The numpad should automatically connect. The LED indicator will become solid.

Image: A hand demonstrating the insertion of the 2.4G wireless adapter into its magnetic storage compartment on the numpad.
3.2.3 Wired USB-C Connection
- Set the mode switch on the numpad to 'OFF' or 'BT'/'2.4G' (wired connection will override wireless).
- Connect the USB-C cable from the numpad to a USB port on your PC.
- The numpad will be recognized as a standard USB input device.
3.3 Шайкештик
The 8Bitdo Retro Mechanical Numpad is compatible with:
- Windows 10 (1803) and above
- Android 9.0 жана андан жогору
4. Operating the Numpad
4.1 Switching Between Numpad and Calculator Modes
The device functions as both a PC numpad and a standalone calculator. Use the dedicated mode switch or button (often labeled 'CAL' or a similar icon) to toggle between these modes.

Image: A user operating the 8Bitdo Numpad in Standard Calculator Mode, demonstrating its use as a standalone calculator.
4.2 Windows Calculator App Shortcut
A dedicated shortcut button is available to instantly launch the Windows Calculator application on your PC. Refer to the numpad's control panel for the specific button.
4.3 Independent Control Panel
The numpad features an independent control panel with a turn dial and buttons for effortless operations. These controls manage connectivity modes, power, and potentially other functions.
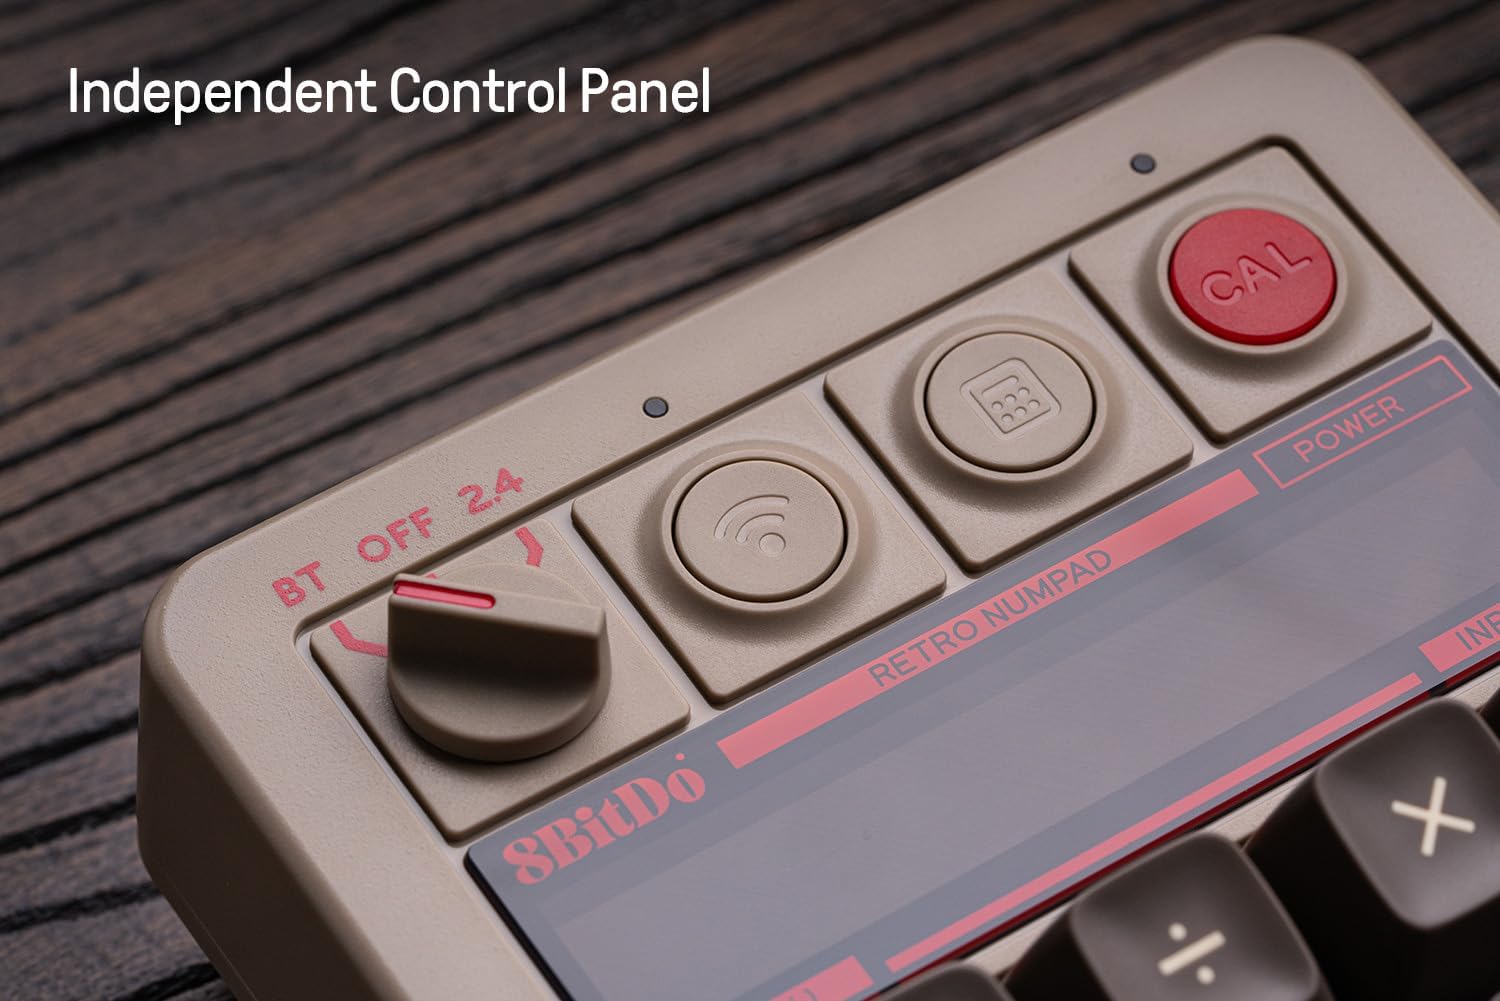
Сүрөт: Жакын план view of the numpad's independent control panel, showing the mode switch, wireless/Bluetooth buttons, and the calculator shortcut button.
4.4 Retro LED Display
The numpad incorporates a nine-digit seven-segment LED display, providing clear and visible numerical output for calculator mode and status indicators.
4.5 Hot-swappable PCB and Switches
The numpad features a hot-swappable PCB, allowing users to easily change the mechanical switches without soldering. It comes equipped with Kailh Box White switches V2.

Сүрөт: деталдуу view of the hot-swappable PCB, showing a keycap and switch removed to illustrate the ease of switch replacement.
4.6 N-key Rollover
The numpad supports N-key rollover, ensuring that every key press is registered accurately, even when multiple keys are pressed simultaneously.
4.7 Баскыч капкактары
The C64 Edition features double-shot ABS keycaps with an SA profile, providing durability and a distinct tactile feel.
5. Техникалык тейлөө
5.1 Тазалоо
To maintain the numpad's appearance and functionality:
- Сыртын сүртүү үчүн жумшак, кургак чүпүрөктү колдонуңуз.
- өжөр кир үчүн, бир аз гampчүпүрөктү суу же жумшак тазалоо эритмеси менен жууп салыңыз. Катуу химиялык заттардан алыс болуңуз.
- Баскыч капкактарынын ортосундагы чаңды жана калдыктарды тазалоо үчүн кысылган абаны колдонуңуз.
5.2 Баскычтын капкагын жана которгучту алмаштыруу
Due to the hot-swappable design, keycaps and switches can be replaced. Use a keycap puller and switch puller (not included) for safe removal and installation. Ensure the new switches are compatible with the PCB.
5.3 Батареяга кам көрүү
Батареянын иштөө мөөнөтүн узартуу үчүн:
- Батареяны бат-баттан толук кубаттап калуудан алыс болуңуз.
- Store the numpad in a cool, dry place when not in use for extended periods.
- Charge the battery at least once every three months if unused.
6. Кыйынчылыктарды
6.1 Байланыш маселелери
- No Connection (Bluetooth/2.4G): Ensure the numpad is charged and the mode switch is set correctly. Re-pair Bluetooth or re-insert the 2.4G adapter. Try a different USB port for the 2.4G adapter.
- Үзгүлтүксүз туташуу: Reduce distance between numpad and device. Avoid sources of interference (e.g., other wireless devices).
- Wired Connection Not Recognized: Try a different USB-C cable or USB port on your PC. Ensure the cable is fully inserted.
6.2 Дисплей маселелери
- Бош дисплей: Ensure the numpad is powered on and charged. If in PC numpad mode, the display may show less information. Switch to calculator mode to verify.
- Incorrect Characters: Restart the numpad. If persistent, check for firmware updates.
6.3 Киргизүүдөгү негизги көйгөйлөр
- Ачкычтар жооп бербейт: Check for debris under keycaps. If hot-swappable, ensure switches are fully seated.
- Double Input/Missed Input: Бул которгучтун бузук экенин көрсөтүшү мүмкүн. Бузулган которгучту алмаштыруу үчүн ысык алмаштыруу функциясын колдонуңуз.
6.4 Батарея заряддалбай жатат
- Ensure the USB-C cable is functional and properly connected.
- Башка USB кубат булагын байкап көрүңүз.
- Эгер көйгөй чечилбесе, кардарларды колдоо менен байланышыңыз.
7. Техникалык шарттар
| Өзгөчөлүк | Деталь |
|---|---|
| Модель аты | C64 Edition |
| Ачкычтардын саны | 18 |
| Которгучтар | Kailh Box White switches V2 (Hot-swappable) |
| Баскыч капкактары | Double-shot ABS (C64 edition) |
| Байланыш | Bluetooth, 2.4G Wireless, Wired USB-C |
| Шайкештик | Windows (10 and above), Android (9.0 and above) |
| Батарея түрү | Литий полимери |
| Батареянын иштөө мөөнөтү | Up to 160 use hours |
| Заряддоо убактысы | Болжол менен 4 саат |
| Дисплей | Nine-digit seven-segment LED |
| Өлчөмдөр | 7.91 x 7.05 x 2.36 дюйм |
| Элемент Салмагы | 1.3 фунт |
8. Кепилдик маалыматы
8Bitdo products typically come with a limited manufacturer's warranty. For specific details regarding the warranty period and terms for your 8Bitdo 18 Key Retro Mechanical Numpad, please refer to the warranty card included in your product packaging or visit the official 8Bitdo webсайт.
9. Колдоо
For further assistance, firmware updates, or to download the 8Bitdo Ultimate Software V2 (for firmware updates only), please visit the official 8Bitdo support webсайт:
You may also contact 8Bitdo customer service through their website for technical support or inquiries.


