1. Киришүү
This manual provides detailed instructions for the installation, operation, and maintenance of your RetroSound RetroRadio LABC-M1-226-08-80F1. This unit is designed for 1967-68 Ford Mustang vehicles and features an AM/FM RDS tuner, Bluetooth connectivity, and auxiliary input.
2. Коопсуздук маалыматы
- Орнотуудан мурун, электр шорт-тыгыз туташууларынын алдын алуу үчүн ар дайым унаанын аккумуляторун сууруп алыңыз.
- Ensure all wiring connections are secure and properly insulated to avoid damage to the unit or vehicle.
- Агрегатты айдоодон алаксыта тургандай иштетпеңиз.
- Refer to a professional installer if you are unsure about any part of the installation process.
3. Пакеттин мазмуну
Пакетиңизде бардык буюмдар бар экенин текшериңиз:
- RetroSound RetroRadio LABC-M1-226-08-80F1 Head Unit
- Wiring Harness (Power/Speakers)
- InfiniMount Brackets
- Топчу валдар
- Тышкы микрофон
- Орнотуу жабдыктары

Figure 3.1: Included Knob Shafts

3.2-сүрөт: Тышкы микрофон
4. Орнотуу жана орнотуу
4.1. Өлчөмдөр
Before installation, ensure the unit fits your vehicle's dashboard opening. Refer to the diagram below for precise measurements.

4.1-сүрөт: Бирдиктин өлчөмдөрү
4.2. Mounting with InfiniMount Brackets
The patented InfiniMount brackets allow for flexible mounting of the unit's shafts at various angles to accommodate different dashboard configurations.

Figure 4.2: InfiniMount Brackets and Flexible Shaft Mounting
- Attach the InfiniMount brackets to the sides of the head unit using the provided screws.
- Insert the knob shafts into the desired positions on the brackets.
- Adjust the angle of the shafts as needed to align with your vehicle's dashboard openings.
- Secure the unit into the dashboard opening.
4.3. Зымдарды туташтыруу
Carefully connect all necessary wires as shown in the diagram below. Ensure all connections are secure.
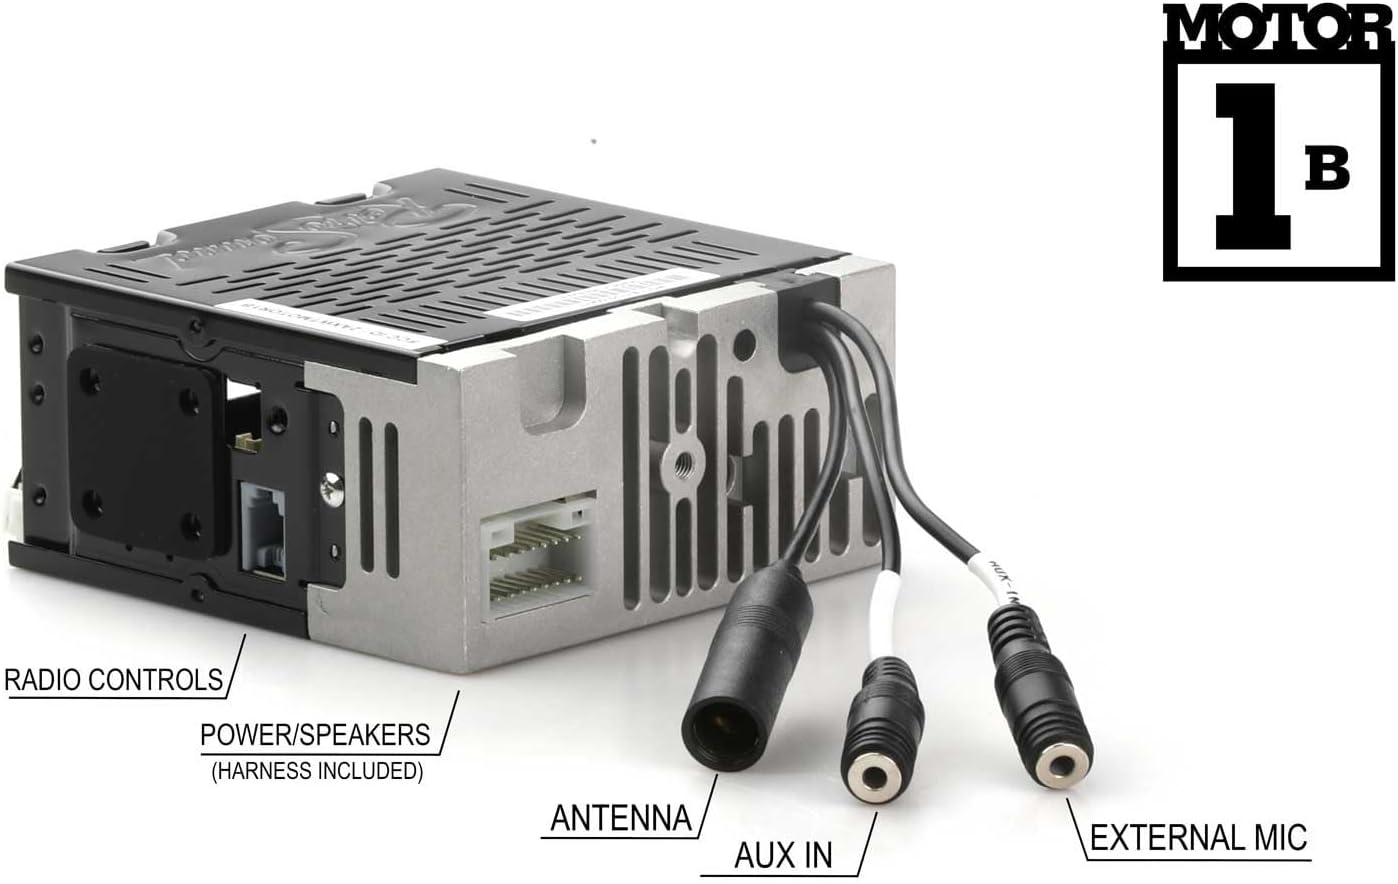
Сүрөт 4.3: Арткы панелдик байланыштар
- Күч/Спикерлер: Connect the included wiring harness to the corresponding port on the unit and then to your vehicle's power and speaker wiring. Refer to your vehicle's wiring diagram for correct connections.
- Антенна: Connect your vehicle's AM/FM antenna to the antenna input.
- AUX кирүүсү: Connect external audio devices using a 3.5mm audio cable to this input.
- External Mic: Plug in the provided external microphone for hands-free calling. Position the microphone in a location that allows for clear voice pickup.
- Радио башкаруу: Connect to compatible vehicle radio controls if available.
5. Иштөө нускамалары
5.1. Күйгүзүү/өчүрүү
Press the power button (usually integrated with the volume knob) to turn the unit on or off.
5.2. AM/FM Tuner
- Топтун тандоосу: Press the BAND button to switch between AM and FM bands.
- тюнинг: Use the tuning knobs or seek buttons to find radio stations.
- Алдын ала орнотуулар: The unit supports 30 presets. To save a station, tune to the desired station, then press and hold a preset button until you hear a confirmation beep. To recall a preset, press the corresponding preset button.
- RDS (Radio Data System): When available, RDS will display station information such as station name, song title, or artist.
- Тюнер жыштыктары: The tuner frequencies can be selected for USA, Europe, Australia, Japan, or Russia. Refer to the settings menu to adjust this if needed.
5.3. Bluetooth Connectivity (Version 5.0)
Бирдикте үнсүз чалуу жана аудио агым үчүн орнотулган Bluetooth бар.
- Жупташтыруу:
- Мобилдик түзмөгүңүздө Bluetooth иштетилгенин текшериңиз.
- On the RetroRadio, navigate to the Bluetooth menu (refer to the display for menu options).
- "Түзмөктү жупташтыруу" же ушул сыяктуу опцияны тандаңыз. Бирдик ачыла турган болуп калат.
- On your mobile device, search for available Bluetooth devices and select "RetroRadio" (or similar name).
- Эгер суралса, жупташтыруу кодун ырастаңыз.
- Hands Free Чалуу: Once paired, you can make and receive calls through the unit using the external microphone. Use the unit's controls to answer, end, or reject calls.
- Аудио агым: Play audio from your paired mobile device directly through the RetroRadio. Use the unit's controls to play, pause, skip tracks, and adjust volume.
5.4. Көмөкчү киргизүү
Connect any portable audio device (e.g., MP3 player, smartphone) to the rear-mounted auxiliary input using a 3.5mm audio cable. Select the AUX input source on the RetroRadio to listen to audio from the connected device.
6. Техникалык тейлөө
- Тазалоо: Use a soft, dry cloth to clean the unit's display and controls. Do not use abrasive cleaners or solvents.
- Программалык камсыздоонун жаңыртуулары: Check the RetroSound webОптималдуу иштөөнү камсыз кылуу үчүн, мезгил-мезгили менен сайттагы микропрограммалык камсыздоонун бардык жеткиликтүү жаңыртууларын карап туруңуз.
7. Кыйынчылыктарды
| Көйгөй | Мүмкүн себеп | Чечим |
|---|---|---|
| Күч жок | Электр кубаты үзүлгөн, сактагыч күйгөн, унаанын аккумулятору ажыратылган. | Check power wiring, inspect vehicle fuses, ensure battery is connected. |
| Үн жок | Speaker wires disconnected, volume too low, incorrect source selected. | Verify speaker connections, increase volume, select correct audio source (AM/FM, Bluetooth, AUX). |
| Bluetooth жупташкан жок | Bluetooth not enabled on device, unit not in pairing mode, device too far. | Ensure Bluetooth is on, put unit in pairing mode, bring device closer, try re-pairing. |
| Радио кабыл алуу начар | Antenna not connected, damaged antenna, weak signal area. | Check antenna connection, inspect antenna for damage, try tuning to a stronger station. |
8. Техникалык шарттар
- Модел: LABC-M1-226-08-80F1
- Бренд: RetroSound
- Ampөмүр берүүчү: Камтылган 275 ватт (чоку күч) Mosfet amplifier, 18 watts RMS x 4 channels
- Bluetooth: Version 5.0 (with external microphone for hands-free calls)
- тюнер: 30 алдын ала орнотулган AM/FM RDS тюнер
- Тюнер жыштыктары: Тандалма (АКШ/EUR/AUS/JAP/RUS)
- Киргизүүлөр: Rear-mounted Auxiliary input (3.5mm), Bluetooth
- Туруктуу эс тутум: Ооба
- Бирдиктин өлчөмдөрү (H x W x D): Approximately 2" x 4.34" x 4" (51mm x 110mm x 100mm) - Refer to Figure 4.1 for exact measurements.
- Элемент Салмагы: 3.3 фунт
9. Кепилдик маалыматы
This RetroSound product is covered by a 1 жылдык кепилдик from the date of purchase. This warranty covers defects in materials and workmanship under normal use. Please retain your proof of purchase for warranty claims. For full warranty terms and conditions, please refer to the official RetroSound webсайтка же кардарларды колдоо менен байланышыңыз.
10. Кардарларды колдоо кызматы
If you encounter any issues not covered in this manual or require further assistance, please contact RetroSound customer support. Contact information can typically be found on the official RetroSound webсайт.
Webсайт: www.retrosound.com


