Продукт бүттүview
The Shinmax Bike Helmet (Model HT19) is designed for adult cyclists, offering safety features, comfort, and visibility. It incorporates a high-density PC shell and EPS foam for impact absorption, a magnetic goggle system for eye protection, and an integrated LED rear light for enhanced visibility.

Image: Shinmax Bike Helmet in black, featuring magnetic goggles and an integrated LED rear light. The helmet has multiple vents for ventilation.
Коопсуздук маалыматы
This helmet is designed to reduce the risk of head injury during cycling. It meets CPSC/CPC safety standards. For maximum protection, ensure the helmet fits correctly and is securely fastened. Always replace your helmet after any impact, even if visible damage is not apparent.
- Курулуш: The helmet features a high-density PC (Polycarbonate) shell and EPS (Expanded Polystyrene) foam, utilizing in-molding technology for improved safety performance.
- Таасир жутуу: The durable hard shell and detachable soft inner pads are designed to absorb pressure from external impacts.
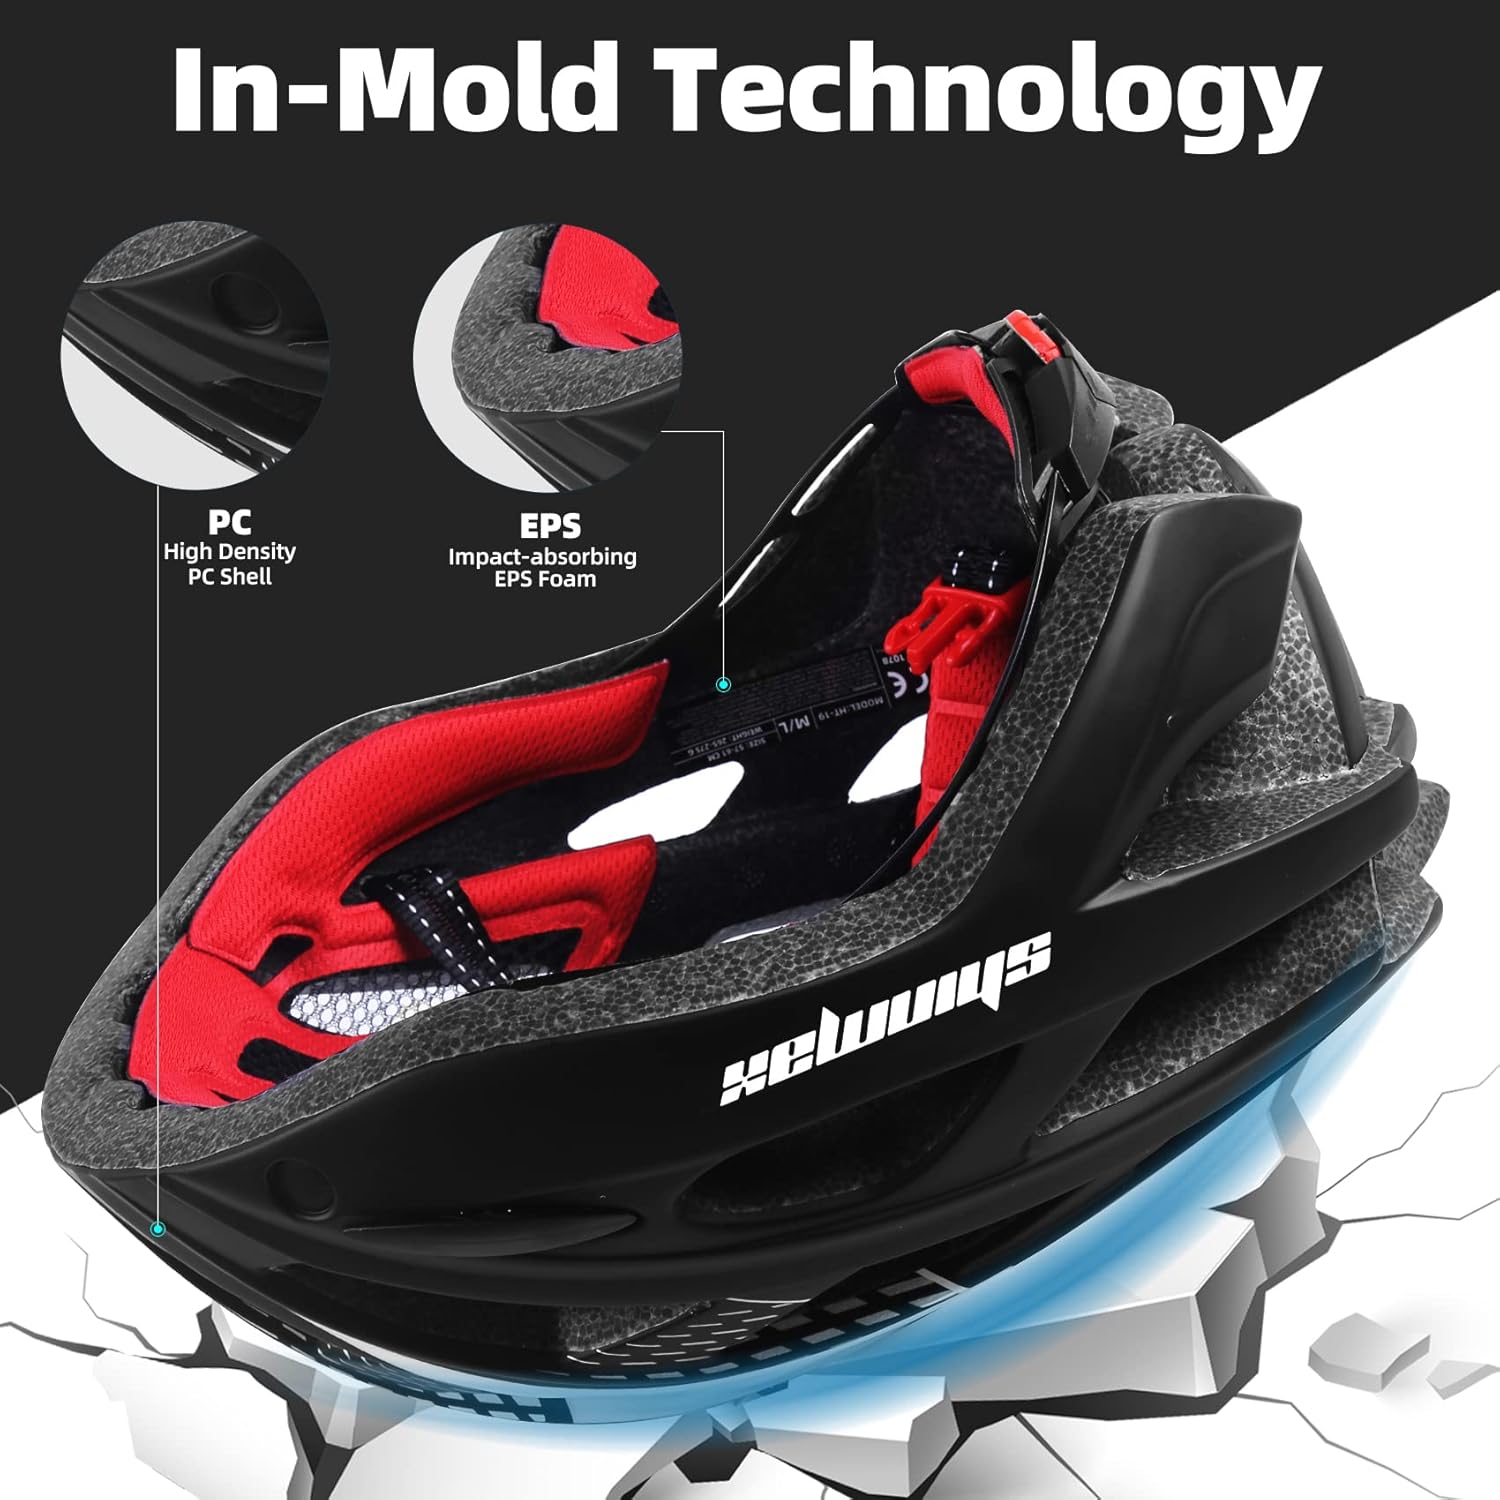
Сүрөт: кесилген view of the Shinmax helmet illustrating the high-density PC shell and impact-absorbing EPS foam, highlighting the in-mold technology for structural integrity.
Setup and Fit Adjustment
- Баштын айланасын өлчөө: Use a tape measure to determine the circumference of your head, placing it from the forehead to the back of the head. This helmet is suitable for head circumferences of 54-58cm (M size) or 57-62cm (L size).
- Алгачкы жайгаштыруу: Place the helmet squarely on your head, ensuring it covers your forehead. It should not tilt backward or forward.
- Adjust Retention System: Locate the adjusting knob at the back of the helmet. Turn the knob clockwise to tighten the fit or counter-clockwise to loosen it until the helmet feels snug and secure without being uncomfortably tight. The helmet should not move excessively when you shake your head.
- Adjust Chin Straps: Fasten the chin strap buckle. Adjust the straps so that they form a “V” shape under your ears. The strap should be snug against your chin, allowing only one or two fingers to fit between the strap and your chin.
- Акыркы текшерүү: Ensure the helmet is level and stable. It should not obstruct your vision.
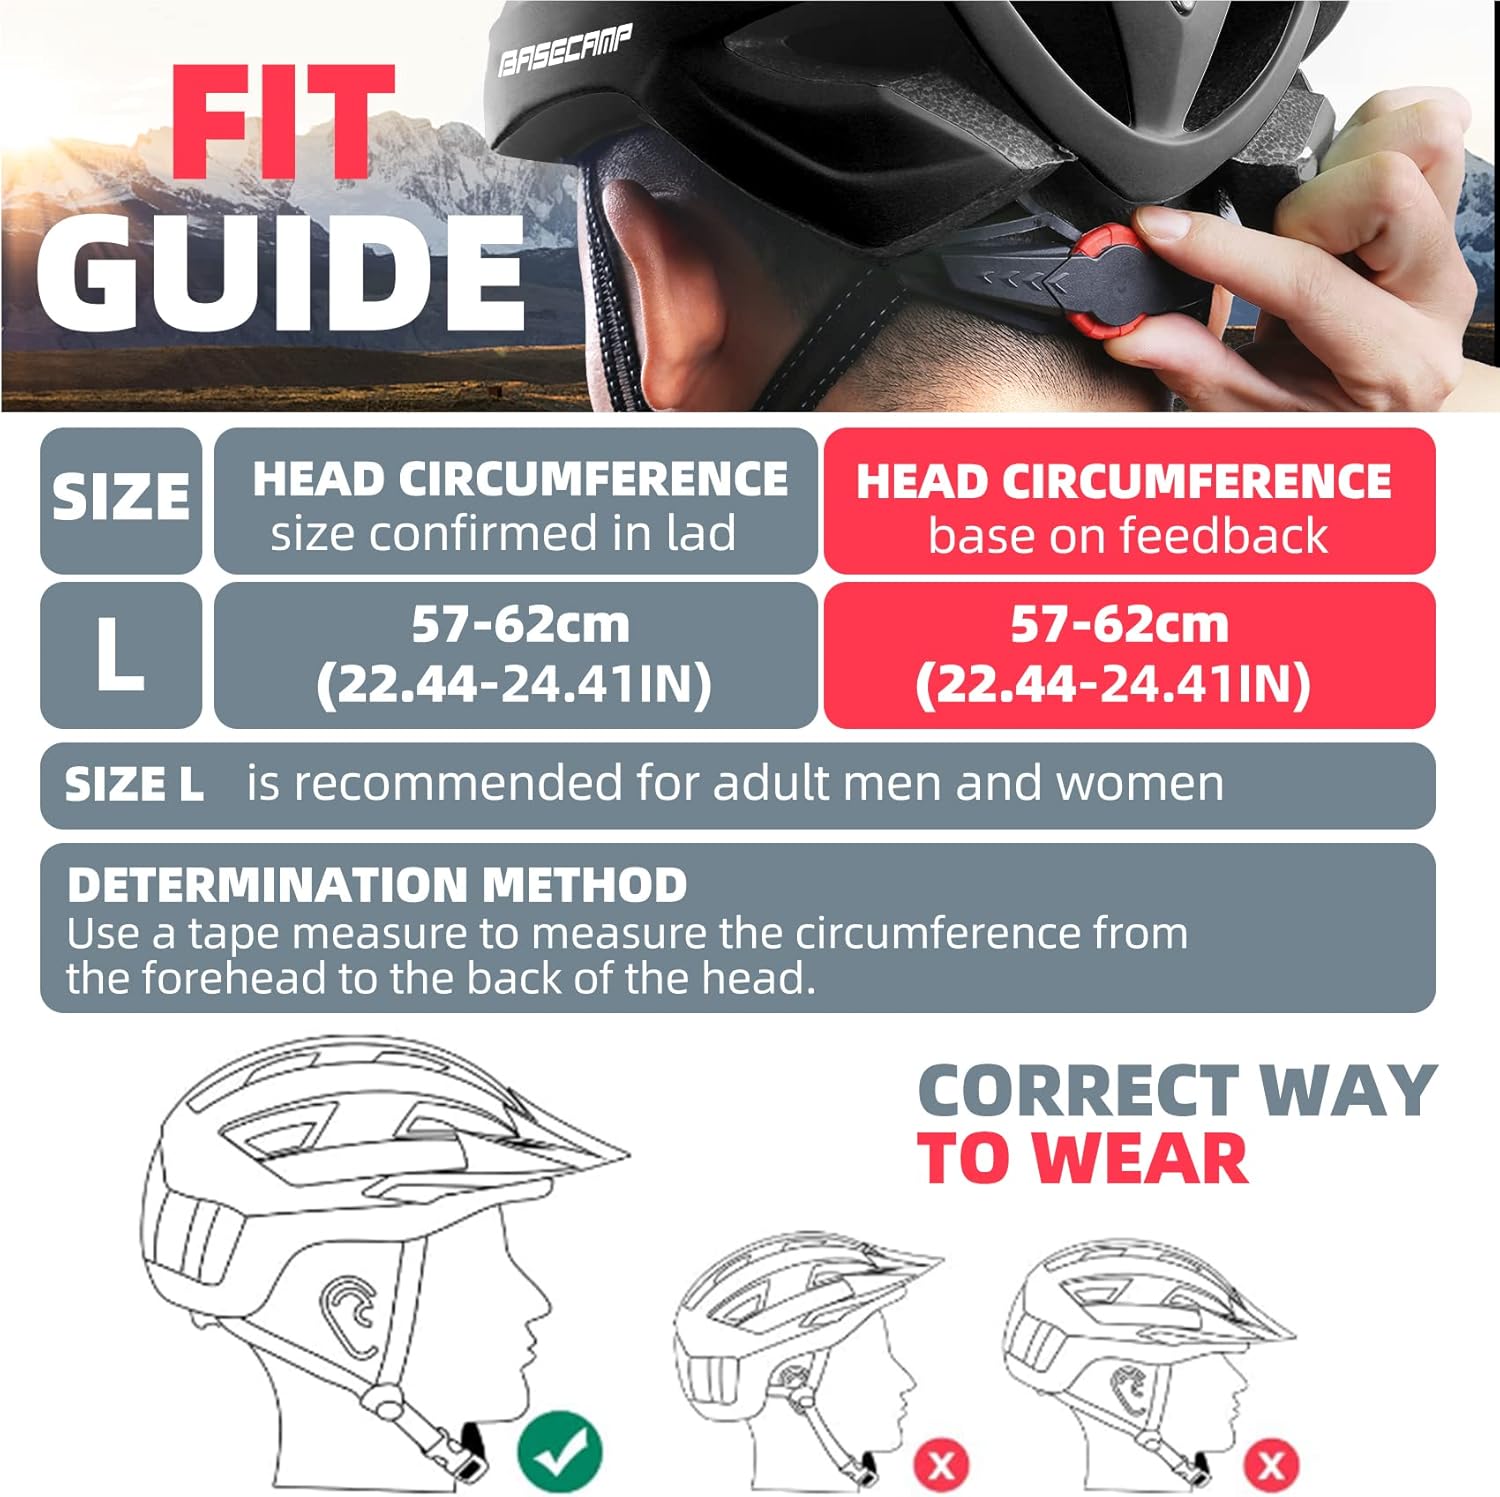
Image: A visual guide demonstrating how to measure head circumference and the correct way to wear the helmet, ensuring it sits level and covers the forehead.

Сүрөт: деталдуу view of the helmet’s adjustable dial retention system located at the back, with arrows indicating “Tighten” and “Loosen” for precise fit adjustment.
Иштөө нускамалары
LED арткы жарык
The integrated LED rear light enhances your visibility to others, especially during low-light conditions or at night. It features three distinct lighting modes:
- Туруктуу: Provides continuous illumination.
- Жай жаркылдоо: A slow, rhythmic flash pattern.
- Тез жаркылдоо: A rapid flash pattern for increased attention.
To cycle through the modes, press the button located on the LED light unit. Press once for steady, a second time for slow flash, a third time for fast flash, and a fourth time to turn it off.

Image: The helmet’s LED safety light, depicted with icons representing its three flashing modes: Always On, Slow Flash, and Fast Flash. A CR1616 backup battery is also shown.
Magnetic Goggles
The detachable magnetic goggles provide UV400 protection and shield your eyes from wind, sand, and strong ultraviolet light. They attach securely with three strong magnets.
- Attaching Goggles: Align the magnets on the goggles with the corresponding points on the helmet’s visor. The magnets will snap them into place.
- Detaching Goggles: Gently pull the goggles away from the helmet to detach them.
- Wearing Modes:
- Goggles Down: For full eye protection during speedy riding or bright conditions.
- Goggles Up: Flip the goggles upwards and they will magnetically attach to the helmet, out of your line of sight, suitable for slower riding or sightseeing.
- No Goggles: Remove the goggles entirely for standard riding.
- Eyewear Compatibility: The design allows for wearing personal prescription glasses underneath the magnetic goggles.

Image: A visual representation of the three ways to wear the magnetic goggles: fully down for protection, flipped up and attached to the helmet, or completely removed.

Image: A side-profile diagram showing a person wearing the helmet in three configurations: without goggles, with goggles flipped up, and with goggles down for sun protection.
Техникалык тейлөө
- Cleaning the Helmet: Use a soft cloth, mild soap, and water to clean the exterior of the helmet. Avoid harsh chemicals or abrasive materials, as these can damage the helmet’s shell or internal components.
- Cleaning Inner Liners: The helmet features removable inner liners for easy cleaning. Gently detach the liners, hand wash them with mild soap and water, rinse thoroughly, and allow them to air dry completely before reattaching them to the helmet.
- Goggle Care: Clean the magnetic goggles with a soft, lint-free cloth and a lens cleaning solution or water. Avoid wiping with abrasive materials to prevent scratches.
- Сактагыч: Store the helmet in a cool, dry place away from direct sunlight and extreme temperatures. Do not store it in a hot car, as excessive heat can damage the EPS foam.

Image: An illustration showing the removable inner liners of the Shinmax helmet, indicating they can be easily detached for cleaning and reinserted.
LED Rear Light Battery Replacement
The LED rear light is powered by a CR1616 button cell battery. An extra replacement battery is included with your helmet. To replace the battery:
- Remove Light Unit: Gently push the rear light unit out of its housing at the back of the helmet.
- Open Light Casing: Кылдаттык менен ачыңыз casing of the rear light. This may involve prying it open with a small flat tool or screwdriver.
- Remove Circuit Board: Detach the small circuit board to access the battery compartment.
- Батареяны алмаштыруу: Эски CR1616 батареясын чыгарып, жаңысын салыңыз, туура полярдуулукту (+/-) камсыз кылыңыз.
- Кайра чогултуу: Place the circuit board back, close the light casing securely, and reinsert the light unit into the helmet until it clicks into place.

Image: A step-by-step visual guide demonstrating how to replace the CR1616 battery in the helmet’s LED rear light, including pushing out the light, opening it, removing the board, and replacing the battery.
Проблемаларды чечүү
| Көйгөй | Мүмкүн себеп | Чечим |
|---|---|---|
| Helmet feels loose or unstable. | Improper fit adjustment. | Tighten the rear adjustment knob and ensure chin straps are snug. Refer to the “Setup and Fit Adjustment” section. |
| LED rear light not working. | Батарея түгөндү же туура эмес орнотулган. | Replace the CR1616 battery, ensuring correct polarity. Refer to the “LED Rear Light Battery Replacement” section. |
| Magnetic goggles do not attach securely. | Magnets or helmet surface obstructed/damaged. | Ensure magnets on both goggles and helmet are clean and free of debris. Check for any physical damage to the magnets. |
| Helmet is uncomfortable. | Incorrect fit or liner positioning. | Re-adjust the helmet’s fit using the retention system and chin straps. Ensure inner liners are properly seated. |
Техникалык шарттар
| Өзгөчөлүк | Деталь |
|---|---|
| Бренд | Shinmax |
| Модель аты | HT19 |
| Түс | Black (for this variant) |
| Жаш аралыгы | бойго жеткен |
| Size (M) | 54-58cm (21.26-22.83 inches) |
| Сырткы материал | Поликарбонат (PC) |
| Ички материал | Кеңейтилген полистирол (EPS) |
| Өзгөчөлүктөр | Integrated LED Rear Light, Detachable Magnetic Visor/Goggles |
| Сунушталган колдонуу | Велосипед тебүү |
| Пакет Салмагы | 0.3 килограмм (болжол менен 0.66 фунт) |
| Камтылган компоненттер | Bike helmet, Magnetic Goggles, Extra CR1616 Battery |
Кепилдик жана колдоо
This Shinmax product includes a limited warranty. For specific details regarding the warranty period and coverage, please refer to the documentation included with your product packaging or contact Shinmax customer support.
For any questions, technical assistance, or support inquiries, please contact the manufacturer, Shinmax, through their official channels. Contact information can typically be found on the product packaging or their official webсайт.


