1. Бүттүview
The Waveshare ESP32-S3 7inch Capacitive Touch Screen Development Board is a high-performance microcontroller board designed for various applications. It integrates a 7-inch capacitive touch LCD with an 800x480 resolution and 65K RGB colors. Powered by an Xtensa 32-bit LX7 dual-core processor running up to 240MHz, it supports 2.4GHz Wi-Fi (802.11 b/g/n) and Bluetooth 5 (LE) with an onboard antenna. The board features 5-point capacitive touch control via an I2C interface with interrupt support, and includes 8MB Flash and 8MB PSRAM. Multiple external peripheral interfaces such as CAN, RS485, I2C, and a Micro SD card slot are available, along with a full-speed USB serial port.

Figure 1: Waveshare ESP32-S3 7inch Capacitive Touch Screen Development Board with connection cables.
Негизги өзгөчөлүктөрү:
- 7-inch capacitive touch screen with 800x480 resolution and 65K colors.
- Xtensa 32-bit LX7 dual-core processor, up to 240MHz main frequency.
- Supports 2.4GHz Wi-Fi (802.11 b/g/n) and Bluetooth 5 (LE) with onboard antenna.
- 5-point capacitive touch control via I2C interface with interrupt support.
- Built-in 512KB SRAM and 384KB ROM, with onboard 8MB Flash and 8MB PSRAM.
- Onboard CAN, RS485, I2C interfaces, Micro SD card slot, and full-speed USB serial port.
- Flexible clock and independent module power supply settings for low power consumption.
2. Пакеттин мазмуну
Төмөндө тизмеленген нерселердин баары пакетиңизге камтылганын текшериңиз:
- ESP32-S3-Touch-LCD-7 x1
- HY2.0 2P to 2PIN male cable 10cm x2
- HY2.0 2P to 3PIN male cable 10cm x1
- HY2.0 2P to 4PIN male cable 10cm x2
3. Техникалык шарттар
| Өзгөчөлүк | Деталь |
|---|---|
| Продукциянын өлчөмдөрү | 7 x 7 x 7 дюйм |
| Элемент Салмагы | 10.2 унция |
| Модель аты | ESP32-S3-Touch-LCD-7 |
| RAM эстутум орнотулган өлчөмү | 8 MB |
| Эстутум сактоо сыйымдуулугу | 8 MB |
| CPU ылдамдыгы | 240 МГц |
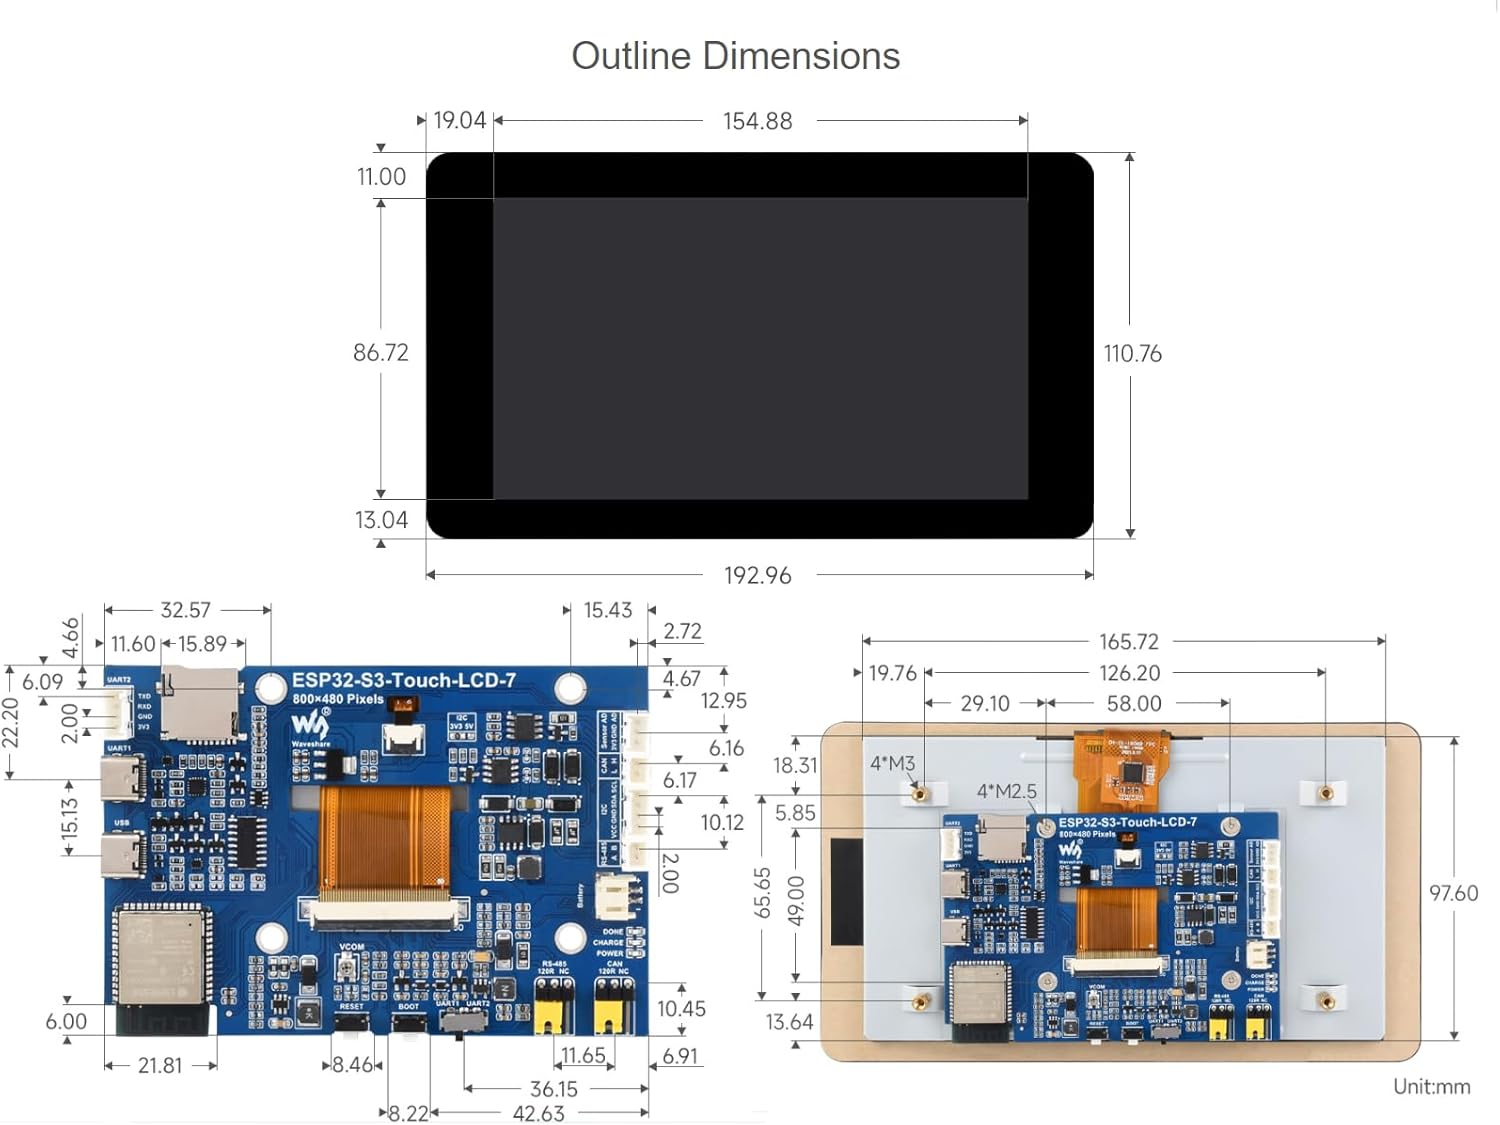
Figure 2: Outline dimensions of the ESP32-S3 7inch LCD development board.
4. Орнотуу
4.1 Аппараттык камсыздоо бүттүview
The development board features various components and interfaces. Familiarize yourself with the layout for proper connection and operation.
Figure 3: Labeled diagram of the ESP32-S3 7inch LCD board components.
- ESP32-S3N8R8: SoC with WiFi and Bluetooth, up to 240MHz, 8MB PSRAM and Flash.
- 3.7V single lithium battery PH2.0 header.
- Touch panel connector.
- CAN terminal resistor selection.
- TF картанын уячасы.
- RS485 terminal resistor selection.
- USB Type-C порту.
- UART selection: select UART1 or UART2.
- UART1 Port.
- BOOT button: Press and hold while powering on for program burning.
- UART2 connector.
- RESET баскычы.
- Sensor header.
- I2C level selection: 3.3V / 5V.
- CAN header.
- DONE: Lithium battery charging completed indicator.
- I2C header.
- CHG: Lithium battery charging indicator.
- RS485 header.
- PWR: Power supply indicator.
4.2 Software Setup (Arduino IDE)
To program the ESP32-S3 development board, you will typically use the Arduino IDE. Follow these steps for proper setup:
- Китепканаларды орнотуу: Select the correct installation library path in your Arduino IDE preferences. If a 'libraries' folder does not exist, create one. Copy all necessary library files бул папкага.
- Тактаны тандаңыз: In the Arduino IDE, navigate to 'Tools' -> 'Board' and select 'ESP32S3 Dev Module'.
- Configure Flash Mode: Set the 'Flash Mode' to 'QIO 80MHz'.
- Configure Flash Size: Select 'Flash Size' as '8MB (64Mb)'.
- Configure PSRAM: Select 'PSRAM' as 'OPI PSRAM'.
- COM портун тандаңыз: Before uploading, ensure you select the correct COM port corresponding to your connected device under 'Tools' -> 'Port'.
- Compile and Upload: Click the 'Upload' button to compile and upload your code to the board.
Video 1: This video demonstrates the software setup and upload process for an ESP32-S3 Touch-LCD board using the Arduino IDE. While it features a 4.3-inch model, the library installation, board selection, and upload steps are generally applicable to the 7-inch model.
5. Аппаратты иштетүү
5.1 Негизги өз ара аракеттенүү
The 7-inch capacitive touch screen allows for intuitive interaction with your applications. The 5-point touch support enables multi-touch gestures, enhancing user experience for GUI interfaces developed with frameworks like LVGL.

Figure 4: The ESP32-S3-Touch-LCD-7 displaying a graphical user interface.
5.2 Колдонуу сценарийлери
This development board is suitable for a wide range of applications, including Human-Machine Interfaces (HMI) and GUI development using LVGL. Its multiple peripheral interfaces allow for integration with various sensors and external devices.

5-сүрөт: Мисamples of application scenarios for the ESP32-S3 board.
5.3 Peripheral Expansion
The board supports expansion of multiple peripherals via its CAN, RS485, and I2C interfaces, as well as UART and USB ports. This flexibility allows for complex system designs.

Figure 6: The ESP32-S3 board supporting multiple peripherals.

Сүрөт 7: Мурункуample of the ESP32-S3 board in an application setup.
6. Техникалык тейлөө
To ensure the longevity and optimal performance of your Waveshare ESP32-S3 7inch Capacitive Touch Screen Development Board, follow these maintenance guidelines:
- Тазалоо: Use a soft, dry cloth to clean the screen and board. Avoid abrasive materials or harsh chemicals that could damage the components or screen coating.
- Сактагыч: Store the board in a cool, dry environment away from direct sunlight, extreme temperatures, and high humidity.
- Колдонуу: Handle the board by its edges to avoid touching sensitive electronic components. Static electricity can damage the board, so use anti-static precautions when necessary.
- Электр камсыздоо: Always use a stable and appropriate power supply as specified in the documentation to prevent damage.
7. Кыйынчылыктарды
This section addresses common issues and their potential solutions:
- CAN reception failure:
- UCANV2.0.exe ичиндеги COM портун кайра иштетиңиз жана ESP32-S3-Touch-LCD-7 баштапкы абалга келтирүү баскычын бир нече жолу басыңыз.
- Сериялык порт мүчүлүштүктөрдү оңдоо жардамчысында DTR жана RTS белгисин алып салыңыз.
- No screen response after uploading an Arduino demo for RGB screen displaying:
- Check whether the correct configurations are set in Arduino IDE -> Tools. Ensure 'Flash (8MB)' and 'PSRAM (8MB OPI)' are enabled.
- Fails to compile an Arduino demo for the RGB screen and shows errors:
- Verify that the ESP32-S3-Touch-LCD-7_libraries are correctly installed. Refer to the installation steps in Section 4.2.
8. Кепилдик жана колдоо
For warranty information, technical support, and additional resources, please visit the official Waveshare webсайтына кириңиз же алардын кардарларды тейлөө кызматына кайрылыңыз. Кепилдик боюнча дооматтар үчүн сатып алуу дүмүрчөгүңүздү сактап коюңуз.


