1. Коопсуздук боюнча маанилүү маалымат
Сураныч, орнотууну баштоодон мурун бардык нускамаларды окуп, түшүнүңүз. Бул нускамаларды аткарбоо электр шок, өрт же жеке жаракат алып келиши мүмкүн.
- Бардык электр байланыштары квалификациялуу электрик тарабынан жасалышы керек.
- Орнотуудан же техникалык тейлөөдөн мурун, негизги автоматтык өчүргүчтү же сактагыч кутучасын электр тогунан ажыратыңыз.
- Орнотуу жери желдеткичтин салмагын көтөрө ала тургандыгын текшериңиз.
- Желдеткичти бычактары же корпусу бузулган учурда иштетпеңиз.
- This fan is designed for indoor use and covered outdoor areas only.
2. Пакеттин мазмуну
Carefully unpack all components and ensure you have received all items listed below. If any parts are missing or damaged, contact customer support before proceeding.
- Ceiling Fan Unit (with integrated LED and motor)
- 3 ABS бычактары
- Алыстан башкаруу
- Монтаждоочу аппараттык комплект
- Instruction Manual

Сүрөт 2.1: Бүттүview of the Parrot Uncle 22" Distressed Wood Grain Ceiling Fan. This image displays the complete ceiling fan unit, highlighting its distressed wood grain finish and flush mount design, with the integrated LED light visible at the bottom center.
3. Орнотуу жана орнотуу
This ceiling fan is designed for flush-mount installation. Ensure the electrical box is securely mounted and capable of supporting the fan's weight.
3.1 Алдын ала орнотуу
- Автоматтык өчүргүчтөн электр кубатын өчүрүңүз.
- Identify supply wires (live, neutral, ground).
3.2 Кронштейнди орнотуу
Attach the mounting bracket to the ceiling electrical box using the provided screws and washers. Ensure it is firmly secured.
3.3 Зымдарды туташтыруу
- Желдеткичтин жерге туташтыруучу зымын үйдөгү жерге туташтыруучу зымга туташтырыңыз.
- Желдеткичтин нейтралдуу зымын үй шартындагы нейтралдуу зымга туташтырыңыз.
- Connect the fan's live wire to the household live wire.
- Secure all connections with wire nuts and ensure no loose strands.
3.4 Вентилятор блогун орнотуу
Carefully lift the fan unit and secure it to the mounting bracket. Ensure all screws are tightened to prevent wobbling.
3.5 Чачты орнотуу
Attach the three ABS blades to the fan motor housing according to the instructions provided in the detailed diagram. Ensure blades are securely fastened.

Image 3.1: Product Dimensions. This diagram illustrates the overall dimensions of the ceiling fan, showing a 22-inch diameter and a 7.7-inch height, crucial for planning installation space.
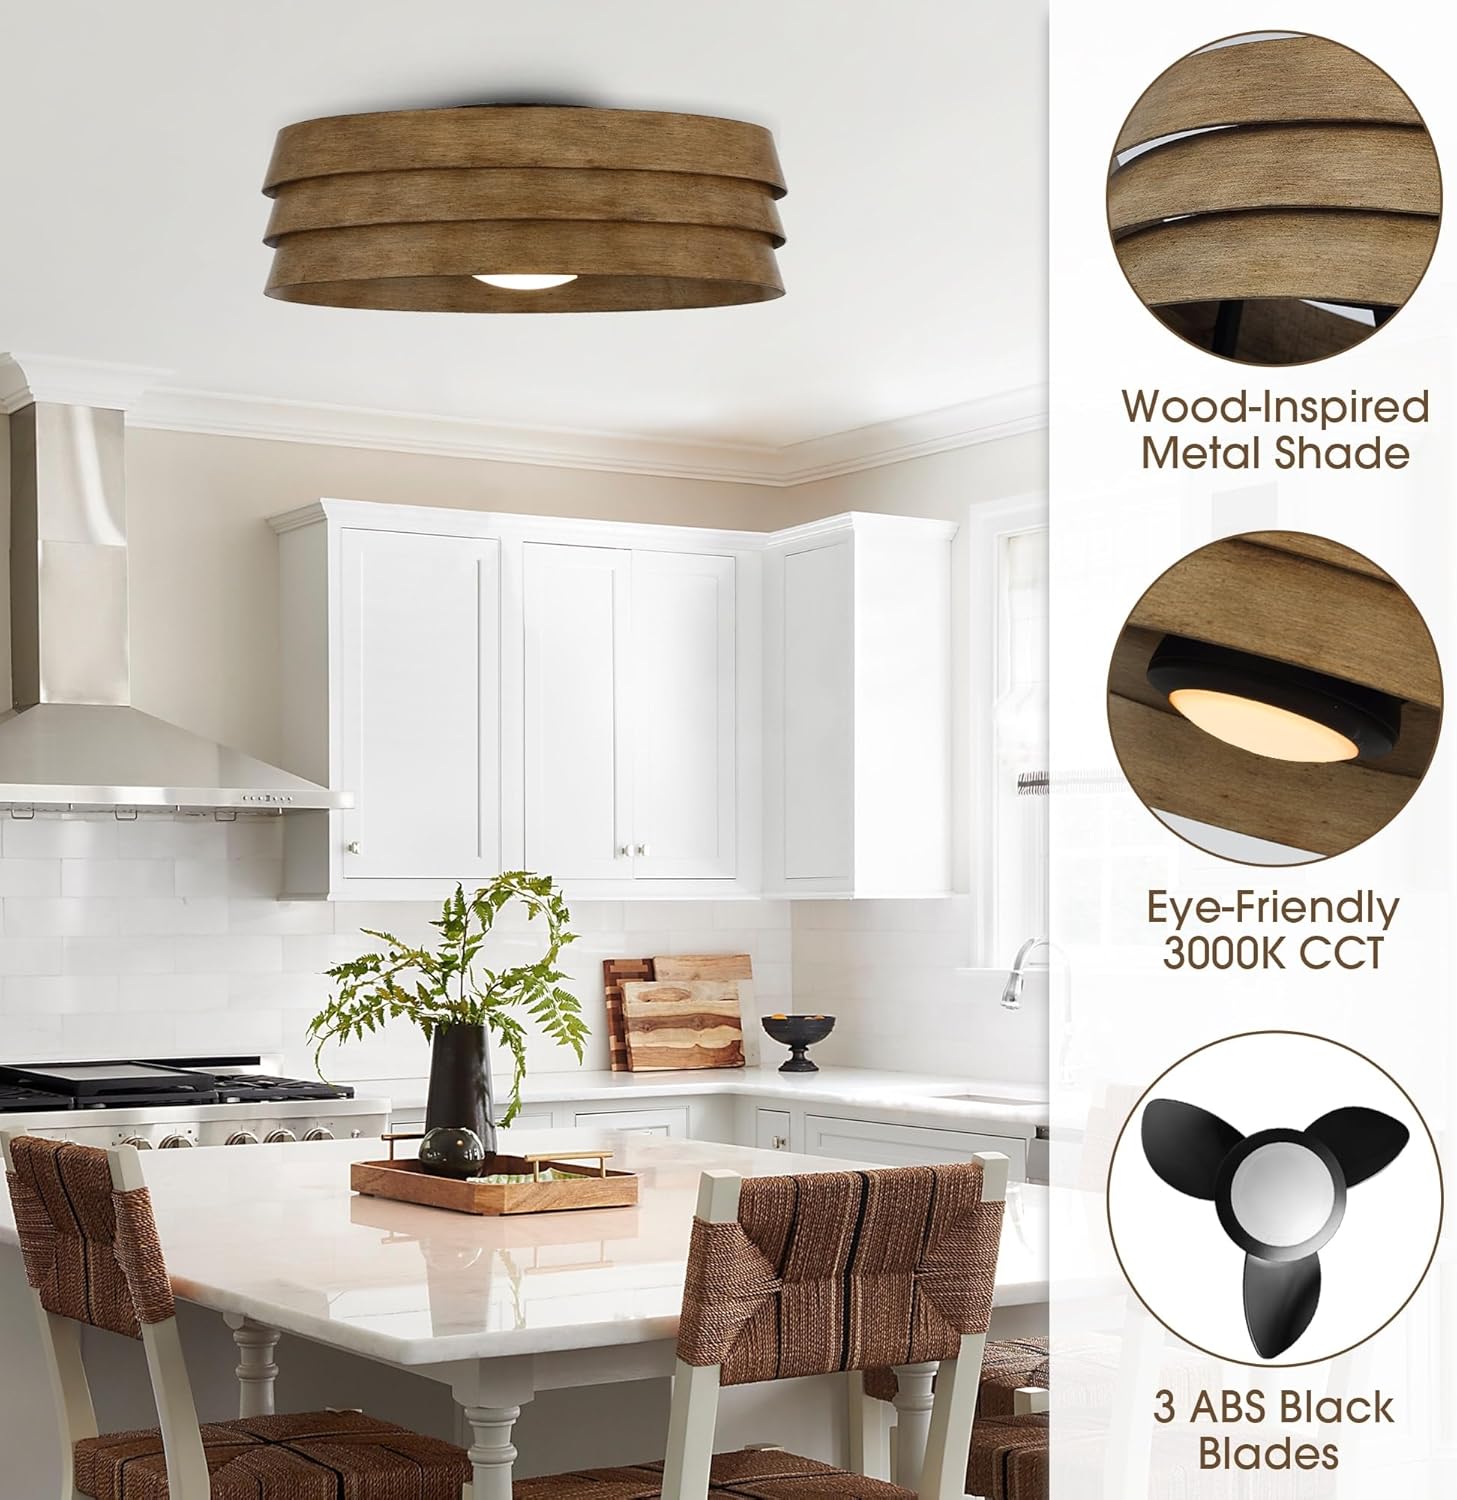
Image 3.2: Key Features. This image highlights the fan's design elements including the wood-inspired metal shade, the eye-friendly 3000K CCT integrated LED light, and the three black ABS blades.
4. Иштөө нускамалары
The Parrot Uncle ceiling fan is operated using the included remote control. Ensure the remote control has a working battery installed.
4.1 Желдетүүчүнүн иштеши
- Кубат баскычы: Желдеткичти күйгүзүү же өчүрүү үчүн басыңыз.
- Ылдамдыкты көзөмөлдөө: 6 желдеткич ылдамдыгы аркылуу айлануу үчүн ылдамдык баскычтарын колдонуңуз.
- Тескери функция: Press the reverse button to change the direction of blade rotation. This function is useful for circulating warm air in winter and cool air in summer.
4.2 Жарык иштөө
- Жарык баскычы: Press to turn the integrated LED light on or off.
- The fan features a 10-watt 3000K integrated LED bulb, providing ambient, energy-efficient lighting.

Image 4.1: Integrated LED Light. A close-up view of the integrated 10-watt 3000K LED light, positioned at the center of the fan, providing illumination.
5. Техникалык тейлөө
Үзгүлтүксүз тейлөө сиздин шыптын желдеткичиңиздин оптималдуу иштешин жана узак иштөөсүн камсыз кылат.
- Тазалоо: Dust the fan blades and housing regularly with a soft, damp кездеме. Абразивдүү тазалагычтарды же эриткичтерди колдонбоңуз.
- Катуулоо: Periodically check and tighten all screws on the fan housing and blades to prevent wobbling and noise.
- Интегралдык LED: The LED light is integrated and not user-replaceable. If the light fails, contact customer support.

Image 5.1: Distressed Wood Grain Finish. A detailed view of the fan's distressed wood grain finish, illustrating the texture and aesthetic that requires gentle cleaning.
6. Кыйынчылыктарды
Эгерде сиз шып желдеткичиңиз менен көйгөйлөргө туш болсоңуз, төмөнкү кеңири таралган көйгөйлөрдү жана чечимдерди караңыз:
- Күйөрман иштебейт:
- Check if power is supplied to the fan.
- Бардык зым байланыштары коопсуз экенин текшериңиз.
- Алыстан башкаруу пультунун батареясы туура орнотулганын жана иштеп жатканын текшериңиз.
- Жарык иштебейт:
- Check power supply to the fan.
- Пульттагы жарык баскычы басылганын текшериңиз.
- As the LED is integrated, if power is confirmed and light still fails, contact customer support.
- Күйөрмандар солкулдап:
- Бардык бычак бурамалар бекем тартылганын текшериңиз.
- Verify the mounting bracket is securely attached to the ceiling electrical box.
- Алыстан башкаруу жооп бербей жатат:
- Пульттун батареясын алмаштырыңыз.
- Алыстан башкаруу пульту менен желдеткичтин кабыл алгычынын ортосунда эч кандай тоскоолдуктар жок экенин текшериңиз.
7. Техникалык шарттар
| Өзгөчөлүк | Спецификация |
|---|---|
| Бренд | Тоту куш байке |
| Модель аты | A560701CA110V-LN |
| Продукциянын өлчөмдөрү | 22 x 22 x 7.7 дюйм |
| Материал | Plastic (ABS blades), Metal (housing) |
| Стиль | Өнөр жай фермасы |
| Монтаж түрү | Flush тоосу |
| Blades саны | 3 |
| Мотор түрү | DC Motor |
| Күйөрмандардын ылдамдыгы | 6-тез |
| Башкаруу ыкмасы | Алыстан башкаруу |
| Жарык булагы | Integrated 10-watt LED |
| Түс температурасы | 3000K |
| Power Source | Battery Powered (for remote) |
| Салмагы | 21.2 фунт |
| UPC | 810132410086 |
8. Кепилдик жана колдоо
For warranty information or technical assistance, please contact Parrot Uncle customer support. Keep your purchase receipt for warranty claims.
Visit the official Parrot Uncle store for more products and support: Parrot Uncle Store


