1. Киришүү
Сатып алганыңыз үчүн рахматasing the Minifire MF24C1 24-inch Curved Monitor. This manual provides essential information for setting up, operating, and maintaining your monitor. Please read it thoroughly before use and retain it for future reference.
Коопсуздук маалыматы
- Өрткө же электр тогуна урунбоо үчүн мониторду жамгырдын же нымдуулуктун таасирине дуушар кылбаңыз.
- Мониторду ачпаңыз casinг. Ичинде колдонуучу тейлей турган бөлүктөр жок. Бардык тейлөөлөрдү квалификациялуу кызматкерлерге тапшырыңыз.
- Монитор кулап калбаш үчүн аны туруктуу, тегиз бетке коюңуз.
- Монитордун айланасында туура желдетүүнү камсыз кылыңыз. Вентиляция тешиктерин жаап албаңыз.
- Монитор менен кошо берилген кубат адаптерин гана колдонуңуз.
- Монитор узак убакыт бою колдонулбай турган болсо, электр сайгычын розеткадан ажыратыңыз.
2. Пакеттин мазмуну
Пакетиңизде бардык буюмдар бар экенин текшериңиз:
- Minifire MF24C1 24-inch Curved Monitor
- Монитор стенд (негизги жана моюн)
- Кубаттуу адаптер
- USB Type-C кабели
- Колдонуучунун Колдонмосу (бул документ)
3. Орнотуу жана чогултуу
3.1 Стендди чогултуу
Стендди мониторуңузга бекитүү үчүн бул кадамдарды аткарыңыз:
- Чийилбеш үчүн мониторду кылдаттык менен жумшак, таза кездемеге ылдый каратып коюңуз.
- Монитордун арткы панелине стенд мойнуна бекитиңиз. Анын ордуна коопсуз чыкылдатуусун камсыз кылыңыз.
- Attach the stand base to the bottom of the stand neck. Tighten the screw(s) if provided, usually located at the bottom of the base.
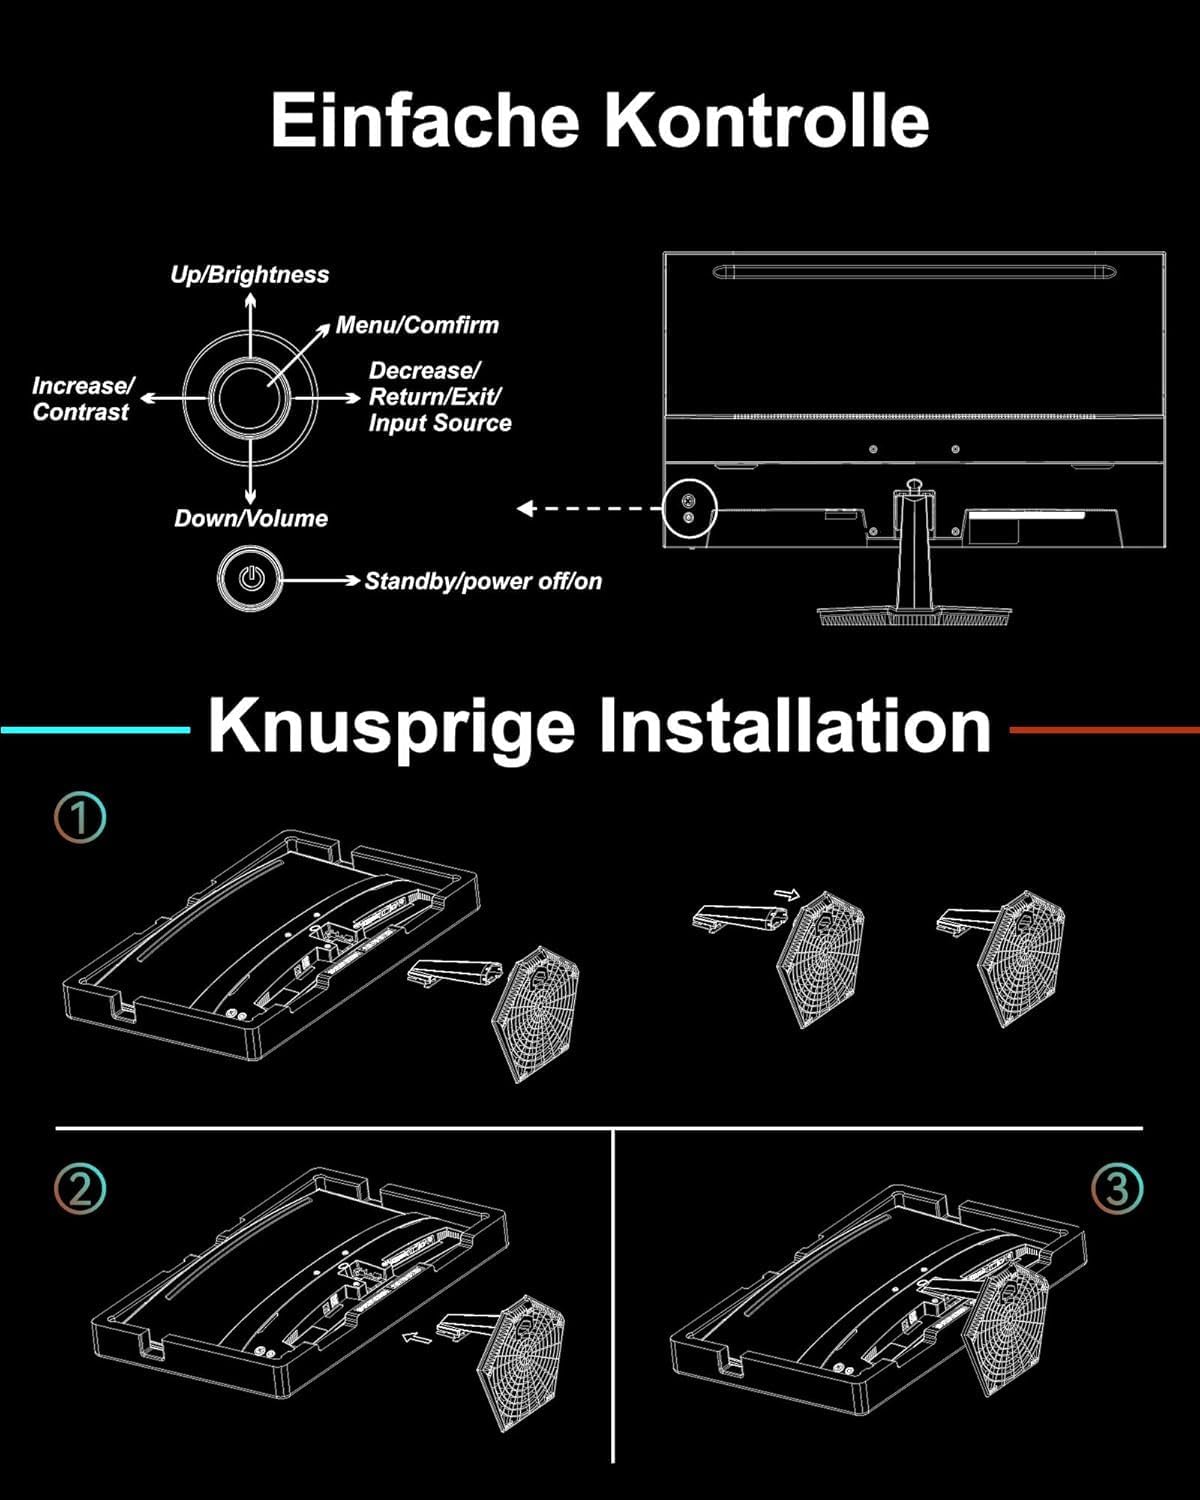
Сүрөт: Stand assembly diagram. This image illustrates the three steps for attaching the monitor stand: inserting the neck into the monitor, then attaching the base to the neck.
3.2 VESA дубалга орнотулган жабдууну орнотуу (милдеттүү эмес)
The monitor supports VESA mounting standard 75x75mm. To install a VESA mount:
- Эгерде стенд мурунтан эле бекитилген болсо, аны алып салыңыз.
- Attach your VESA-compatible wall mount or arm to the four screw holes on the back of the monitor. Use M4 x 8mm screws.
- Refer to your VESA mount's instructions for specific installation details.

Сүрөт: VESA mount and tilt suggestions. This image displays the VESA 75x75mm mounting pattern and the monitor's tilt range of -5° to 15°.
4. Мониторду иштетүү
4.1 Күйгүзүү/өчүрүү
Connect the power adapter to the monitor's power input and then to a power outlet. Press the power button located on the back of the monitor to turn it on or off.
4.2 Экрандагы дисплей (OSD) менюсу
The monitor features a five-way joystick control for navigating the OSD menu. This single button allows for easy access to various settings without complex button combinations.

Сүрөт: Joystick control diagram. This image shows the five-way joystick on the back of the monitor and its functions: Up/Brightness, Menu/Confirm, Decrease/Return/Exit/Input Source, Down/Volume, and Standby/Power Off/On.
Джойстик функциялары:
- Өйдө: Adjust Brightness / Navigate Up
- Төмөн: Adjust Volume / Navigate Down
- Сол жакта: Decrease Value / Return / Exit / Change Input Source
- Оң: Increase Value / Confirm
- Press (Center): Open Menu / Confirm Selection
- Узак басуу: Standby / Power Off
5. Түзмөктөрдү туташтыруу
The Minifire MF24C1 monitor offers versatile connectivity options for various devices.

Сүрөт: Арткы view of the monitor with port labels. This image highlights the HDMI, USB Type-C (data only, no charging), and 3.5mm audio jack ports.
- HDMI1.4: Connect to computers, laptops, or gaming consoles using an HDMI cable.
- USB Type-C: Connect to compatible devices like laptops, MacBooks, or smartphones for video signal transmission. Эскертүү: This Type-C port does not support device charging.
- 3.5 мм аудио уячасы: Connect external headphones or speakers if desired.

Сүрөт: Display modes. This image demonstrates how the monitor can be used in duplicate mode (mirroring), as a second screen (extended desktop), or as a single primary display.
6. Негизги өзгөчөлүктөрү
6.1 Curved Display (1500R)
1500R ийрилик иммерсивдүү камсыз кылат viewing experience, wrapping the display around your field of vision. This design helps reduce eye strain during extended use by maintaining a consistent focal distance across the screen.

Сүрөт: Immersive curved display. This image depicts a user engaged in gaming on the curved monitor, emphasizing the wide and vibrant visual experience.
6.2 High Refresh Rate (100Hz) & Fast Response Time (1ms MPRT)
With a 100Hz refresh rate and 1ms Moving Picture Response Time (MPRT), the monitor delivers smooth and fluid visuals, minimizing motion blur and ghosting. This is particularly beneficial for fast-paced content like gaming and action videos.

Сүрөт: 1ms response and 100Hz smooth. This image illustrates the difference in smoothness between 60Hz, 75Hz, and 100Hz refresh rates, and highlights the 1ms MPRT for reduced blur and tearing.
6.3 VA Panel with Excellent Color and Contrast
The VA (Vertical Alignment) panel technology provides exceptional color reproduction and deep contrast ratios (3000:1). With 100% sRGB color accuracy, images and videos are displayed with vibrant colors and rich detail.

Сүрөт: High contrast ratio and excellent color space. This image demonstrates the superior contrast and color depth achieved with a 3000:1 contrast ratio and 100% sRGB, compared to standard dynamic range (SDR).
6.4 Интеграцияланган баяндамачылар
The monitor includes two 2.5W integrated speakers, providing convenient audio output without the need for external speakers.

Сүрөт: See and hear thoroughly. This image shows a user enjoying a game on the curved monitor, emphasizing the combined visual immersion and integrated audio experience.
6.5 Low Blue Light Technology
The monitor incorporates low blue light technology to reduce harmful blue light emissions, helping to alleviate visual fatigue and promote eye comfort during prolonged viewing.

Сүрөт: Relieve visual fatigue. This image visually represents how low blue light and flicker-free technology contribute to reducing eye strain.
6.6 HDR колдоосу
High Dynamic Range (HDR) support enhances the contrast and color accuracy, allowing for a more detailed and lifelike visual experience, especially in scenes with extreme brightness and darkness.

Сүрөт: See more in images, perceive more with HDR. This image visually compares a scene rendered in HDR versus SDR, demonstrating the increased detail and dynamic range provided by HDR.
7. Техникалык шарттар
| Өзгөчөлүк | Спецификация |
|---|---|
| Модел | MF24C1 |
| Screen Size | 24 дюйм |
| Панел түрү | VA панели |
| Ийрилик | 1500R |
| Резолюция | 1920 x 1080 (FHD) |
| Аспект катышы | 16:9 |
| Жаңыртуу ылдамдыгы | 100 Гц |
| Жооп убактысы | 1 мс MPRT |
| Контраст катышы | 3000:1 |
| Түс гаммасы | 100% sRGB |
| Viewбурч | 178° (горизонталдуу/вертикалдуу) |
| Жарыктык | 250 кд/м² |
| Баяндамачылар | 2 x 2.5W интеграцияланган динамиктер |
| Байланыш | 1x HDMI 1.4, 1x USB Type-C (data only), 1x 3.5mm Audio Jack |
| VESA шайкештиги | 75 x 75 mm (M4 x 8mm screws) |
| Тилтти тууралоо | -5°тан 15°ка чейин |
| Продукциянын өлчөмдөрү (стенд менен) | 60.4 x 39.49 x 11.89 см |
| Салмагы (стенд менен) | 3.4 кг |
8. Кыйынчылыктарды
Эгерде сиз мониторуңуз менен көйгөйлөргө туш болсоңуз, төмөнкү кеңири таралган көйгөйлөрдү жана чечимдерди караңыз:
8.1 Күч жок
- Ensure the power adapter is securely connected to both the monitor and a working power outlet.
- Check if the power indicator light on the monitor is on. If not, press the power button.
- Учурдагы розетканын көйгөйүн жокко чыгаруу үчүн башка розетканы колдонуп көрүңүз.
8.2 Сигнал жок / Бош экран
- Verify that the video cable (HDMI or USB-C) is securely connected to both the monitor and your source device (computer, console).
- Ensure the correct input source is selected on the monitor. Use the joystick to navigate to the OSD menu and select the appropriate input (HDMI or Type-C).
- Check if your source device is powered on and outputting a video signal.
- Башка видео кабелин же мүмкүн болсо, портту колдонуп көрүңүз.
8.3 Динамиктерден үн чыкпайт
- Increase the monitor's volume using the joystick control.
- Check the audio settings on your source device to ensure audio is being sent to the monitor.
- If using an HDMI connection, ensure the audio output is set to HDMI on your source device.
- If external headphones or speakers are connected to the 3.5mm audio jack, the internal speakers will be muted. Disconnect external audio devices to use internal speakers.
8.4 Image Quality Issues (Blurry, Distorted, Incorrect Colors)
- Ensure the monitor's resolution is set to its native resolution (1920x1080) in your source device's display settings.
- OSD менюсу аркылуу жарыктык, контраст жана түс жөндөөлөрүн тууралаңыз.
- Видео кабелге же портторго кандайдыр бир физикалык зыян келтирилгенин текшериңиз.
9. Техникалык тейлөө жана кам көрүү
Minifire мониторуңуздун узак мөөнөттүү жана оптималдуу иштешин камсыз кылуу үчүн, төмөнкү техникалык тейлөө көрсөтмөлөрүн аткарыңыз:
- Экранды тазалоо: Экранды жумшак, түксүз чүпүрөк менен акырын сүртүңүз. өжөр белгилери үчүн, жеңил гampчүпүрөккө суу же атайын экран тазалоочу каражат. Эч качан суюктукту түздөн-түз экранга чачпаңыз.
- Тазалоо Casing: Мониторду тазалоо үчүн жумшак, кургак чүпүрөктү колдонуңуз casinг. Абразивдүү тазалагычтарды же эриткичтерди колдонуудан алыс болуңуз.
- Вентиляция: Ашыкча ысып кетүүнүн алдын алуу үчүн желдетүү тешиктерин чаңдан жана тоскоолдуктардан тазалаңыз.
- Сактагыч: Эгерде мониторду узак убакытка сактап жатсаңыз, аны электр тармагынан сууруп, салкын, кургак жерде, мүмкүн болсо, баштапкы таңгагында сактаңыз.
10. Кепилдик жана колдоо
10.1 Кепилдик маалыматы
The Minifire MF24C1 monitor comes with a 24 айлык кепилдик сатып алынган күндөн тартып. Бул кепилдик өндүрүштүк кемчиликтерди жана нормалдуу колдонуудагы бузулууларды камтыйт. Кепилдик дооматтары үчүн сатып алганыңыздын далилин сактап коюңуз.
Мындан тышкары, а 14-day refund or return guarantee is provided, allowing you to return the product within 14 days of receipt if you are not satisfied.
10.2 Кардарларды колдоо
Minifire offers professional customer service and өмүр бою акысыз техникалык колдоо for your product. If you have any questions, require assistance with setup, or encounter any issues not covered in this manual, please contact our support team.
For support, please visit the official Minifire store on Amazon or refer to the contact information provided with your purchase documentation.


