1. Орнотуу
1.1 Кутудан чыгаруу жана компоненттер
Carefully unpack all items from the box. Ensure all components are present before proceeding with assembly.
- Айлануучу бирдиги
- Transparent Dustcover
- Туташуу кабели
- Universal Power Adapter
- Тегиздөө транспорттору
- Жалгыз адаптер

Фронт view of the Pro-Ject Debut EVO 2 turntable.
1.2 Пластинаны жана курду орнотуу
- Carefully place the heavy aluminum platter onto the spindle in the center of the turntable.
- Locate the drive belt. Gently stretch the belt around the inner rim of the platter and around the motor pulley.
- Rotate the platter manually a few times clockwise to ensure the belt is properly seated.
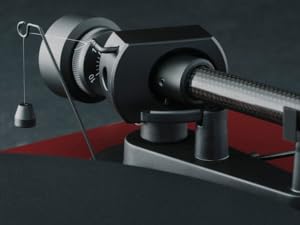
Image showing the platter with the drive belt correctly installed around the motor pulley.
1.3 Tonearm Assembly
- Slide the counterweight onto the rear of the tonearm.
- Attach the pre-mounted Pick it MM EVO cartridge to the tonearm headshell.

Деталдаштырылган view of the carbon fiber tonearm and the pre-mounted Pick it MM EVO cartridge.

Diagram illustrating the TPE counterweight and premium bearing block for the tonearm.
1.4 Dustcover Installation
Carefully insert the hinges of the transparent dustcover into the corresponding slots on the turntable base.

The Pro-Ject Debut EVO 2 turntable with its transparent dustcover in place.
1.5 Leveling the Turntable
Place the turntable on a stable, level surface. Use a bubble level (not included) to ensure the turntable is perfectly horizontal. Adjust the turntable's feet as necessary to achieve a level position.
1.6 Balancing the Tonearm
This critical step ensures proper tracking force and prevents damage to your records and stylus. Follow the detailed instructions in the included manual for precise tonearm balancing and anti-skating adjustment.

Detail of the tonearm showing the anti-skating mechanism.
1.7 Аудио системага туташуу
Айлануучу табакты өзүңүзгө туташтырыңыз amplifier or receiver using the provided connection cable. Ensure your amplifier has a phono input, or use an external phono preamplifier if necessary. Connect the ground wire to the ground terminal on your ampөмүр бою/мурункуamp to minimize hum.
Video: Fluance Reference Turntable First Time Setup. This video provides a general guide for turntable setup, including platter, belt, tonearm, and dust cover installation, as well as leveling and balancing.
Video: How to Connect a Fluance Turntable to a Stereo Amplifier. This video offers a general guide on connecting a turntable to an amplifier, which can be helpful for the Pro-Ject Debut EVO 2.
2. Иштөө нускамалары
2.1 Күйгүзүү/өчүрүү жана ылдамдыкты тандоо
To power on the turntable, rotate the power knob. The Debut EVO 2 features electronic speed selection for 33 and 45 RPM. Use the dedicated button to switch between these speeds. For 78 RPM records, a special stylus and pulley may be required (sold separately).
2.2 Пластинканы ойнотуу
- Пластинкаңызды табакка салыңыз.
- Туура ойнотуу ылдамдыгын тандаңыз (33 же 45 RPM).
- Коюу рычагын колдонуп, колду акырын көтөрүңүз.
- Тонер рычагын жаздыруудагы каалаган тректин үстүнө коюңуз.
- Стилустун пластинка ойугуна түшүшү үчүн, белгилөө рычагын акырындык менен түшүрүңүз.
- At the end of the record, lift the tonearm using the cueing lever and return it to its rest.
3. Техникалык тейлөө
3.1 Тазалоо
- Regularly clean the dustcover and turntable plinth with a soft, dry cloth.
- Use a carbon fiber brush to gently clean your records before each play to remove dust and static.
- Clean the stylus carefully with a dedicated stylus brush, moving from back to front.
3.2 Стилуска кам көрүү
The stylus is a delicate component. Avoid touching it with your fingers. Replace the stylus when signs of wear appear, typically after 500-1000 hours of playback, to maintain sound quality and prevent record damage.
4. Кыйынчылыктарды
4.1 Үн жок
- Check all cable connections between the turntable, preamplifier (if used), and ampкөтөргүч/алуучу.
- Ensure the correct input is selected on your ampкөтөргүч/алуучу.
- Verify the stylus is properly seated in the cartridge and the tonearm is balanced.
4.2 Өткөрүп жиберүү же бурмалоо
- Айлануучу табактын туруктуу, тегиз жерде турганын текшериңиз.
- Re-check tonearm balance and anti-skating settings.
- Пластинканы жана стилусту тазалаңыз.
- Inspect the stylus for damage or wear.
4.3 Humming Noise
- Жерге туташтыруучу зым айланма табакка бекем туташтырылганын жана сиздин ampөмүр бою/мурункуamp.
- Check for any loose connections in the audio cables.
- Move the turntable away from other electronic devices that might cause interference.
5. Техникалык шарттар
- Продукциянын өлчөмдөрү: 1.26 x 1.63 x 0.44 дюйм
- Элемент Салмагы: 17.6 фунт (8 килограмм)
- Модель номери: 9120129864954
- Бренд: Pro-Ject
- Максималдуу айлануу ылдамдыгы: 45 RPM (supports 33 and 45 RPM electronically)
- Камтылган компоненттер: Turntable, transparent dustcover, connection cable, universal power adapter, alignment protractor, single adapter
- Өзгөчө өзгөчөлүгү: Adjustable 8.6" carbon tonearm, Aluminium diecast platter, Built-in speed control, Precision machined MDF plinth
- Материал: Carbon Fibre (tonearm)
- Түсү: Кара сатин
- Модель аты: Дебют EVO 2
- Шайкеш түзмөктөр: AV Receiver, Audio Component with Analog or Digital Inputs, Integrated Amplifier, Powered Speaker
6. Кепилдик жана колдоо
6.1 Запастык бөлүктөрдүн болушу
Pro-Ject offers a 25-year spare parts availability guarantee for this turntable, ensuring its longevity and continued performance.
6.2 Кардарларды колдоо
For further assistance, technical support, or warranty claims, please refer to the contact information provided in your product packaging or visit the official Pro-Ject Audio Systems webсайт.


