1. Киришүү
Thank you for choosing the Irfora T58B Digital Multimeter. This instrument is a handheld, true RMS digital multimeter designed for accurate measurement of AC/DC voltage, AC/DC current, frequency, resistance, capacitance, and diodes. It is a versatile tool for solving industrial and household electrical problems, suitable for both DIY enthusiasts and professionals.
Please read this manual thoroughly before use to ensure safe and proper operation. Keep this manual for future reference.
2. Коопсуздук маалыматы
Эскертүү: To avoid electric shock or personal injury, and to prevent damage to the meter or the equipment under test, observe the following safety rules:
- Эсептегичтин туура функцияда жана өлчөө диапазонунда экенин ар дайым текшериңиз.
- Баалангандан ашык колдонбоңузtage, эсептегичте белгиленгендей, терминалдардын ортосунда же кандайдыр бир терминал менен жердин ортосунда.
- Том менен иштөөдө этият болуңузtag30V AC RMS, 42V пик же 60V DC жогору. Мындай томtagшок коркунучун жаратат.
- Before making current measurements, ensure the meter's fuses are intact and the test leads are connected to the correct input jacks.
- Disconnect the test leads from the circuit before changing functions or ranges.
- Эгерде ал бузулуп калса же сыноо өткөргүчтөрүнүн изоляциясы бузулса, эсептегичти колдонбоңуз.
- Туура эмес көрсөткүчтөрдү болтурбоо үчүн, батареянын заряды аз экенин көрсөткөн индикатор пайда болору менен батареяны алмаштырыңыз.
- Жергиликтүү жана улуттук коопсуздук эрежелерин сактаңыз.
3. Продукт бүтүп калдыview
The Irfora T58B Digital Multimeter features a robust design and a clear LCD display for easy readings.
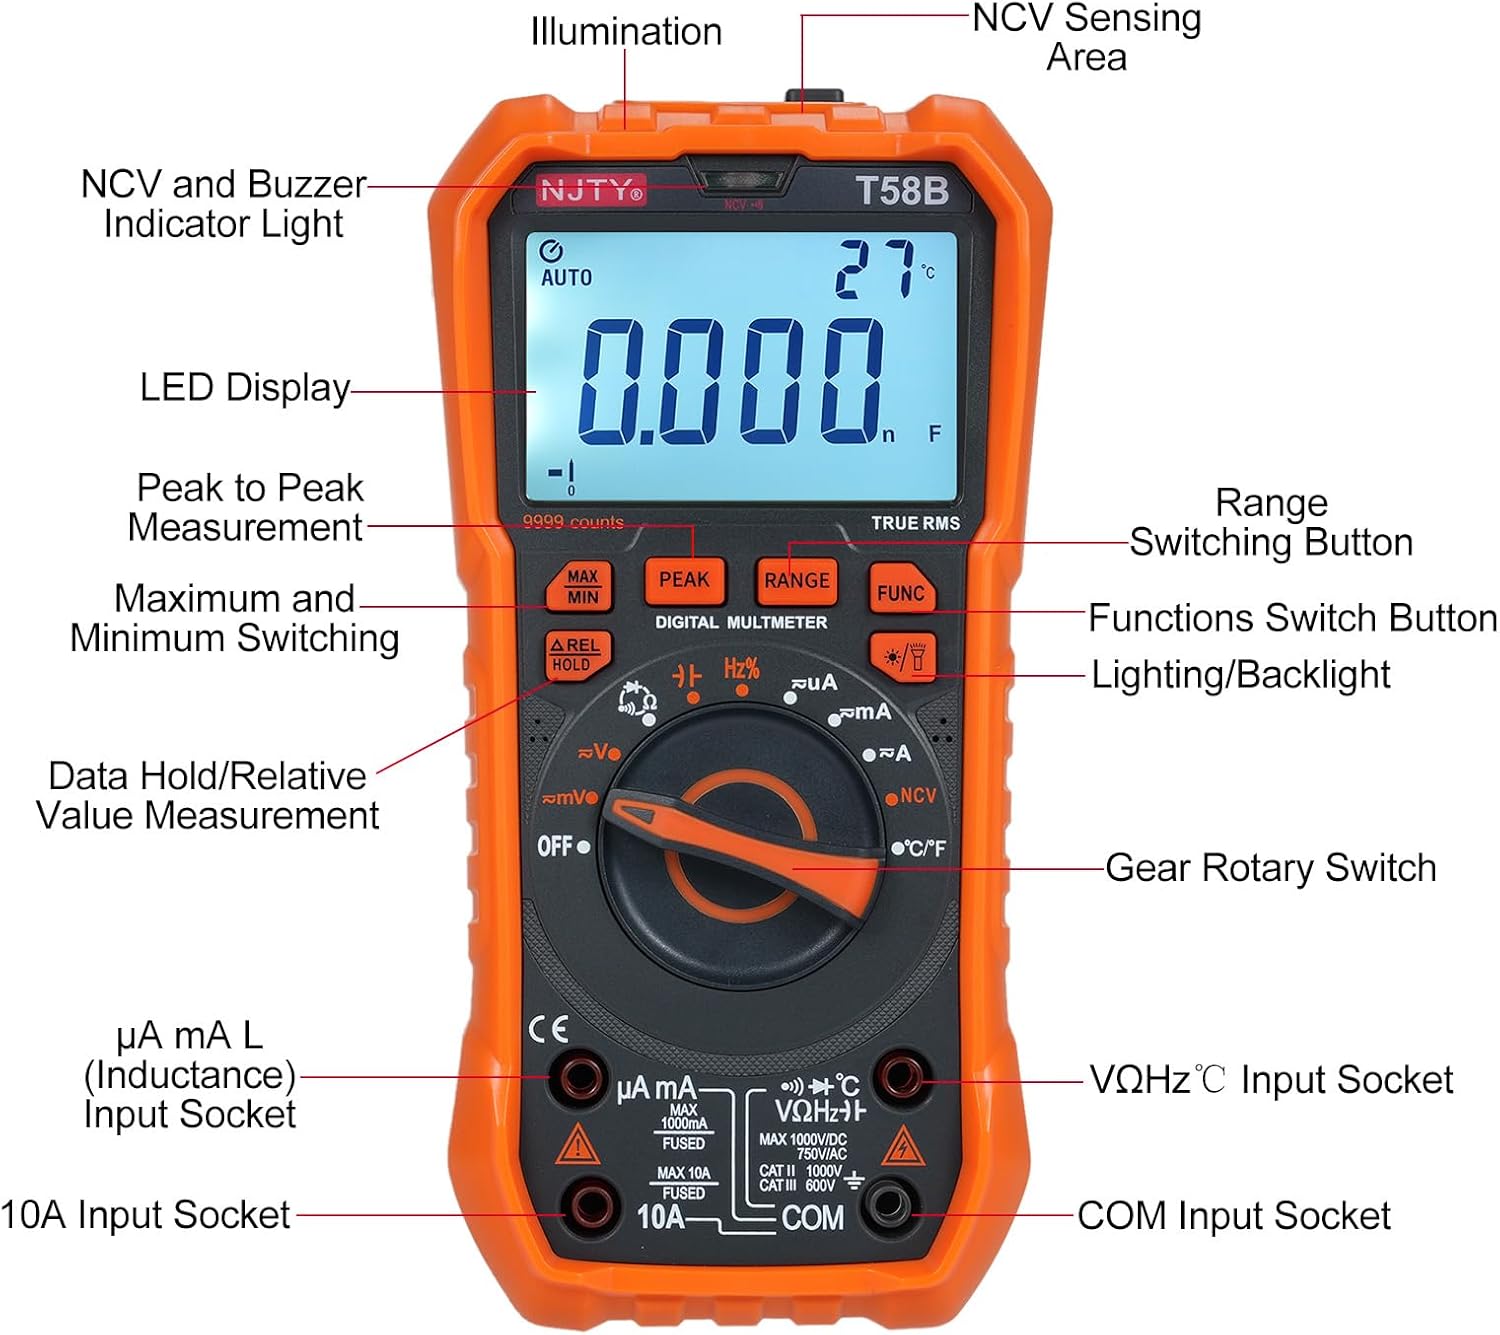
3.1-сүрөт: Фронт view of the Irfora T58B Digital Multimeter with labeled components. Key features include the LED Display, NCV and Buzzer Indicator Light, Gear Rotary Switch, Input Sockets, and various function buttons.

3.2-сүрөт: Dimensions of the Irfora T58B Digital Multimeter. The device measures approximately 187mm (7.36in) in height, 95mm (3.74in) in width, and 55mm (2.16in) in depth.

3.3-сүрөт: Арткы view of the multimeter showing the 90-degree adjustable support stand and integrated storage slots for test leads, designed for convenience and protection.

3.4-сүрөт: Бүттүview of the Irfora T58B Digital Multimeter's capabilities, including 9999 counts display, and measurement of current, resistance, capacitance, temperature, and frequency.
Негизги өзгөчөлүктөрү:
- 9999 Counts LCD Digital Display with Backlight
- Чыныгы RMS өлчөө
- Байланышсыз томtage (NCV) аныктоо
- Автоматтык түрдө өчүрүү
- Data Hold and Relative Value Measurement
- Flashlight Function for low-light conditions
- Чаралар AC/DC Voltage, AC/DC Current, Resistance, Capacitance, Frequency, and Temperature
- Диод жана үзгүлтүксүздүк тести
4. Орнотуу
4.1. Батареяны орнотуу
The Irfora T58B Multimeter requires 3 x 1.5V AAA batteries (not included). To install or replace batteries:
- Ensure the multimeter is turned OFF and disconnect all test leads from the input terminals.
- Батарея уясынын капкагын эсептегичтин арткы жагында табыңыз.
- Батареянын капкагын бекиткен бурагычты(ларды) бошотуш үчүн бурагычты колдонуңуз.
- Remove the cover and insert the 3 AAA batteries, observing the correct polarity (+ and -).
- Батареянын капкагын кайра ордуна коюп, бурамаларыңызды бекемдеңиз.
Эскертүү: Эгерде эсептегич көпкө чейин колдонулбаса, агып кетүүнүн алдын алуу үчүн батарейкаларды алып салыңыз.
4.2. Сыноо линияларын туташтыруу
Always connect the black test lead to the "COM" (Common) input jack. Connect the red test lead to the appropriate input jack based on the measurement type:
- Voltage, Resistance, Capacitance, Frequency, Diode, and Temperature measurements: Connect the red lead to the "VΩHz°C" jack.
- For Current measurements (up to 600mA): Connect the red lead to the "µA mA" jack.
- For High Current measurements (up to 10A): Connect the red lead to the "10A" jack.
Ensure test leads are fully inserted into the jacks before use.
5. Иштөө нускамалары
To operate the multimeter, turn the Gear Rotary Switch to the desired function. The meter will automatically select the appropriate range in most modes (AUTO function).
5.1. AC/DC Voltage Өлчөө
- Turn the rotary switch to the "V~" (AC Voltagд) же "V-" (ТК көлөмүtagд) кызмат орду.
- Connect the black test lead to the "COM" jack and the red test lead to the "VΩHz°C" jack.
- Сыноочу зонддорду чынжырдын чекиттерине тийгизиңиз, анда тtagе өлчөө керек.
- Томду окуңузtage дисплейдеги e мааниси.
5.2. AC/DC Ток өлчөө
Абайлаңыз: Эч качан эсептегичти томго параллель туташтырбаңызtage source when measuring current. This can blow the fuse or damage the meter.
- Turn the rotary switch to the "µA mA" or "A" position for AC or DC current. Use the "FUNC" button to switch between AC and DC if necessary.
- Connect the black test lead to the "COM" jack. Connect the red test lead to the "µA mA" jack for currents up to 600mA, or to the "10A" jack for currents up to 10A.
- Ток күчү өлчөнө турган чынжырды ачып, эсептегичти жүк менен удаалаш туташтырыңыз.
- ЖК дисплейдеги учурдагы маанини окуңуз.
5.3. Каршылык Өлчөө
- Айлануучу которгучту "Ω" абалына буруңуз.
- Connect the black test lead to "COM" and the red test lead to "VΩHz°C".
- Каршылыкты өлчөөдөн мурун чынжырдын токтун өчүрүлгөнүн текшериңиз.
- Touch the test probes across the component or circuit where resistance is to be measured.
- ЖК дисплейдеги каршылыктын маанисин окуңуз.
5.4. Capacitance Measurement
- Turn the rotary switch to the "Capacitance" position (often shared with other functions, use FUNC button if needed).
- Connect the black test lead to "COM" and the red test lead to "VΩHz°C".
- Эсептегичтин бузулушун алдын алуу үчүн өлчөөдөн мурун конденсаторду толугу менен бошотуңуз.
- Конденсатордун терминалдарынан тестирлөөчү зонддорго тийиңиз.
- ЖК дисплейдеги сыйымдуулуктун маанисин окуңуз.
5.5. Frequency Measurement
- Айланма которгучту "Гц" абалына буруңуз.
- Connect the black test lead to "COM" and the red test lead to "VΩHz°C".
- Touch the test probes across the circuit where frequency is to be measured.
- Жыштыктын маанисин ЖК дисплейден окуңуз.
5.6. Diode Test and Continuity
- Turn the rotary switch to the "Diode/Continuity" position. Use the "FUNC" button to toggle between diode test and continuity.
- Connect the black test lead to "COM" and the red test lead to "VΩHz°C".
- For Diode Test: Place the red probe on the anode and the black probe on the cathode. The display will show the forward voltage түшүрүңүз. Зонддорду тескери буруңуз; дисплейде жакшы диоддун болушу үчүн "OL" (Ачык цикл) көрсөтүлүшү керек.
- For Continuity Test: Touch the probes to the circuit points. If resistance is below approximately 50Ω, the buzzer will sound, indicating continuity.
5.7. Температураны өлчөө
- Turn the rotary switch to the "°C/°F" position.
- Connect the thermocouple (included) to the "VΩHz°C" and "COM" jacks, observing polarity.
- Place the thermocouple tip on the object or area where temperature is to be measured.
- Read the temperature value on the LCD display. Use the "FUNC" button to switch between Celsius and Fahrenheit.
5.8. Контактсыз томtage (NCV) аныктоо

5.1-сүрөт: Demonstrating NCV (Non-Contact Voltage) detection. The meter's top is placed near an AC voltage source, and the signal strength indicator lights up, accompanied by an audible alarm.
- Айланма которгучту "NCV" абалына буруңуз.
- Place the top of the meter (NCV sensing area) close to the conductor or outlet you suspect has AC voltage.
- Эгерде AC voltage is detected, the corresponding signal strength indicator (low-yellow, high-red) will light up, and the buzzer will emit different frequency alarms based on signal strength.
5.9. Backlight and Flashlight
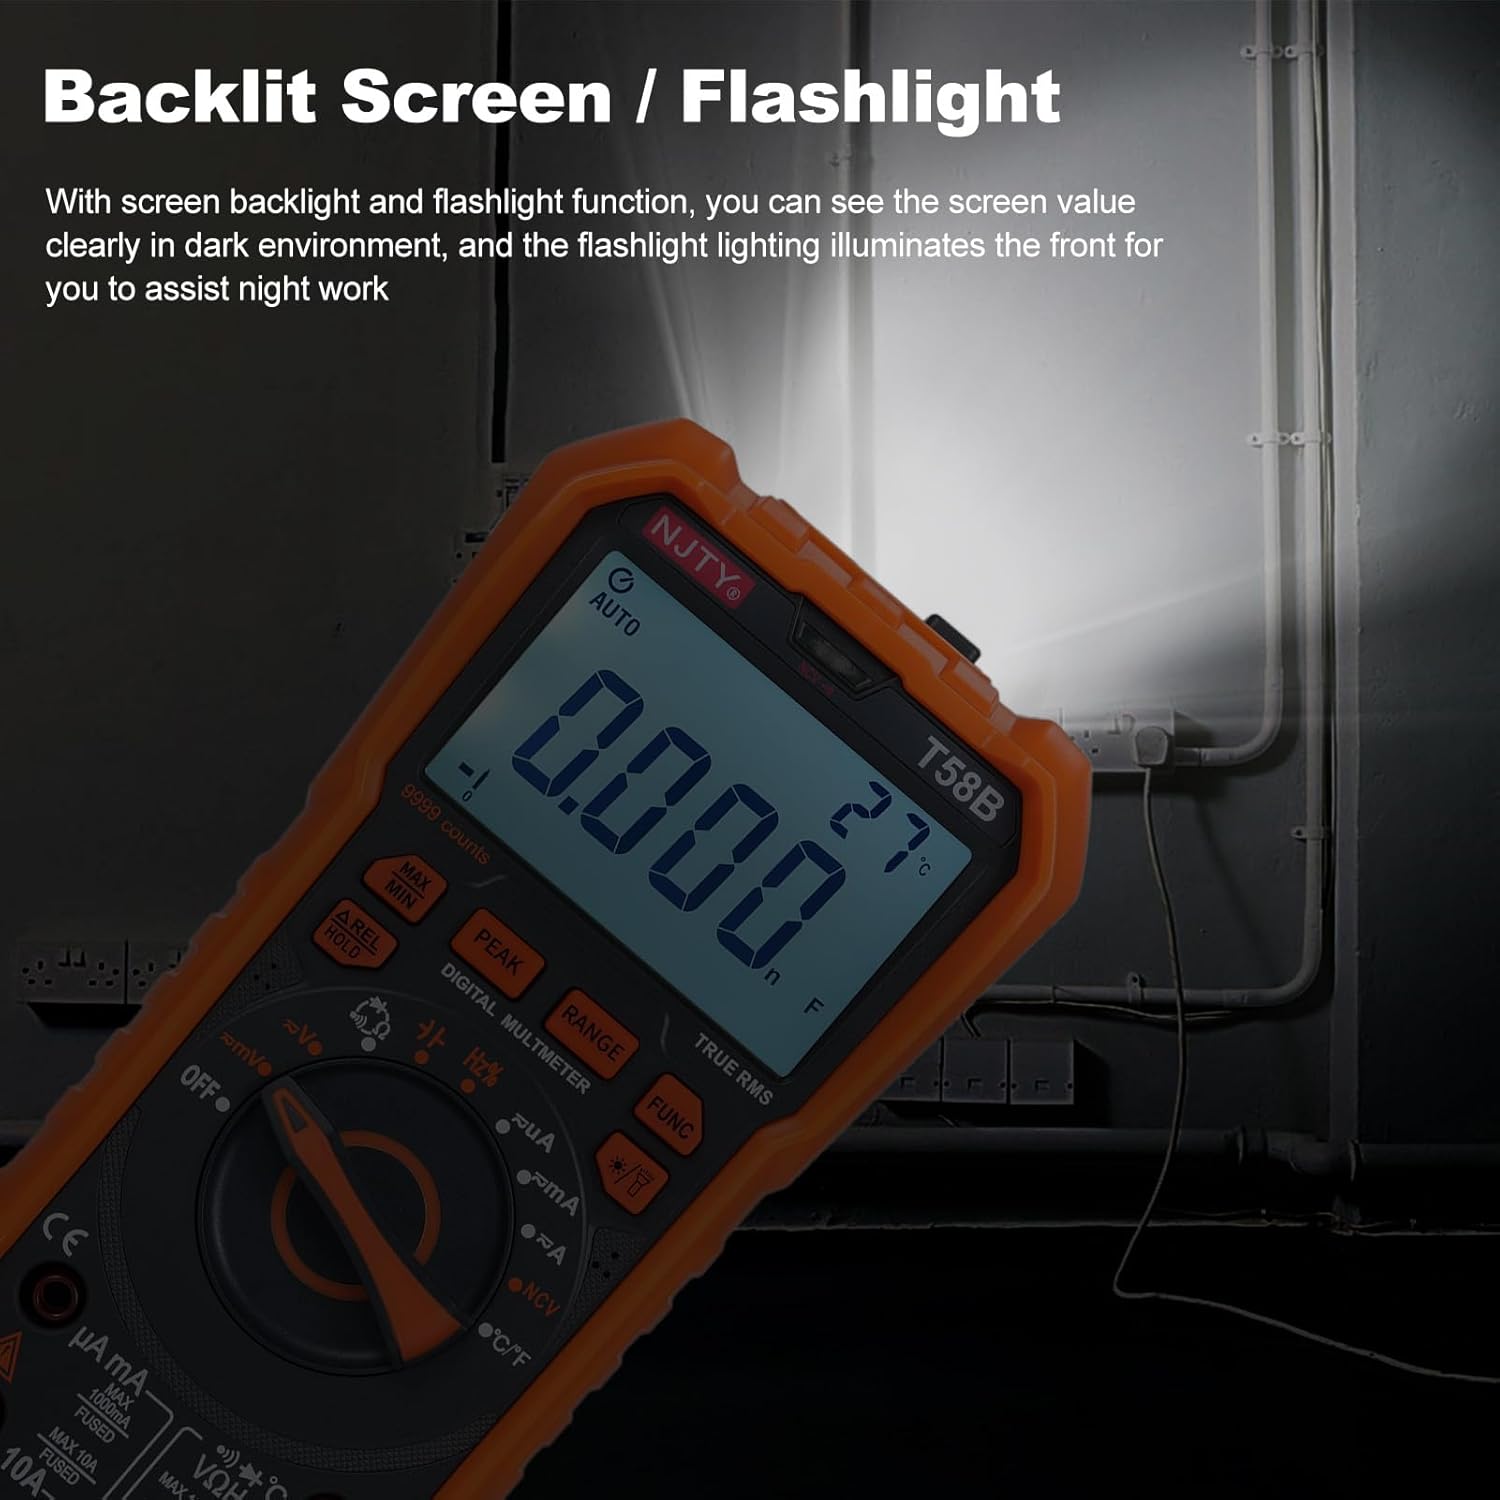
5.2-сүрөт: The multimeter's backlit screen and integrated flashlight illuminate the display and work area, enhancing visibility in dark environments.
Press the "Lighting/Backlight" button (often marked with a light bulb icon) to turn on the display backlight. Press and hold the same button to activate the flashlight located at the top of the meter. Press again to turn off.
5.10. Автоматтык түрдө өчүрүү

5.3-сүрөт: The multimeter features an automatic shutdown function, turning off after approximately 15 minutes of inactivity to conserve battery life.
The multimeter will automatically power off after approximately 15 minutes of inactivity to conserve battery life. An audible voice prompt will sound before shutdown. To restart the meter, press any button or turn the rotary switch.
6. Техникалык тейлөө
6.1. Тазалоо
Жарнама менен эсептегичти сүртүңүзamp кездеме жана жумшак жуугуч. Абразивдерди же эриткичтерди колдонбоңуз. Киргизүү терминалдарын кирден жана нымдан тазалаңыз.
6.2. Батареяны алмаштыруу
When the low battery indicator appears on the display, replace the batteries as described in Section 4.1. Prompt battery replacement ensures accurate readings.
6.3. Сактагычты алмаштыруу
If the meter fails to measure current, the fuse may be blown. To replace the fuse:
- Мультиметрдин өчүк экенин текшерип, бардык сыноо өткөргүчтөрүн ажыратыңыз.
- Батарея бөлүмүнүн капкагын 4.1-бөлүмдө сүрөттөлгөндөй ачыңыз.
- Эски сактагычты этияттык менен алып салыңыз.
- Replace with a fuse of the same type and rating:
- For µA mA input: F 600mA/250V
- For 10A input: F 10A/250V
- Батареянын капкагын кайра ордуна коюп, бурамаларыңызды бекемдеңиз.
7. Кыйынчылыктарды
| Көйгөй | Мүмкүн себеп | Чечим |
|---|---|---|
| Эсептегич күйбөйт. | Өлүк же туура эмес орнотулган батарейкалар. | Check battery polarity and replace batteries if necessary (Section 4.1). |
| No reading or "OL" displayed during measurement. | Incorrect range, open circuit, or blown fuse (for current). | Ensure correct function/range. Check test lead connections. For current, check and replace fuse (Section 6.3). Verify circuit continuity. |
| Туура эмес окуулар. | Low battery, incorrect connection, or external interference. | Replace batteries. Recheck test lead connections. Move away from strong electromagnetic fields. |
| Buzzer does not sound during continuity test. | Circuit resistance is too high. | Ensure resistance is below approximately 50Ω for continuity indication. |
Бул чечимдерди колдонууга аракет кылгандан кийин көйгөй чечилбесе, кардарларды колдоо кызматына кайрылыңыз.
8. Техникалык шарттар
The following specifications are for the Irfora T58B Digital Multimeter:
Жалпы мүнөздөмөлөрү:
- Display: 9999 Counts LCD display
- Safety Rating: CAT III 600V, CAT II 1000V
- Pollution Grade: 2
- Working Height: Under 2000m
- Working Temperature: 0-40°C (<80%RH, not considered <10°C)
- Storage Temperature: -10~60°C (<80%RH, remove battery)
- Test/Calibration Ambient Temperature: 20°C ± 2°C
- Максималдуу томtage between Measurement End and Ground: 1000V DC or 750V AC
- Fuse коргоо:
- For µA mA input: F 600mA/250V
- For 10A input: F 10A/250V
- Conversion Rate: Approximately 3 readings/second
- Overload Display: "OL"
- Power Supply: 3 * 1.5V AAA batteries (Not included)
- Item Size: 187 * 95 * 55mm / 7.36 * 3.74 * 2.16in
- Item Weight: 331g / 11.67oz
Өлчөө чектери:
- DC Voltage: 100mV, 600mV, 1V, 60V, 600V, 1000V
- AC Voltage: 100mV, 600mV, 1V, 60V, 600V, 750V
- DC Current: 600µA, 6mA, 60mA, 600mA, 6A, 10A
- AC Current: 600µA, 6mA, 60mA, 600mA, 6A, 10A
- Каршылык: 600Ω, 6kΩ, 60kΩ, 600kΩ, 6MΩ, 60MΩ
- Capacitance: 6nF, 60nF, 600nF, 6µF, 60µF, 600µF, 6mF, 60mF
- Frequency: 100Hz, 1KHz, 10KHz, 100KHz, 1MHz, 10MHz, 25MHz
- Temperature: -50°C~1000°C / -58°F~1832°F
- Диод сыноо: Ооба
- Buzzer (Continuity): Yes
9. Кепилдик жана колдоо
For warranty information or technical support, please refer to the purchase platform or contact Irfora customer service directly. Keep your purchase receipt as proof of purchase.
Байланыш маалыматы: Please refer to the seller's contact details on the platform where the product was purchased.
