1. Киришүү
This manual provides detailed instructions for the installation, operation, and maintenance of your Jansite OEM Bracket for the T30 Mirror Dash Cam. This bracket offers a secure and integrated mounting solution, replacing traditional strap installations for improved stability and aesthetics.
2. Продукциянын өзгөчөлүктөрү
- Жакшыртылган туруктуулук: Provides a more firmly fixed installation compared to strap mounting, reducing dashcam shaking during driving.
- Үзгүлтүксүз интеграция: Designed specifically for the Jansite T30 rearview mirror dashcam, ensuring a clean look without the original rearview mirror being partially covered.
- OEM Design: Offers an original equipment manufacturer (OEM) style fit for a professional appearance.
3. Пакеттин мазмуну
The Jansite OEM Bracket package includes the following items:
- 1x Car Mount (OEM Bracket assembly)
- Монтаждоо үчүн бурамалар

Figure 1: Contents of the Jansite OEM Bracket package.
4. Шайкештик
This bracket is exclusively designed for the Jansite T30 Mirror Dash Cam. It is not compatible with other dash cam models.
Сатып алуудан мурунasing and installing, please verify that your vehicle's original rearview mirror bracket and base are compatible with this OEM bracket. The bracket is suitable for most models, but some vehicles may require additional adapters or a different bracket type. Contact Jansite customer service for compatibility confirmation if unsure.
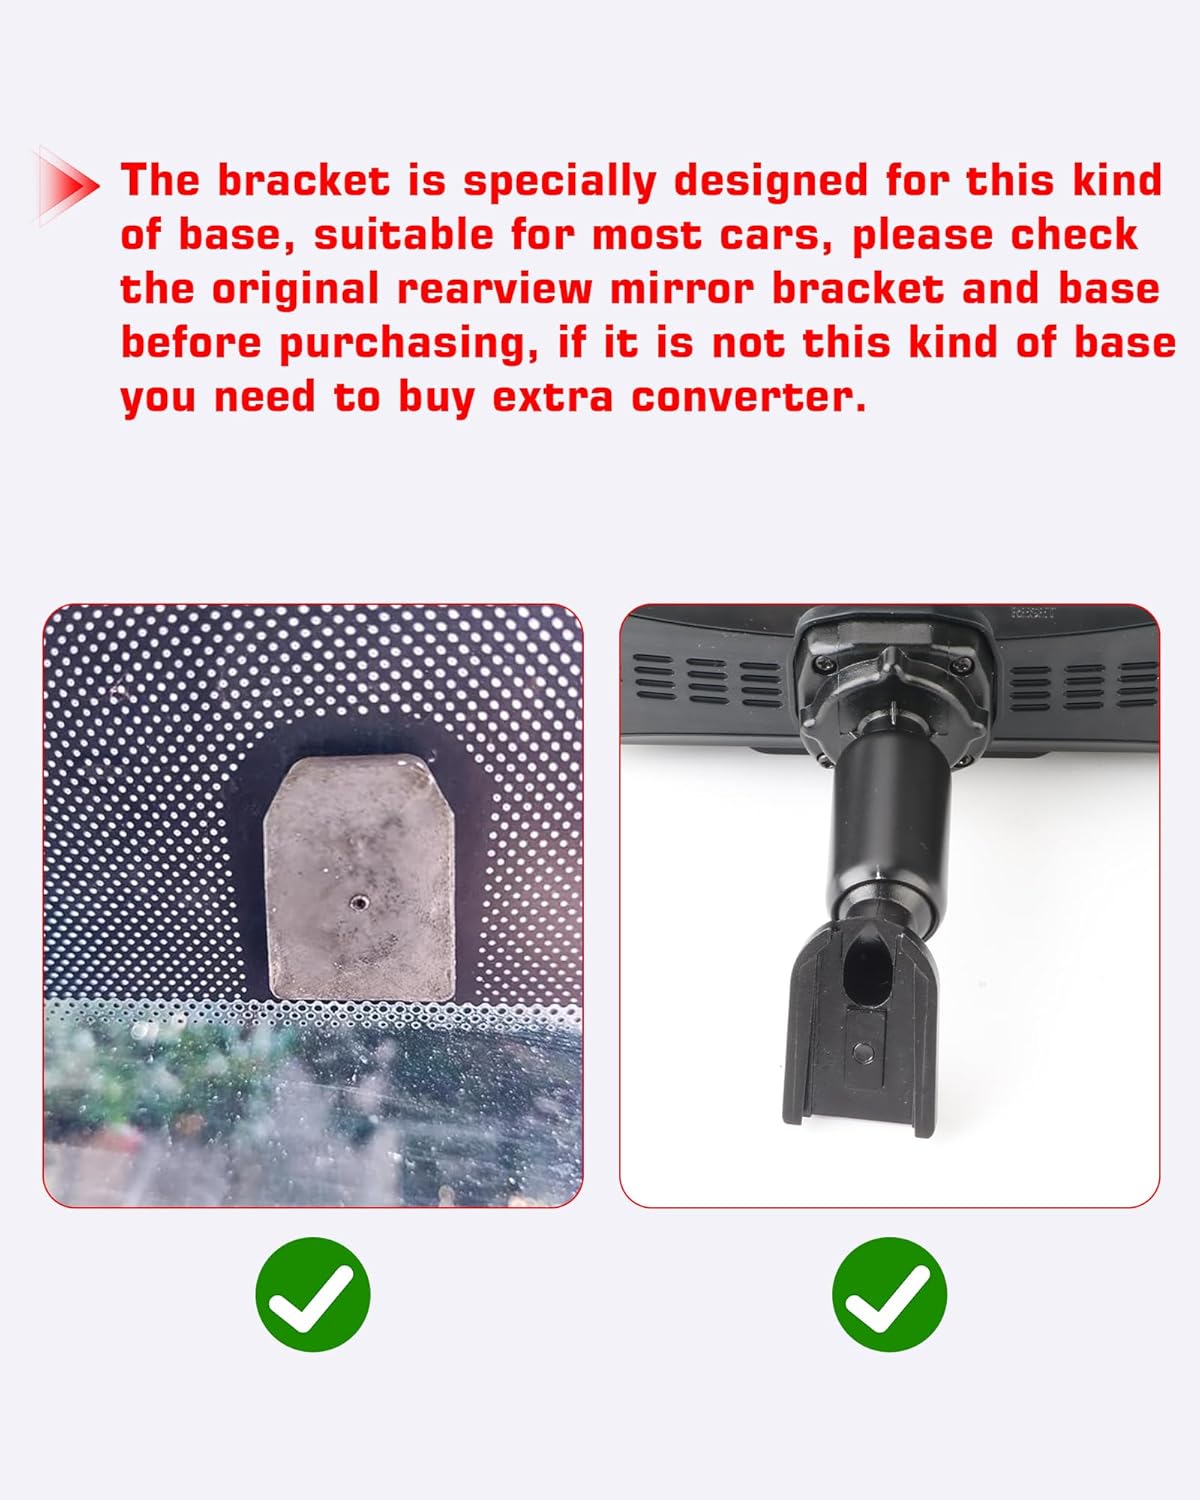
Figure 2: Visual guide for checking rearview mirror base compatibility.
5. Орнотуу боюнча колдонмо
Follow these steps for a secure installation of your Jansite OEM Bracket:
5.1. Assembling the Bracket to the Dash Cam
- Remove Original Bracket: Gently remove the original bracket from your T30 Mirror Dash Cam by pushing it down.
- Тегиздөө жана бекитүү: Locate the RESET hole on the top of the dash cam. Align the buckle of the OEM bracket with this hole and push up with both hands simultaneously until it clicks into place.
- Бурама менен бекитүү: Pass the provided screws through the designated holes in the bracket and into the dash cam's back panel.
- Катуу: Use a screwdriver to install and tighten the screws, ensuring the bracket is firmly fixed. Adjust tightness as needed for optimal positioning.

Figure 3: Step-by-step assembly of the OEM bracket to the Jansite T30 Dash Cam.
5.2. Installing the Bracket on the Vehicle's Rearview Mirror Base
- Remove Original Rearview Күзгү: Carefully remove your vehicle's original rearview mirror from its base on the windshield.
- Retain the Base: Ensure the original rearview mirror base remains securely attached to the windshield.
- Attach OEM Bracket: Position the assembled OEM bracket onto the vehicle's rearview күзгү базасы.
- Коопсуз бекемдөө: Use the appropriate tool to tighten the screw on the OEM bracket, fixing it firmly to the base.
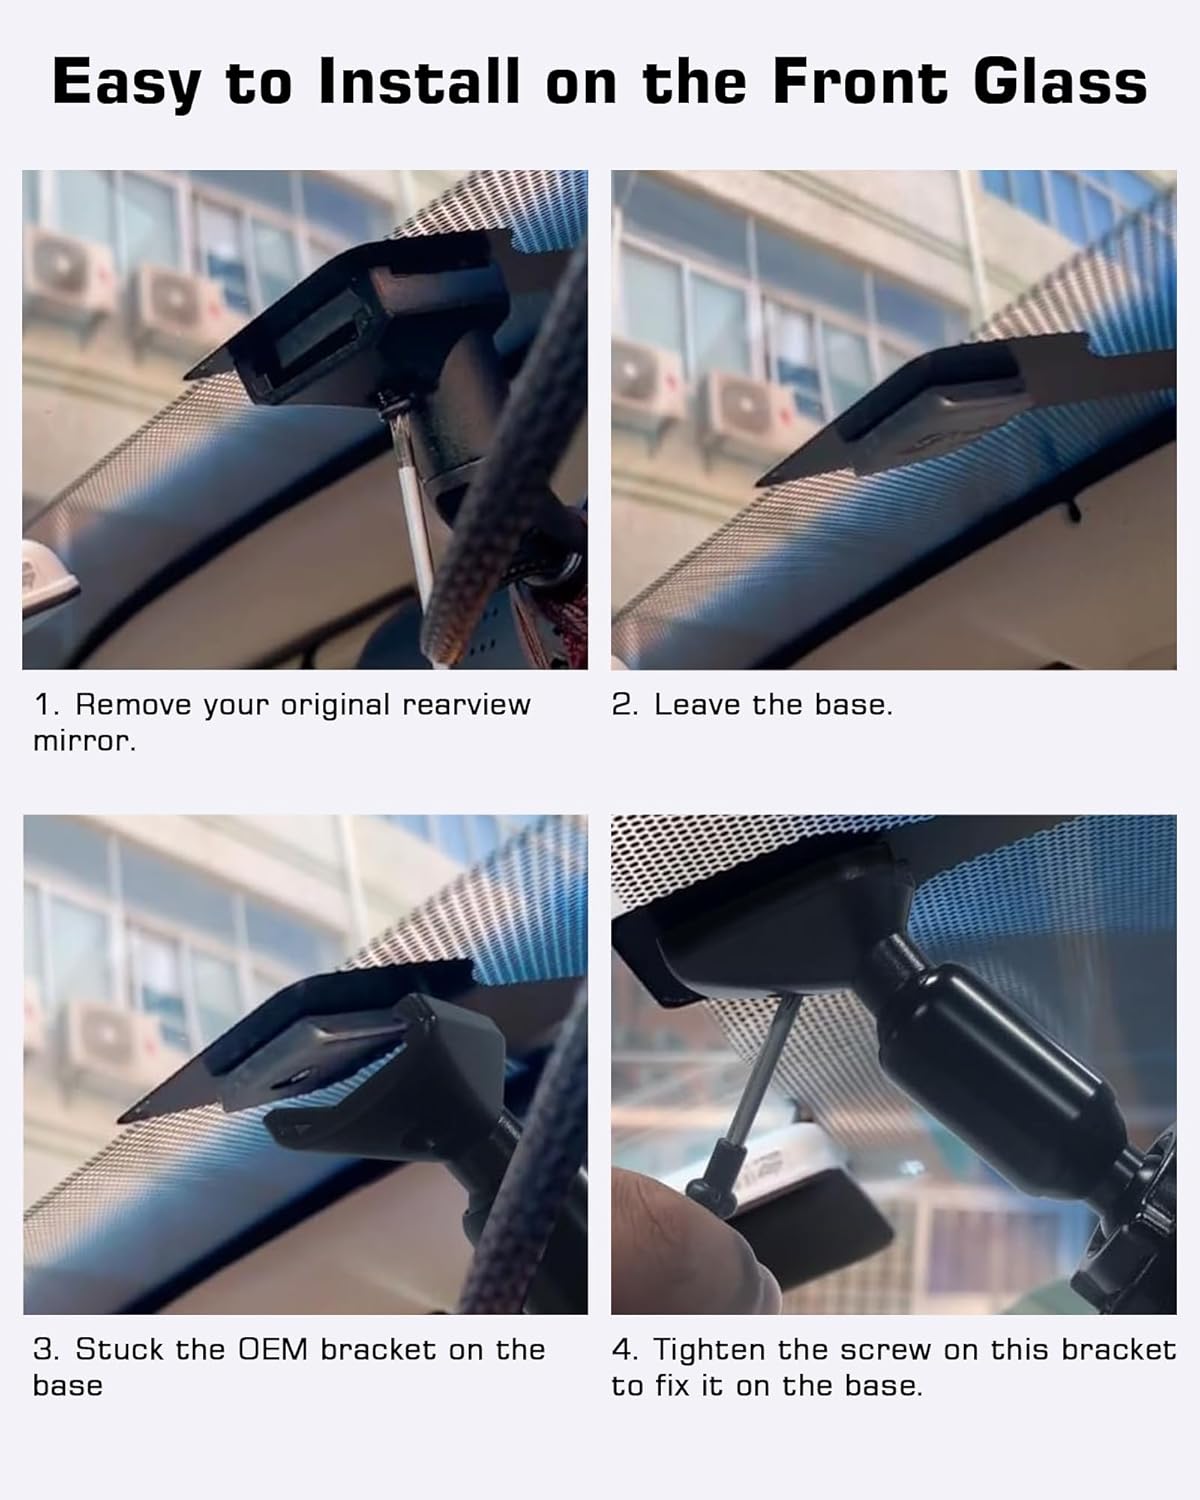
Figure 4: Installation of the OEM bracket onto the vehicle's existing rearview күзгү базасы.
5.3. Visual Comparison: OEM Bracket vs. Strap Mounting
The Jansite OEM bracket provides a cleaner and more stable installation compared to traditional strap mounting methods. This reduces unwanted movement and vibration of the dashcam, offering a clearer view and improved aesthetics.
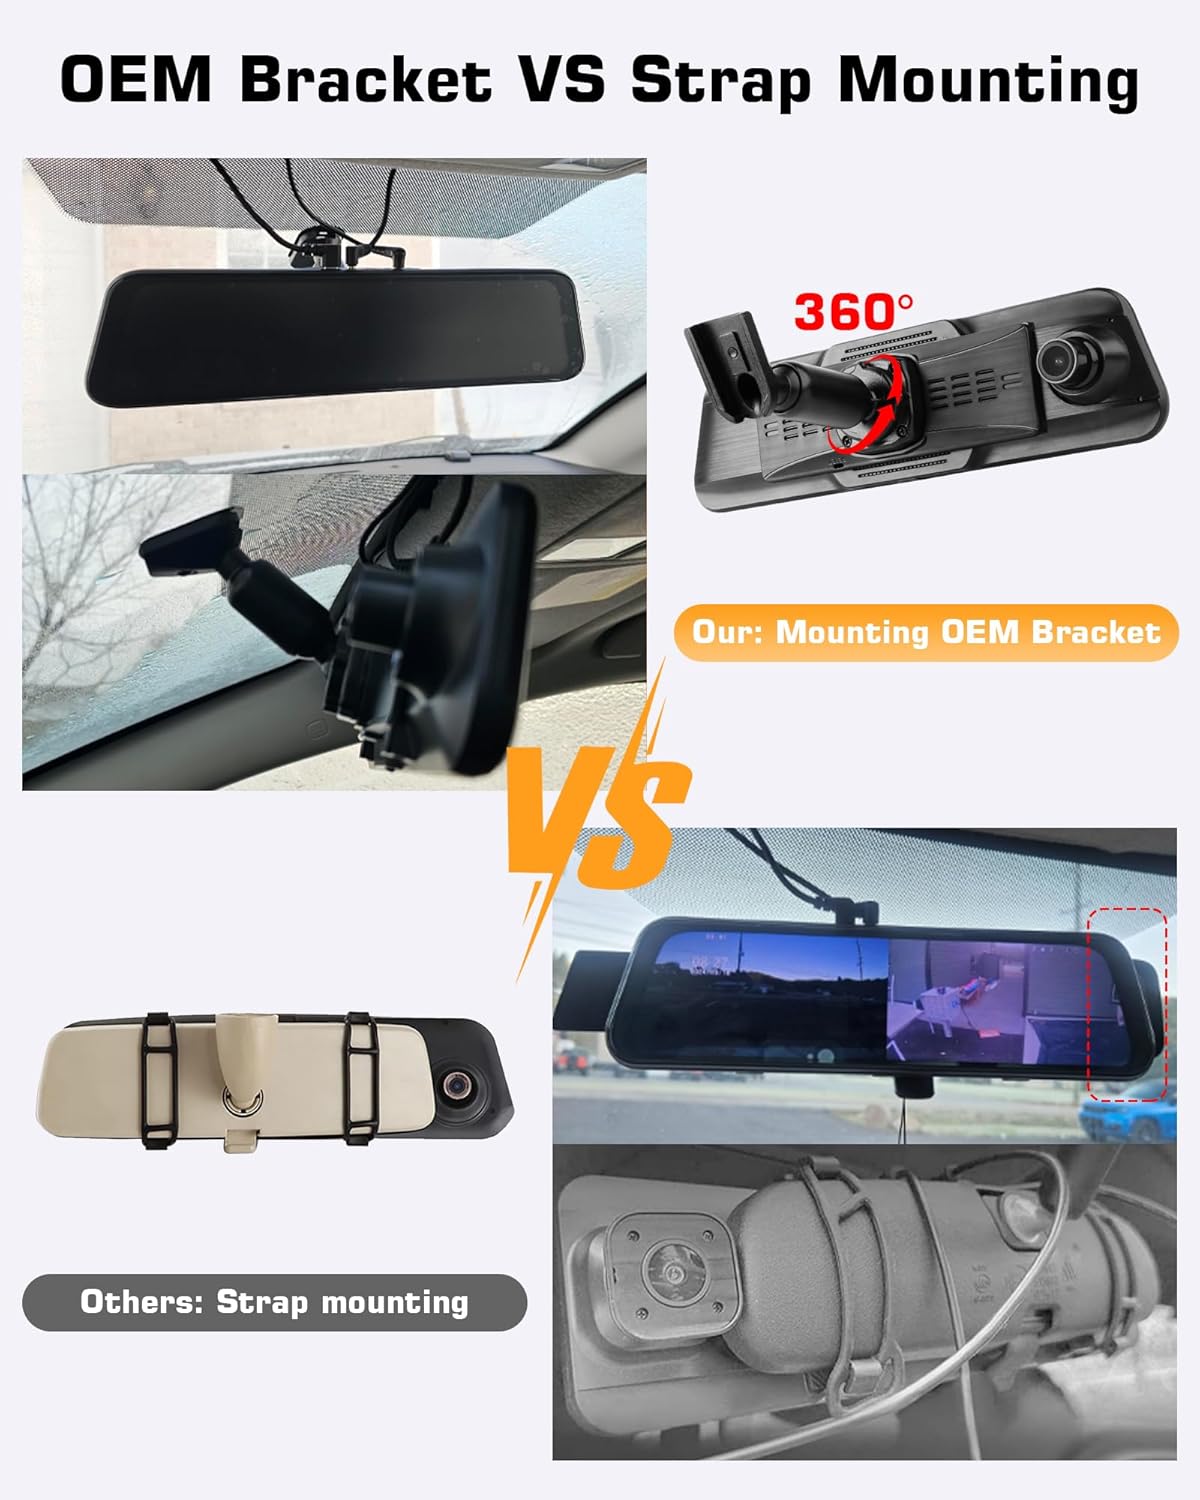
Figure 5: Comparison of OEM bracket installation versus strap mounting.
5.4. Assembly Demonstration Videos
The following videos demonstrate general principles of mirror mount assembly that may be helpful during your installation process. Please note these videos may feature similar but not identical products.
Video 1: Demonstration of a Rear View Mirror Back Plate Panel assembly. This video illustrates the process of attaching a back plate to a mirror-mounted device, which can be relevant for understanding the initial assembly of the Jansite OEM bracket.
Video 2: Demonstration of a Rear View Mirror Mount assembly. This video provides a general overview of how a mirror mount is put together, offering visual context for the Jansite OEM bracket's components.
Video 3: Demonstration of a Rearview Mirror Back Plates Dash Cam Bracket assembly. This video shows the process of attaching a dash cam bracket to a rearview mirror's back plate, which is directly applicable to the Jansite OEM bracket installation.
Video 4: Demonstration of a Rear View Mirror Back Plate Panel. This video provides another perspective on the installation of a back plate panel for a rearview mirror, aiding in the understanding of the bracket's mounting mechanism.
Video 5: Demonstration of a DOITOOL Rear View Mirror Back Plate. This video offers a quick visual guide on a rearview mirror back plate, which can be useful for familiarizing yourself with similar components.
6. Иштөө нускамалары
Once installed, the Jansite OEM Bracket securely holds your T30 Mirror Dash Cam. The dash cam itself will have its own operating instructions for recording, settings, and other functions. The bracket's primary function is to provide a stable and adjustable mounting point.
- Жөндөө бурчу: The bracket allows for angle adjustment of the dash cam to ensure optimal viewing and recording angles. Gently loosen any adjustment knobs on the bracket, position the dash cam as desired, and then re-tighten to secure.
7. Техникалык тейлөө
Proper maintenance ensures the longevity and performance of your Jansite OEM Bracket:
- Үзгүлтүксүз текшерүү: Periodically check all screws and connection points to ensure they remain tight and secure. Vibrations from driving can sometimes loosen fasteners over time.
- Тазалоо: жумшак колдонуу, damp cloth to clean the bracket. Avoid harsh chemicals or abrasive materials that could damage the finish.
- Ашыкча күч колдонуудан алыс болуңуз: Do not apply excessive force when adjusting the dash cam's angle or when cleaning, as this could damage the bracket or the dash cam.
8. Кыйынчылыктарды
If you encounter any issues with your Jansite OEM Bracket, consider the following:
- Dash Cam Shaking: Ensure all screws securing the bracket to the dash cam and to the vehicle's mirror base are fully tightened.
- Шайкеш келбеген форма: If the bracket does not fit your vehicle's mirror base, it may be incompatible. Refer to the compatibility section and contact Jansite customer service for assistance.
- Бурчту тууралоо кыйынчылыгы: Check for any obstructions or if adjustment knobs are overtightened. Loosen slightly, adjust, and re-tighten.
9. Техникалык шарттар
| Атрибут | Нарк |
|---|---|
| Продукциянын өлчөмдөрү | 2.8"D x 6.5"W x 2.6"H |
| Элемент Салмагы | 6.4 унция |
| ASIN | B0DCJFSKMZ |
| Элемент моделинин номери | Z022+Z023-US5 |
| Өндүрүүчү | Jansite |
| Монтаж түрү | Арткыview Mirror Mount |
10. Кепилдик жана колдоо
For any questions regarding product compatibility, installation, or troubleshooting, please contact Jansite customer service. You can visit the official Jansite store on Amazon or their webколдоо үчүн сайт.
Jansite Store: Visit Jansite Store on Amazon
Please refer to the product packaging or the official Jansite webатайын кепилдик маалымат үчүн сайт.


