1. Киришүү
Сатып алганыңыз үчүн рахматasing the Matbip Wireless Controller. This manual provides detailed instructions on how to set up, operate, and maintain your controller. Please read this manual carefully before use to ensure optimal performance and longevity of your device.
2. Продукт бүтүп калдыview
The Matbip Wireless Controller is designed for an enhanced gaming experience across multiple platforms. It features programmable back buttons, adjustable TURBO function, HD vibration, and a 6-axis gyro sensor.
2.1 Пакеттин мазмуну
- 1 x Matbip Wireless Controller
- 1 x USB заряддоо кабели
- 1 x User Manual
2.2 Controller Layout

Сүрөт 2.2.1: Алдыңкы жана арткы view of the Matbip Wireless Controller with all buttons and ports labeled. Key components include Left/Right Analog Sticks, Direction Pad, ABXY Buttons, TURBO Button, Capture Button, Home Button, Menu Selection buttons, L/R/ZL/ZR Buttons, M1/M2 Programmable Back Buttons, LED Indicators, and Type-C Interface.
- Сол аналогдук таякча: For movement and navigation.
- Багыт тактасы: Багыттуу киргизүү үчүн.
- ABXY баскычтары: Стандарттык аракет баскычтары.
- Оң аналогдук таякча: Камераны башкаруу жана мээлөө үчүн.
- TURBO баскычы: Activates rapid fire function.
- Тартуу баскычы: Скриншотторду тартат.
- Үй баскычы: Returns to the console's home screen.
- Menu Selection Buttons (+/-): Меню багыттоо үчүн.
- Сол/Оң/Жалгыз/Жалгыз баскычтар: Ийин жана триггер баскычтары.
- M1/M2 баскычтары: Программалануучу арткы баскычтар.
- LED көрсөткүчтөрү: Show connection status and battery level.
- Type-C интерфейси: Заряддоо жана зымдуу туташуу үчүн.
3. Орнотуу жана туташуу
3.1 Контроллерди заряддоо
Before first use, fully charge the controller. Connect the supplied USB charging cable to the Type-C port on the controller and the other end to a USB power source (e.g., console, PC, USB wall adapter).
- Толук кубаттоо, адатта, болжол менен 3 саатты талап кылат.
- The built-in 600mAh battery provides approximately 16-20 hours of continuous use on a full charge. Actual usage time may vary depending on game and vibration settings.

Figure 3.1.1: The controller features a 600mAh battery, offering 16-20 hours of gameplay per charge.
3.2 Wireless Connection to Nintendo Switch/Switch Lite/Switch OLED
- БАШКЫ БЕТ менюсунан "Контроллерлер" > "Тартууну/Тартипти өзгөртүү" дегенди тандаңыз.
- On the next screen, press and hold the Home button on the Matbip controller for 3-5 seconds until the LED indicators start flashing rapidly.
- Once connected, the LED indicator(s) on the controller will remain solid, and the console will register the controller.
Wake-up Feature: The controller supports one-key wake-up. When the console is in standby mode, press the Home button on the controller to wake up the console and automatically reconnect.
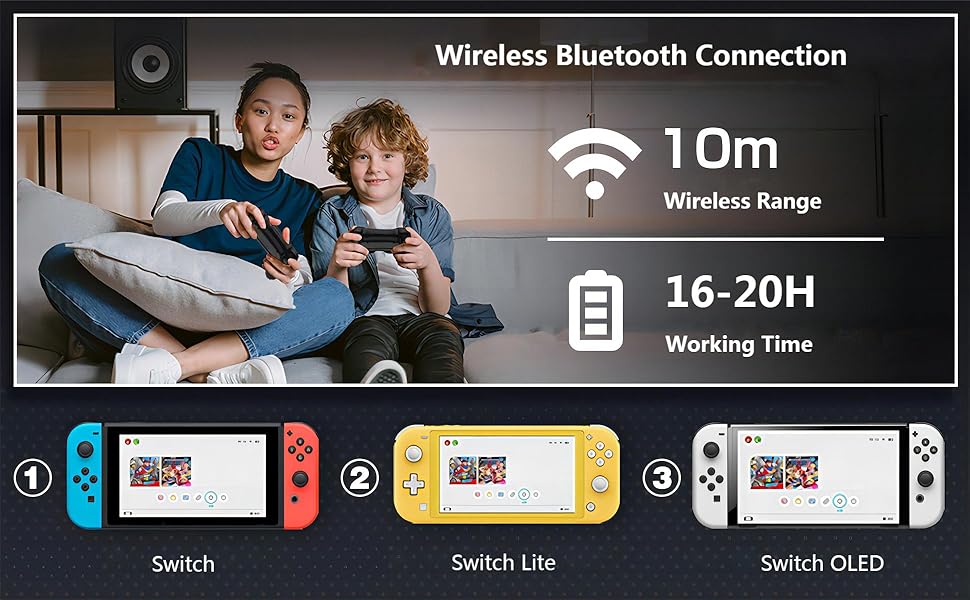
Figure 3.2.1: The controller connects wirelessly via Bluetooth to Nintendo Switch, Switch Lite, and Switch OLED consoles, offering a wireless range of up to 10 meters.
3.3 Wired/Bluetooth Connection to PC (X-Input Mode)
- Зымдуу туташуу: Connect the controller to your PC using the USB charging cable. The PC should automatically detect and install the necessary drivers.
- Bluetooth байланыш: Ensure your PC has Bluetooth enabled. Go to your PC's Bluetooth settings and search for new devices. Select the Matbip controller from the list to pair. The controller will operate in X-Input mode for PC compatibility.
4. Иштөө нускамалары
4.1 TURBO функциясы
The TURBO function allows for rapid, continuous input of a button press. This can be useful in games requiring fast button mashing.
- Activate TURBO: Press and hold the TURBO button, then press the desired action button (A/B/X/Y/L/R/ZL/ZR) to enable TURBO for that button.
- TURBO ылдамдыгын жөндөө: While holding the TURBO button, press the Right Analog Stick (R3) up or down to cycle through 3 speed levels:
- Level 1: 5 times/second
- Level 2: 12 times/second
- Level 3: 20 times/second
- Deactivate TURBO: Press and hold the TURBO button, then press the action button again to disable TURBO for that button. Alternatively, press and hold the TURBO button for 5 seconds to clear all TURBO settings.

Figure 4.1.1: The TURBO function allows for rapid button presses, with adjustable speeds up to 20 shots per second, providing an advantagтез темптеги оюндарда e.
4.2 Programmable Back Buttons (M1/M2)
The M1 and M2 back buttons can be programmed to execute a sequence of up to 16 button actions, or to replicate other buttons for complex "combo techniques."
- Программалоо режимине кирүү: Press and hold the M1 (or M2) button and the TURBO button simultaneously for 3 seconds. The LED indicators will flash slowly to indicate programming mode.
- Record Actions: Press the desired sequence of buttons (up to 16 actions).
- Сактоо программасы: Press the M1 (or M2) button again to save the recorded sequence. The LED indicators will stop flashing and return to normal.
- Программаны тазалоо: To clear a programmed button, repeat step 1, then press the M1 (or M2) button twice without recording any actions.

Figure 4.2.1: The M1 and M2 buttons on the back of the controller can be programmed to perform complex button combinations or sequences, enhancing gameplay.
4.3 HD Vibration Adjustment
The controller features 4 levels of HD vibration feedback to enhance immersion in games.
- Титирөөнү тууралоо: Press and hold the TURBO button, then press the Left Analog Stick (L3) up or down to cycle through the 4 vibration levels (0%, 30%, 70%, 100%).
- Release the TURBO button to set the desired vibration level.

Figure 4.3.1: The controller offers 4 adjustable levels of HD vibration (0%, 30%, 70%, 100%) for a more realistic gaming experience.
4.4 6-Axis Motion Sensor
The integrated high-sensitivity 6-axis detection system allows for tilt and movement control in compatible games.
- The motion sensor detects swinging motion, differentiates viewing motion, and enables precise direction control.
- Ensure the controller is calibrated correctly within your game settings if you experience issues with motion control.

Figure 4.4.1: The 6-axis motion sensor provides precise control by detecting physical movements like swinging, tilting, and directional changes, enhancing interactive gameplay.
5. Шайкештик
The Matbip Wireless Controller is compatible with the following systems:
- Nintendo Switch
- Nintendo Switch Lite
- Nintendo Switch OLED
- PC (via wired USB or Bluetooth in X-Input mode)
6. Техникалык тейлөө
- Keep the controller away from dust, moisture, and extreme temperatures.
- Башкаргычты жумшак, кургак чүпүрөк менен тазалаңыз. Катуу химиялык заттарды же абразивдүү материалдарды колдонбоңуз.
- Көзөмөлдөгүчтү кулап же катуу таасирлерге дуушар кылуудан качыңыз.
- When not in use for extended periods, store the controller in a safe place and ensure it is partially charged to preserve battery health.
7. Кыйынчылыктарды
| Көйгөй | Мүмкүн себеп | Чечим |
|---|---|---|
| Controller does not connect/pair. | Low battery; out of range; pairing mode not activated; interference. | Ensure controller is charged. Move closer to the console/PC. Re-enter pairing mode (hold Home button). Turn off other Bluetooth devices. |
| Киргизүүнүн кечигиши же жооп бербей жаткан баскычтар. | Low battery; wireless interference; software glitch. | Charge the controller. Reduce distance to console/PC. Restart the controller and console. Try wired connection to PC to rule out wireless issues. |
| Контроллер тез-тезден ажыратылат. | Low battery; wireless interference; console/PC issues. | Ensure controller is fully charged. Minimize wireless interference. Update console/PC software. |
| Analog stick "drift" or incorrect input. | Calibration issue; physical wear. | Recalibrate analog sticks through the console's system settings. If the issue persists, contact customer support. |
| Vibration is too strong or too weak. | Вибрация деңгээлин орнотуу. | Adjust the HD vibration level as described in Section 4.3. |
8. Техникалык шарттар
- Модель номери: SW02-blue&red
- Байланыш: Зымсыз (Bluetooth), Зымдуу (USB Type-C)
- Шайкештик: Nintendo Switch, Switch Lite, Switch OLED, PC
- Батарея сыйымдуулугу: 600mAh
- Заряддоо убактысы: Болжол менен 3 саат
- Иш убактысы: 16-20 hours (approximate, varies with usage)
- Дирилдөө: 4-step HD Vibration
- Кыймыл сенсору: 6-ок гиро
- Программалануучу баскычтар: 2 (M1, M2)
- TURBO функциясы: 3 adjustable speeds (5/12/20 times/sec)
- Өлчөмдөрү: 6.77 x 4.53 x 2.72 дюйм
- Салмагы: 9.14 унция
9. Кепилдик жана колдоо
Matbip provides customer support for its products. If you encounter any issues or have questions regarding your Matbip Wireless Controller, please contact us via email. We aim to respond to all inquiries within 24 hours.
For further assistance, please refer to the contact information provided with your purchase or visit the official Matbip store on Amazon: Matbip Store


