1. Киришүү
The Robotistan SolarX V2 is an educational DIY kit designed to introduce users to the principles of solar energy and sun-tracking technology. This kit allows you to build a functional solar panel system that automatically adjusts its position to follow the sun, maximizing energy capture. It incorporates an Arduino Nano microcontroller, light-dependent resistors (LDRs), and servo motors to demonstrate intelligent solar tracking. This manual provides comprehensive instructions for assembly, operation, maintenance, and troubleshooting.

Image: The SolarX V2 kit is designed as a playful and educational DIY experience.
2. Коопсуздук маалыматы
- Чоңдордун көзөмөлү: Бул комплект майда тетиктерден жана электрондук компоненттерден турат. Чоңдордун көзөмөлүндө болуу сунушталат, айрыкча жаш колдонуучулар үчүн.
- Кубат булагы: Use only the specified power source (1 Lithium Ion battery, included) or a compatible USB power adapter. Incorrect power sources can damage the device or pose a fire hazard.
- Компонент менен иштөө: Handle electronic components with care to avoid damage from static electricity or physical impact.
- Сыртта колдонуу: While designed for outdoor use, ensure the kit is placed on a stable surface and protected from extreme weather conditions (heavy rain, strong winds) to prevent damage.
- Зымдар: Ensure all wiring connections are secure and correct before applying power to prevent short circuits.
3. Пакеттин мазмуну
Сиздин комплектиңизде төмөндө келтирилген бардык компоненттер бар экенин текшериңиз:

Сүрөт: деталдуу view of all components included in the SolarX V2 DIY kit.
- 1x Solar Panel (6V)
- 1x Robotistan Arduino Nano
- 1x SolarX PCB
- 4x LDR Sensors
- 2x Servo Motors
- 3x Wooden Parts (for frame assembly)
- 1x Educational Booklet
- 2x Connecting Cables (multi-pin)
- 1x USB кабели
- 1x 1500mAh Li-Ion Battery
- 1x Screwdriver
- 5x Plastic Bolts
- 5x пластик гайкалар
- 15x Nuts (metal)
- 10x Screws (various sizes)
- 3x Standoff-Spacer (various sizes)
- 1x эки тараптуу скотч
- 1x Robotistan Keychain (accessory)
Кутудан чыгуучу видео
Video: An official unboxing video for the SolarX V2 kit, showing the contents as they appear in the package.
4. Орнотуу жана чогултуу
Follow these steps to assemble your SolarX V2 kit. Refer to the included educational booklet for detailed visual instructions and QR codes for video tutorials.
4.1. Базалык Ассамблея
Begin by assembling the wooden base components. Ensure all pieces fit snugly and are secured with the provided screws and nuts.

Image: The fully assembled SolarX V2 kit, highlighting the wooden base structure and connected electronics.
4.2. Mounting LDR Sensors
Attach the four LDR (Light Dependent Resistor) sensors to the designated slots on the top wooden panel. These sensors detect light intensity from different directions, enabling the sun-tracking functionality.
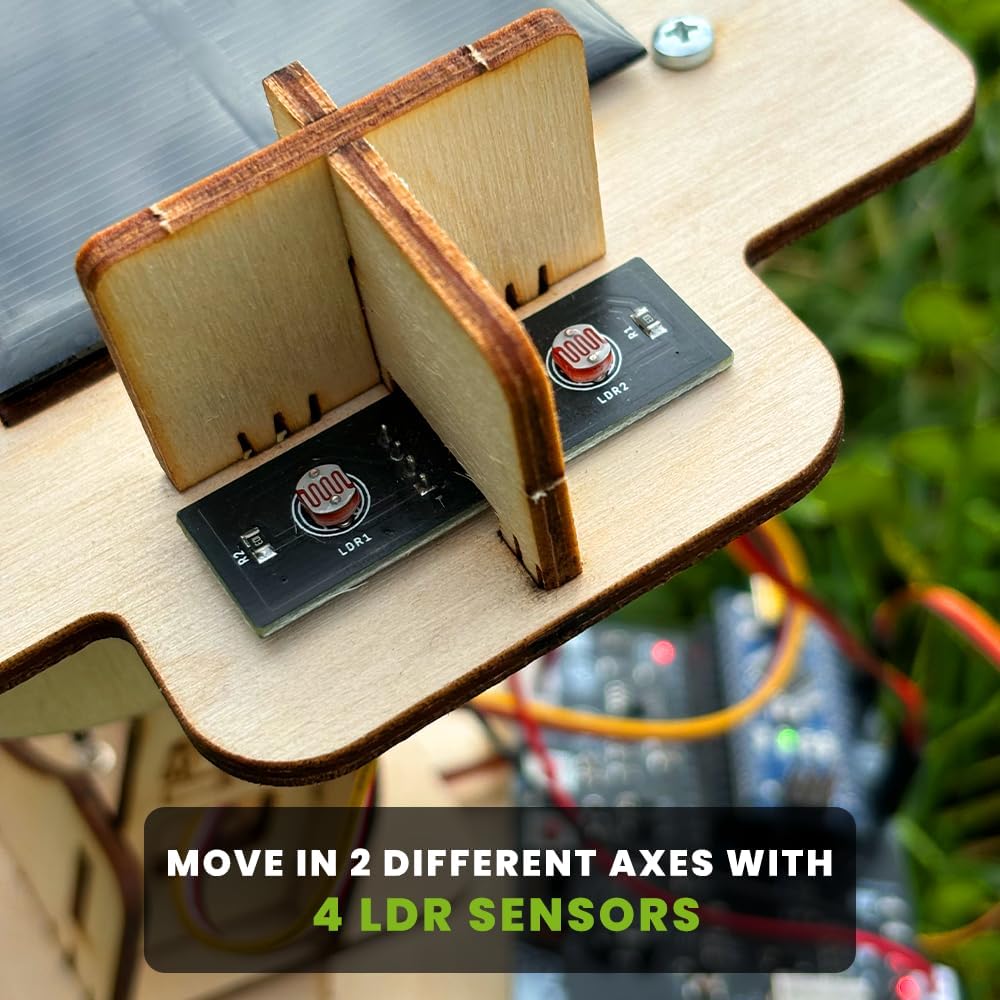
Сүрөт: жакын план view of the four LDR sensors, crucial for detecting sunlight direction.
4.3. Integrating Servo Motors and Solar Panel
Install the two servo motors, which will control the movement of the solar panel. Secure the solar panel to the movable frame, ensuring it can pivot freely. Connect the servo motors and LDR sensors to the SolarX PCB and Arduino Nano using the provided connecting cables.
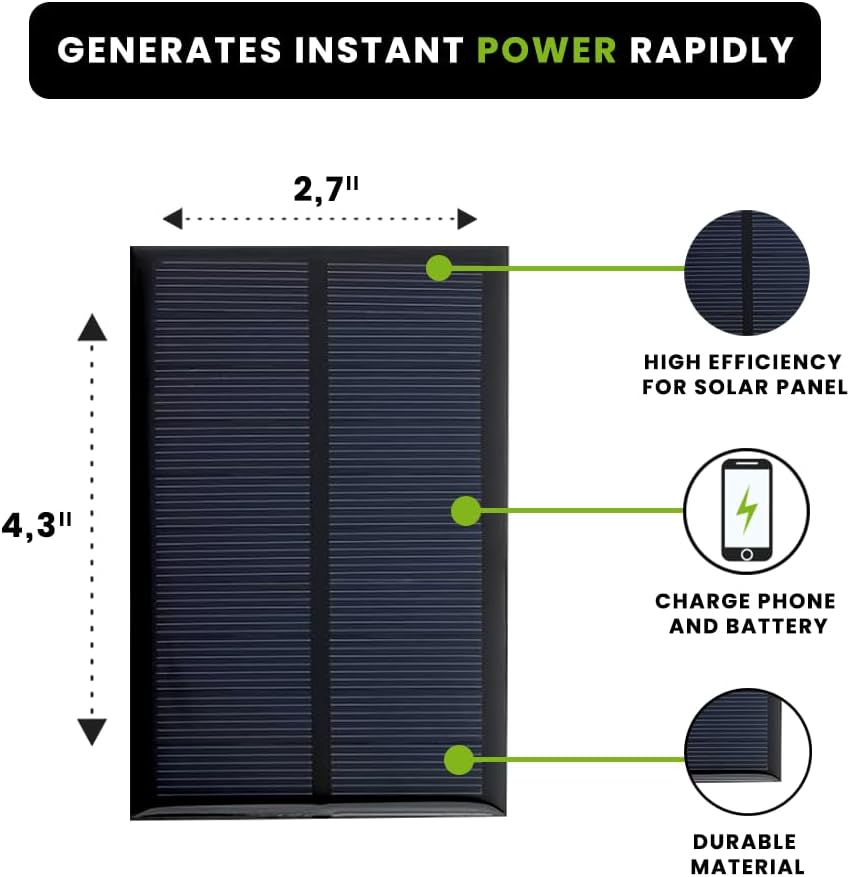
Image: The solar panel, measuring 2.7" x 4.3", is designed for high efficiency and durability.
4.4. Зымдар жана электр туташтыруу
Carefully follow the wiring diagram in the educational booklet to connect all electronic components to the SolarX PCB and Arduino Nano. Once all connections are secure, insert the 1500mAh Li-Ion battery into its holder or connect the USB cable for power.
Video: A demonstration of a similar solar tracking starter kit assembly, providing visual guidance for connecting components.
5. Иштөө нускамалары
5.1. Баштапкы кубаттуулук
Once assembled and powered, the Arduino Nano will execute the pre-programmed code. The servo motors will begin to adjust the solar panel's orientation based on the light readings from the LDR sensors. The system is designed to automatically track the brightest light source.

Image: The SolarX V2 features 2-axis 180° rotatable sun tracking for optimal light capture.
5.2. Sun Tracking Functionality
Place the SolarX V2 kit in an area with direct sunlight. The LDR sensors will detect the sun's position, and the Arduino will command the servo motors to tilt and rotate the solar panel to face the sun directly. This continuous adjustment maximizes the solar panel's efficiency throughout the day.
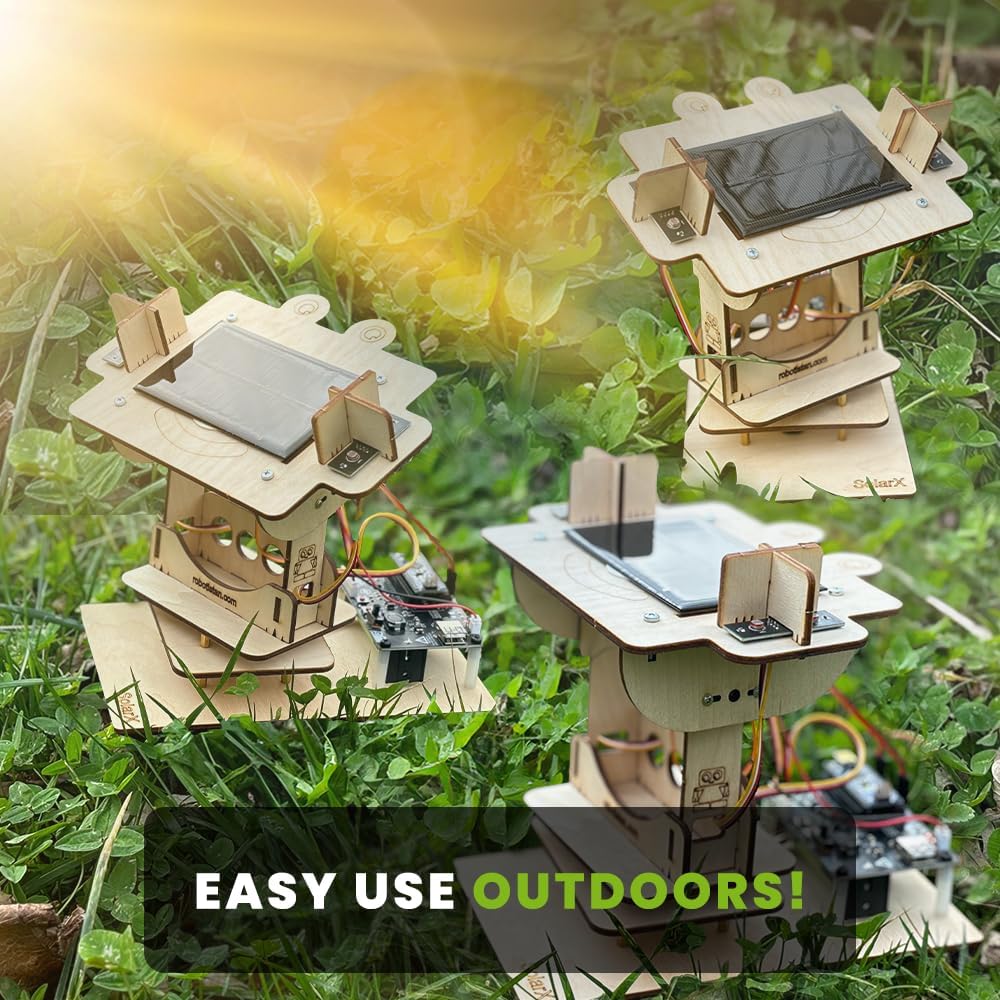
Image: SolarX V2 kits are designed for easy and effective outdoor use.
5.3. Заряддоочу түзүлүштөр
The generated solar energy can be used to charge small electronic devices. Connect your phone or power bank to the designated charging port on the SolarX PCB. The kit is capable of powering microcontrollers, LEDs, and other low-power components, or charging a small battery.

Image: The SolarX V2 kit can be used to charge various devices, such as smartphones.
6. Техникалык тейлөө
- Тазалоо: Күн панелинин бетин дайыма жумшак, г менен сүртүңүзamp cloth to remove dust and debris, ensuring maximum light absorption.
- Компонентти текшерүү: Periodically inspect all connections and components for any loose wires or signs of wear.
- Батареяга кам көрүү: If using the Li-Ion battery, ensure it is charged regularly and stored in a cool, dry place when not in use.
- Курчап турган чөйрөнү коргоо: While robust, avoid prolonged exposure to heavy rain or extreme temperatures to extend the lifespan of the electronic components.
7. Кыйынчылыктарды
| Көйгөй | Мүмкүн себеп | Чечим |
|---|---|---|
| Solar panel not tracking the sun. | LDR sensors are not detecting light correctly or are misaligned. Servo motors are not functioning. | Check LDR sensor connections and ensure they are facing the correct directions. Verify servo motor connections and functionality. Re-upload Arduino code if necessary. |
| No power output for charging. | Insufficient sunlight. Loose connections. Battery low/faulty. | Ensure direct sunlight exposure. Check all power connections. Verify battery charge or try powering via USB. |
| Erratic or no movement from servo motors. | Loose servo connections. Incorrect wiring. Servo motor damage. | Inspect servo wiring and connections to the PCB. Ensure the Arduino code is correctly uploaded and running. Replace servo if damaged. |
| Arduino Nano not powering on. | Power supply issue. USB cable faulty. | Check battery connection or try a different USB cable/power source. Ensure the battery is charged. |
8. Техникалык шарттар
- Модель номери: 22613
- Продукциянын өлчөмдөрү: 2 x 3 x 1 дюйм (чогултулган, болжолдуу)
- Элемент Салмагы: 1.48 фунт
- Кубат булагы: 1 литий-иондук батарейка (кошулган)
- Микроконтроллер: Arduino Nano R3 (compatible)
- Сенсорлор: 4x LDR (Light Dependent Resistors)
- Аткаруучулар: 2x Servo Motors (for 2-axis tracking)
- Күн панелинин чыгышы: 6V (specific current/wattage каралган эмес)
9. Кепилдик жана колдоо
For detailed support, refer to the educational booklet included in your kit. It contains visual installation steps and QR codes for accessing video tutorials and additional learning resources. For further assistance, please contact Robotistan customer support through their official channels.
Specific warranty information is not provided in the product details. Please refer to your purchase documentation or contact the seller for warranty terms and conditions.


