1. Киришүү
This manual provides detailed instructions for the installation, operation, and maintenance of your Sodola 10Gb L2 Managed PoE Switch. This device is designed to facilitate high-speed data transfer and efficient power delivery over Ethernet, suitable for various networking environments.
The switch features 4 x 10G PoE ports, 1 x 10G RJ-45 uplink port, and 1 x 10G SFP+ port. It supports advanced Layer 2 management functionalities and adheres to IEEE802.3af/at/bt PoE standards.

Сүрөт 1.1: Алдыңкы view of the Sodola 10Gb L2 Managed PoE Switch.
2. Продукт бүтүп калдыview
2.1. Пакеттин мазмуну
- Sodola 10Gb L2 Managed PoE Switch (Model: 4X10G POE+10G RJ45+SFP+)
- Кубат адаптери/кабели
- User Manual
2.2. Аппараттык камсыздоонун өзгөчөлүктөрү

Image 2.1: Front and rear panel overview of the switch, highlighting ports and indicators.
The switch features a robust metal casing and an efficient cooling system. Key components include:
- Порттор:
- 4 x 10G PoE Ports (10GBase-T)
- 1 x 10G RJ-45 Uplink Port (10GBase-T)
- 1 x 10G SFP+ Port
- 1 x Console Port (RJ45)
- LED көрсөткүчтөрү:
- SYS: System status indicator (slowly blinking indicates running)
- Link/Act: Per-port link/activity indicator (Green for 2.5/5Gbps, Yellow for 10Gbps)
- PoE: Per-port PoE indicator
- Арткы Panel:
- Калыбына келтирүү баскычы
- Жер бурамасы
- AC киргизүү

Сүрөт 2.2: Бүттүview of the switch's cooling fan, lightning protection, power, and bandwidth capabilities.
3. Орнотуу
3.1. Физикалык орнотуу
The Sodola 10Gb L2 Managed PoE Switch is designed for desktop placement or wall mounting. A wall-mount kit is not included. This model does not support 1U rack mounting.
- Иш тактада жайгаштыруу: Place the switch on a stable, flat surface with adequate ventilation. Ensure no objects block the ventilation holes on the sides.
- Дубалга орнотуу: If wall mounting, ensure the wall can support the switch's weight. Use appropriate screws and anchors (not supplied) for secure installation.

Image 3.1: The switch is designed for desktop installation only and is not rack mountable.
3.2. Power Connection
- Connect the provided power cable to the AC input port on the rear of the switch.
- Электр кабелинин экинчи учун стандарттуу электр розеткасына сайыңыз.
- Verify the SYS LED indicator illuminates, indicating the switch is receiving power.
3.3. Тармакка кошулуу
- Connect your network devices (e.g., computers, servers, NAS, IP cameras, wireless APs) to the 10G PoE ports or the 10G RJ-45 uplink port using Ethernet cables.
- For SFP+ connectivity, insert a compatible SFP+ module into the SFP+ port and connect it to your fiber optic network.
- Observe the Link/Act LEDs for each connected port. A solid or blinking LED indicates a successful connection and activity.

Сүрөт 3.2: Мисample 10G LAN setup for home or small office environments.
3.4. Баштапкы Web Интерфейстин конфигурациясы
To access the switch's management interface:
- Ensure your computer's IP address is set via IPv4 and is within the same subnet as the switch's default IP address (e.g., 192.168.0.x).
- ачуу а web браузерди ачып, демейки IP дарекке өтүңүз: 192.168.0.1.
- Демейки эсептик дайындарды киргизиңиз:
Колдонуучунун аты: админ
Купуя сөз: админ - Upon successful login, you can configure various Layer 2 management features.
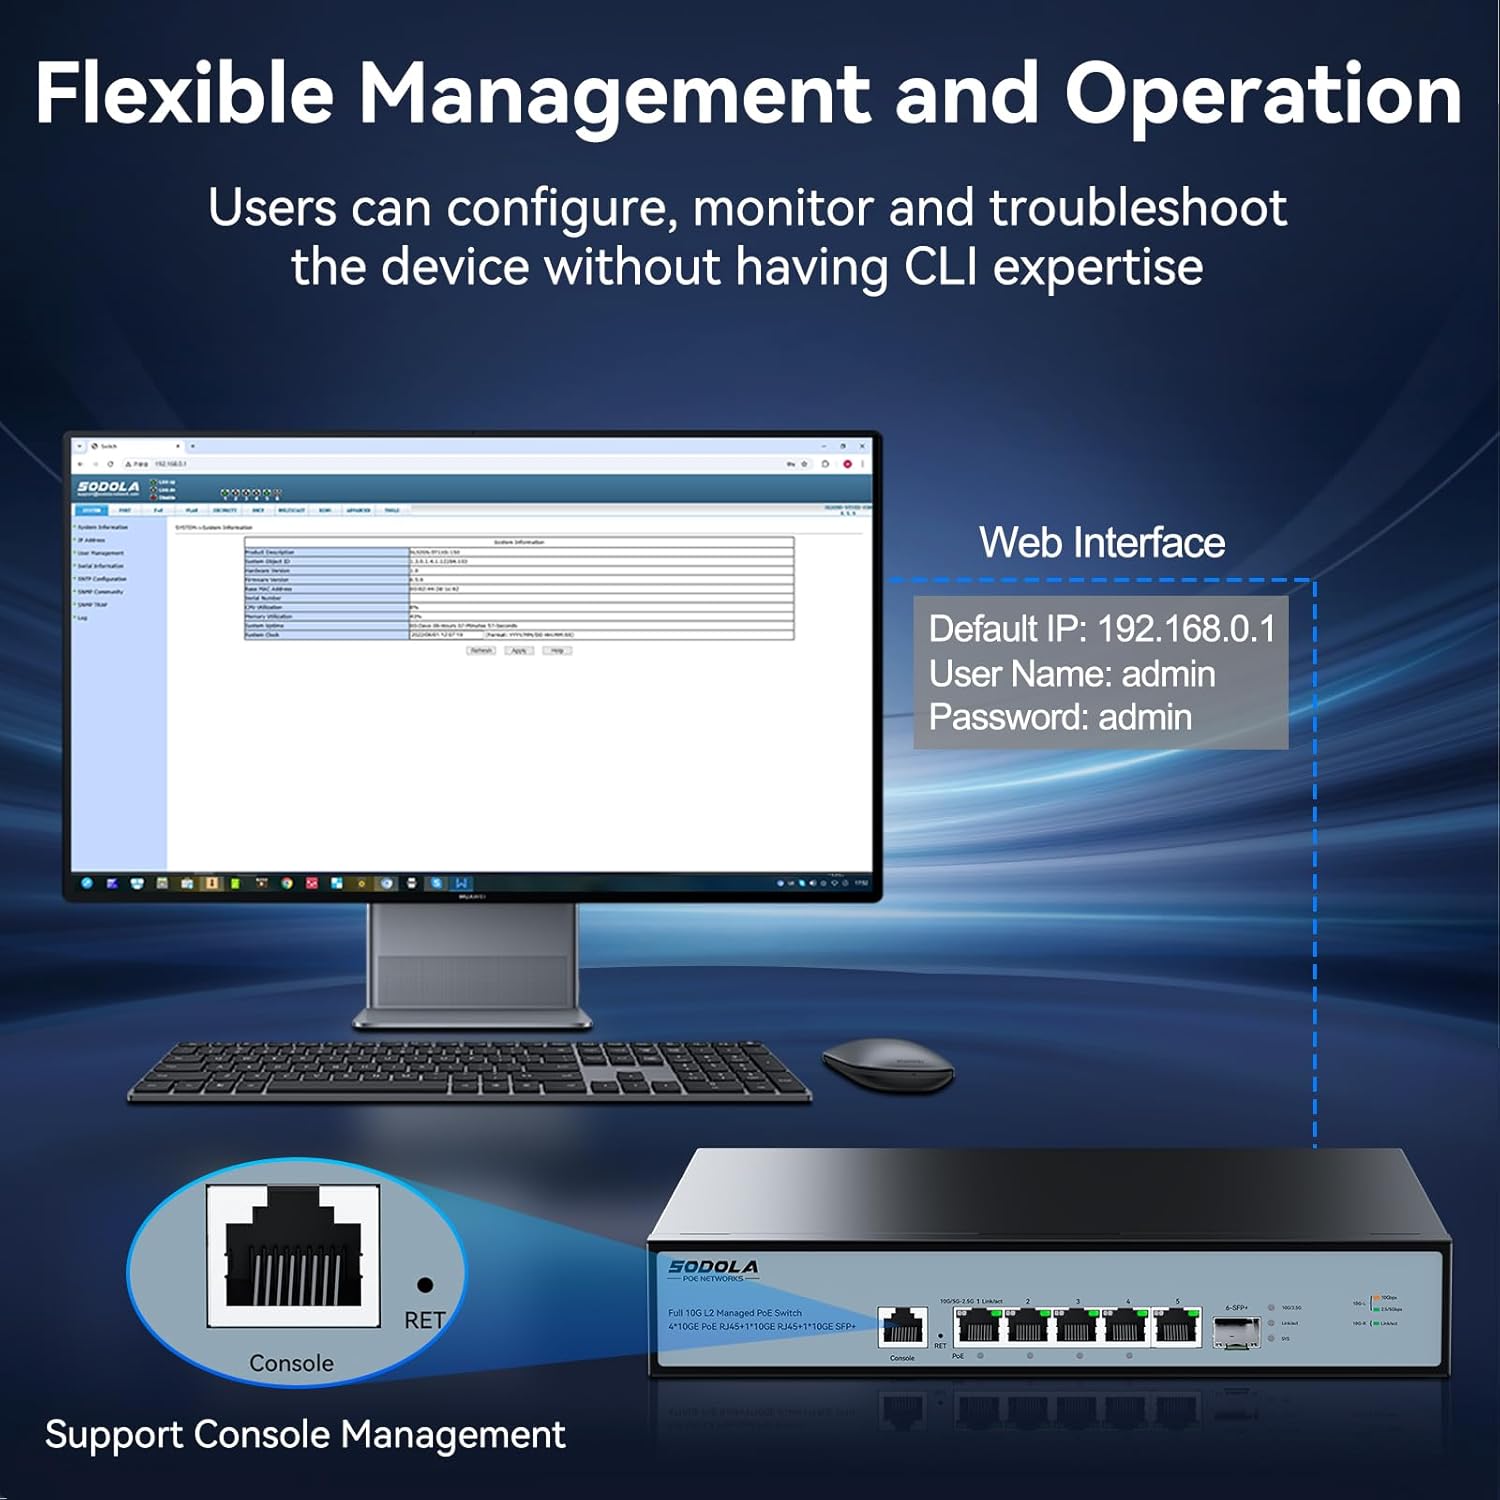
Image 3.3: Accessing the web management interface and console port for configuration.
4. Иштөө нускамалары
4.1. Ethernet аркылуу кубаттоо (PoE) функциясы
The switch provides Power over Ethernet capabilities to compatible devices.
- Порт 1: Supports IEEE802.3af/at/bt standards with a maximum output of 90W.
- 2-4 порттору: Support IEEE802.3af/at standards, offering up to 30W per port.
- Жалпы PoE бюджети: The switch has a total power supply capacity of 150W for all PoE ports.
When a PoE-compatible device is connected, the switch automatically detects its power requirements and supplies the necessary power. The PoE LED indicator for the respective port will illuminate.

Image 4.1: Diagram illustrating PoE+ IEEE802.3af/at/bt support for various devices.
4.2. Layer 2 Management Features
The switch offers a comprehensive suite of Layer 2 management features accessible via the web interface or console port:
- VLAN (Virtual Local Area Network): Жакшыртылган коопсуздук жана майнаптуулук үчүн тармагыңызды сегменттерге бөлүңүз.
- LACP (Шилтемелерди бириктирүүнү башкаруу протоколу): Өткөрүү жөндөмдүүлүгүн жана ашыкчаны көбөйтүү үчүн бир нече физикалык шилтемелерди бир логикалык шилтемеге бириктириңиз.
- SNMP (Жөнөкөй тармак башкаруу протоколу): Тармак түзмөктөрүн көзөмөлдөп, тармактын иштешин башкарыңыз.
- DHCP (Dynamic Host Configuration Protocol): Manage IP address assignment.
- Мультикаст: Efficiently deliver data to multiple recipients simultaneously (e.g., IGMP).
- MAC дарегин башкаруу: MAC даректерине негизделген кирүүнү башкаруу.
- RSTP (Тез жайылуучу дарак протоколу): Prevent network loops and ensure network redundancy.
- QoS (Кызматтын сапаты): Маанилүү тиркемелер үчүн тармактык трафикке артыкчылык бериңиз.
- ACL (Кирүүлөрдү көзөмөлдөө тизмеси): Filter network traffic based on defined rules.
Refer to the online documentation or the switch's web interface help section for detailed configuration guides on each feature.

Image 4.2: Visual representation of the advanced Layer 2 management features supported by the switch.
5. Техникалык тейлөө
5.1. Cooling and Ventilation
The switch is equipped with an upgraded cooling fan that intelligently adjusts its speed based on power consumption and heat. This ensures optimal operating temperature and near-silent operation during idle times.
- Өчүргүчтүн айланасында жетиштүү аба айланышын камсыз кылыңыз. Желдетүүчү тешиктерди жаппаңыз.
- Avoid placing the switch in enclosed spaces or near heat sources.
5.2. Тазалоо
Оптималдуу иштөөсүн сактоо үчүн, өчүргүчтүн сыртын мезгил-мезгили менен тазалап туруңуз.
- Тазалоодон мурун электр кабелин сууруп алыңыз.
- Бетти сүртүү үчүн жумшак, кургак чүпүрөктү колдонуңуз.
- Суюк же аэрозоль тазалагычтарды колдонбоңуз, анткени алар түзмөккө зыян келтириши мүмкүн.
5.3. Микропрограмманы жаңыртуу
Мезгил-мезгили менен өндүрүүчүнүн текшерүү website for available firmware updates. Firmware updates can provide new features, performance improvements, and security enhancements. Follow the instructions provided with the firmware update package carefully.
6. Кыйынчылыктарды
This section addresses common issues you might encounter with your Sodola 10Gb L2 Managed PoE Switch.
6.1. Күч жок
- Ensure the power cable is securely connected to both the switch and the electrical outlet.
- Башка аспапка туташтыруу менен электр розеткасынын иштешин текшериңиз.
- Check the SYS LED indicator. If it is off, the switch is not receiving power.
6.2. Тармактык байланыш жок
- Ensure Ethernet cables are securely connected to both the switch port and the network device.
- Verify the cable type is appropriate for the connection speed (e.g., Cat6a or higher for 10Gbps).
- Check the Link/Act LED for the specific port. If it is off, there is no active link.
- Test with a different Ethernet cable or port.
6.3. PoE Not Working
- Confirm the connected device is PoE-compatible and adheres to IEEE802.3af/at/bt standards.
- Check the PoE LED indicator for the port. If it is off, power is not being supplied.
- Ensure the total power consumption of all connected PoE devices does not exceed the switch's 150W PoE budget.
- Verify the device is connected to a PoE-enabled port (Ports 1-4).
6.4. Кирүү мүмкүн эмес Web Интерфейс
- Ensure your computer's IP address is configured to be in the same subnet as the switch (default 192.168.0.1).
- Өзүңүздү тазалаңыз web браузердин кэши.
- Verify you are using the correct default IP address (192.168.0.1) and credentials (admin/admin).
- If the IP address has been changed and forgotten, you may need to perform a factory reset using the reset button on the rear panel.
6.5. Заводдук абалга кайтаруу
To restore the switch to its factory default settings, locate the Reset button on the rear panel. With the switch powered on, use a paperclip or similar pointed object to press and hold the Reset button for approximately 5-10 seconds until the LEDs indicate a reset process has begun. The switch will then restart with default settings.
7. Техникалык шарттар
| Өзгөчөлүк | Спецификация |
|---|---|
| Модел | 4X10G POE+10G RJ45+SFP+(Managed) |
| Бренд | Содола |
| Interface Type | PoE, SFP+ |
| Порттардын саны | 6 (4x 10G PoE, 1x 10G RJ45, 1x 10G SFP+) |
| PoE стандарты | IEEE802.3af/at/bt |
| Max PoE Output (Port 1) | 90 Вт |
| Max PoE Output (Ports 2-4) | Порт үчүн 30 Вт |
| Жалпы PoE бюджети | 150 Вт |
| Маалыматтарды өткөрүү ылдамдыгы | Секундасына 10 Гигабит |
| Арткы панелдин өткөрүү жөндөмдүүлүгү | 120Gbps |
| Пакетти жөнөтүү ылдамдыгы | 89.28Mpps |
| MAC дарек столунун көлөмү | 16K |
| Иштин материалы | Металл |
| Түс | Кара |
| Элемент Салмагы | 4.97 фунт |
| Пакеттин өлчөмдөрү | 16.1 x 10.91 x 3.66 дюйм |
| Шайкеш түзмөктөр | Camera, Desktop, Laptop, Printer, Router |
8. Кепилдик жана колдоо
Your Sodola 10Gb L2 Managed PoE Switch is backed by a one-year warranty, ensuring coverage against manufacturing defects and malfunctions under normal use.
Sodola also provides lifetime after-sales service. A dedicated team of technical engineers is available to assist you with any issues or questions you may have regarding the product. For technical support or warranty claims, please contact Sodola customer service through their official channels or visit the Sodola Store on Amazon.


