Kidsneed 2 камералуу бала мониторунун колдонуучу колдонмосу
Model: SM935A-2
Introduction
Thank you for choosing the Kidsneed Baby Monitor with 2 Cameras. This manual provides detailed instructions for setting up, operating, and maintaining your baby monitor system. Please read this manual thoroughly before use to ensure proper functionality and safety. This system is designed to help you monitor your baby with high-resolution video, two-way audio, and various smart features.

Image: The Kidsneed Baby Monitor system, featuring the parent unit (monitor) and two baby cameras.
Кутуда эмне бар
Сураныч, пакеттин мазмунун текшерип, бардык буюмдар бар экенин текшериңиз:
- 1 x Ата-эне бирдиги (Монитор)
- 2 x Baby Camera Units
- 3 x Power Adapters (for Parent Unit and Camera Units)
- 1 x User Manual
Жайгашуу
1. Ата-эне блогун заряддоо
Before first use, fully charge the parent unit for approximately 8 hours. Connect the small end of the power adapter to the parent unit's charging port and the other end to a power outlet.

Image: A hand plugging the power adapter into the parent unit, illustrating the charging process.
2. Positioning the Baby Camera Units
Place the baby camera units in a location that provides a clear view of your baby. Ensure the camera is at least 3 feet (1 meter) away from the baby's crib or bed to prevent entanglement hazards. Connect each camera unit to a power outlet using its dedicated power adapter.
3. Pairing Cameras (if necessary)
The cameras are typically pre-paired with the parent unit. If a camera loses connection or you are adding a new camera, refer to the 'Add Camera' option in the parent unit's menu. Follow the on-screen prompts to complete the pairing process.
Мониторду иштетүү
Ата-эне бирдиги бүттүview

Image: An illustration highlighting key features of the Kidsneed Baby Monitor system, including remote pan/tilt/zoom, infrared night vision, two-way communication, room temperature display, lullabies, 960ft range, and 1200mAh battery.
1. Күйгүзүү/өчүрүү
Press and hold the Power button on the parent unit to turn it on or off. The camera units will power on automatically when connected to power.
2. Панорамалоо, эңкейтүү жана масштабдоо (PTZ)
Use the directional buttons on the parent unit to remotely adjust the camera's viewing angle. Press the 'Zoom' button to zoom in (2x) or out on the image.

Image: The parent unit displaying a baby, alongside a camera unit with arrows indicating its 355-degree pan and 120-degree tilt capabilities, demonstrating comprehensive room coverage.

Image: A visual comparison on the parent unit screen, showing a baby at 1x zoom and then at 2x zoom, illustrating the digital zoom function.
3. Түнкү көрүнүш
The camera automatically switches to infrared night vision mode in low-light conditions, providing a clear greyscale image of your baby.

Image: The parent unit screen showing a baby sleeping in a crib, depicted in clear greyscale, demonstrating the automatic night vision feature in a dark room.
4. Эки тараптуу сүйлөшүү
Press and hold the microphone button on the parent unit to speak to your baby through the camera's speaker. Release the button to hear your baby.
5. Бешик ырлары
Access the menu to select and play from 4 pre-programmed lullabies to soothe your baby. You can also stop the lullabies from the menu.

Image: A baby camera unit with musical notes emanating from it, indicating the lullaby function, and a thermometer icon, representing the temperature sensor.
6. Температураны көзөмөлдөө
The camera unit has a built-in temperature sensor that displays the room temperature on the parent unit. Alerts can be set for temperature deviations.
7. VOX Mode (Voice Operated Exchange)
In VOX mode, the parent unit's screen will turn off to save battery, but it will automatically activate and display video when sound is detected from the baby's room. You can adjust the VOX sensitivity level in the settings.
8. Батареянын иштөө мөөнөтү
The parent unit features a 1200mAh battery. Battery life varies depending on usage:
- Audio Only Mode: Up to 12 hours
- Live Screen Mode: Up to 4 hours

Image: The parent unit displaying battery life information, indicating 12 hours in audio-only mode and 4 hours with the live screen on.
9. Көп камералуу колдоо
The system supports up to four cameras. You can switch between cameras manually or set it to scan mode, which cycles through connected cameras automatically.
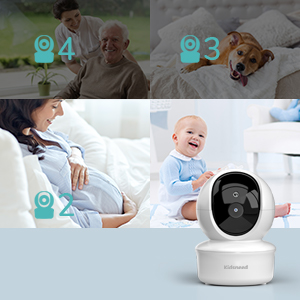
Image: A graphic illustrating the capability to connect and monitor up to four cameras simultaneously, showing different scenarios like monitoring a baby, an elderly person, or a pet.
Техникалык тейлөө
To ensure optimal performance and longevity of your Kidsneed Baby Monitor, follow these maintenance guidelines:
- Тазалоо: Use a soft, dry cloth to clean the surfaces of the parent unit and camera units. Do not use abrasive cleaners or solvents.
- Сактагыч: If storing the unit for an extended period, ensure the parent unit's battery is fully charged, then power it off. Store in a cool, dry place.
- Батареяга кам көрүү: Avoid fully discharging the parent unit's battery frequently. Charge it regularly to maintain battery health.
Проблемаларды чечүү
| Көйгөй | Мүмкүн себеп | Чечим |
|---|---|---|
| Ата-эне блогунда сүрөт/үн жок | Parent unit or camera is off; Out of range; Camera not paired. | Ensure both units are powered on. Move units closer. Re-pair camera if necessary. |
| Сүрөттүн сапаты начар | Low light (night vision active); Lens dirty; Interference. | This is normal for night vision. Clean camera lens. Move away from other electronic devices. |
| Статикалык же интерференция | Too far from camera; Obstructions; Other 2.4GHz devices. | Move parent unit closer to camera. Reduce obstructions. Turn off other 2.4GHz devices temporarily. |
| Ата-эне бөлүгүнүн батареясы бат эле түгөнөт | Constant screen on; Old battery. | Use VOX mode. Ensure full charge before use. Battery may need replacement over time. |
Техникалык шарттар
- Модел: SM935A-2
- Дисплей өлчөмү: 3.5 дюймдук LCD
- Видеонун чечилиши: 480p
- Байланыш: 2.4GHz FHSS (Wireless, No Wi-Fi/App required)
- Диапазон: 960 футка чейин (көрүү сызыгы)
- Камеранын өзгөчөлүктөрү: Pan (355°), Tilt (120°), 2x Zoom, Automatic Night Vision, Two-Way Talk, Temperature Sensor
- Ата-эне блогунун батареясы: 1200mAh литий-ион (кошулган)
- Кубат булагы: Электр зымдары
- Камтылган компоненттер: 1 Monitor Part, 2 Camera Parts
- Ички/тышкы колдонуу: Indoor
Кепилдик жана колдоо
Kidsneed products are designed for reliability and performance. For warranty information or technical support, please refer to the contact details provided on the product packaging or visit the official Kidsneed webсайт. Сатып алуу квитанциясын кепилдик дооматтары үчүн сатып алуунун далили катары сактаңыз.


