1. Киришүү
The Creality Rotary Roller Pro is a versatile 3-in-1 accessory designed to expand the capabilities of your laser engraver. It enables precise engraving on various curved and spherical objects, including cylinders, cups, rings, and balls. This manual provides detailed instructions for setup, operation, and maintenance to ensure optimal performance and safety.

Image 1: The Creality Rotary Roller Pro with a wine glass in position for engraving.

Сүрөт 2: An overview of the Creality Rotary Kit Pro, showcasing its features for curved surface engraving, including no assembly required, multifunctional adjustable jaws, one-handed clamping, and an adjustable rotary chuck.
2. Коопсуздук маалыматы
- Always wear appropriate laser safety glasses when operating a laser engraver with this accessory.
- Ensure the work area is well-ventilated to dissipate fumes generated during engraving.
- Колдорду жана кенен кийимдерди иштөө учурунда кыймылдуу бөлүктөрдөн алыс кармаңыз.
- Do not leave the laser engraver unattended while in operation.
- Ensure the Rotary Roller Pro is securely placed and the object is firmly clamped before starting any engraving task.
3. Пакеттин мазмуну
Пакетте бардык компоненттер бар экенин текшериңиз:
- Rotary Kit Pro unit
- Quick колдонмо
- M4 Аллен ачкычы
- M4*8 Screws (quantity: 4)
- Hex Studs (quantity: 3)
- Башкаруучу
Кутудан чыгаруу жана андан арыview Video
Video 1: This official Creality video provides a quick guide on how to set up the Rotary Kit Pro, including unboxing the components and initial installation steps.
4. Орнотуу нускамалары
4.1 Installing the Rotary Roller Pro
- Prepare your Laser Engraver: If your laser engraver requires additional height for the rotary module, install the raiser stands (if provided with your engraver model) to elevate the machine.
- Place the Rotary Kit: Position the Rotary Roller Pro unit securely on your engraving platform.
- Connect to Laser Engraver: Locate the Y-axis motor cable on your laser engraver. Disconnect the existing Y-axis cable and connect the Rotary Roller Pro's cable to the Y-axis port of your laser engraver.

Image 3: The Creality Rotary Roller Pro installed and connected to a laser engraver, demonstrating its ready-to-use design.
4.2 Software Configuration (LightBurn Exampле)
To enable rotary engraving, configure your engraving software (e.g., LightBurn) as follows:
- Open LightBurn and navigate to the Орнотуулар меню.
- Опцияны иштетиңиз "Show rotary enable on main window" жана басыңыз OK.
- барыңыз Лазердик куралдар жана ачыңыз "Rotary Setup" терезе.
- коюңуз Айлануучу түрү чейин "Chuck".
- текшерүү "Enable Rotary" куту.
- коюңуз Rotary Axis чейин "Y Axis".
- Киргизүү "40 mm per rotation".
- Measure the diameter or circumference of your engraving object using the included ruler and input the value into the corresponding field.
- Click OK орнотууларды сактоо үчүн.
5. Operating the Rotary Roller Pro
5.1 КлampМетоддор
The Rotary Roller Pro offers three clamping methods for various object shapes:
Метод 1: Clamp from the Outside (Cylindrical Objects with Diameter of 1-110mm)
- Align the triangle marker on the chuck with the hand-twisted screw.
- Tighten the hand-twisted screw clockwise to fix the chuck. This prevents the chuck from rotating when adjusting the tensioner.
- Measure the circumference of the object to be engraved using the provided ruler.
- Rotate the tensioner to open the chuck jaws.
- Place the cylindrical object between the jaws and rotate the tensioner to fix the object securely.
- Install the support module as needed for longer objects.
- Loosen the hand-twisted screw counter-clockwise.
- Rotate the chuck to check if the object can rotate smoothly.

Image 4: A cylindrical cup clamped from the outside using the Rotary Roller Pro's jaws.
Method 2: Prop Up from the Inner Side (Cylindrical Objects with Diameter of 25-75mm)
- Change the chuck configuration to prop up from the inner side. This involves adjusting the jaws to extend inwards.
- Install the engraved object by fitting it onto the inner jaws.
- For tapered objects, raise one side of the rotary unit using a shim or support to ensure the engraving surface is level with the laser.

Image 5: A cylindrical object propped up from the inner side for engraving.
Method 3: Using Hex Stud (Spheres with Diameter of 10-130mm, Rings/Bracelets with Diameter of 15-100mm)
- Change the chuck configuration to install the hex studs. Insert the three hex studs into the chuck.
- Fix the ring or sphere onto the hex studs.
- For clear glass surfaces, an additional dark coating (e.g., black spray paint or tape) is required to absorb the laser energy for effective engraving.
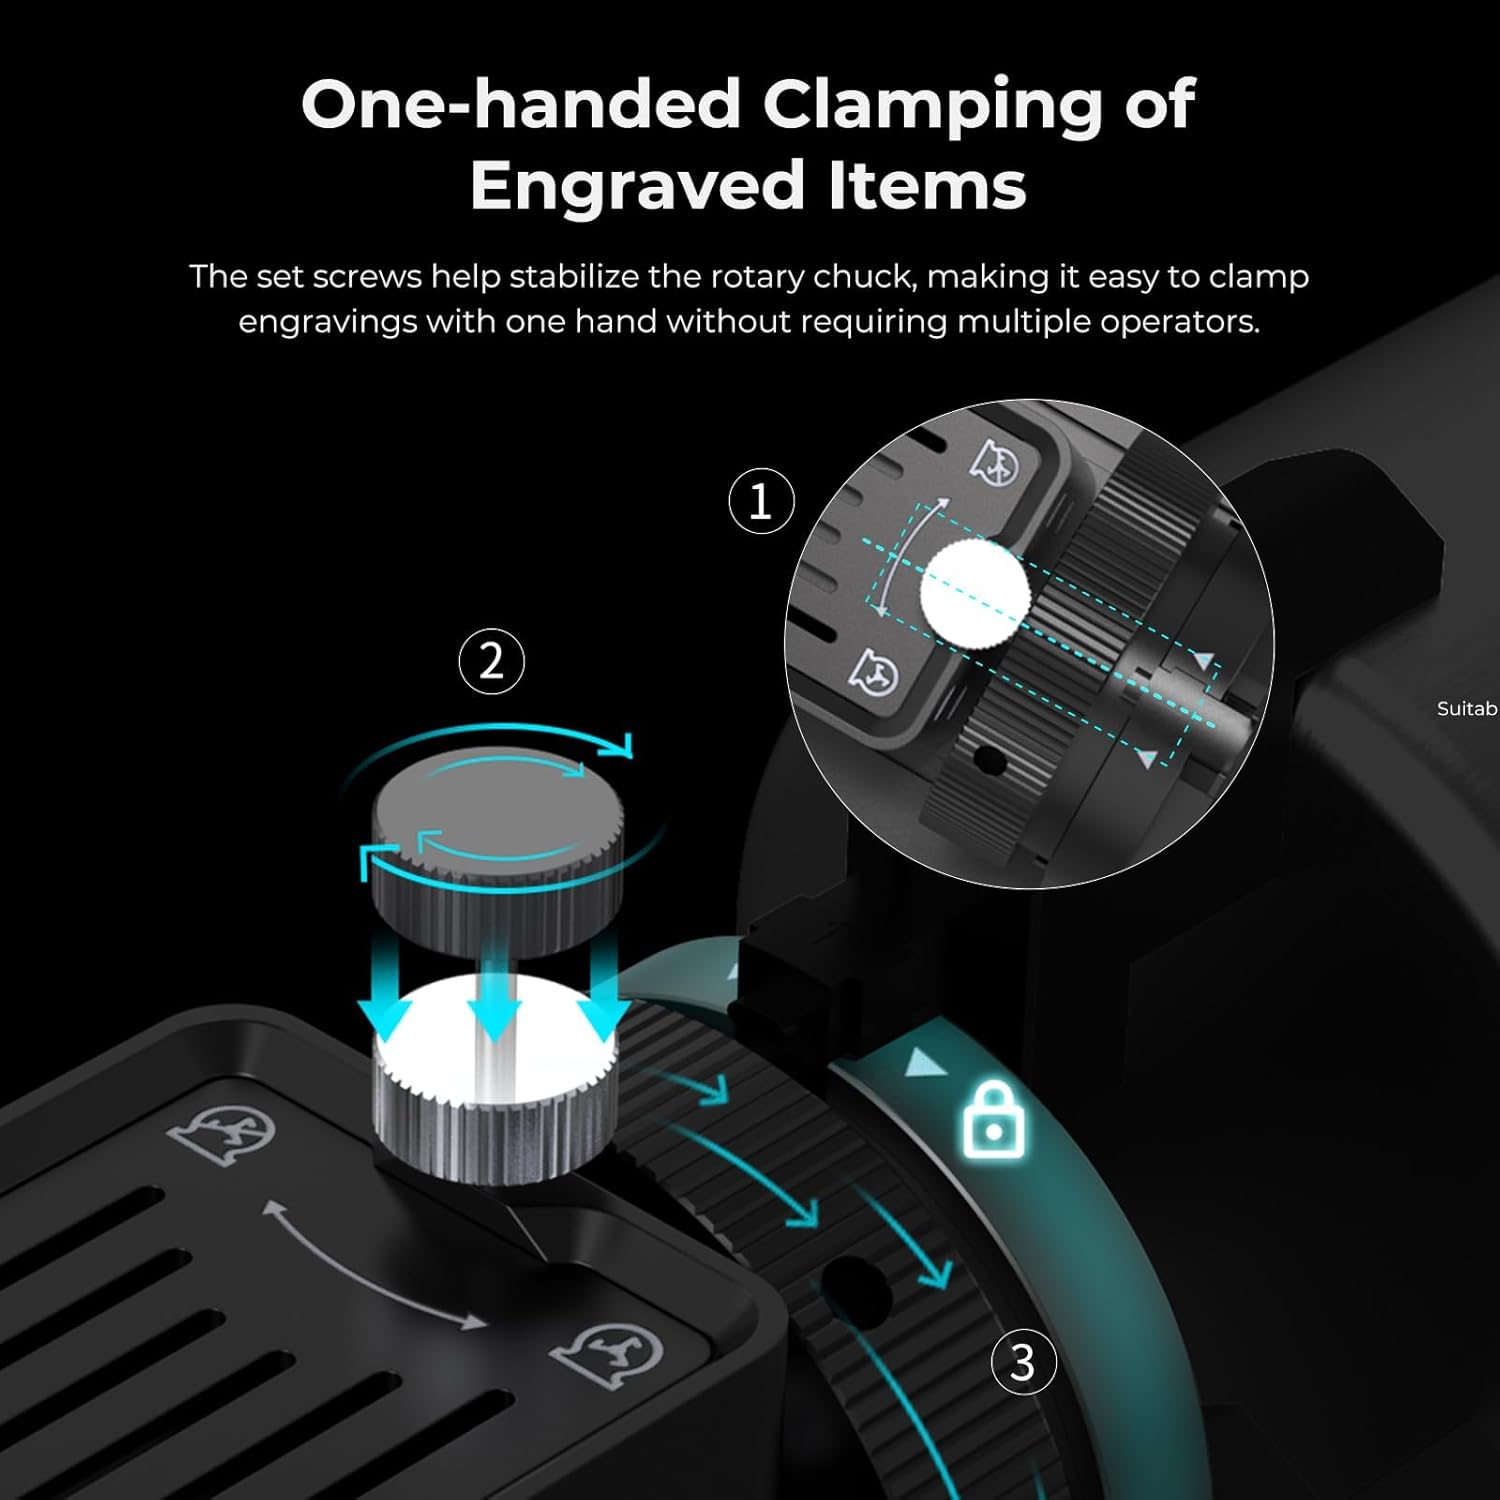
Image 6: A spherical object held by hex studs for precise engraving.

Image 7: A ring securely held by hex studs for detailed engraving.
5.2 Фокустун узундугун тууралоо
cl кийинamping the object, adjust the focal length of your laser module to ensure optimal engraving quality:
- Place the focal length gauge (if provided with your laser engraver) on the surface of the object.
- Adjust the height of the laser module until the bottom of the module touches the gauge.
- Remove the gauge. The laser is now at the correct focal distance.
5.3 Starting Engraving
Once the object is clamped and the focal length is set, you can proceed with your engraving project using your laser engraver's software.

Image 8: The anti-slip soft pads on the Rotary Roller Pro, designed to enhance friction and protect fragile items during engraving.

Image 9: A visual representation of the high precision (0.225 degrees) offered by the Rotary Roller Pro for accurate engraving.
6. Шайкештик
The Creality Rotary Roller Pro is designed for broad compatibility:
- Laser Engravers: Compatible with Creality Falcon series and approximately 95% of other laser engraver machines on the market that utilize a PH2.0-6P (6 PIN) interface. Users of other brands should verify port compatibility.
- Программалык камсыздоо: Supports popular engraving software such as LaserGRBL and LightBurn.

Image 10: The Rotary Roller Pro is compatible with popular engraving software like LightBurn and LaserGRBL.

Image 11: The Creality Rotary Roller Pro is compatible with various laser engraver brands, including Creality, XTOOL, ORTUR, Sculpfun, Genmitsu, LONGER, ATOMSTACK, Twotrees, and ATEZR.
7. Техникалык шарттар
| Өзгөчөлүк | Деталь |
|---|---|
| Продукциянын өлчөмдөрү | 14 x 4.8 x 3.9 дюйм |
| Элемент моделинин номери | Rotary Roller Pro |
| Элемент Салмагы | 5.04 фунт |
| Өндүрүүчү | Creality |
| Max. Support Length | 230mm (for longer objects) |
| Cylindrical Object Diameter (Clamp from outside) | 1-110 мм |
| Cylindrical Object Diameter (Prop up from inner side) | 25-75 мм |
| Sphere Diameter (Hex Stud) | 10-130 мм |
| Ring/Bracelet Diameter (Hex Stud) | 15-100 мм |

Image 12: Detailed product parameters, including diameter ranges for different object types.
8. Техникалык тейлөө
- Regularly clean the rollers and chuck jaws to prevent debris buildup, which can affect rotation and clamping.
- Inspect cables for any signs of wear or damage. Replace if necessary.
- Store the Rotary Roller Pro in a clean, dry environment when not in use.
9. Кыйынчылыктарды
- Object Slipping: Объекттин бекем бекитилгенин текшериңизamped using the appropriate method. Check if the anti-slip pads are clean and intact.
- Uneven Engraving: Verify that the object is level and the focal length is correctly set across the entire engraving surface. For tapered objects, use shims to level the surface.
- Туташуу маселелери: Confirm that the Rotary Roller Pro cable is firmly connected to the Y-axis port of your laser engraver and that software settings are correctly configured for rotary engraving.
10. Кепилдик жана колдоо
For warranty information, technical support, or further assistance, please refer to the official Creality website or contact Creality customer service directly.
Сиз да зыярат кылсаңыз болот Creality Official Store on Amazon продукт маалымат жана колдоо булактары үчүн.


