1. Киришүү
The VCELINK 2 Gang Brush Wall Plate is designed to provide a clean and organized solution for routing low-voltage cables through walls. It effectively conceals cables, reducing clutter and enhancing the aesthetic of your living or working space. The integrated brush design helps prevent dust and pests from entering the wall cavity while protecting cables from damage.
2. Коопсуздук маалыматы
- Бул продукт үчүн арналган аз көлөмдүүtage cables only. Do not use for high-voltage electrical wiring (e.g., AC power cords).
- Ensure power is turned off at the circuit breaker before cutting into any wall to avoid electrical shock.
- Always check for studs, pipes, and existing electrical wires behind the wall before cutting. Use a stud finder and appropriate tools.
- Wear appropriate safety gear, including eye protection and gloves, during installation.
- If you are unsure about any part of the installation process, consult a qualified electrician or professional installer.
3. Пакеттин мазмуну
Each package includes the following components:
- 2 × 2 Gang Brush Faceplates (White)
- 2 × Mounting Brackets (Black)
- Монтаждоо бурамалар

This image displays the complete package contents: two white brush wall plates and two black mounting brackets, ready for installation.
4. Техникалык шарттар
| Өзгөчөлүк | Спецификация |
|---|---|
| Бренд | VCELINK |
| Модель номери | A181+A182 |
| Материал | Nylon, Polycarbonate (PC) |
| Түс | White, with Bracket |
| Продукциянын өлчөмдөрү | 4.57"W x 4.51"H (116.0 mm x 114.5 mm) |
| Cable Opening Dimensions | 3.31"W x 2.24"H (84.0 mm x 57.0 mm) |
| Аяктоо түрү | Жылмаланган |
| Конфигурация | Double Gung |
| Орнотуу түрү | Screw-In |
| Элемент Салмагы | 6.1 унция (0.38 фунт) |

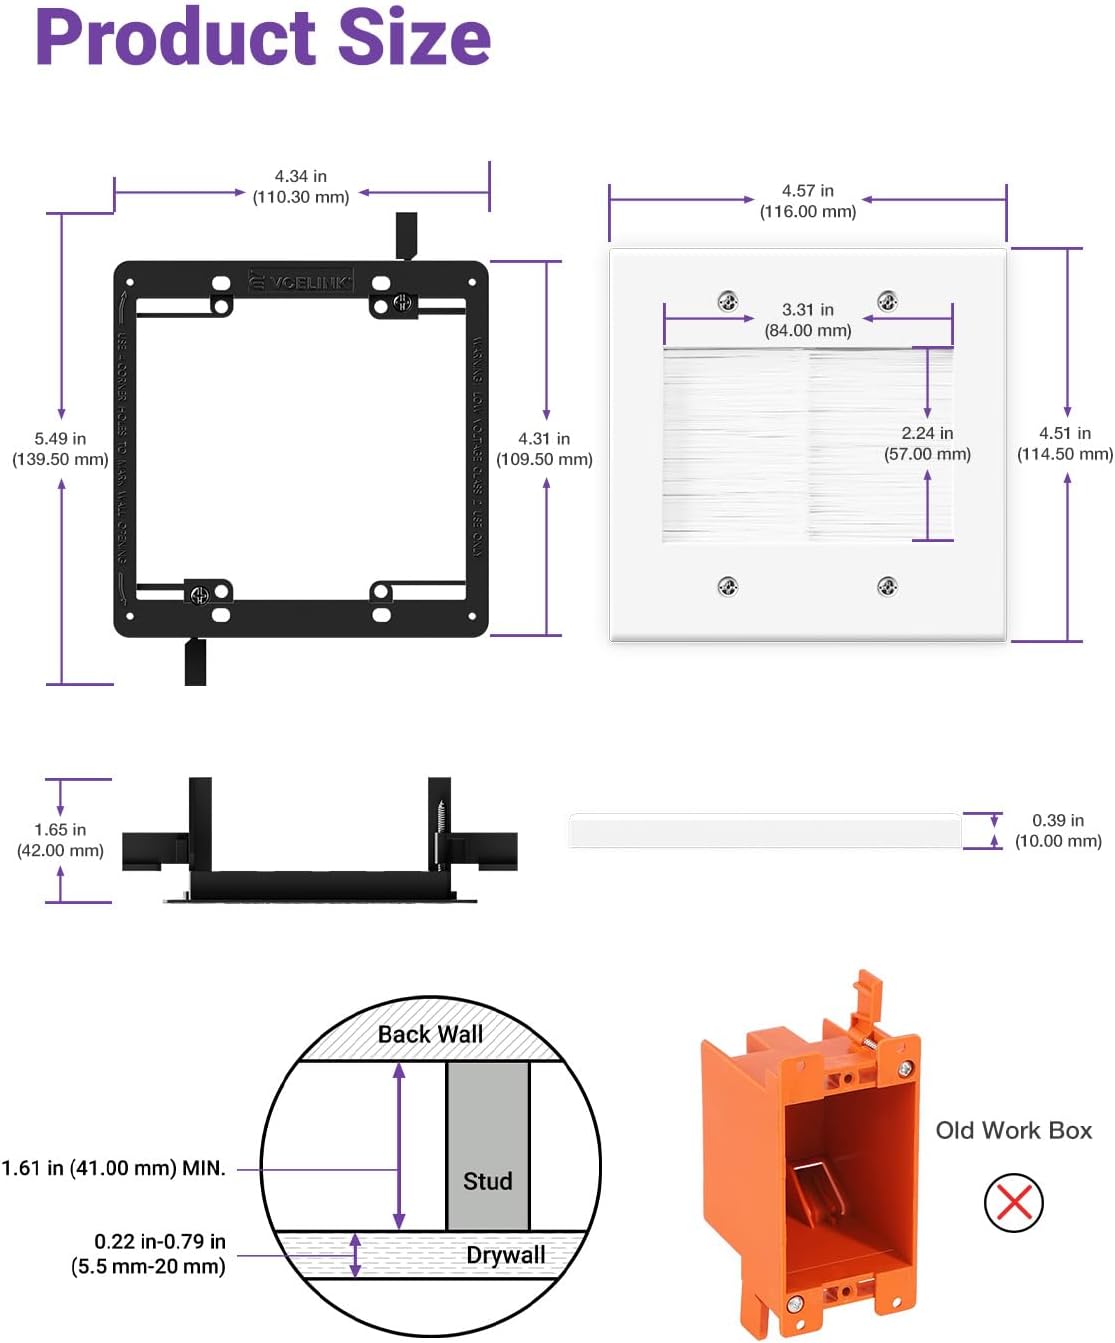
This diagram provides precise measurements for the brush wall plate and its mounting bracket, including the overall dimensions, the size of the cable opening, and recommended drywall thickness for installation.
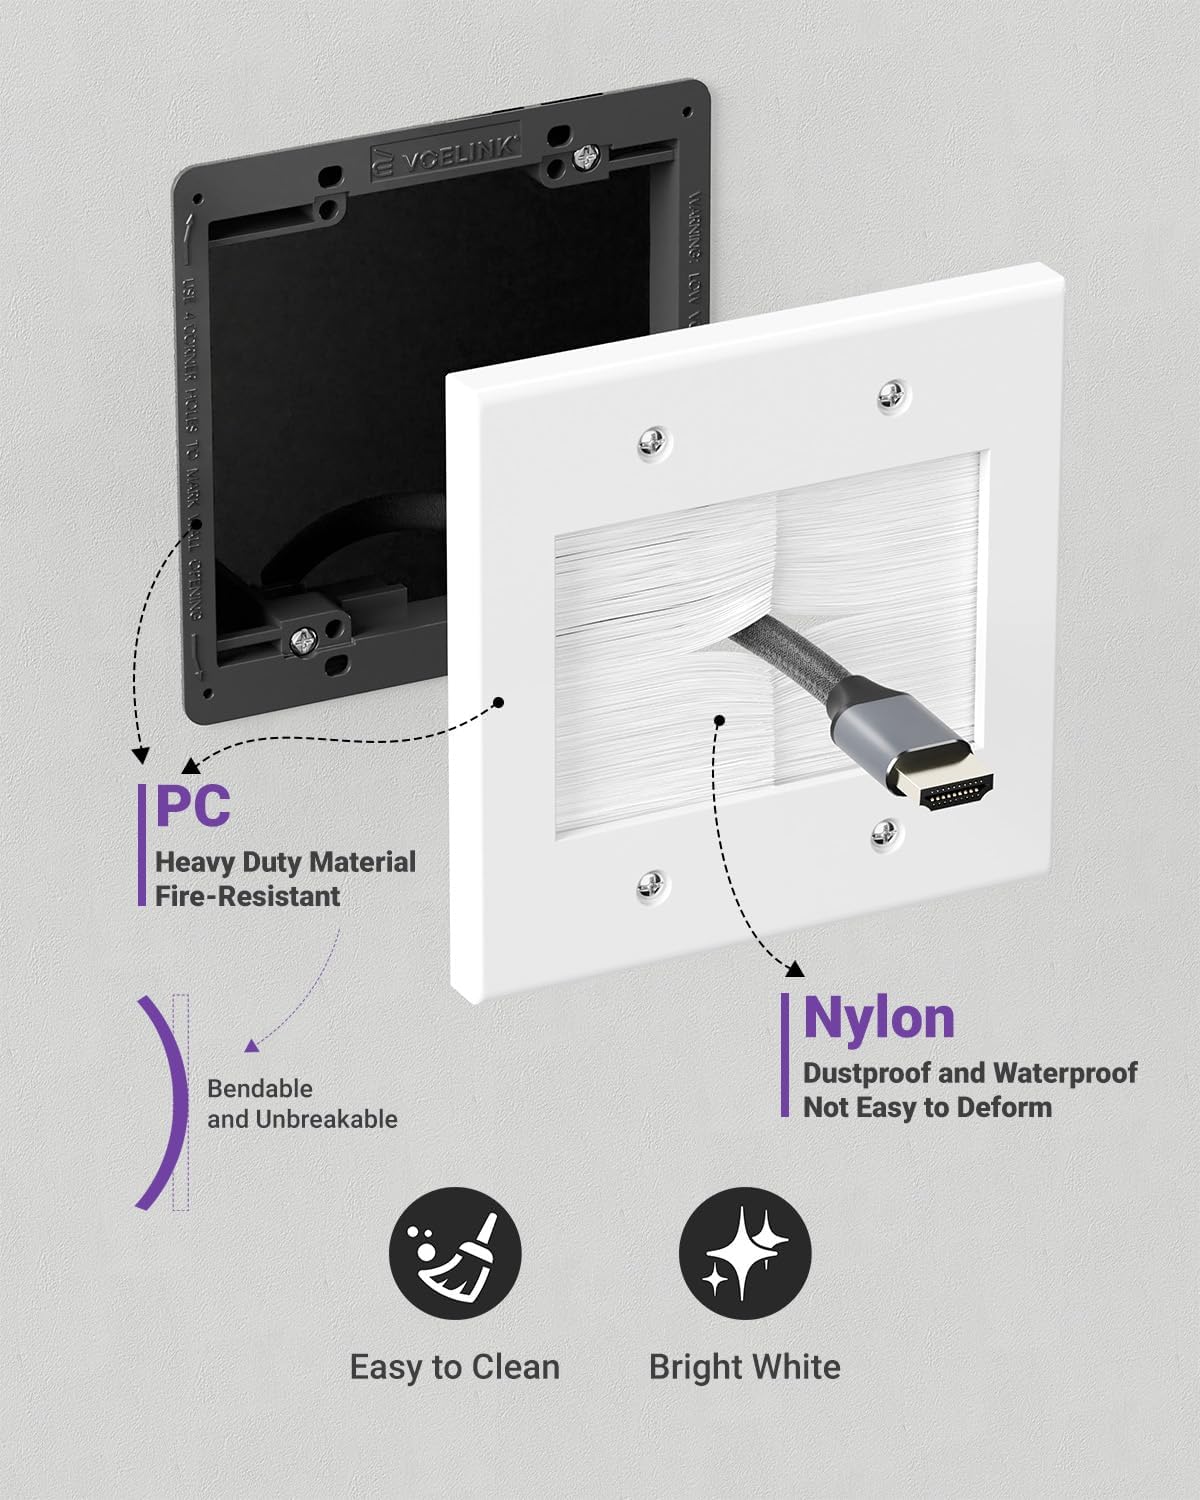
This image details the construction materials of the wall plate, highlighting the heavy-duty, fire-resistant PC material for the frame and the dustproof, waterproof, and non-deforming nylon bristles.
5. Орнотуу жана орнотуу
Follow these steps to properly install your VCELINK 2 Gang Brush Wall Plate:
Керектүү куралдар:
- Электрдик бургу
- Гипсокартон араа
- Phillips or Flathead Screwdriver
- Карандаш же маркер
- Башкаруучу же түз

This diagram highlights the 'Easy to Install' features, detailing how to use the corner holes for marking the wall and how the bracket's wings lock in place for a secure fit. It also lists required tools: Electric Drill, Drywall Saw, Phillips or Flathead Screwdriver.
Орнотуу кадамдары:
- Mark the Wall Opening: Position the mounting bracket on the desired wall location. Use the four corner holes on the bracket to mark the wall with a pencil. Ensure the marked area is level and clear of obstructions.
- Ачууну кесип: Drill pilot holes at the marked corners. Using a drywall saw, carefully cut along the marked lines to create the rectangular opening in the wall. Ensure the cut is clean and precise for a snug fit.
- Монтаждык кронштейнди орнотуу: Insert the mounting bracket into the cut opening. The bracket features adjustable wings. Tighten the screws on the bracket to extend the wings, securing the bracket firmly against the inside of the drywall.
- Attach the Brush Wall Plate: Align the brush wall plate with the installed mounting bracket. Secure the faceplate to the bracket using the provided screws. Do not overtighten.
This series of illustrations provides a clear, step-by-step guide for installing the brush wall plate. It covers marking the wall opening, cutting the area, installing the mounting bracket, and finally attaching the brush wall plate.
Орнотуу боюнча видео көрсөтмө:
This video demonstrates the complete installation process for the VCELINK 2 Gang Brush Wall Plate, from marking the wall to securing the plate, providing a visual guide for users.
6. Иштөө нускамалары
Once the brush wall plate is installed, you can begin routing your cables:
- Gently push the desired low-voltage cables (e.g., HDMI, Ethernet, coaxial, speaker wires) through the brush opening.
- The soft nylon bristles will flex to accommodate the cables, allowing them to pass through while maintaining a sealed opening.
- Arrange the cables as needed on both sides of the wall for a tidy setup.

This image illustrates the large capacity of the brush wall plate, showing several HDMI and USB-C cables neatly routed through the brush opening. Dimensions for the opening are also visible.

This image demonstrates the effectiveness of the 2 Gang Brush Wall Plate in managing cables. The 'before' shows messy cables behind a TV, while the 'after' shows a clean setup with cables routed through the wall plate.
7. Техникалык тейлөө
The VCELINK 2 Gang Brush Wall Plate requires minimal maintenance:
- To clean the faceplate, wipe it with a soft, damp cloth. Avoid abrasive cleaners that may damage the polished finish.
- The nylon bristles are designed to be durable and resist deformation. If dust accumulates, gently brush it away.
8. Кыйынчылыктарды
- Cables are difficult to pass through: Ensure you are not attempting to pass too many cables at once. The brush is designed for a large capacity, but excessive force should not be needed. Check if any cable connectors are snagging on the bristles.
- Wall plate does not sit flush: Verify that the wall opening was cut accurately and that the mounting bracket's wings are fully extended and tightened against the drywall. Uneven drywall surfaces may require minor adjustments.
- Dust or pests entering through the brush: While the brush is designed to minimize this, ensure the bristles are not overly spread apart by too many cables. If the issue persists, consider reducing the number of cables or repositioning them for better brush coverage.
9. Кепилдик жана колдоо
VCELINK stands behind the quality of its products. This product comes with an 18 айлык кепилдик for any quality-related issues.
For technical support, warranty claims, or any questions regarding your VCELINK 2 Gang Brush Wall Plate, please refer to the contact information provided with your purchase or visit the official VCELINK webсайт.


