1. Киришүү
This manual provides detailed instructions for the installation, operation, and maintenance of your Naifay Android 12 Double Din Car Stereo. Please read this manual thoroughly before using the product to ensure proper function and safety. Keep this manual for future reference.

Image 1.1: Naifay Android 12 Double Din Car Stereo with included backup camera, GPS antenna, and a smartphone displaying Carplay/Android Auto.
2. Продукт бүтүп калдыview
2.1 Негизги өзгөчөлүктөрү
- Операция системасы: Android 12 with 4-Core processor, 2GB RAM, and 32GB ROM.
- Дисплей: 10.1-inch 2.5D capacitive IPS touch screen with 1024x600 resolution, supporting 1080P video playback.
- Байланыш: Built-in Wireless Carplay & Android Auto, Wired/Wireless Mirrorlink (iOS wireless, Android wireless/wired).
- Навигация: Integrated GPS module for offline and online navigation.
- Зымсыз: WiFi connection for app downloads and internet access, Bluetooth 5.1 for hands-free calling and audio streaming.
- Аудио: FM Radio with preset stations, 10-band EQ settings with various default styles.
- Киргизүүлөр/чыгыштар: Two USB ports, AHD backup camera input, Steering Wheel Control (SWC) support.
- Кошумча функциялар: Split screen mode, multi-format music and video player, customizable UI and wallpapers.
2.2 Кутуда эмне бар
Пакет төмөнкү компоненттерди камтыйт:
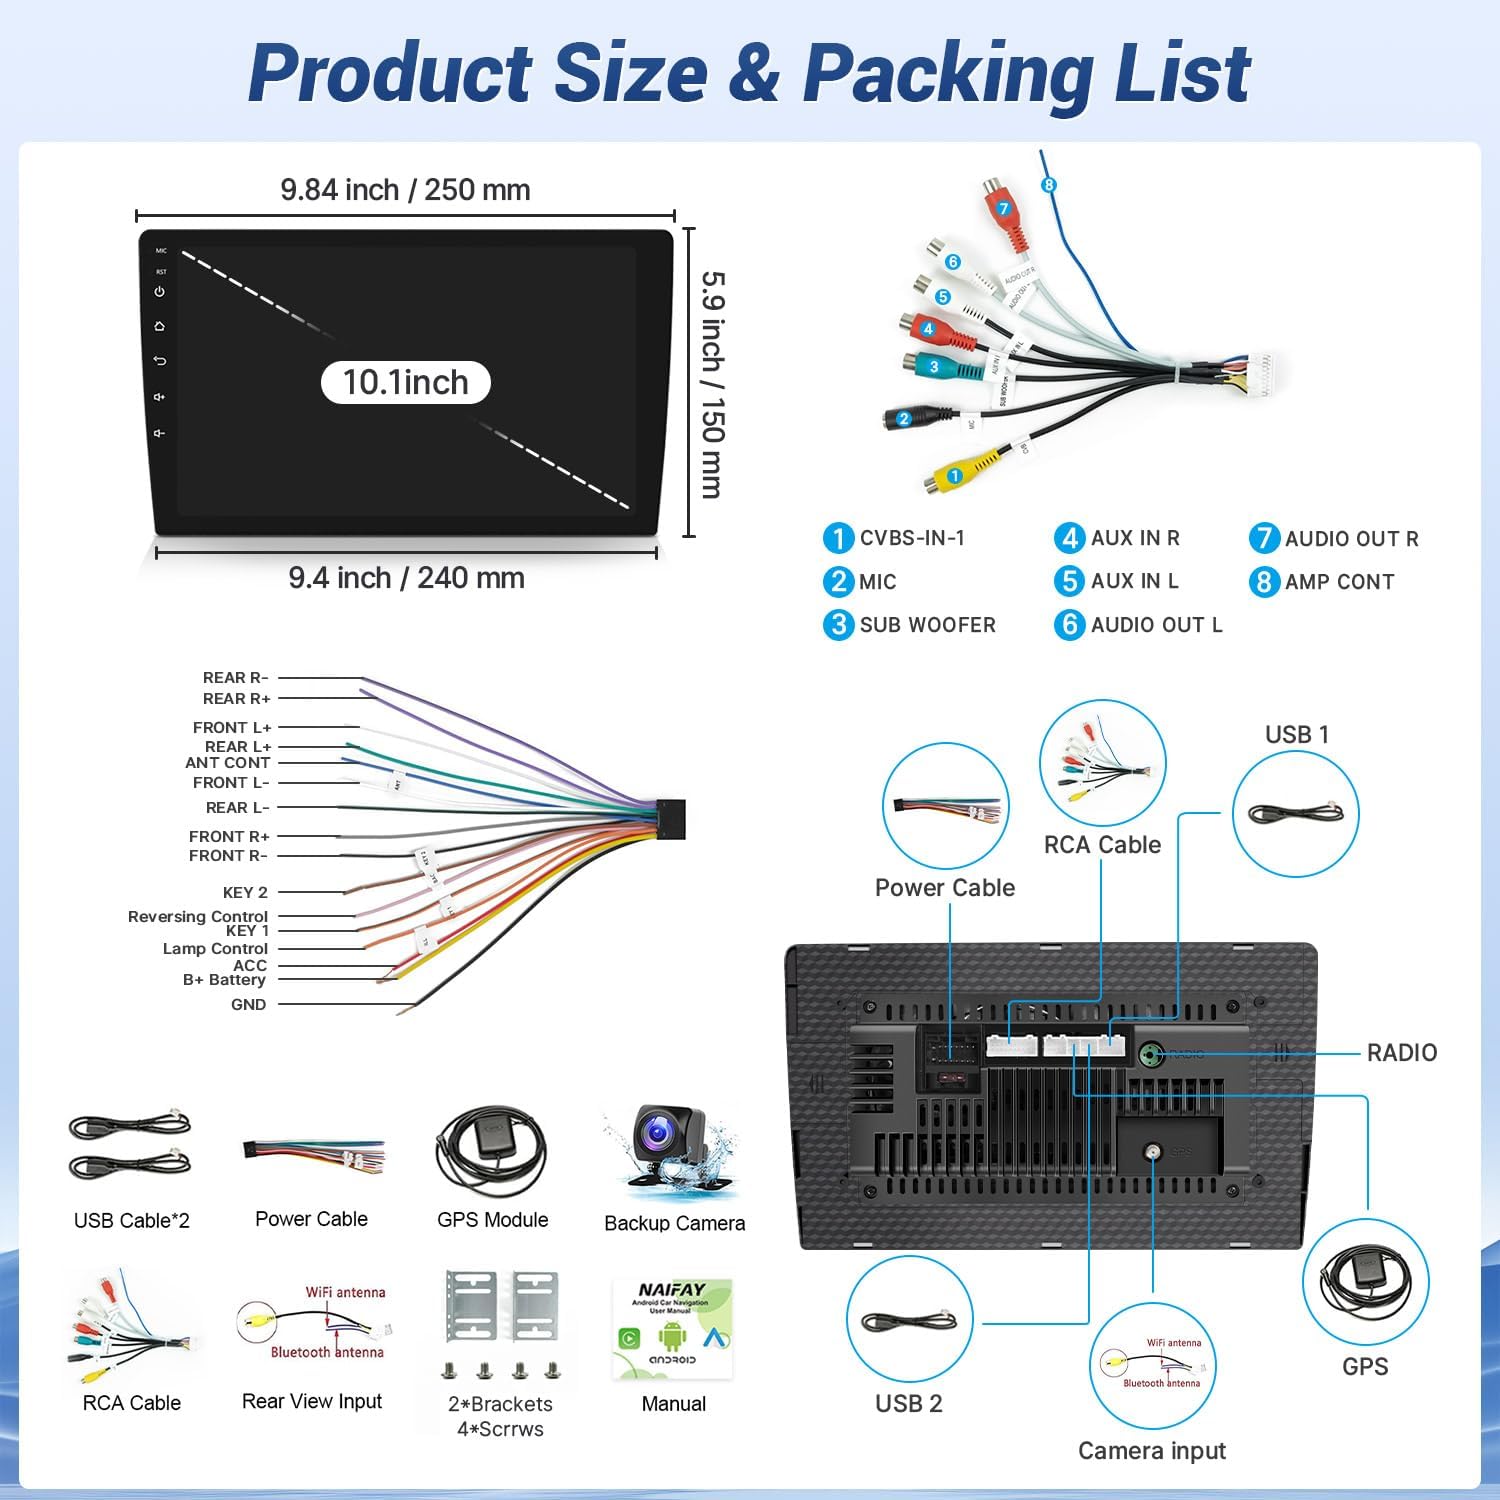
Сүрөт 2.1: Детальдуу view of the product dimensions, rear panel connections, and the complete packing list.
- Naifay 10.1-inch Android Car Stereo Unit
- Электр кабели
- USB кабелдери (x2)
- GPS модулу
- Камера
- RCA кабели
- WiFi антеннасы
- Bluetooth антеннасы
- Монтаждоо кронштейндери (x2)
- Бурамалар (x4)
- User Manual
3. Коопсуздук маалыматы
Observe the following safety guidelines during installation and operation:
- Кесиптик орнотуу сунушталат: Due to the complexity of vehicle wiring, professional installation is highly recommended to prevent damage to the unit or vehicle.
- Электр камсыздоо: Ensure the car radio operates on a 12V power supply. Connecting to a voltage over 12V may damage the unit.
- Зымдар: Always use the provided power cables. Do not attempt to connect original car plugs directly to the unit without verifying compatibility. Incorrect wiring can lead to malfunctions or damage.
- Сактагычты алмаштыруу: If a fuse needs replacement, use only the same type and rating.
- Айдоо коопсуздугу: Агрегатты айдоодон алаксыта тургандай иштетпеңиз. Ар дайым жол коопсуздугун биринчи орунга коюу.
- Температура: Аппаратты экстремалдык температурага же түз күн нуруна узак убакытка калтыруудан сактаңыз.
4. Орнотуу жана орнотуу
4.1 Орнотууга чейинки текшерүү
- Verify the installation size: 178(L) x 65(W) x 70(H) mm (Standard 2 DIN opening size). The 10.1-inch screen extends beyond the standard double DIN chassis. Ensure your vehicle's dashboard has sufficient space for the screen's dimensions (approximately 9.84 inches / 250 mm wide and 5.9 inches / 150 mm high).
- Орнотууну баштоодон мурун унаанын аккумуляторун ажыратыңыз.
4.2 Зымдарды туташтыруу
Refer to the wiring diagram provided in Image 2.1 and the specific backup camera connection diagram below.

Image 4.1: Diagram illustrating the connection of the backup camera to the car stereo system.
- Connect the video input cable (yellow RCA) from the backup camera to the 'CVBS-IN-1' port on the stereo's rear panel.
- Connect the pink wire from the stereo's power cable to the reversing trigger cable (usually a reverse light signal wire).
- Connect the backup camera's power cable: the red wire to the car's reversing light positive, and the black wire to the car's reversing light negative (ground).
- Ensure all other power and speaker connections are made according to the main wiring diagram. The red and yellow wires of the stereo's power supply should be connected to the positive side of the car's power supply, and the black wire to the negative (ground).
4.3 Агрегатты монтаждоо
Install the head unit into the double DIN slot using the provided mounting brackets and screws. Ensure the unit is securely fastened. The screen is designed to protrude slightly from the dash for optimal viewing.

Image 4.2: Visual comparison of a car dashboard before and after the installation of the Naifay Android 12 car stereo, highlighting the screen size and fit.
5. Иштөө нускамалары
5.1 Wireless Carplay & Android Auto
This stereo supports wireless Apple Carplay and wireless Android Auto. To connect:
- Смартфонуңузда Bluetooth жана Wi-Fi иштетиңиз.
- On the car stereo, navigate to the Carplay or Android Auto application.
- Pair your phone via Bluetooth with the car stereo.
- Once paired, the system will automatically establish a Wi-Fi connection for Carplay or Android Auto.
You can now access phone functions like navigation, calls, messages, and music via the stereo's touchscreen or voice commands (Siri/Google Assistant).

Сүрөт 5.1: Бүттүview of wireless Carplay, Android Auto, and Mirror Link functionalities on the Naifay car stereo.

Image 5.2: Screenshot of the Wireless Apple Carplay interface on the stereo display.

Image 5.3: Screenshot of the Wireless Android Auto interface on the stereo display.
5.2 Mirror Link функциясы
The Mirror Link function allows you to display your smartphone screen on the car stereo. iOS devices support wireless connection, while Android devices support both wireless and wired connections.
- For wireless connection (iOS & Android): Connect your phone to the stereo's Wi-Fi hotspot.
- For wired connection (Android only): Connect your Android phone to the stereo via a USB cable.
- Open the Mirror Link application on the stereo and follow the on-screen prompts to establish the connection.

Image 5.4: Illustration of the Mirror Link feature, showing a smartphone screen mirrored onto the car stereo display.
5.3 GPS навигациясы
The unit features a built-in GPS module for navigation. You can use pre-installed offline maps or download online maps when connected to Wi-Fi.
- To use offline maps, ensure the GPS module is connected and maps are downloaded.
- For online maps, connect the stereo to Wi-Fi or your phone's hotspot.
- Open the Navigation app and enter your destination.

Image 5.5: Display showing GPS navigation, Wi-Fi connection, and Bluetooth interface on the car stereo.

Сүрөт 5.6: Детальдуу view of the GPS navigation map interface on the stereo screen.
5.4 Wi-Fi туташуусу
Connect the stereo to a Wi-Fi network to access online content and download applications.
- Орнотуулар > Wi-Fi бөлүмүнө өтүңүз.
- Каалаган тармагыңызды тандап, сырсөзүңүздү киргизиңиз.
- Once connected, you can use apps like YouTube, Spotify, and other Play Store applications.

Image 5.7: Display showing various applications available when the stereo is connected to Wi-Fi.
5.5 Bluetooth 5.1
The integrated Bluetooth 5.1 allows for hands-free calling and wireless audio streaming.
- Телефонуңузда жана унаа стереосунда Bluetooth'ду иштетиңиз.
- Издөө available devices on your phone and select the stereo's Bluetooth name.
- Эгер суралса, жупташтыруу кодун ырастаңыз.
Once connected, you can make/receive calls, access your phonebook, and play music wirelessly.

Image 5.8: Screenshots demonstrating Bluetooth 5.1 features, including hands-free calling and music playback.
5.6 FM радиосу
Access local radio stations with the built-in FM tuner.
- Open the FM Radio application.
- Use the scan function to find and save available stations.
- Adjust EQ settings for preferred audio output.

Image 5.9: Display of the FM radio interface, showing station tuning and frequency.
5.7 Рулду башкаруу (SWC)
The unit supports analog steering wheel controls. Manual learning is required to map your vehicle's steering wheel buttons to the stereo functions.
- Go to Settings > Steering Wheel Control.
- Follow the on-screen instructions to assign functions (e.g., volume up/down, track skip, mode) to your steering wheel buttons.

Image 5.10: Screenshot of the Steering Wheel Control learning interface on the car stereo.
5.8 Камера
The included AHD backup camera provides a wide-angle view for safer reversing.
- When the vehicle is shifted into reverse gear, the camera feed will automatically display on the stereo screen.
- Ensure the camera is properly installed and wired as per Section 4.2.

Image 5.11: Display showing the backup camera view with parking guidelines, alongside other features like split screen and FM radio.
5.9 Бөлүнгөн экран функциясы
The split screen feature allows you to run two applications simultaneously on the display.
- To activate, long-press the recent apps button or drag an app to one side of the screen.
- Экрандын экинчи жарымын ээлөө үчүн экинчи колдонмону тандаңыз.

Сүрөт 5.12: Мисample of the split screen function, showing two applications running side-by-side on the stereo display.
6. Техникалык тейлөө
- Экранды тазалоо: Сенсордук экранды тазалоо үчүн жумшак, түксүз чүпүрөктү колдонуңуз. Экранга зыян келтирүүчү абразивдүү тазалагычтардан же эриткичтерден алыс болуңуз.
- Программалык камсыздоо жаңыртуулары: Periodically check for software updates to ensure optimal performance and access to new features. Updates can usually be found through the system settings or the manufacturer's webсайт.
- Жалпы кам көрүү: Keep the unit free from dust and moisture. Ensure proper ventilation around the unit to prevent overheating.
7. Кыйынчылыктарды
If you encounter issues with your Naifay car stereo, refer to the following troubleshooting guide:
| Көйгөй | Мүмкүн себеп | Чечим |
|---|---|---|
| Түзмөк күйбөйт | туура эмес зымдар; күйгөн сактагыч; Электр энергиясы жетишсиз. | Check all power connections (red, yellow, black wires). Verify the fuse. Ensure the car battery is providing 12V. |
| Slow performance or glitches | Too many apps running; Low RAM/ROM; Software issue. | Close unnecessary applications. Perform a factory reset (backup data first). Check for software updates. |
| Wireless Carplay/Android Auto disconnects or fails to connect | Bluetooth/Wi-Fi interference; Incorrect pairing; Software bug. | Ensure Bluetooth and Wi-Fi are enabled on both devices. Forget and re-pair the device. Restart both phone and stereo. |
| Сенсордук экран жооп бербейт | Software freeze; Hardware malfunction. | Restart the unit (press the RST button if available). If the issue persists, contact customer support. |
| Үн жок | Speaker wiring issue; Volume too low; Mute activated. | Check speaker connections. Increase volume. Ensure the unit is not muted. |
| Камдык камера көрсөтүлбөй жатат | Incorrect camera wiring; Camera malfunction. | Verify the camera's power and video connections (refer to Image 4.1). Ensure the pink reversing trigger wire is correctly connected. |
| Unit does not fit dashboard opening | Incorrect vehicle application; Screen dimensions exceed space. | This unit has a 10.1-inch screen that extends beyond a standard double DIN chassis. Confirm your vehicle's dashboard has adequate space for the screen's dimensions (250mm x 150mm). Professional installation may be required for custom fitting. |
8. Техникалык шарттар
| Өзгөчөлүк | Спецификация |
|---|---|
| Операция системасы | Android 12 |
| CPU | 4-өзөктүү |
| Эстутум (RAM+ROM) | 2 ГБ RAM + 32 ГБ ROM |
| Screen Size | 10.1 дюйм |
| Экран түрү | IPS сенсордук экран (2.5D чыңалган айнек) |
| Screen Resolution | 1024x600 |
| Зымсыз байланыш | Wireless Carplay, Wireless Android Auto, WiFi, Bluetooth 5.1 |
| Mirror Link | Wired/Wireless (Android), Wireless (iOS) |
| GPS навигациясы | Built-in GPS Module, supports offline/online maps |
| Радио тюнер | FM радиосу |
| Аудио чыгаруу режими | Стерео |
| Камера | AHD, 170-degree wide angle, waterproof |
| Продукциянын өлчөмдөрү | 9.8 x 1.57 x 5.79 inches (Unit chassis: 178x65x70mm) |
| Элемент Салмагы | 2.72 фунт |
| Өндүрүүчү | Naifay |
9. Кепилдик жана колдоо
Naifay is committed to providing excellent customer service and technical support.
- Жооп убактысы: Суроолорго 24 сааттын ичинде тез жооп күтүңүз.
- Кайтаруу саясаты: 60-day no-worry return period.
- Кепилдик: 12 months replacement available within 12 months of purchase.
- Техникалык колдоо: Өмүр бою сатуудан кийинки консультация жана техникалык колдоо көрсөтүлөт.
For any questions regarding pre-sales information, installation guidance, or technical support, please contact Naifay customer service. You can typically find contact information by clicking 'sold by Naifay' on the product page and then 'ask a question'.

Image 9.1: Summary of Naifay's customer support commitments, including response time, return policy, warranty, and lifetime technical support.


