1. Киришүү
This manual provides detailed instructions for the safe and effective operation, maintenance, and troubleshooting of your Nitecore MH40S rechargeable flashlight and NB10000 power bank. Please read this manual thoroughly before use to ensure optimal performance and longevity of your devices.
2. Пакеттин мазмуну
Төмөндө тизмеленген нерселердин баары пакетиңизде бар экенин текшериңиз:
- Nitecore MH40S Flashlight
- 2 x Nitecore NL2150 5,000mAh Li-ion Batteries
- Nitecore NB10000 10,000mAh Power Bank
- Зымсыз Remote Switch
- QC адаптери
- USB-C заряддоо кабели
- Запастык шакек
- Lanyard
- Илмек жана илмек
- 2 x Hook-and-loop Straps
- Holster

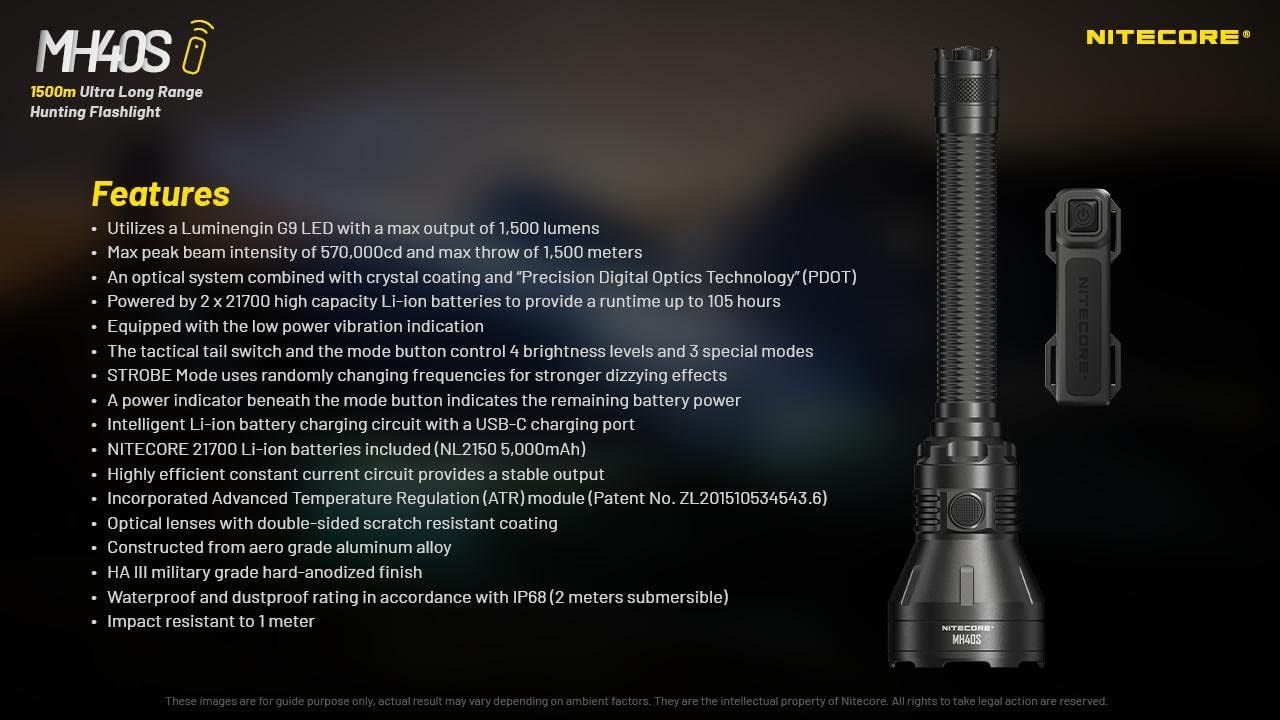
3. Продукциянын өзгөчөлүктөрү
- Utilizes a Luminengin G9 LED with a maximum output of 1,500 lumens.
- Maximum peak beam intensity of 570,000cd and a maximum throw of 1,500 meters.
- Optical system combines crystal coating and "Precis Digital Optics Technology" (PDOT).
- Powered by 2x high-capacity Li-ion batteries, providing a runtime of up to 105 hours.
- Equipped with a low power vibration indicator.
- Tactical tail switch and mode button control 4 brightness levels and 3 special modes.
- STROBE mode uses randomly changing frequencies for enhanced disorienting effects.
- Power indicator beneath the mode button displays remaining battery power.
- Intelligent Li-ion battery charging circuit with a USB-C charging port.
- Includes Nitecore NL2150 5,000mAh Li-ion batteries.
- Highly efficient constant current circuit ensures stable output.
- Incorporates Advanced Temperature Regulation (ATR) module.
- Optical lenses feature double-sided scratch-resistant coating.
- HA III аскердик класстагы катуу аноддолгон финиш менен аэро-класстын алюминий эритмесинен курулган.
- Waterproof and dustproof rating in accordance with IP68 (2 meters submersible).
- 1 метрге чейин соккуга туруктуу.

4. Техникалык шарттар
4.1 MH40S Flashlight Technical Data
| FL1 стандарты | TURBO | ЖОГОРКУ | MID | АЗ | STROBE | МАЯК | SOS |
|---|---|---|---|---|---|---|---|
| Чыгуу | 1,500 Lumens | 500 Lumens | 150 Lumens | 18 Lumens | 1,500 Lumens | 1,500 Lumens | 1,500 Lumens |
| Runtime | 3с 15мин | 7с 15мин | 25ч | 105ч | — | — | — |
| Beam Distance | 1,500 м | 860 м | 450 м | 150 м | — | — | — |
| Beam Intensity | 570,000cd | 186,000cd | 51,000cd | 5,800cd | — | — | — |
Note: The stated data is measured in accordance with international flashlight testing standards ANSI/PLATO FL 1-2019, using 2x 21700 Li-ion batteries (5,000mAh) under laboratory conditions. Actual data may vary due to different battery types or environmental conditions.

4.2 Жалпы спецификациялар
- LED: Luminengin G9 LED
- Рефлектор: SMO
- Батарея: 2 x 21700 Li-ion (NL2150 5,000mAh included)
- Атайын режимдер: Location Beacon, SOS, Strobe
- Beam Color: Ак жарык
- Узундугу: 256 мм (10.08 дюйм)
- Баштын көлөмү: 65 мм (2.56 дюйм)
- Салмагы: 245.8 г (8.67 унция) (батареясыз)
- Материал: Аэрокласстагы алюминий эритмеси
- Бүтүрүү: HA III military-grade hard-anodized
- Суу өткөрбөйт рейтинги: IP68 (2 метр сууга түшүүчү)
- Таасирге каршылык: 1 метр
4.3 NB10000 Power Bank Specifications
- Сыйымдуулугу: 10,000mAh 3.85V
- Номиналдуу энергия: 6,400mAh 5V
- Киргизүү (USB-C): 5V - 2.4A / 9V - 2A
- Чыгуу (USB-C): 5V - 3A / 9V - 2A / 12V - 1.5A
- Dual Ports Output: 5V - 3A (MAX)
- Материал: Carbon fiber frame and panels
- Өлчөмдөрү: 4.8" x 2.32" x 0.42"
- Салмагы: 5.29 унц
- Өзгөчөлүктөрү: Dual output channels (USB and USB-C), LED remaining power level indicator, one-touch low current mode.
5. Орнотуу
5.1 Батареяны орнотуу
- Unscrew the tail cap of the MH40S flashlight.
- Insert the two Nitecore NL2150 21700 Li-ion batteries with the positive (+) terminals facing the head of the flashlight.
- Туура тийүү жана сууга туруштук берүү үчүн куйрук капкагын кайра бекем буруңуз.
Эскертүү: Ensure batteries are inserted with correct polarity. Incorrect insertion can damage the device.
5.2 Алгачкы заряддоо
Before first use, fully charge the MH40S flashlight and the NB10000 power bank.
5.2.1 Charging the MH40S Flashlight
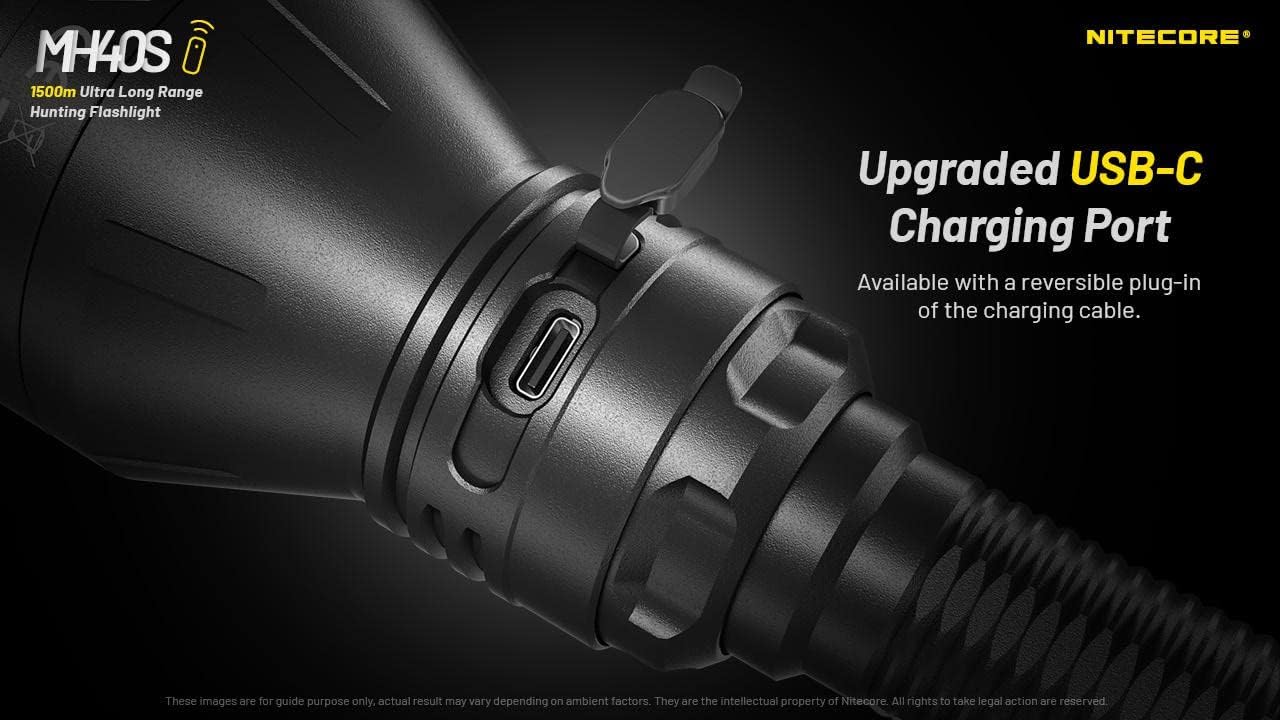
- Кол чырактын корпусундагы USB-C заряддоо портун табыңыз.
- Open the rubber cover protecting the port.
- Connect the USB-C charging cable to the flashlight and the QC Adapter.
- Plug the QC Adapter into a power outlet.
- The power indicator beneath the mode button will flash during charging and remain solid when fully charged.
- Close the rubber cover after charging to maintain water and dust resistance.
5.2.2 Charging the NB10000 Power Bank
- Connect the USB-C charging cable to the USB-C input port on the NB10000.
- Connect the other end of the cable to a USB power source (e.g., QC Adapter, computer USB port).
- The LED indicators on the power bank will show the charging status.
6. Иштөө нускамалары
6.1 Basic Flashlight Operation
The MH40S features a tactical tail switch and a mode button for control.

6.1.1 Күйгүзүү/өчүрүү
- Убактылуу күйгүзүү: Half-press and hold the tactical tail switch. Release to turn off.
- Туруктуу күйгүзүү/өчүрүү: Fully press the tactical tail switch until a click is heard to turn on. Fully press again to turn off.
6.1.2 Brightness Level Adjustment
- With the flashlight on, press the mode button to cycle through brightness levels: LOW - MID - HIGH - TURBO.
- The flashlight will memorize the last used brightness level (except for special modes) when turned off and on again.
6.1.3 Special Modes (STROBE, BEACON, SOS)
- With the flashlight on, press and hold the mode button to activate STROBE mode.
- While in STROBE mode, press the mode button again to cycle through BEACON and SOS modes.
- To exit special modes, short press the mode button or turn off the flashlight.
6.2 Wireless Remote Switch Operation
The included wireless remote switch allows for convenient control of the MH40S from a distance of up to 1 meter (3.28 feet).

- Убактылуу күйгүзүү: Press and hold the designated button on the remote switch. Release to turn off.
- Туруктуу күйгүзүү/өчүрүү: Press the designated button on the remote switch to turn on. Press again to turn off.
- STROBE: Press the designated STROBE button on the remote switch to activate. Press again to turn off.
The remote switch is powered by a 3V CR1632 button cell battery and features advanced power cut-off (APC) technology for extended standby time.
6.3 NB10000 Power Bank Usage
- Түзмөктөрдү кубатталууда: Connect your device to the USB-A or USB-C output port of the NB10000 using an appropriate charging cable.
- Күч деңгээлинин көрсөткүчү: Press the power button on the NB10000 to check the remaining battery level via the LED indicators.
- Төмөн ток режими: For charging delicate electronics (e.g., Bluetooth earphones, smartwatches), activate the low current mode by pressing and holding the power button until a specific indicator lights up.
7. Техникалык тейлөө
- Тазалоо: Кол чырактын корпусун жумшак, гamp кездеме. Абразивдүү тазалагычтарды же эриткичтерди колдонбоңуз.
- Жиптер жана O-шакекчелер: Lubricate the threads and O-rings regularly with silicone grease to maintain water resistance. Replace worn O-rings as needed.
- Батареяга кам көрүү: Remove batteries if the flashlight will not be used for an extended period. Store batteries in a cool, dry place.
- Заряддоо порту: Keep the USB-C charging port clean and free of debris. Ensure the rubber cover is securely closed when not charging.
8. Кыйынчылыктарды
- Кол чырак күйбөй жатат:
- Батарейканын уюлдуулугун текшериңиз.
- Батареялар толук заряддалганын текшериңиз.
- Куйрук капкагын бекем тартыңыз.
- Clean battery contacts with an alcohol swab.
- Кыскартылган жарыктык же кыска иштөө убактысы:
- Батареялар аз болушу мүмкүн; аларды кайра заряддаңыз.
- Batteries may be aging; consider replacement.
- Ensure the flashlight head and tail cap are tightly screwed on.
- Remote switch not responding:
- Check the distance between the remote and the flashlight (max 1 meter).
- Replace the CR1632 battery in the remote switch.
- Сигналга эч кандай тоскоолдуктар тоскоол болбогонун текшериңиз.
- Заряддоо маселелери:
- Verify the USB-C cable is properly connected.
- Ensure the power source (QC Adapter) is functioning.
- Заряддоо портун ар кандай таштандылардан тазалаңыз.
9. Коопсуздук маалыматы
- Кол чыракты түздөн-түз көзгө тийгизбеңиз.
- Балдар жетпеген жерде сактаңыз.
- Do not disassemble or modify the flashlight or power bank, as this voids the warranty and may cause damage.
- Avoid exposing the devices to extreme temperatures or direct sunlight for prolonged periods.
- Use only recommended batteries and charging accessories.
- Батареяларды жергиликтүү эрежелерге ылайык жок кылыңыз.
10. Кепилдик жана колдоо
Nitecore products are covered by a warranty. For detailed warranty information and support, please refer to the official Nitecore webсайтына кириңиз же жергиликтүү дистрибьюторуңузга кайрылыңыз. Кепилдик талаптары үчүн сатып алуу дүмүрчөгүңүздү сактап коюңуз.
Кошумча жардам алуу үчүн, баш багыңыз Amazonдагы Nitecore дүкөнү or the official Nitecore webсайт.


