1. Киришүү
This user manual provides comprehensive instructions for the setup, operation, maintenance, and troubleshooting of your Thomson 27-inch QHD Gaming Monitor (Model: M27QG5Y14). This monitor is designed to deliver a superior visual experience with its QHD resolution, 180Hz refresh rate, and IPS panel technology, making it ideal for gaming and multimedia applications.

Сүрөт 1.1: Алдыңкы view of the Thomson 27-inch QHD Gaming Monitor, showcasing анын саркеч дизайн жана дисплей аянты.
2. Коопсуздук маалыматы
Мониторду колдонуудан мурун бардык коопсуздук нускамаларын кылдат окуп чыгыңыз. Бул колдонмону келечекте маалымат алуу үчүн сактаңыз.
- Кубат булагы: Монитор менен кошо берилген кубат адаптерин гана колдонуңуз. Электр розеткасынын туура жерге туташтырылганын текшериңиз.
- Вентиляция: Желдетүүчү тешиктерди жаппаңыз. Ашыкча ысып кетүүнүн алдын алуу үчүн монитордун айланасында абанын туура айланышы үчүн жетиштүү орун калтырыңыз.
- Суюктук жана нымдуулук: Мониторду суудан, жамгырдан же ашыкча нымдуулуктан алыс кармаңыз. Монитордун үстүнө суюктук толтурулган буюмдарды койбоңуз.
- Тазалоо: Disconnect the power cable before cleaning. Use a soft, dry cloth. Do not use liquid cleaners or aerosol cleaners.
- Жайгашкан жери: Мониторду туруктуу, тегиз бетке коюңуз. Аны күн тийген жерге же жылуулук булактарынын жанына коюудан алыс болуңуз.
- Колдонуу: Мониторду этияттык менен колдонуңуз. Аны түшүрүүдөн же катуу таасирлерге дуушар кылуудан алыс болуңуз.
- Тейлөө: Мониторду өзүңүз тейлөөгө аракет кылбаңыз. Бардык тейлөөлөрдү квалификациялуу тейлөө кызматкерлерине тапшырыңыз.
3. Пакеттин мазмуну
Таңгактагы бардык буюмдардын бар экенин текшериңиз. Эгерде кандайдыр бир буюмдар жок болсо же бузулуп калса, сатуучуңузга кайрылыңыз.
- Thomson 27-inch QHD Gaming Monitor
- Монитор стенд (негизги жана моюн)
- Кубат адаптери жана кубат кабели
- HDMI кабели
- DisplayPort (DP) Cable (may vary by region)
- USB-Bден USB-Aга кабели (USB хабынын функциялары үчүн)
- Колдонуучунун Колдонмосу (бул документ)
- Стендди чогултуу үчүн бурамалар
4. Орнотуу
4.1. Монитордун стендди чогултуу
- Мониторду таңгагынан кылдаттык менен алып чыгып, чийилбеш үчүн аны жумшак, таза бетке ылдый каратып коюңуз.
- Берилген бурамалар аркылуу стенд мойнуна монитор панелине бекитиңиз.
- Attach the stand base to the stand neck and secure it with the designated screw.
- Once assembled, carefully lift the monitor and place it on a stable desk or table.

Image 4.1: Monitor dimensions and stand assembly overview. The monitor measures approximately 61 cm wide, 54 cm high (with stand), and 24 cm deep (with stand).
4.2. Мониторду туташтыруу
Connect the necessary cables to the monitor's input ports. Refer to the image below for port locations.
- Кубат туташуу: Connect the power adapter to the "DC IN" port on the monitor, then plug the power cable into a power outlet.
- Video Input:
- Connect an HDMI cable from your computer's graphics card to an "HDMI 2.1" port on the monitor.
- Alternatively, connect a DisplayPort (DP) cable from your computer's graphics card to a "DP 1.2" port on the monitor.
- USB хабы: To enable the monitor's USB 3.0 ports, connect a USB-B cable from the "USB 3.0 B" port on the monitor to a USB-A port on your computer.
- Аудио чыгаруу: Connect headphones or external speakers to the "Earphone Plug" (3.5mm audio jack) for audio output.

Image 4.2: Rear panel of the monitor displaying the various input and output ports for connectivity.
4.3. Эргономикалык тууралоо
Монитор стендиңизди оптималдаштыруу үчүн ар кандай тууралоолорду жүргүзүүгө мүмкүндүк берет viewсооронуч:
- Россия: Adjust the screen's vertical angle (up or down).
- Айлануучу: Rotate the screen horizontally (left or right).
- Пивот: Портрет режими үчүн экранды 90 градуска буруңуз viewing.
- Бийиктигин тууралоо: Мониторду каалаган көз деңгээлине чейин көтөрүңүз же түшүрүңүз.
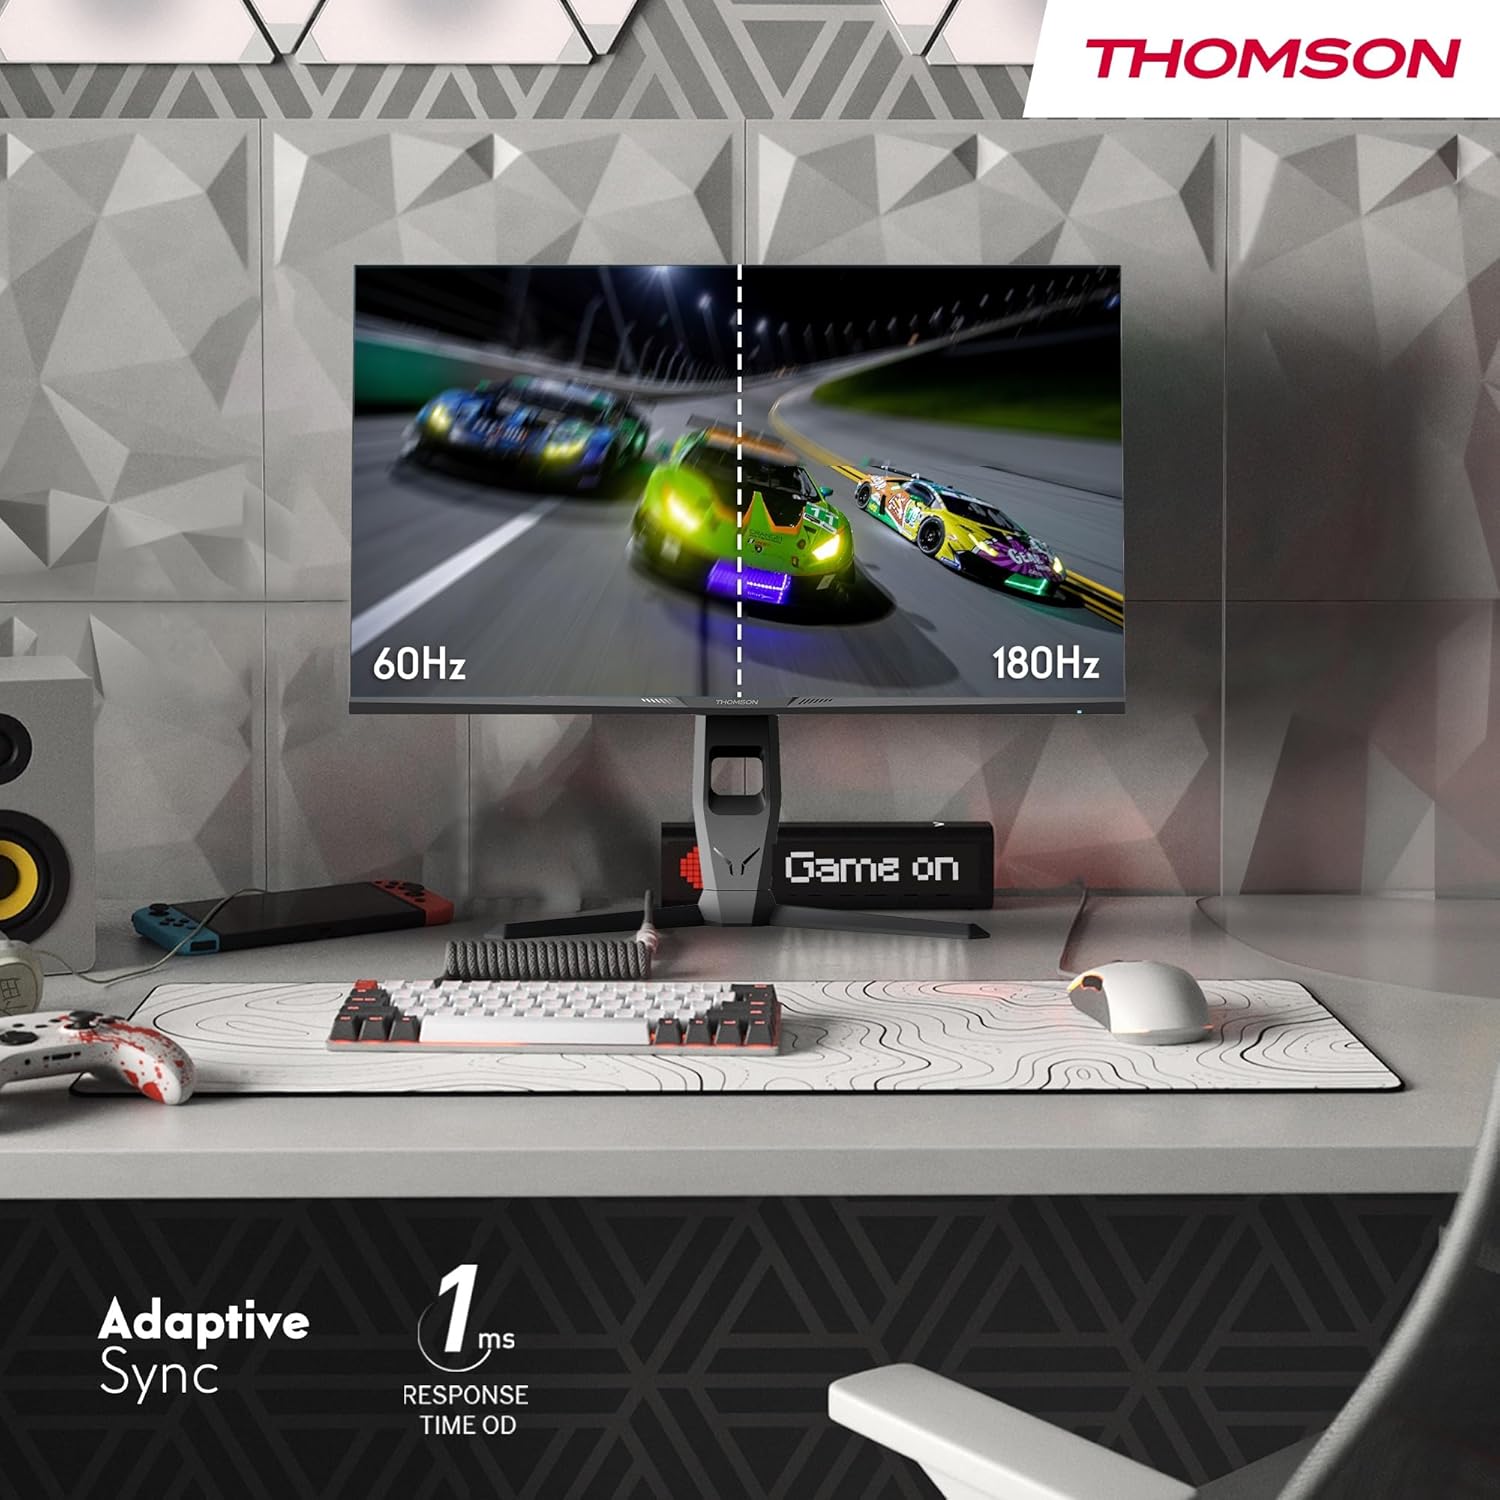
Image 4.3: Demonstrations of the monitor's ergonomic capabilities, including tilt, swivel, and pivot for optimal viewбурчтар.
4.4. VESA орнотуу
The monitor is compatible with VESA 100x100mm mounting standards. To mount the monitor on a wall or an alternative stand, remove the original stand and attach the VESA-compatible mount (sold separately) using appropriate screws.
5. Иштөө нускамалары
5.1. Күйгүзүү/өчүрүү
Мониторду күйгүзүү же өчүрүү үчүн, адатта, анын арткы же астыңкы жагында жайгашкан кубат баскычын басыңыз. Монитор күйүп турганда кубат индикаторунун жарыгы күйөт.
5.2. Экрандагы дисплей (OSD) менюсу
The OSD menu allows you to adjust various monitor settings. Use the joystick or buttons (location may vary) on the monitor to navigate the menu.
- Сүрөт жөндөөлөрү: Жарыктыкты, контрастты, тактыкты, түс температурасын жана гамманы тууралаңыз.
- Түс жөндөөлөрү: Fine-tune RGB levels, saturation, and hue.
- Киргизүүнү тандоо: HDMI жана DisplayPort киргизүүлөрүнүн ортосунда кол менен которулуңуз.
- Аудио: Adjust volume for built-in speakers or headphone output.
- OSD Орнотуулары: Экрандык экрандын тилин, тунуктугун жана күтүү мөөнөтүн өзгөртүңүз.
- Оюн орнотуулары: Access features like Adaptive Sync, response time (OD), and crosshair overlays.
5.3. Оюн функциялары
- 180Hz жаңыртуу ылдамдыгы: Provides smoother motion and reduced input lag, especially beneficial for fast-paced games. Ensure your graphics card and cable support this refresh rate.
- 1ms Response Time (OD): Minimizes motion blur and ghosting for clear, crisp images during rapid movements.
- Адаптивдүү синхрондоштуруу: Synchronizes the monitor's refresh rate with your graphics card's frame rate, eliminating screen tearing and stuttering. Enable this feature in the OSD menu and your graphics card control panel.

Image 5.1: Visual comparison illustrating the difference between 60Hz and 180Hz refresh rates, highlighting the smoother motion provided by the higher refresh rate, alongside the Adaptive Sync feature.
5.4. Көзгө кам көрүүнүн өзгөчөлүктөрү
- Анти Flicker технологиясы: Reduces screen flickering, which can cause eye strain during prolonged use.
- Төмөн көк жарык режими: Filters out harmful blue light emissions to protect your eyes and reduce fatigue. This mode can be activated through the OSD menu.
- Anti-Glare Screen: The matte screen surface minimizes reflections from ambient light, providing clear visuals without distraction.

Image 5.2: Depiction of the monitor's eye comfort features, including an anti-glare screen and technologies like Anti-Flicker and Low Blue Light for reduced eye strain.
5.5. RGB Ambient Lighting
The monitor features integrated RGB ambient lighting on the rear. This lighting can be customized via the OSD menu to enhance your gaming environment or match your setup's aesthetics.
6. Техникалык тейлөө
6.1. Мониторду тазалоо
- Экран: Экранды жумшак, түксүз чүпүрөк менен акырын сүртүңүз. өжөр белгилери үчүн, жеңил гampen the cloth with water or a specialized screen cleaner (ensure it's safe for LCD/IPS panels) and wipe gently. Never spray liquid directly onto the screen.
- Casing: Мониторду сүртүү үчүн жумшак, кургак чүпүрөктү колдонуңуз casinг. Абразивдүү тазалагычтарды же эриткичтерди колдонуудан алыс болуңуз.
- Тазалоодон мурун ар дайым электр кабелин сууруп алыңыз.
6.2. Сактоо
Мониторду узак убакытка сактасаңыз, бардык кабелдерди ажыратып, аны баштапкы таңгагына (эгер бар болсо) таңгактап, күн нурунан жана өтө температурадан алыс, салкын, кургак жерде сактаңыз.
7. Кыйынчылыктарды
Бул бөлүмдө сиз кездешиши мүмкүн болгон кеңири таралган көйгөйлөр каралат. Эгерде көйгөй чечилбесе, кардарларды колдоо кызматына кайрылыңыз.
| Көйгөй | Мүмкүн себеп | Чечим |
|---|---|---|
| Күч жок | Электр кабели туташкан эмес; Розетка бузук; Монитор өчүк. | Ensure power cable is securely connected. Test the power outlet. Press the monitor's power button. |
| Сигнал жок / Бош экран | Video cable not connected; Incorrect input selected; Computer not outputting signal. | Check HDMI/DP cable connections. Select the correct input source via OSD. Ensure computer is on and outputting video. |
| Distorted image / Flickering | Incorrect resolution/refresh rate; Faulty cable; Graphics driver issue. | Set display resolution to 2560x1440 and refresh rate to 180Hz. Try a different video cable. Update graphics drivers. |
| No audio from speakers/headphones | Volume too low; Audio cable not connected; Incorrect audio output selected on PC. | Increase monitor volume via OSD. Ensure headphones/speakers are connected. Select monitor as audio output device in PC settings. |
8. Техникалык шарттар
Detailed technical specifications for the Thomson M27QG5Y14 monitor.
| Өзгөчөлүк | Спецификация |
|---|---|
| Бренд | Томсон |
| Модел | M27QG5Y14 |
| Screen Size | 27 дюйм |
| Панел түрү | IPS |
| Резолюция | 2560 x 1440 (QHD) |
| Жаңыртуу ылдамдыгы | 180 Гц |
| Жооп убактысы | 1 Millisecond (OD) / 5 Milliseconds (GtG) |
| Жарыктык | 350 Nits |
| Контраст катышы | 1200:1 |
| Viewбурч | 178 градус (горизонталдуу/вертикалдуу) |
| Түс гаммасы | 120% sRGB |
| HDR колдоо | HDR10 (10-bit) |
| Adaptive Sync | Ооба |
| Байланыш | 2x HDMI 2.1, 1x DisplayPort 1.2, 1x USB 3.0 Type-B (upstream), 3x USB 3.0 Type-A (downstream), 1x Earphone Plug (3.5mm) |
| Камтылган динамиктер | Yes (2x2W) |
| VESA тоосунун шайкештиги | 100x100мм |
| Продукциянын өлчөмдөрү (стенд менен) | 61 x 54 x 24 см (W x Y x D) |
| Салмагы (стенд менен) | 7.3 кг |
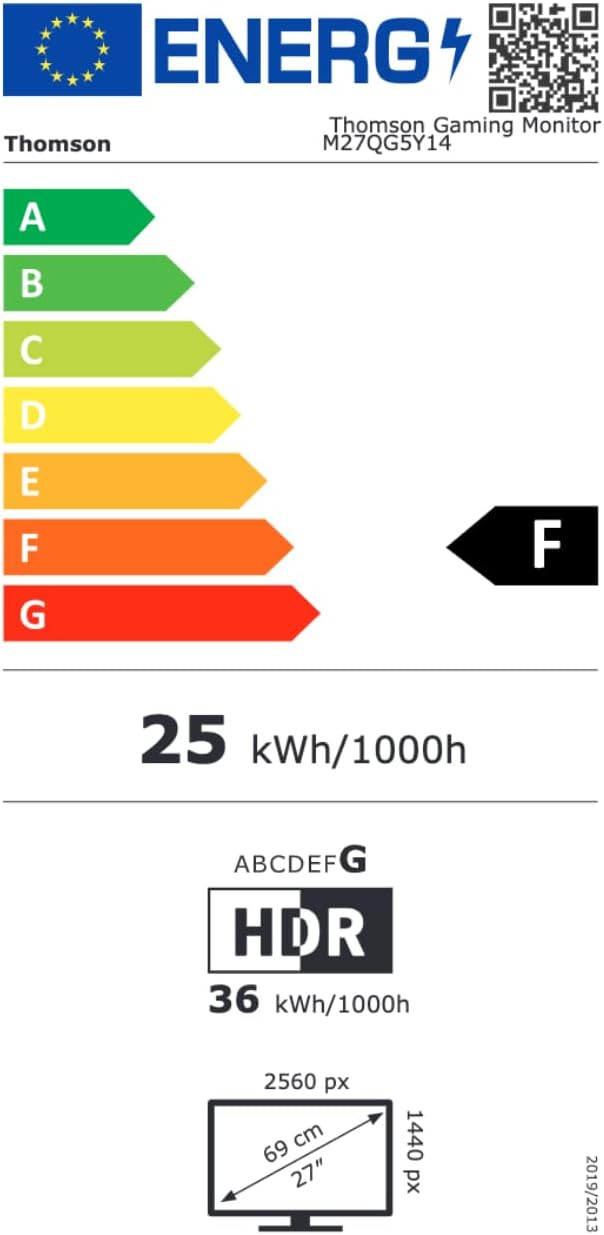
Image 8.1: EU Energy Label for the Thomson M27QG5Y14 monitor. For more details, visit the EPREL маалымат базасы.
9. Кепилдик жана колдоо
Thomson products are designed for reliability and performance. This monitor typically comes with a 3 жылдык кепилдик сатып алынган күндөн тартып өндүрүш кемчиликтерин жабуу. Кепилдик дооматтары үчүн сатып алганыңыздын далилин сактап коюңуз.
For technical assistance, troubleshooting beyond this manual, or warranty inquiries, please contact Thomson customer support or your local retailer. Refer to the official Thomson website or your product packaging for specific contact details.
You can also visit the official Thomson store on Amazon for more information: Thomson Store.


