1. Киришүү
This manual provides instructions for the installation, operation, and maintenance of your SOUNDKITS Single Din Touchscreen Radio. This device integrates modern infotainment features such as Apple CarPlay, Android Auto, Bluetooth connectivity, and a 6.5-inch IPS display into a standard single DIN form factor, suitable for upgrading classic vehicles.

Image: The SOUNDKITS Single Din Touchscreen Radio unit, featuring a 6.5-inch IPS display showing the Apple CarPlay interface, accompanied by its infrared remote control.
2. Коопсуздук маалыматы
Read all instructions carefully before installation and operation. Failure to follow these instructions may result in injury or damage to the device or vehicle.
- Кесиптик орнотуу сунушталат: Due to the complexity of car audio systems, professional installation is advised.
- Кубат булагы: Түзмөктү терс жерге туташтырылган 12 В туруктуу токтун булагына гана туташтырыңыз.
- Зымдар: Ensure all wiring is correctly connected to prevent short circuits and damage. Insulate all exposed wires.
- Айдоо коопсуздугу: Агрегатты айдоодон алаксыта тургандай иштетпеңиз. Ар дайым жол коопсуздугун биринчи орунга коюу.
- Температура: Аппаратты экстремалдык температурага же түз күн нуруна узак убакытка калтыруудан сактаңыз.
- Нымдуулук: Keep the unit dry. Exposure to moisture can cause malfunction or electric shock.
3. Пакеттин мазмуну
Пакетте бардык буюмдар бар экенин текшериңиз:
- Single Din CarPlay Stereo Unit
- Электр зымдары
- Монтаждоо комплекттери
- IR Remote Control
- Колдонуучунун инструкциясы (бул документ)
4. Продукт бүтүп калдыview
4.1 Алдыңкы панелдин башкаруу элементтери жана порттору
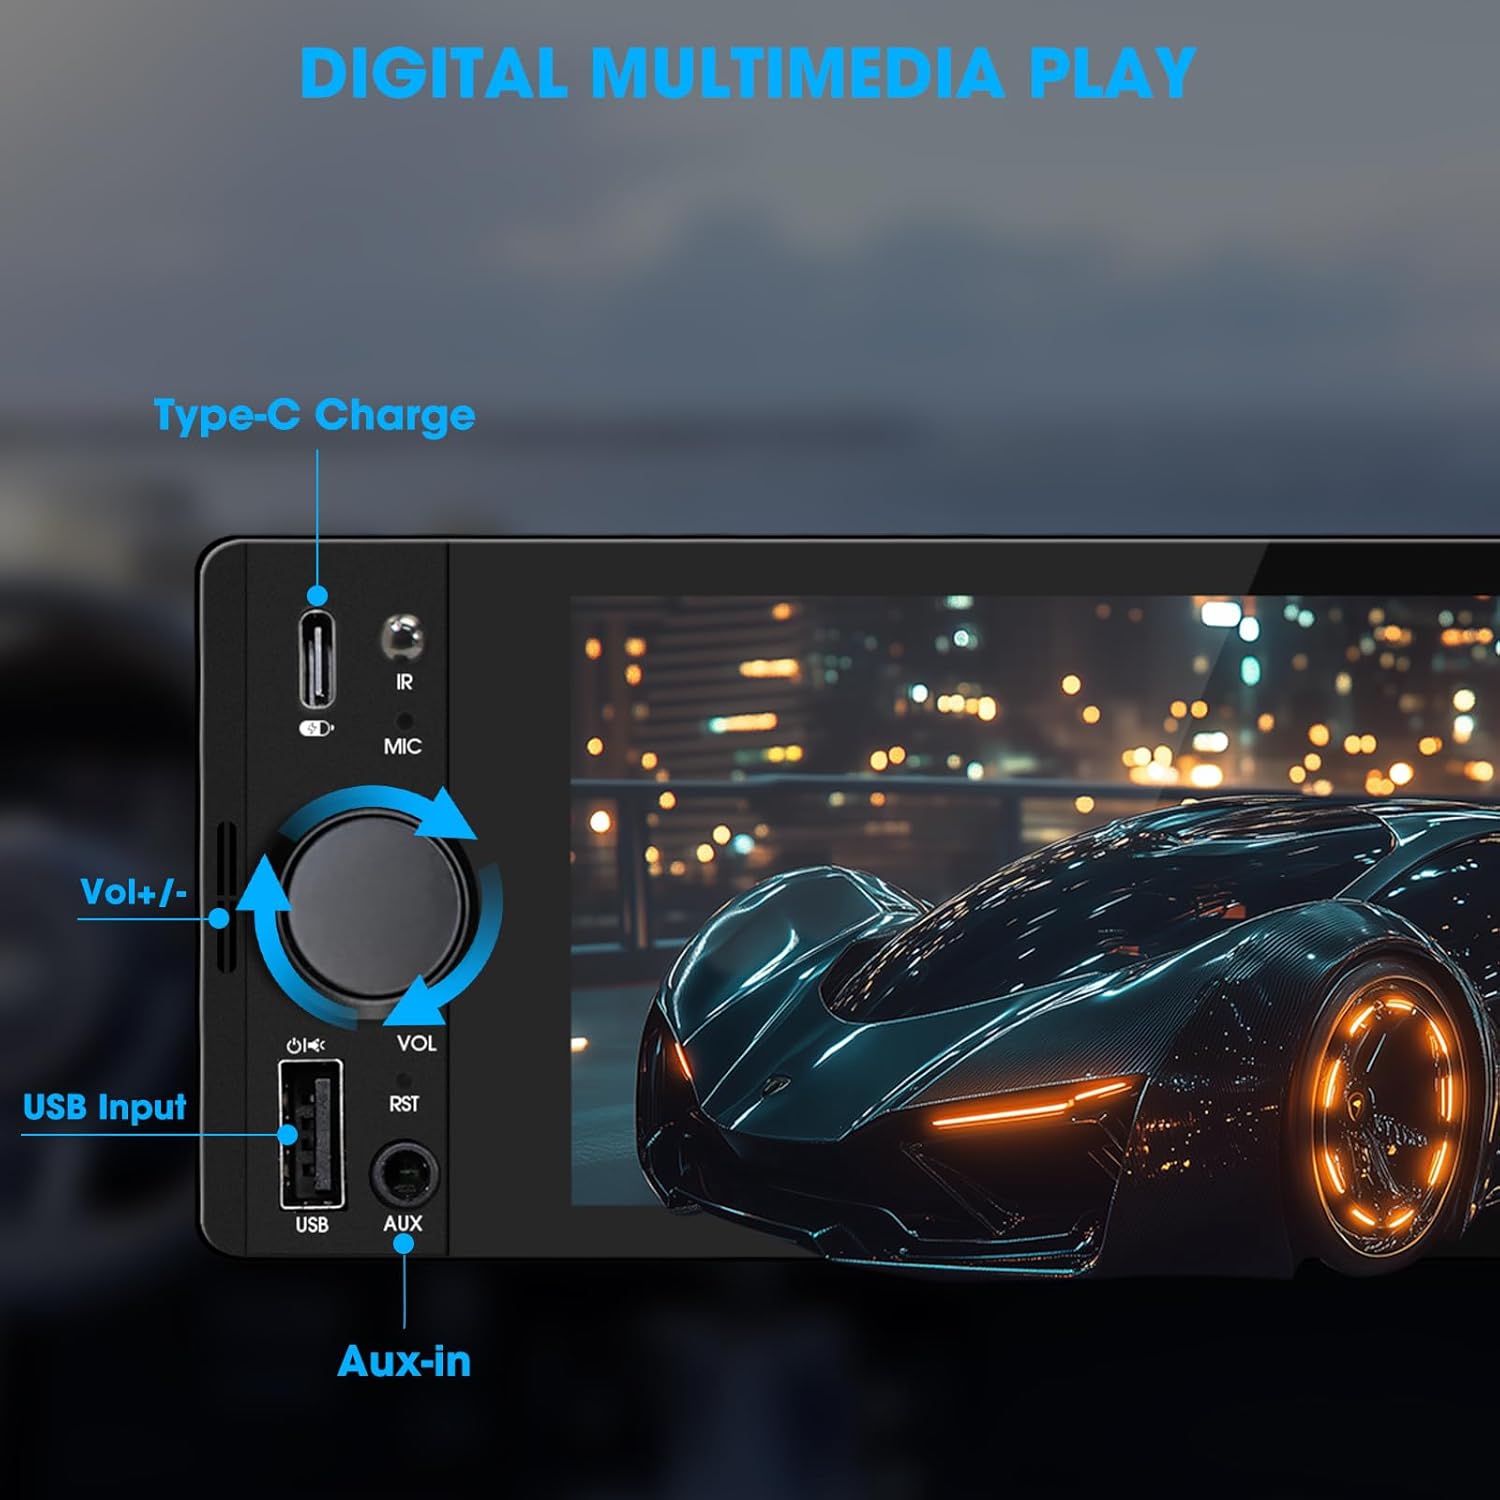
Image: Close-up of the radio's front panel, highlighting the Type-C charging port, IR receiver, microphone, volume knob, USB input, and AUX-in port.
- 6.5 дюймдук IPS сенсордук экран: Main display for all functions and interfaces.
- Үн баскычы (VO): Үндү тууралоо үчүн буруңуз. Үнсүз/чыгаруу үчүн басыңыз.
- USB киргизүү: For media playback, CarPlay/Android Auto connection, and phone mirroring.
- AUX кирүүсү: 3.5mm audio input for external audio devices.
- Type-C заряддоо порту: Provides 2.1A quick charging for compatible devices.
- Микрофон (МИК): Handsfree чалуулар жана үн буйруктары үчүн орнотулган микрофон.
- IR алуучу: Алыстан башкаруу менен иштөө үчүн.
- Баштапкы абалга келтирүү баскычы (RST): Small button to reset the unit (requires a thin object like a paperclip).
4.2 Арткы панелдин туташуулары

Image: Diagram showing the rear connections of the radio, including the main wiring harness, RCA outputs, external microphone jack, and radio antenna input.
- Main Wiring Harness Connector: Connects to the vehicle's power, speaker, and control wires.
- RCA Audio Outputs (L-OUT, R-OUT): Тышкы туташтыруу үчүн ampаман калгандар.
- RCA Video Outputs (V-OUT1, V-OUT2): For connecting external monitors (e.g., headrest monitors).
- Арткыview Camera Input (CAMIN): RCA input for a rearview камера.
- Тышкы микрофон уячасы: For connecting an optional external microphone.
- Radio Antenna Input: Connects to the vehicle's AM/FM antenna.
5. Орнотуу жана орнотуу
This section outlines the general steps for installing the SOUNDKITS Single Din Touchscreen Radio. Professional installation is recommended.
5.1 Алдын ала орнотуу текшерүү тизмеси
- Орнотууну баштоодон мурун, унаанын аккумулятору ажыратылганын текшериңиз.
- Confirm the vehicle has a standard single DIN slot.
- Gather necessary tools (wire strippers, crimpers, electrical tape, screwdriver).

Image: A visual comparison showing older car radios replaced by the modern SOUNDKITS Single Din Touchscreen Radio, demonstrating the aesthetic upgrade.
5.2 Зымдарды туташтыруу
Refer to the provided wiring harness diagram for specific connections. The harness uses universal ISO interface and wire color coding.
| Wire Color | Функция |
|---|---|
| Сары | Туруктуу 12V (батарея) |
| Кызыл | Кошумча 12V (Тутандыруу) |
| Кара | Жер (GND) |
| Көк | Антенна/Ampкөтөргүчтү алыстан күйгүзүү |
| Ачык күрөң | Illumination/Dimmer |
| Күрөң | Рулду башкаруу (SWC) |
| Жашыл/Ак | Арткы сол динамик (+) |
| Жашыл/Кара | Арткы сол динамик (-) |
| Кызгылт / Ак | Арткы оң динамик (+) |
| Кызгылт көк/кара | Арткы оң динамик (-) |
| Ак / Ак | Алдыңкы сол динамик (+) |
| Ак/Кара | Алдыңкы сол динамик (-) |
| Боз/Ак | Алдыңкы оң динамик (+) |
| Боз/Кара | Алдыңкы оң динамик (-) |
| Reverse (often Pink/Brown) | Арткы тиштүү сигнал (арткы үчүн)view камера) |
Эскертүү: Always cross-reference with your vehicle's specific wiring diagram and the diagram provided with the product's harness. Incorrect wiring can cause damage.
5.3 Агрегатты монтаждоо
- Secure the mounting sleeve into the vehicle's single DIN dash opening.
- Connect all necessary wiring harnesses, antenna, and any external accessories (e.g., rearview camera, external microphone).
- Carefully slide the head unit into the mounting sleeve until it locks into place.
- Унаанын аккумуляторун кайра туташтырыңыз.
- Test all functions before reassembling the dashboard trim.
6. Иштөө нускамалары
6.1 Негизги операция
- Күйгүзүү/өчүрүү: The unit powers on with the vehicle's ignition. Press and hold the volume knob to turn off/on the display.
- Үндү көзөмөлдөө: Rotate the volume knob clockwise to increase volume, counter-clockwise to decrease. Press the knob to mute/unmute.
- Сенсордук экран интерфейси: Navigate menus and select options by tapping or swiping on the 6.5-inch IPS touchscreen.
6.2 Bluetooth байланышы

Image: The radio's display showing a successful Bluetooth 5.3 connection to a smartphone, with music playback information visible.
- Негизги менюдан тандаңыз Bluetooth сөлөкөтү.
- On your smartphone, search for available Bluetooth devices and select "SOUNDKITS" (or similar device name).
- Эгер суралса, жупташтыруу кодун эки түзмөктө тең ырастаңыз.
- Once connected, you can make hands-free calls and stream audio.
6.3 Apple CarPlay жана Android Auto
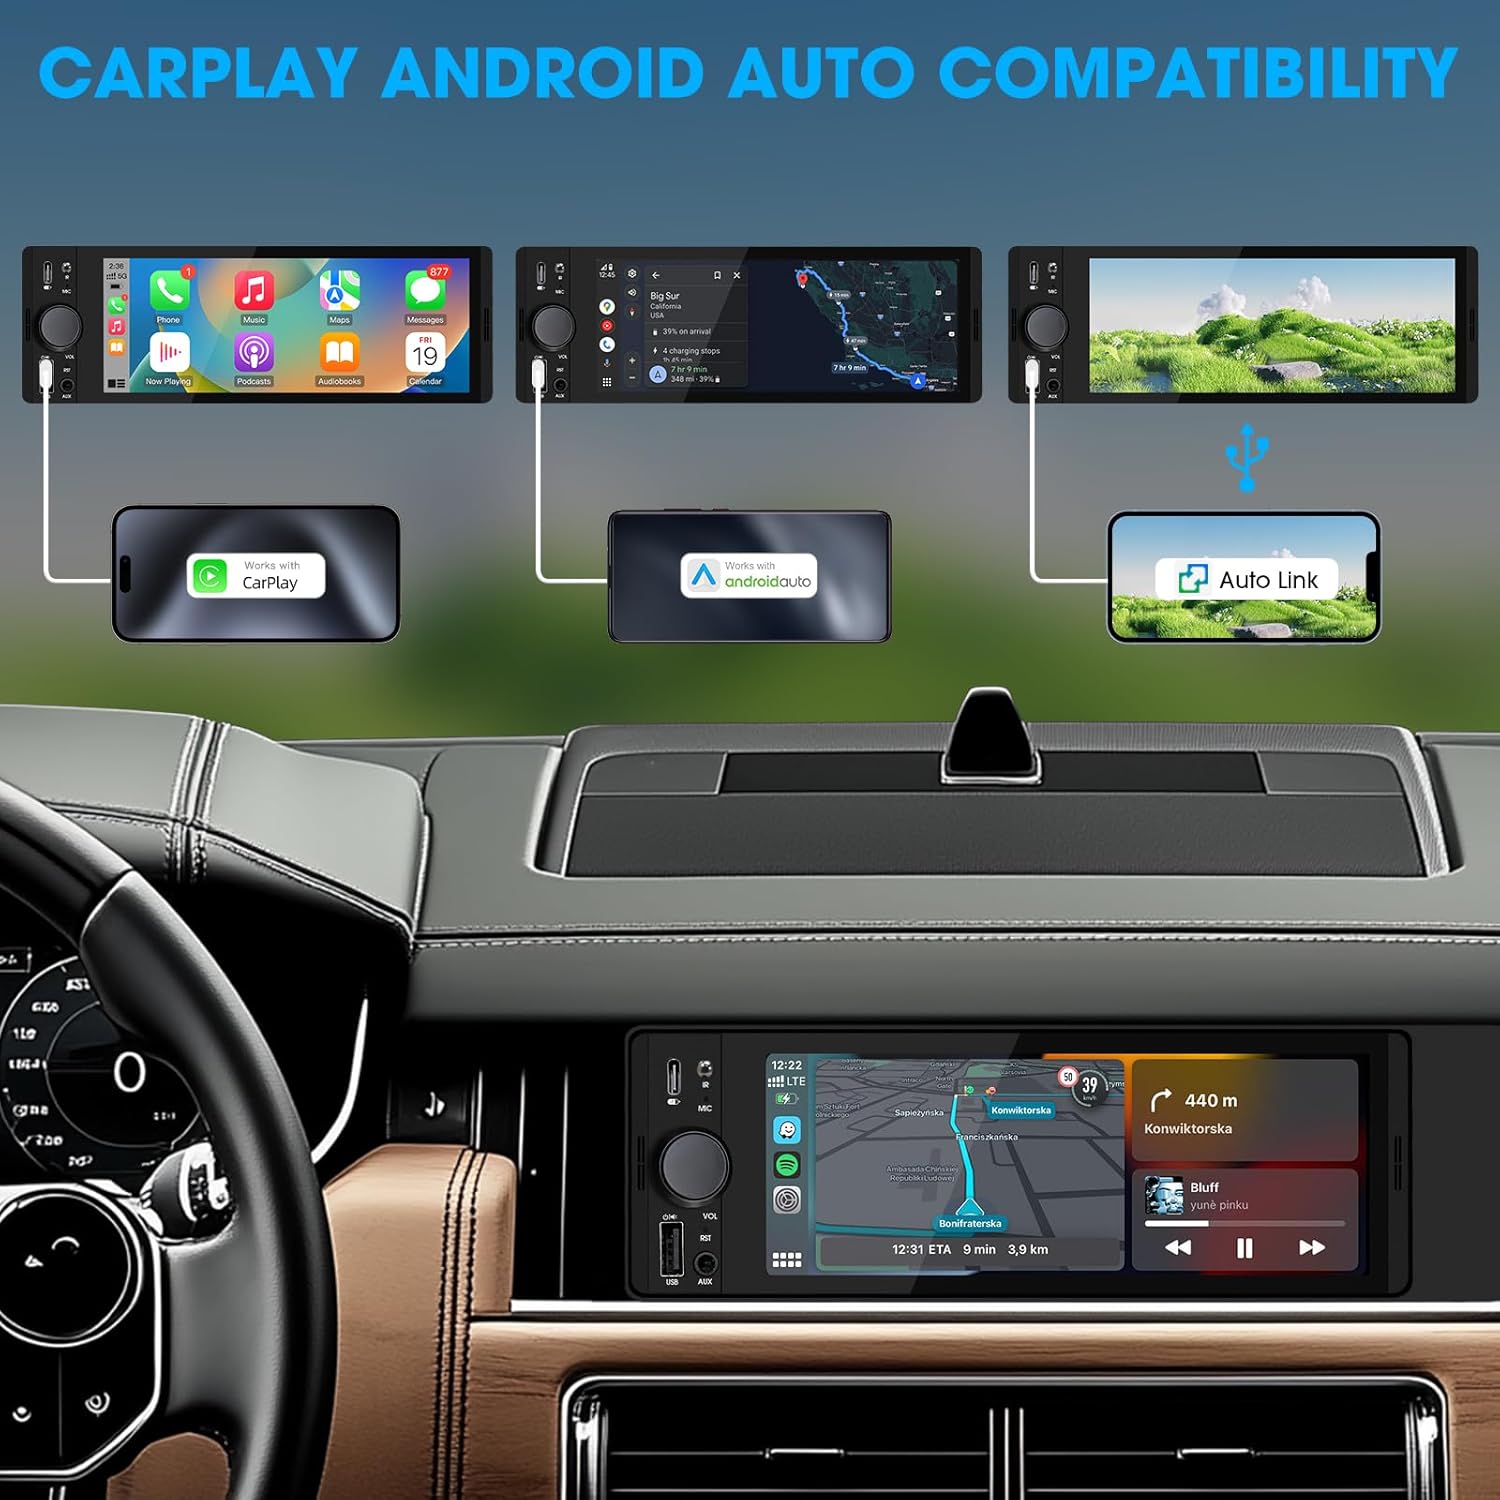
Image: An illustration demonstrating how to connect smartphones via USB for Apple CarPlay, Android Auto, and Auto Link functionality on the car stereo.
- Connect your iPhone (for CarPlay) or Android phone (for Android Auto) to the unit's USB port using a certified USB cable.
- The unit will automatically detect the connection and launch the respective interface.
- Follow any on-screen prompts on your phone or the unit to complete the setup.
- Access navigation, music, calls, and other compatible apps directly from the touchscreen.
6.4 USB Phone Mirroring
This feature allows you to display your smartphone's screen directly on the unit's display.
- Connect your smartphone to the unit's USB port.
- Select the "Phonelink" or "Mirrorlink" option from the main menu.
- Follow the on-screen instructions to establish the connection. This may require installing a specific app on your phone.
6.5 Radio (AM/FM)

Image: The radio interface displaying AM and FM frequency ranges and signal strength, indicating available stations.
- Негизги менюдан тандаңыз Радио сөлөкөтү.
- таптаңыз AM or FM to switch bands.
- колдонуу Издөө buttons to automatically search for stations.
- Учурдагы станцияны сактоо үчүн алдын ала коюлган номерди басып, кармап туруңуз.
6.6 Media Playback (USB, AUX)
- USB: USB дискти USB портуна салыңыз. Түзмөк шайкеш келген аудио/видеону автоматтык түрдө аныктап, ойнотот fileс. Чабыттоо files using the on-screen interface.
- AUX: Connect an external audio device to the 3.5mm AUX-in port using an audio cable. Select the AUX source from the main menu.
6.7 Үн менен башкаруу

Image: A driver interacting with the car stereo using voice commands for Siri and Google Assistant, demonstrating hands-free operation.
When connected via CarPlay or Android Auto, you can activate your phone's voice assistant (Siri or Google Assistant) by pressing the voice control button on the unit (if available) or by using the voice command phrase (e.g., "Hey Siri" or "Ok Google").
6.8 Рулду башкаруу (SWC)
Image: The steering wheel control configuration screen on the radio, showing options to program various buttons for functions like volume, track skip, and mode.
If your vehicle supports steering wheel controls, connect the SWC wire during installation. Access the Руль башкаруу settings in the unit's menu to program the buttons to control various functions (e.g., volume, track skip, mode).
6.9 Эквалайзердин жөндөөлөрү

Image: The audio equalizer settings interface, showing adjustable frequency bands and preset options, alongside a diagram of RCA audio and video outputs.
кирүү Үн орнотуулары or EQ menu to adjust audio parameters. The unit features a 10-band equalizer with preset options (e.g., Pop, Rock, Jazz) and custom settings to tailor the sound output to your preference.
6.10 Арткыview Камера киргизүү
Арткы жагын туташтырыңызview camera to the КАМИН RCA input. When the vehicle is shifted into reverse, the unit will automatically display the camera feed, enhancing parking safety.
7. Техникалык шарттар
| Өзгөчөлүк | Деталь |
|---|---|
| Модель номери | Single Din Touchscreen Radio |
| Дисплей | 6.5 Inch HD IPS Touch Screen (1024x600 resolution) |
| Байланыш | Bluetooth 5.3, USB, Auxiliary, Type-C (charging) |
| Смартфон интеграциясы | Apple CarPlay (Wired), Android Auto (Wired), Screen Mirroring |
| Аудио чыгаруу | 300W Peak Power, 4-CH RCA Out, 10-band EQ |
| Радио тюнер | AM (530-1710KHz), FM (87.5-107.9MHz) |
| Video ойнотуу | 1080p Video Playback, H.264, H.265/HEVC encoding |
| Контролдоо ыкмалары | Touchscreen, IR Remote Control, Steering Wheel Control, Voice Control |
| Өлчөмдөр | 4.5 x 7.36 x 2.4 дюйм (Продукт) |
| Салмагы | 2.03 фунт |
| Электр камсыздоо | 12V DC (терс негиз) |
8. Кыйынчылыктарды
Жалпы маселелер жана алардын чечимдери үчүн бул бөлүмдү караңыз.
8.1 Күч жок
- Зымдарды текшерүү: Ensure the yellow (constant 12V), red (accessory 12V), and black (ground) wires are correctly connected and have proper voltage.
- Страховка: Check the fuse on the unit's wiring harness and the vehicle's fuse box. Replace if blown.
- Батарея: Ensure the vehicle's battery is charged and connected.
8.2 Үн жок
- Үн деңгээли: Increase the volume. Check if the unit is muted.
- Динамик зымдары: Verify all speaker wires are correctly connected and not short-circuited.
- Булак тандоо: Ensure the correct audio source (e.g., Radio, USB, Bluetooth, AUX) is selected.
- Ampөмүр берүүчү: Эгерде тышкы amplifier is used, ensure it is powered on and correctly wired.
8.3 CarPlay/Android Auto туташпай жатат
- USB кабели: Use a high-quality, certified USB data cable. Faulty cables can prevent connection.
- USB порт: Ensure the phone is connected to the correct USB port on the unit.
- Телефон тууралоолору: Check your phone's settings to ensure CarPlay/Android Auto is enabled and allowed to connect to the unit.
- Программалык камсыздоону жаңыртуу: Ensure your phone's operating system and any relevant apps (e.g., Android Auto app) are up to date.
8.4 Сенсордук экран жооп бербей жатат
- Бирдикти баштапкы абалга келтирүү: Use a thin object to press the RST button on the front panel to perform a soft reset.
- Power Cycle: Turn off the vehicle's ignition, wait a few minutes, then restart.
9. Техникалык тейлөө
- Экранды тазалоо: Сенсордук экранды акырын сүртүү үчүн жумшак, мамыксыз чүпүрөктү колдонуңуз. Эгерде өжөр тактар болсо, бир аз сүртүңүз.ampчүпүрөккө суу же экранды тазалоочу каражат. Катуу химиялык заттардан алыс болуңуз.
- Жалпы тазалоо: Use a dry, soft cloth to wipe the unit's body. Do not use abrasive cleaners or solvents.
- Программалык камсыздоонун жаңыртуулары: Мезгил-мезгили менен өндүрүүчүнүн текшерүү webоптималдуу аткарууну жана шайкештикти камсыз кылуу үчүн бардык жеткиликтүү микропрограммаларды жаңыртуу үчүн сайт.
10. Кепилдик жана колдоо
SOUNDKITS provides the following support and warranty information:
- Кепилдик: The product comes with a 12-month responsibility for all products.
- Free Replacement/Refund: A 90-day free replacement or refund policy is available.
- Technical Guidance & Support: Lifetime technical guidance and support are provided.
- Кардарларды тейлөө: Fast response within 24 hours for inquiries.
For further assistance, please contact SOUNDKITS customer support through the platform where the product was purchased or visit the official SOUNDKITS store page.
You can typically find contact information by navigating to the seller's profile on the purchase platform and selecting "Ask a question."

Image: A graphic detailing SOUNDKITS' customer service commitments: 24-hour fast response, 90-day free replacement or refund, 12-month product responsibility, and lifetime technical guidance & support.


