1. Киришүү
This manual provides detailed instructions for the installation, operation, and maintenance of your Sharkoon MK6 RGB Micro ATX PC Case. Please read this manual thoroughly before beginning assembly to ensure proper setup and optimal performance.
The Sharkoon MK6 RGB is a compact Micro ATX PC case designed with a modern glass aesthetic, featuring tempered glass panels on the front and side. It includes three pre-installed addressable RGB PWM fans for efficient cooling and customizable lighting. The case supports BTF motherboards and offers ample space for various components, including large graphics cards and extensive cooling solutions.
2. Орнотуу жана Компонентти орнотуу
Before starting, ensure you have all necessary tools, including a screwdriver set and anti-static wrist strap.
2.1 Ишти ачуу
Carefully remove the tempered glass side panel by unscrewing the retaining thumbscrews, typically located at the rear of the case. Gently slide the panel off and set it aside on a soft, flat surface to prevent scratches.
2.2 Motherboard орнотуу
- Install the I/O shield into the designated opening at the rear of the case.
- Align your Micro ATX or BTF motherboard with the standoffs inside the case. Ensure all standoffs match the motherboard's mounting holes.
- Берилген бурамалар менен энелик платаны бекитиңиз. Өтө катуу тартпаңыз.
2.3 Электр менен камсыздоо блогун (PSU) орнотуу
The MK6 RGB supports bottom-mount power supplies up to 23.5 cm in length.
- Кубат блогун корпустун арткы астыңкы жагындагы атайын бөлүмгө жылдырыңыз.
- Secure the PSU to the case using screws from the rear panel.
2.4 Сактоочу дискти орнотуу
The case accommodates up to two 3.5" HDDs or three 2.5" SSDs.
- 3.5" HDD: Locate the drive cage, typically near the PSU shroud. Mount the HDDs using the provided trays or screws.
- 2.5" SSD: SSDs can be mounted on dedicated brackets behind the motherboard tray or within the drive cage.
2.5 Графикалык картаны (GPU) орнотуу
The MK6 RGB supports graphics cards up to 41 cm in length and includes a rubberized graphics card holder for support.
- Керектүү PCIe уячасынын капкактарын корпустун арткы бөлүгүнөн алып салыңыз.
- Графикалык картаңызды энелик платадагы тиешелүү PCIe уячасына салыңыз.
- Secure the graphics card with screws. Adjust the graphics card holder to provide additional support if needed.
2.6 Муздатуу системасын орнотуу
The case comes with three pre-installed 120mm addressable RGB PWM fans. Two fans are inverted on the side for intake, and one is at the rear for exhaust. The case supports up to eight fans in total.
- Additional Fans: Install additional 120mm or 140mm fans in available mounting positions (top, bottom, side) as required for optimal airflow.
- Liquid Cooling Radiators: The case supports a 360mm radiator and an additional 240mm radiator. Mount radiators to the designated areas (e.g., top, side) using appropriate screws.
2.7 Кабелди башкаруу
Кабелдерди башкаруу үчүн энелик плата лотогунун артындагы кабелдерди өткөрүү кесиктерин жана байлоочу чекиттерди колдонуңуз. Бул аба агымын жана эстетиканы жакшыртат.

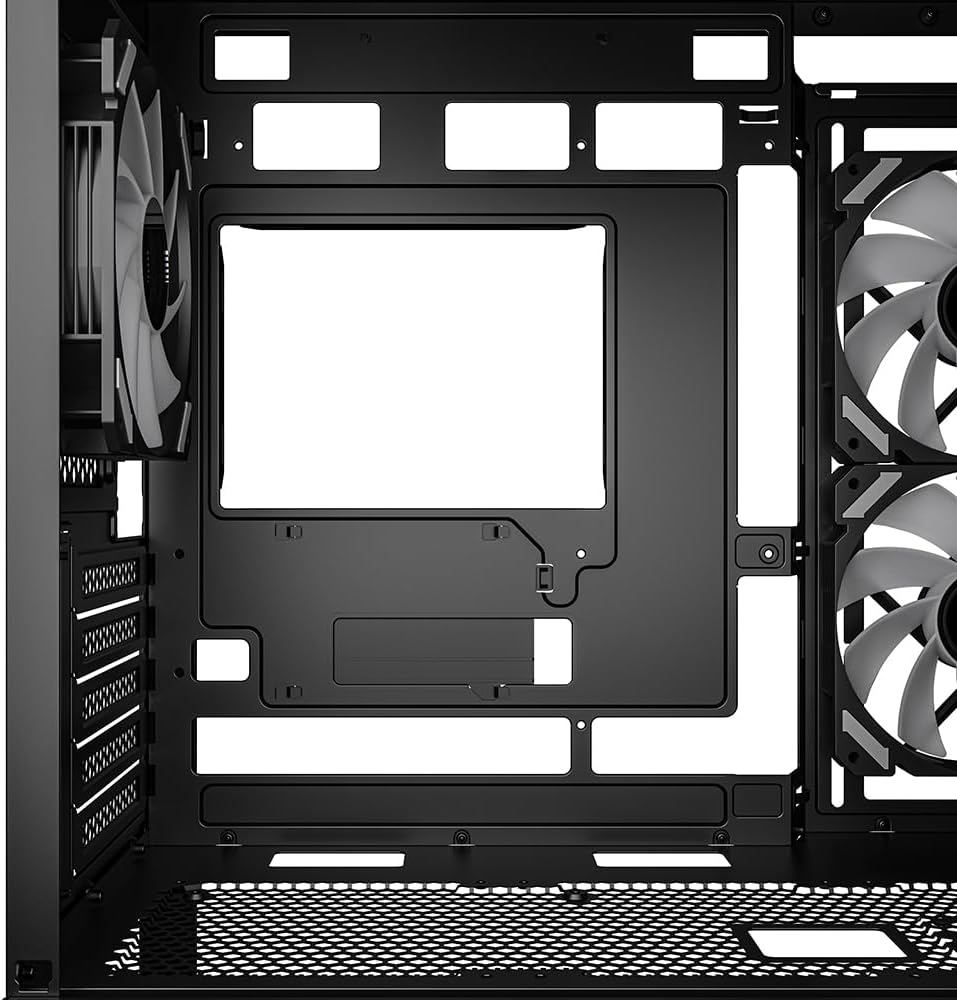
1-сүрөт: Ички view of the Sharkoon MK6 RGB PC case, highlighting the pre-installed fans and drive bay locations.

2-сүрөт: Ички view showing the motherboard tray and various cutouts for efficient cable management.

3-сүрөт: Ички view illustrating the available mounting points for liquid cooling radiators.

4-сүрөт: Ички view displaying the adjustable graphics card holder for enhanced GPU support.
3. Иштөө нускамалары
3.1 Күйгүзүү
After all components are installed and cables are connected, close the side panel. Connect your monitor, keyboard, mouse, and power cable to the PC. Press the power button on the front panel to start your system.
3.2 RGB жарыкты башкаруу
The MK6 RGB includes an RGB controller that provides connections for up to four LED elements and up to four PWM fans. The pre-installed fans are connected to this controller.
- Default Modes: The RGB lighting will typically cycle through default patterns upon startup.
- Программалык камсыздоону көзөмөлдөө: If connected to a compatible motherboard, RGB lighting can be controlled via the motherboard's RGB synchronization software. Refer to your motherboard manual for specific instructions.
- Кол менен башкаруу: Some cases may feature a dedicated button on the front panel to cycle through RGB modes. Consult the case's quick start guide for this feature.
3.3 Алдыңкы панелдин туташуусу
The front panel features modern TRRS and USB-C ports for broad compatibility with various devices. Connect your peripherals and storage devices as needed.

Сүрөт 5: Алдыңкы view of the Sharkoon MK6 RGB PC case, showcasing the tempered glass panel and visible RGB fans.
4. Техникалык тейлөө
Үзгүлтүксүз тейлөө сиздин PC компоненттеринин оптималдуу иштешин жана узак иштөөсүн камсыз кылууга жардам берет.
4.1 Чаң чыпкасын тазалоо
The case features dust filters to prevent dust accumulation. Regularly clean these filters to maintain good airflow.
- Locate and remove the dust filters (e.g., top, bottom, front).
- Clean the filters using compressed air or by rinsing them with water. Ensure they are completely dry before reinstallation.
4.2 Чыңалган айнекти тазалоо
Use a soft, lint-free cloth and a non-abrasive glass cleaner to clean the tempered glass panels. Avoid harsh chemicals that could damage the glass or coatings.
4.3 Вентиляторду тазалоо
Over time, dust can accumulate on fan blades, reducing cooling efficiency. Use compressed air to gently clean the fan blades. Ensure the system is powered off before cleaning.
6-сүрөт: Жогорку view of the Sharkoon MK6 RGB PC case, illustrating the removable magnetic dust filter for easy cleaning.
5. Кыйынчылыктарды
Бул бөлүм сиз кабылышы мүмкүн болгон жалпы көйгөйлөрдү карайт.
5.1 Система күйбөй жатат
- Кубат туташуулары: Verify that the PSU is properly connected to the wall outlet and the power switch on the PSU is in the 'ON' position.
- Алдыңкы панелдин туташтыргычтары: Ensure the power button cable from the front panel is correctly connected to the motherboard's front panel header.
- Ички компоненттери: Check that all major components (motherboard, CPU, GPU, RAM) are securely seated and connected to the PSU.
5.2 Fans Not Spinning or RGB Not Lighting Up
- Желдеткич туташуулары: Confirm that all fan power cables are securely connected to the motherboard or the RGB controller.
- RGB Controller Power: Ensure the RGB controller itself is receiving power, typically via a SATA power connector from the PSU.
- Software/Button: If using software control, check the software settings. If there's a physical RGB button, try cycling through modes.
5.3 Poor Airflow or Overheating
- Чаң чыпкалары: Clean any clogged dust filters.
- Желдеткичтин багыты: Ensure fans are oriented correctly for optimal airflow (intake at front/side, exhaust at rear/top).
- Кабелдик башкаруу: Аба агымына тоскоолдуктарды азайтуу үчүн кабелдерди башкарууну жакшыртуу.
6. Техникалык шарттар
| Өзгөчөлүк | Деталь |
|---|---|
| Модель аты | MK6 RGB |
| Бренд | Шаркун |
| Иштин түрү | Ара Tower |
| Motherboard шайкештиги | Micro ATX, BTF |
| Материал | Температуралуу айнек |
| Түс | Кара |
| Продукциянын өлчөмдөрү (LxWxH) | 17.13 x 8.86 x 17.52 дюйм (43.5 x 22.5 x 44.5 см) |
| Элемент Салмагы | 13.42 фунт (6.1 кг) |
| CPU муздаткычынын бийиктигинин аралыгы | 17 см чейин |
| Graphics Card Length Clearance | 41 см чейин |
| PSU Length Clearance | 23.5 см чейин |
| Drive Bays | 2x 3.5 дюймдук катуу диск же 3x 2.5 дюймдук SSD |
| Алдын ала орнотулган күйөрмандар | 3x 120mm Addressable RGB PWM Fans |
| Max Fan Support | 8 күйөрманга чейин |
| Радиатор колдоо | 1х 360мм, 1х 240мм |
| Алдыңкы I / O порттору | TRRS, USB-C, USB 3.0 (1 port listed in specs) |
| Муздатуу ыкмасы | Аба |
| Кубат менен камсыздоону орнотуу түрү | Төмөнкү тоо |
7. Кепилдик маалыматы
For detailed warranty information regarding your Sharkoon MK6 RGB PC Case, please refer to the official Sharkoon website or contact your local retailer. Warranty terms and conditions may vary by region and purchase location.
8. Техникалык колдоо
If you encounter any issues or require technical assistance beyond the scope of this manual, please visit the official Sharkoon support website for FAQs, driver downloads, and contact information. You may also reach out to your point of purchase for support.


