1. Киришүү
The MiBOXER B0 Panel Remote is a wall-mounted RGB+CCT controller designed for precise and dynamic control of LED lighting systems. This remote features a modern panel design with a touch-sensitive interface, offering both functionality and aesthetic appeal to any environment.
This manual provides detailed instructions for the setup, operation, and maintenance of your MiBOXER B0 Panel Remote.
2. Негизги өзгөчөлүктөрү
- High-precision capacitive touch IC for responsive control.
- Magnetic installation for easy mounting and removal.
- 2.4G RF wireless transmission technology for reliable connectivity.
- Compatible with MiBoxer/Mi-Light 2.4G series lighting products.
- Control distance up to 30 meters.
- Offers 16 million colors for diverse lighting options.
- Adjustable brightness, color temperature, and saturation.

Сүрөт 2.1: Алдыңкы view of the MiBOXER B0 Panel Remote in black, showcasing its touch interface with a color wheel, brightness slider, and control buttons.
3. Орнотуу жана орнотуу
Follow these steps to install your MiBOXER B0 Panel Remote:
- Монтаждоо бетин даярдаңыз: бети таза жана кургак болушун камсыз кылуу.
- Кармоочуну тиркөө: Tear off the protective film from the adhesive tape on the back of the mounting holder. Stick the holder firmly onto the desired wall position.
- Батареяны орнотуу: Open the battery compartment on the back of the remote. Insert two (2) AAA batteries, ensuring correct polarity.
- Пультту орнотуу: Align the remote with the installed holder and place it onto the holder. The magnetic connection will secure it in place.

Image 3.1: Visual guide demonstrating the four steps for installing the MiBOXER B0 Panel Remote, including peeling tape, sticking the holder, inserting batteries, and magnetically attaching the remote.
4. Операция
The MiBOXER B0 Panel Remote provides intuitive control over your RGB+CCT lighting. Familiarize yourself with the touch interface:
4.1 Негизги башкаруу каражаттары
- ON баскычы: Powers on the connected lights.
- OFF баскычы: Powers off the connected lights.
- R, G, B Buttons: Directly select Red, Green, or Blue colors.
- M Button (Mode): Ар кандай динамикалык жарык режимдери аркылуу айлануу.
4.2 Color and White Tone Adjustment
- Түстүү шакек: Touch and slide your finger along the color ring to select from 16 million colors.
- W баскычы: Activates white light mode.
- CCT Slider (Vertical Bar): Adjusts the color temperature from warm white to cool white when in CCT mode.
4.3 Жарыктыкты жөндөө
- Brightness Slider (Vertical Bar with Sun Icon): Slide your finger up or down to increase or decrease the light brightness. The remote supports stepless dimming from 0.1% to 100%.

Image 4.1: Illustration demonstrating the brightness adjustment feature, showing a hand interacting with the vertical brightness slider on the remote to dim lights from 100% to 0.1% using stepless dimming technology.
4.4 Delay Off Function
- S- (60s) Button: Activates a 60-second delay before the lights automatically turn off.
- S+ (10min) Button: Activates a 10-minute delay before the lights automatically turn off.

Image 4.2: Depiction of the 'Delay Off Light' function, showing the S- (60s) and S+ (10min) buttons on the remote and explaining that pressing them will automatically turn off the light after the specified duration.
4.5 Button Feedback
- The remote provides tactile and auditory feedback. Pressing a button will produce a sound, and the LED indicator will flash.

Image 4.3: Illustrates the button feedback mechanism, indicating that pressing a button generates a sound and an LED flash. Also highlights the high-end tempered glass panel for durability.
5. Техникалык тейлөө
5.1 Тазалоо
To clean the remote, gently wipe the surface with a soft, dry cloth. Avoid using abrasive cleaners, solvents, or excessive moisture, as these can damage the touch panel and internal components.
5.2 Батареяны алмаштыруу
When the remote's performance degrades or it stops responding, it may be time to replace the batteries. Open the battery compartment on the back and replace the two (2) AAA batteries with new ones, ensuring correct polarity. Dispose of old batteries responsibly.
6. Кыйынчылыктарды
If you encounter issues with your MiBOXER B0 Panel Remote, consider the following:
- Алыстан жооп бербейт: Батареялар туура орнотулганын жана заряды жетиштүү экендигин текшериңиз. Керек болсо аларды алмаштырыңыз.
- Жарыктар жооп бербейт: Ensure the remote is within the 30-meter control range of the connected lights. Verify that the lights are powered on and properly paired with the remote.
- Интерференция: While 2.4G RF technology is robust, strong electromagnetic interference from other devices might affect performance. Try operating the remote away from such sources.
- Жупташтыруу маселелери: Refer to the specific pairing instructions for your MiBoxer/Mi-Light series lighting products if the remote loses connection or needs to be paired with new lights.
7. Техникалык шарттар
| Өзгөчөлүк | Спецификация |
|---|---|
| Модель номери | B0 |
| Бренд | MiBOXER |
| Башкаруу түрү | RGB+CCT Panel Remote |
| Зымсыз технология | 2.4G RF зымсыз |
| Control Distance | 30 метр |
| Электр камсыздоо | 2 * AAA батарейкалар |
| Шайкеш түзмөктөр | MiBoxer/Mi-Light 2.4G сериясындагы жарыктар |
| Түс | Кара |
| Элемент Салмагы | 5 унция (болжол менен 0.14 кг) |
| Пакеттин өлчөмдөрү | 4 x 4 x 1 дюйм (болжол менен 10.16 x 10.16 x 2.54 см) |
| Өндүрүүчү | Miboxer |
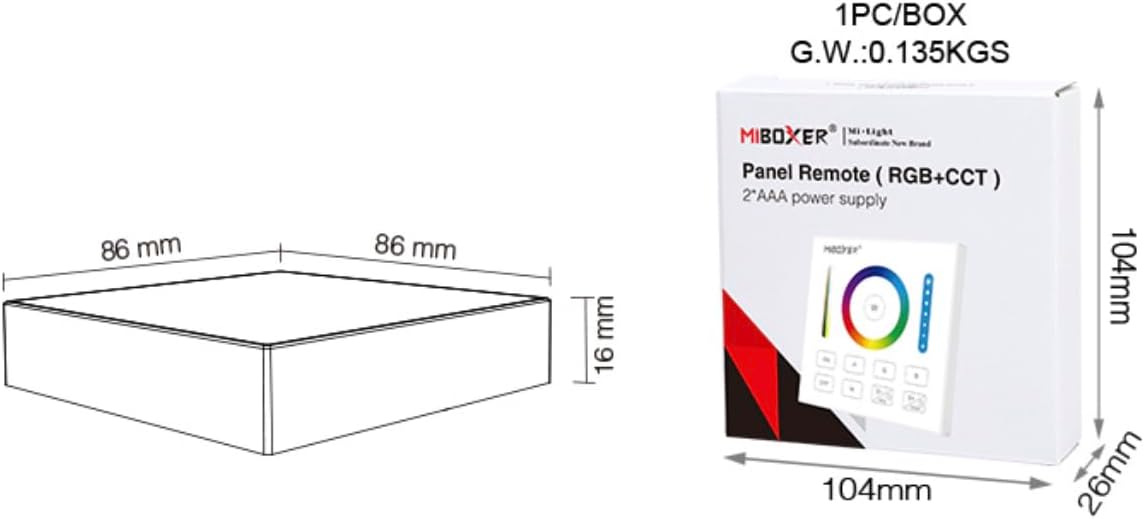
Image 7.1: Diagram illustrating the dimensions of the MiBOXER B0 Panel Remote (86mm x 86mm x 16mm) and its packaging (104mm x 104mm x 26mm), along with the gross weight.
8. Кепилдик жана колдоо
Specific warranty information for the MiBOXER B0 Panel Remote is not provided in this manual. For warranty details, please refer to the product packaging or contact MiBOXER customer support directly.
For technical support or further assistance, please visit the official MiBOXER webсайтка же кардарларды тейлөө бөлүмүнө кайрылыңыз.


