1. Киришүү
This manual provides essential information for the proper installation, operation, and maintenance of your new SOCKIR Headlight Assembly. These headlight assemblies are designed for direct replacement in 2015-2017 Subaru Outback vehicles equipped with factory halogen headlamps. They are not compatible with HID models.
Please read these instructions thoroughly before beginning installation to ensure safe and correct usage.

Сүрөт 1: Алдыңкы view of the SOCKIR Headlight Assembly pair.
2. Коопсуздук маалыматы
- Электрдик иштерди жасоодон мурун, электр тогуна урунуп же зыян келтирбеш үчүн, унаанын аккумуляторун ар дайым сууруп алыңыз.
- Орнотуу учурунда коргоочу көз айнек жана кол кап сыяктуу тиешелүү жеке коргоочу шаймандарды кийиңиз.
- Унаа тегиз жерде токтоп турганына, токтоочу тормозду иштетиңиз.
- Allow the vehicle's engine and existing headlight bulbs to cool down completely before handling to avoid burns.
- If you are unsure about any step of the installation process, it is highly recommended to seek professional assistance.
3. Пакеттин мазмуну
Орнотууну улантуудан мурун бардык компоненттер бар экенин жана бузулбаганын текшериңиз.
- 1x Passenger Side Headlight Assembly (Model SU15-17)
- 1x Driver Side Headlight Assembly (Model SU15-17)
- Integrated LED Daytime Running Lights (DRL)
- Note: High beam (HB3), Low beam (H11), Turn Signal (7440A), and Side Marker (168) bulbs are not included and must be purchased separately or transferred from your original assembly.
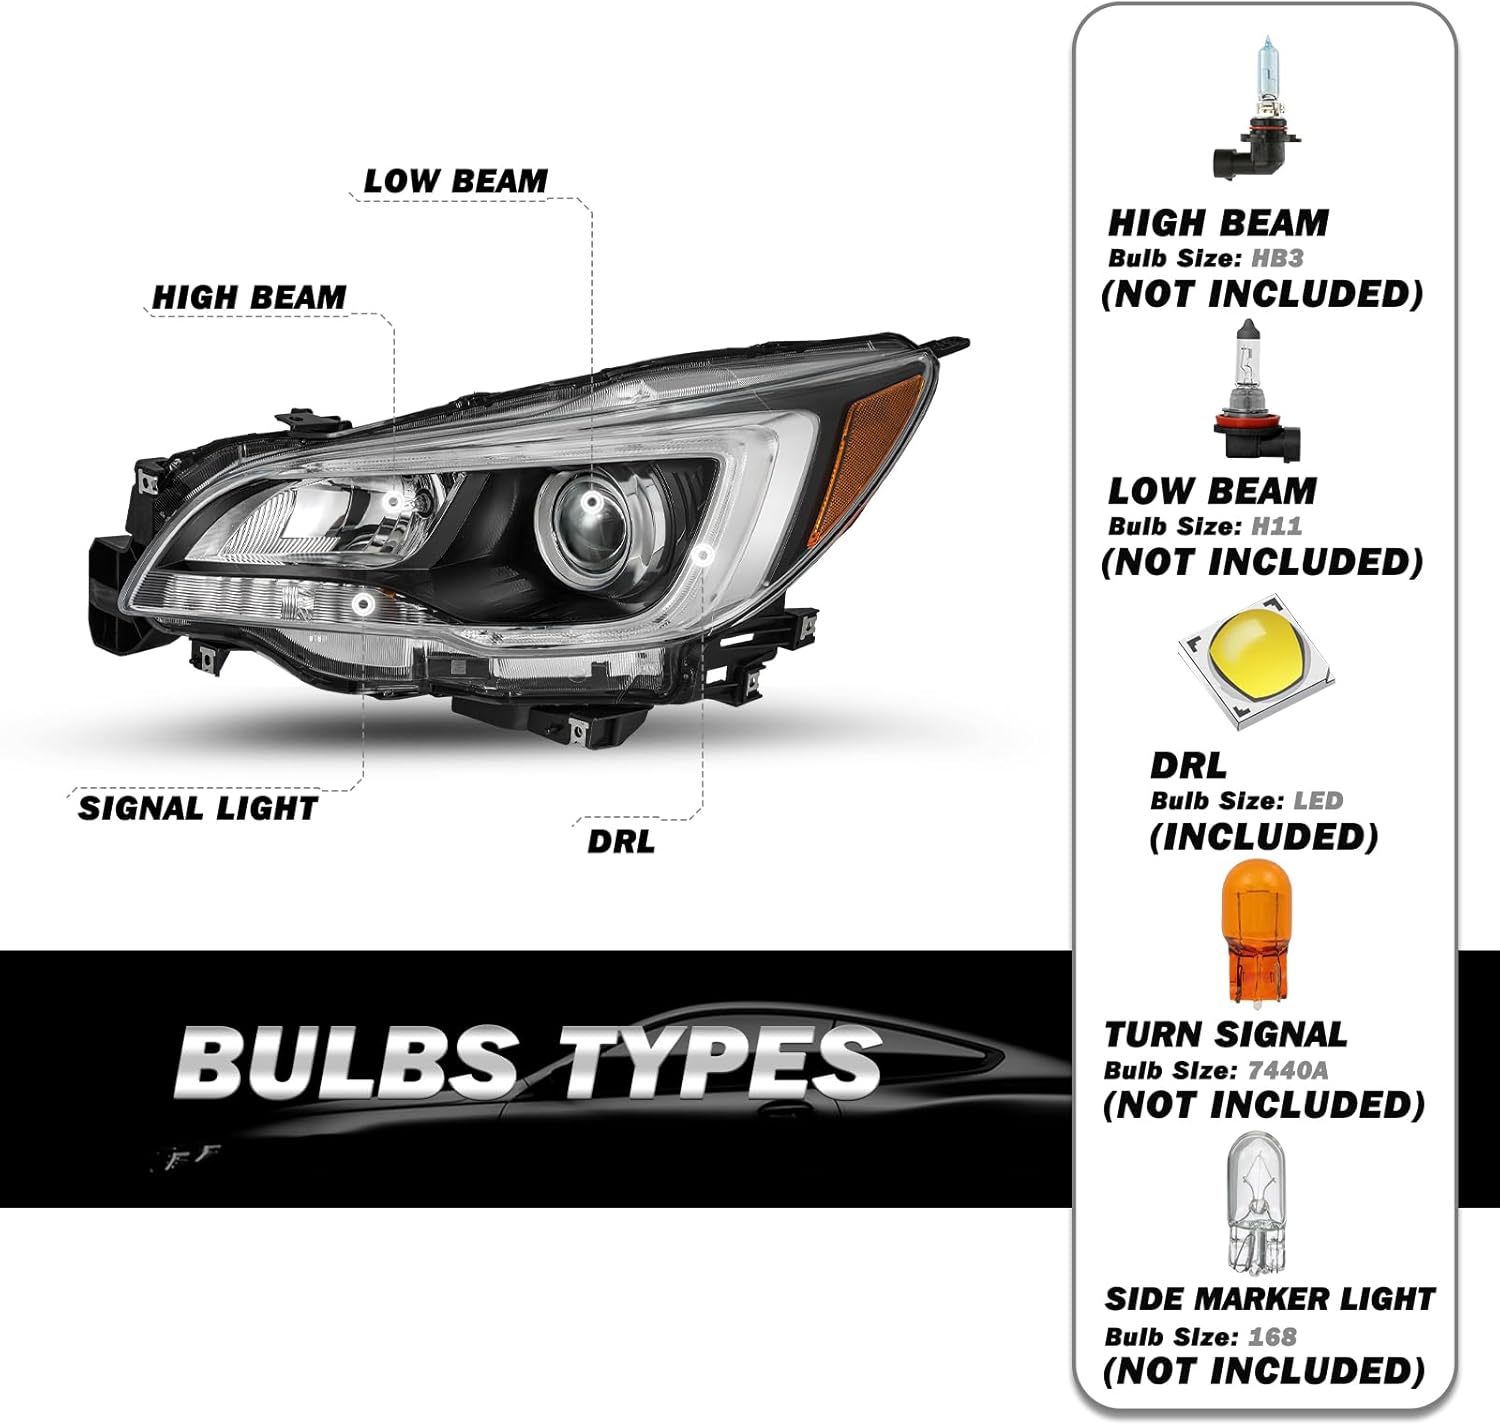
Figure 2: Bulb type specifications for the headlight assembly.
4. Орнотуу боюнча колдонмо
The SOCKIR Headlight Assembly is designed for direct bolt-on, plug-and-play installation. No modification or drilling is required. However, professional installation is highly recommended to ensure proper fitment and functionality.
Жалпы орнотуу кадамдары:
- Унааны даярдоо: Унааны түз жерге токтотуңуз, токтоочу тормозду басып, кыймылдаткычты өчүрүңүз. Батареянын терс терминалын ажыратыңыз.
- Access the Headlight: Depending on your Subaru Outback model, you may need to remove the front bumper cover or other surrounding components to access the headlight assembly mounting bolts. Consult your vehicle's service manual for specific removal procedures.
- Эски фараны алып салуу: Disconnect all electrical connectors from the existing headlight assembly. Unscrew any mounting bolts or clips securing the assembly. Carefully remove the old headlight.
- Transfer Bulbs (if applicable): If your new assembly did not come with bulbs, carefully transfer the high beam (HB3), low beam (H11), turn signal (7440A), and side marker (168) bulbs from your old assembly to the new SOCKIR assembly. Ensure bulbs are handled by their base to avoid touching the glass.
- Жаңы фараны орнотуу: Connect all electrical connectors to the new SOCKIR Headlight Assembly. Position the new assembly into the vehicle's headlight opening and secure it with the mounting bolts and clips.
- Кайра чогултуу жана сыноо: Reinstall any removed bumper covers or components. Reconnect the vehicle's battery. Test all headlight functions: low beam, high beam, turn signals, and DRLs.
- Фараларды багыттоо: After installation, it is crucial to properly aim your headlights to ensure optimal visibility and to avoid blinding oncoming traffic. Refer to your vehicle's service manual or consult a professional for correct headlight aiming procedures.

Figure 3: Compatibility with 2015-2017 Subaru Outback.
4-сүрөт: Арткы view of the headlight assembly showing key components like the adjusting screw and one-way vent.
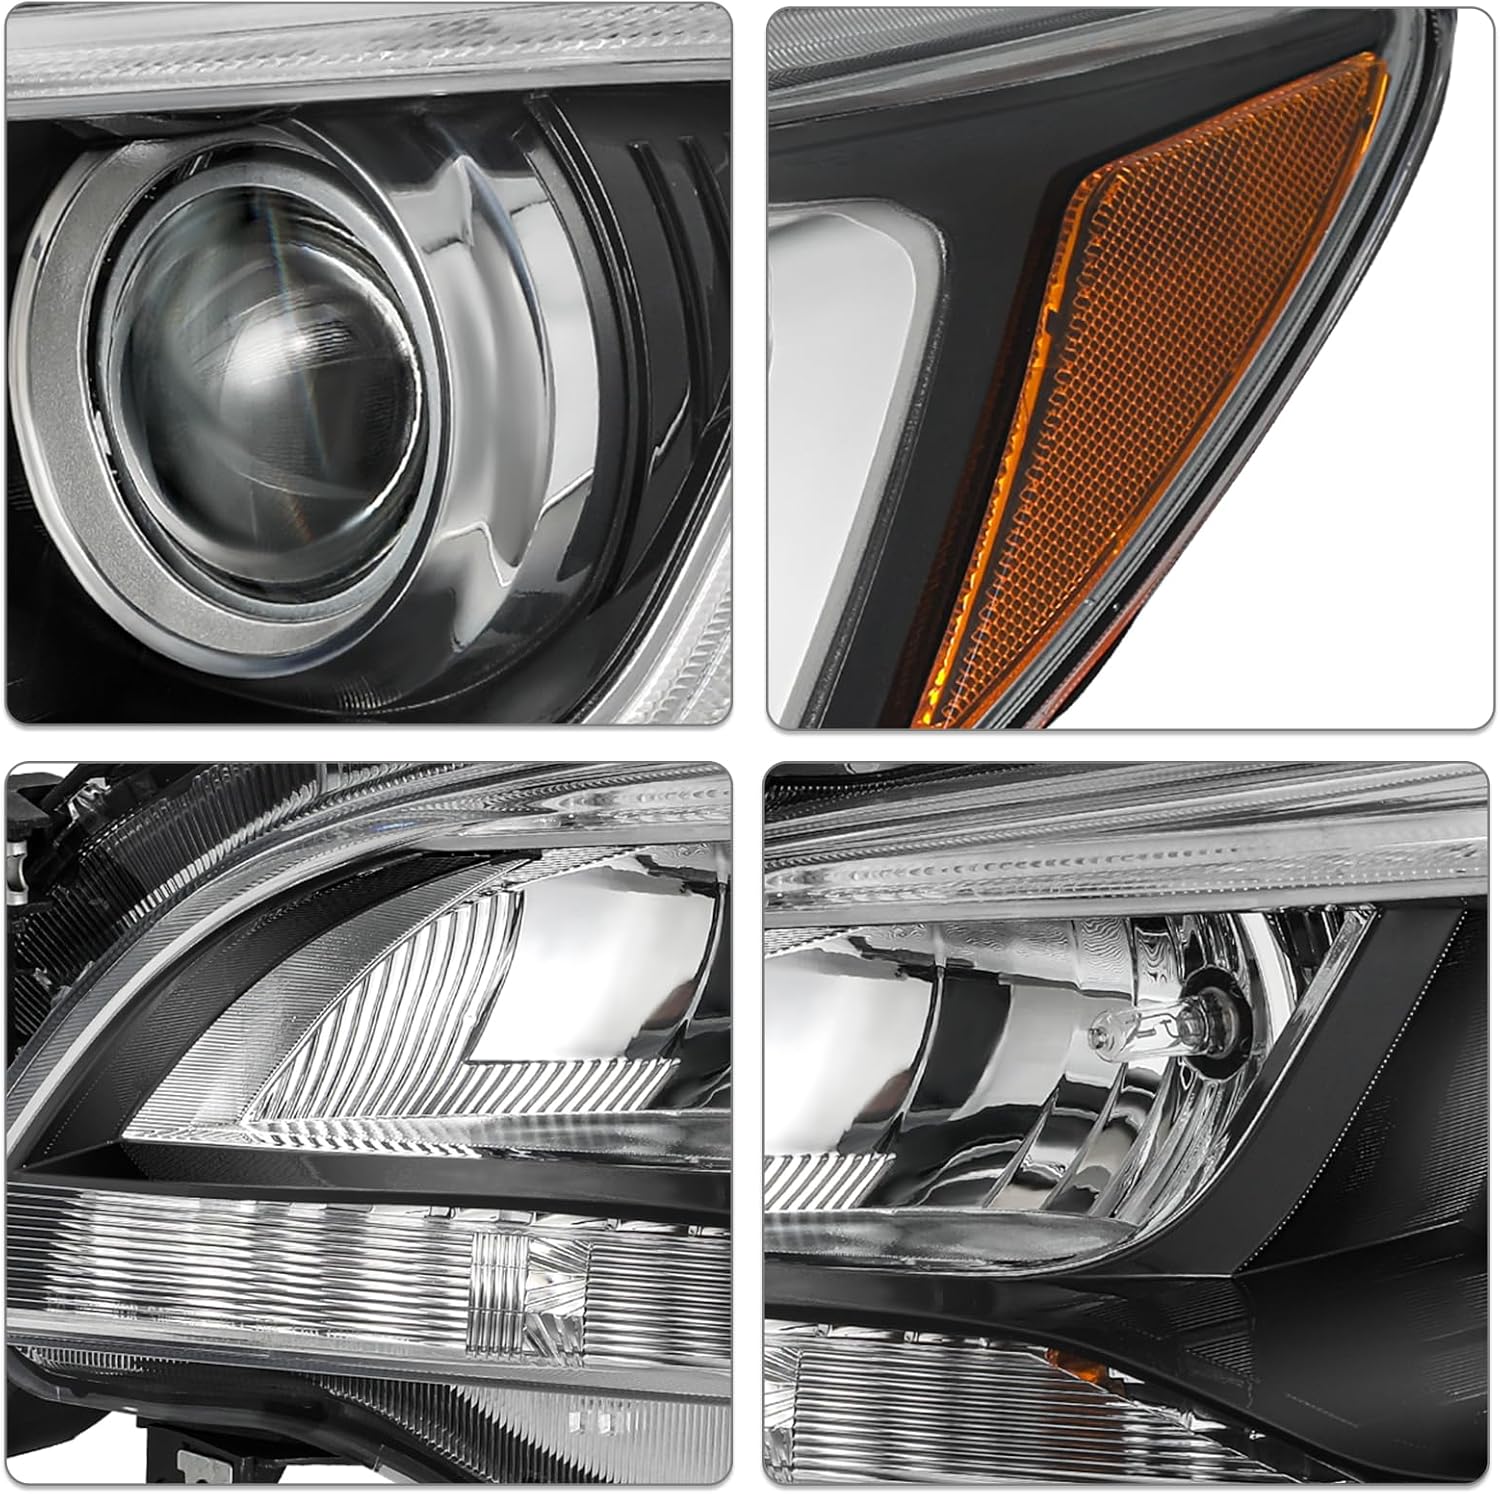
5-сүрөт: Детальдуу views of the headlight lens, reflector, and internal structure.
Орнотуу видео шилтемеси:
Video 1: Demonstration of SOCKIR Headlight Assembly features and compatibility with 2015 Subaru Outback.
5. Операция
The SOCKIR Headlight Assembly operates in conjunction with your vehicle's existing lighting controls. Ensure your vehicle's light switch is set to the appropriate position for desired lighting functions.
- Жарык нур: Provides standard illumination for general driving conditions.
- Жогорку нур: Offers maximum illumination for improved visibility on unlit roads. Use with caution to avoid blinding other drivers.
- Күндүзгү жарыктар (DRL): The integrated LED DRLs activate automatically with the vehicle's ignition, enhancing daytime visibility.
- Бурулуш сигналдары: The amber reflector functions as a turn signal indicator.
- Жөнгө салынуучу нур бурчу: The headlight assembly includes an adjuster for high/low beam angle customization. This allows you to fine-tune the lighting direction according to your driving needs and local regulations. (Refer to Figure 4 for adjuster location).
6. Техникалык тейлөө
Regular maintenance helps ensure the longevity and optimal performance of your headlight assemblies.
- Тазалоо: Clean the outer lens regularly with a soft cloth and mild automotive soap or glass cleaner. Avoid abrasive materials or harsh chemicals that could scratch or damage the lens.
- Текшерүү: Periodically inspect the headlight assemblies for any signs of damage, cracks, or loose connections. Check for moisture accumulation inside the housing. The integrated one-way vents are designed to expel moisture, but persistent fogging may indicate an issue.
- Лампаны алмаштыруу: If a bulb fails, replace it with a bulb of the correct type (HB3 for high beam, H11 for low beam, 7440A for turn signal, 168 for side marker). Refer to your vehicle's service manual for specific bulb replacement procedures.

Figure 6: Headlights designed for reliable performance in various weather conditions.
7. Кыйынчылыктарды
If you encounter issues with your headlight assembly, refer to the following common troubleshooting tips:
| Көйгөй | Мүмкүн себеп | Чечим |
|---|---|---|
| Фара иштебейт | Blown fuse, faulty bulb, loose electrical connection. | Check vehicle fuses. Replace faulty bulb. Ensure all connectors are securely attached. |
| Линзанын ичиндеги нымдуулук | Condensation (normal in some conditions), compromised seal. | Small amounts of condensation should dissipate. If persistent or excessive, inspect the seal for damage. Ensure the one-way vent is clear. |
| Туура эмес нур максаты | Орнотуудан кийин туура эмес тууралоо. | Adjust the beam angle using the adjusting screw (refer to Figure 4). Consult a professional for precise aiming. |
| Былтылдаган же күңүрт жарыктар | Loose connection, weak ground, failing bulb, vehicle electrical issue. | Check all connections and ground points. Replace bulb. Consult a mechanic for vehicle electrical diagnosis. |
8. Техникалык шарттар
| Өзгөчөлүк | Деталь |
|---|---|
| Бренд | СОКИР |
| Модель номери | SU15-17 |
| Шайкештик | 2015-2017 Subaru Outback (Halogen Models Only) |
| OEM бөлүктүн номери | 84001AL03A, 84001AL02A |
| High Beam Bulb Type | HB3 (Not Included) |
| Low Beam Bulb Type | H11 (Not Included) |
| DRL Bulb Type | LED (кошулган) |
| Turn Signal Bulb Type | 7440A (Not Included) |
| Side Marker Bulb Type | 168 (Not Included) |
| Линзанын материалы | Поликарбонат |
| Суу өткөрбөйт рейтинги | Fully sealed design with one-way vents |
| Ассамблея талап кылынат | No (Direct Replacement) |
| Элемент Салмагы | Болжол менен 10 фунт (жуп үчүн) |
| Пакеттин өлчөмдөрү | Болжол менен 31.1 x 11 x 7.5 дюйм |
9. Кепилдик жана колдоо
For warranty information, technical support, or any questions regarding your SOCKIR Headlight Assembly, please contact the manufacturer directly through their official channels or the retailer from whom the product was purchased.
Always provide your product model number (SU15-17) and purchase details when seeking support.


