1. Киришүү
This manual provides detailed instructions for the installation, configuration, and operation of your GIGABYTE B850 GAMING WIFI6 Motherboard. Please read this manual thoroughly before beginning the installation process to ensure proper setup and to prevent damage to your components.
2. Коопсуздук маалыматы
- Кайсы бир компонентке тийүүдөн мурун, ар дайым кубат шнурун розеткадан сууруп алыңыз.
- Электростатикалык разряддын (ESD) бузулушуна жол бербөө үчүн компоненттер менен иштөөдө антистатикалык билек боону тагыңыз.
- Ашыкча ысып кетүүдөн сактануу үчүн компьютериңиздин ичинде туура желдетүүнү камсыз кылыңыз.
- Motherboard'ду нымдуулуктан жана экстремалдык температурадан алыс кармаңыз.
- Refer to the component manufacturer's instructions for specific installation details.
3. Пакеттин мазмуну
Төмөндө саналган нерселердин баары сиздин энелик плата пакетиңизде бар экенин текшериңиз:
- GIGABYTE B850 GAMING WIFI6 Motherboard
- User Manual
- Driver CD/USB (may vary by region)
- SATA кабелдери
- Wi-Fi антеннасы
- M.2 Screws and Stand-offs

Image 1: The GIGABYTE B850 GAMING WIFI6 Motherboard shown alongside its retail packaging, including the Wi-Fi antenna.
4. Motherboard Layout
Энелик платаңыздагы ар кандай компоненттер жана туташтыргычтар менен таанышып алыңыз.

2-сүрөт: жогорудан ылдыйга view of the GIGABYTE B850 GAMING WIFI6 Motherboard, highlighting the CPU socket, DDR5 DIMM slots, PCIe slots, and M.2 slots.
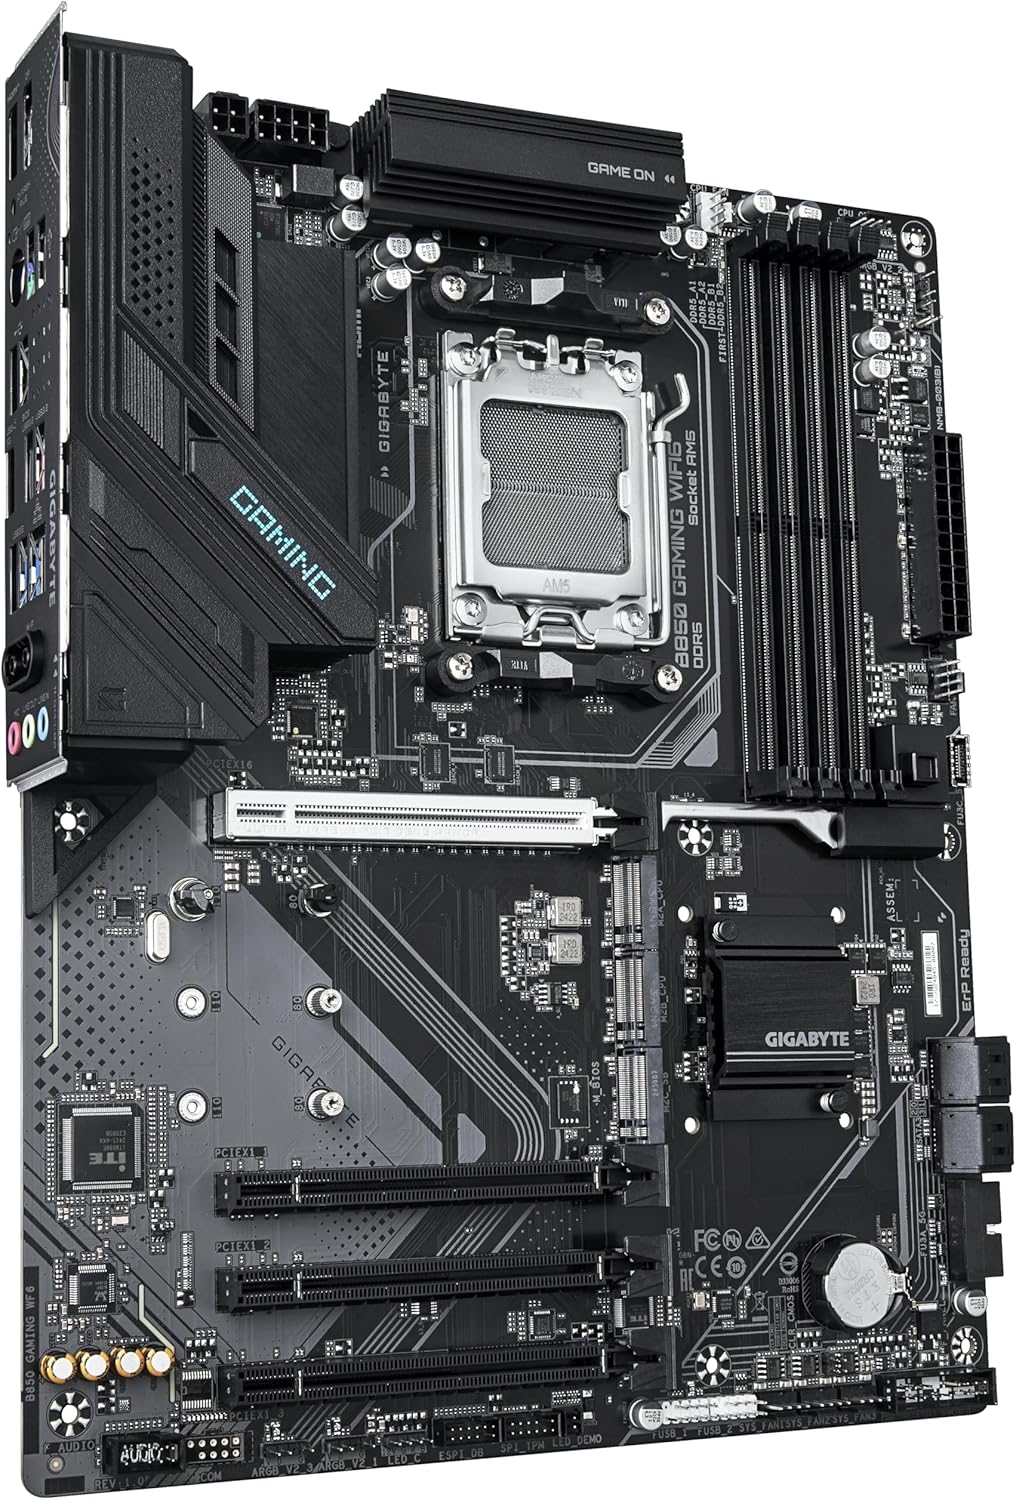
Сүрөт 3: Бурчтуу view of the GIGABYTE B850 GAMING WIFI6 Motherboard, showing the VRM heatsinks, CPU socket, and various expansion slots.
Арткы I/O панели

Сүрөт 4: Жакын план view of the rear I/O panel of the GIGABYTE B850 GAMING WIFI6 Motherboard, displaying USB ports, Ethernet, Wi-Fi antenna connectors, and audio jacks.
- CPU Socket (Socket AM5): For AMD Ryzen 7000/8000/9000 Series Processors.
- DDR5 DIMM Slots: Four slots supporting Dual Channel DDR5 memory up to 8200MHz (OC).
- PCIe Slots: One PCIe Gen5 x16 slot with PCIe UD Slot and EZ-Latch Plus, and two PCIe 4.0 M.2 slots.
- M.2 Connectors: Multiple M.2 slots for NVMe SSDs, including Gen5 with EZ-Latch Plus.
- SATA порттору: Six SATA 6Gb/s ports for storage devices.
- USB порттору: Various USB 3.2 Gen 2 and other USB ports on the rear I/O and internal headers.
- LAN порту: Gigabit Ethernet LAN.
- Wi-Fi 6: Integrated Wi-Fi 6 module with WIFI EZ-Plug.
- Аудио уячалары: Standard audio input/output.
- Q-Flash Plus баскычы: For BIOS updates without CPU, memory, or graphics card installed.
5. Орнотуу
5.1 CPU орнотуу
- CPU розеткасынын рычагын ачыңыз.
- Процессордун үч бурчтук белгиси розеткадагы белгиге дал келишин камсыз кылып, CPU менен розеткага кылдат тууралаңыз.
- Процессорду мажбурлабастан акырын розеткага салыңыз.
- Процессорду бекитүү үчүн CPU розеткасынын рычагын жабыңыз.
- CPU муздаткычын өндүрүүчүнүн көрсөтмөлөрүнө ылайык орнотуңуз.
5.2 Эстутум (RAM) орнотуу
- DDR5 DIMM уячаларынын эки учундагы клиптерди ачыңыз.
- Эстутум модулундагы оюкту DIMM уячасындагы ачкыч менен тууралаңыз.
- Эстутумдун модулун уячага кыстаргычтар орнотулганча кыстарыңыз.
- For dual-channel configuration, refer to the motherboard manual for recommended slot pairings.
5.3 Сактагычты орнотуу
M.2 SSD орнотуу
- Энелик платадагы M.2 уячасын(ларын) табыңыз.
- Remove the M.2 heatsink (if present) and the stand-off/screw from the desired M.2 slot.
- M.2 SSDди уячага 30 градустук бурч менен салыңыз.
- Push down the M.2 SSD and secure it with the stand-off and screw (or use EZ-Latch Plus mechanism).
- Эгер мүмкүн болсо, M.2 радиаторун кайра орнотуңуз.
SATA Drive Installation
- SATA маалымат кабелинин бир учун энелик платадагы SATA портуна туташтырыңыз.
- Connect the other end of the SATA data cable to your SATA storage device (HDD/SSD).
- Connect a SATA power cable from your power supply to the SATA storage device.
5.4 Видеокартаны (PCIe) орнотуу
- PCIe x16 уячасында кармоочу клипти ачыңыз.
- Align your graphics card with the PCIe x16 slot.
- Press down firmly until the card is seated and the retention clip snaps into place.
- Видеокартаны компьютердин корпусуна бурамалар менен бекитиңиз.
- Керектүү PCIe электр кабелдерин кубат булагыңыздан графикалык картага туташтырыңыз.
5.5 Электр булагы
- 24 пин ATX негизги кубат туташтыргычын кубат булагыңыздан энелик платага туташтырыңыз.
- Connect the 8-pin (or 4+4-pin) ATX 12V CPU power connector(s) to the motherboard.
5.6 Front Panel Connectors
Connect the cables from your PC case's front panel (power button, reset button, USB ports, audio jacks, LED indicators) to the corresponding headers on the motherboard. Refer to the detailed motherboard diagram in the full manual for exact pin assignments.
5.7 Wi-Fi Antenna Installation
Screw the included Wi-Fi antenna onto the antenna connectors on the rear I/O panel of the motherboard. Ensure they are securely tightened for optimal signal reception.
6. Иштөө
6.1 Биринчи жүктөө
After assembling all components and connecting power, press the power button on your PC case. The system should power on and display the BIOS/UEFI screen or begin the operating system installation process.
6.2 BIOS/UEFI конфигурациясы
BIOS/UEFI жөндөөсүнө кирүү үчүн, басыңыз DEL key during the Power-On Self-Test (POST). Here you can configure system settings, boot order, and enable features like X3D Turbo Mode for compatible CPUs.
6.3 Драйверди орнотуу
After installing your operating system, install the necessary drivers for the motherboard chipset, audio, LAN, and Wi-Fi. These can be found on the included driver CD/USB or downloaded from the GIGABYTE official webсайт.
6.4 Операциялық системаны орнотуу
Операциялык системаңызды орнотуучу медианы (USB диск же DVD) салып, экрандагы көрсөтмөлөрдү аткарып, каалаган операциялык системаңызды орнотуңуз (мисалы, Windows 10, Windows 11).
Видео 1: Бүттүview of GIGABYTE B850 Motherboards, showcasing key features and design elements. This video provides a general introduction to the B850 series.
7. Техникалык тейлөө
7.1 Тазалоо
Ашыкча ысып кетүүсүнө алып келиши мүмкүн болгон чаңдын пайда болушуна жол бербөө үчүн компьютериңиздин корпусун жана эне платасынын компоненттерин дайыма тазалап туруңуз. Жылыткычтар менен желдеткичтердин чаңын тазалоо үчүн кысылган абаны колдонуңуз. Тазалоодон мурун системанын өчүрүлгөнүн жана розеткадан ажыратылганын текшериңиз.
7.2 BIOS Updates (Q-Flash Plus)
GIGABYTE's Q-Flash Plus feature allows you to update the BIOS without installing a CPU, memory, or graphics card. Download the latest BIOS file GIGABYTEден website, rename it as instructed, and place it on a USB flash drive. Insert the USB drive into the designated Q-Flash Plus USB port and press the Q-Flash Plus button. Refer to the GIGABYTE website for detailed instructions on using Q-Flash Plus.
8. Кыйынчылыктарды
- Кубат жок: Check all power connections (24-pin ATX, 8-pin CPU, GPU power). Ensure the power supply switch is on.
- Дисплей жок: Verify the graphics card is properly seated and connected to the monitor. Check if the monitor is on and set to the correct input.
- Системанын туруксуздугу/бузуулар: This can be caused by incompatible memory, unstable overclocks, or outdated drivers. Try resetting BIOS settings to default, updating drivers, or testing memory modules individually.
- Жүктөө түзмөк табылган жок: SATA/M.2 кабелдик байланыштарын текшериңиз. BIOS/UEFIде жүктөө тартибин текшериңиз. Иштетүү системасы дискке туура орнотулганын текшериңиз.
- Wi-Fi/LAN Issues: Ensure antennas are connected. Install the latest network drivers. Check network cable connections for LAN.
9. Техникалык шарттар
| Өзгөчөлүк | Спецификация |
|---|---|
| Бренд | GIGABYTE |
| Модель аты | B850 GAMING WIFI6 |
| CPU розетка | Розетка AM5 |
| Шайкеш процессорлор | AMD Ryzen 7000 сериясы, AMD Ryzen 8000 сериясы, AMD Ryzen 9000 сериясы |
| Чипсет түрү | AMD B850 |
| RAM эс технологиясы | DDR5 |
| Memory Clock Speed | 8200 МГц чейин (OC) |
| картриджа Slots | 1x PCIe Gen5 x16, 2x PCIe 4.0 M.2 |
| M.2 Slots | Multiple, including Gen5 with EZ-Latch Plus |
| SATA порттору | 6x SATA 6Gb/s |
| LAN | Гигабит Ethernet |
| Зымсыз байланыш | Wi-Fi 6 |
| USB порттору | USB 3.2 Gen 2, various others |
| VRM | 6+2+2 Phase Digital VRM with DrMOS |
| Өлчөмдөр | 9.61 x 12.01 x 1.38 дюйм |
| Элемент Салмагы | 3.33 фунт |
| Платформа | Windows 10, Windows 11 |
10. Кепилдик жана колдоо
For warranty information, please refer to the warranty card included in your product packaging or visit the official GIGABYTE website. Technical support, driver downloads, and BIOS updates are available on the GIGABYTE support page.
GIGABYTE колдоо Webсайт: https://www.gigabyte.com/support


