
1. Киришүү
This manual provides essential instructions for the setup, operation, and maintenance of your RETROSUN Replacement Remote Control. This remote is designed to offer a seamless and reliable control experience for a range of compatible projectors. Please read this manual thoroughly to ensure proper use and to maximize the lifespan of your device.
2. Шайкештик
The RETROSUN Replacement Remote Control is compatible with the following projector models:
- VOPLLS Mini Projector R1
- WiMiUS P61 проектору
- Meer Movie Projector YG390
- Meer Movie Projector YG391
- VANKYO Performance X3 1080P Projector
- Agreago A3 Projector

Image: The remote control displayed alongside several compatible projector models, illustrating its wide compatibility.
3. Орнотуу
This remote control utilizes infrared technology and requires no programming or pairing. Simply install the batteries to begin operation.
3.1 Батареяны орнотуу
- Пульттун артындагы батарея отсегин табыңыз.
- Батареянын капкагын ачуу үчүн ылдый жылдырыңыз.
- Insert two (2) 1.5V AAA alkaline batteries, ensuring the correct polarity (+ and -) as indicated inside the compartment.
- Батареянын капкагын бекем чыккыча ордуна жылдырыңыз.
Note: Batteries are not included with the remote control.

Сүрөт: арткы view of the remote control with the battery cover removed, illustrating the correct placement for two AAA batteries.
4. Иштөө нускамалары
Once batteries are installed, the remote is ready for immediate use with compatible projectors. Ensure a clear line of sight between the remote's infrared emitter and the projector's IR receiver.
4.1 Баскыч функциялары

Сүрөт: ачык фронт view of the remote control, displaying the layout and labels of all functional buttons.
- Кубат баскычы (O): Turns the projector on or off.
- Үнсүз баскычы (): Mutes or unmutes the projector's audio.
- Source/Input Button (): Selects the input source.
- Навигация панели (Жогору, Төмөн, Сол, Оң, ОК): Менюларды багыттоо жана тандоолорду ырастоо.
- Кайтаруу/Артка кайтуу баскычы (): Мурунку экранга же менюга кайтарат.
- Меню баскычы (): Opens the projector's main menu.
- Үй баскычы (): Returns to the home screen.
- Volume Buttons (+ / -): Аудионун үнүн тууралайт.

Image: The remote control in use, highlighting its advanced infrared technology for easy and responsive operation.
5. Иштөө жөндөмдүүлүгү жана бышыктыгы
The RETROSUN Replacement Remote Control is engineered for reliable performance and long-lasting use.
- Жогорку аткаруу: Equipped with upgraded smart chips, the remote offers strong signal transmission over distances up to 8 meters (26 feet). It provides a fast response time of less than 0.2 seconds and is tested for over 160,000 clicks.
- Туруктуу курулуш: Manufactured from high-quality ABS material, the remote is designed to be impact-resistant and durable. The surface features a smooth, glazing finish for a comfortable grip.
- Sensitive Buttons: Silicone buttons are soft to the touch, responsive, and resistant to wear and stains.
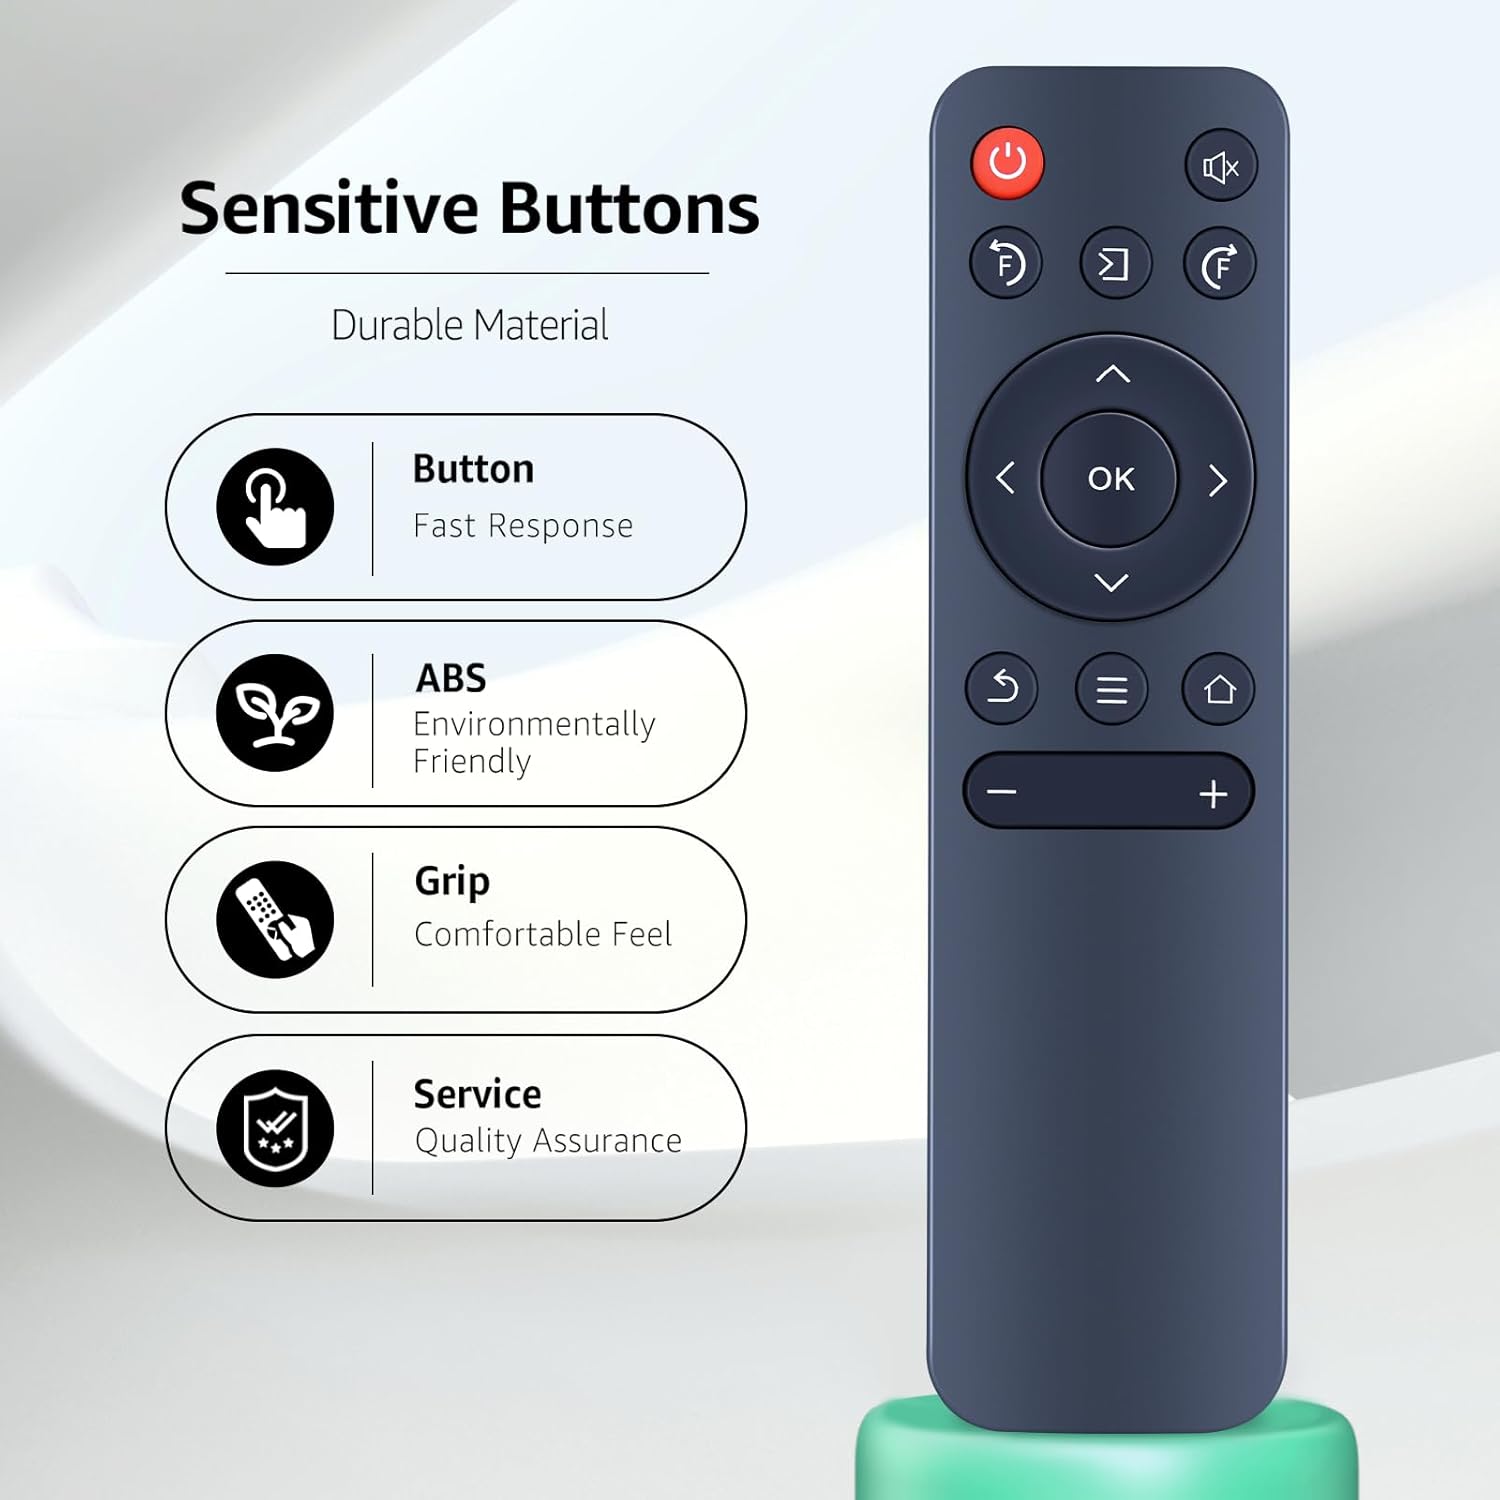
Image: The remote control with callouts emphasizing its sensitive buttons, durable ABS material, comfortable grip, and quality assurance.

Image: Visual representation of the remote's stable infrared signal, showing multi-angle control up to 120 degrees and long-range control up to 26 feet.
6. Техникалык тейлөө
Пультуңуздун оптималдуу иштешин жана узак иштөөсүн камсыз кылуу үчүн төмөнкү тейлөө көрсөтмөлөрүн аткарыңыз:
- Тазалоо: Wipe the remote control with a soft, dry cloth. For stubborn dirt, a slightly damp кездемени колдонсо болот, андан кийин дароо кургатуу. Катуу химиялык заттарды же абразивдүү тазалагычтарды колдонуудан алыс болуңуз.
- Батареяны алмаштыруу: Replace batteries promptly when the remote's responsiveness decreases or it stops functioning. Always replace both batteries at the same time with new AAA alkaline batteries.
- Сактагыч: Store the remote in a cool, dry place away from direct sunlight and extreme temperatures. If storing for an extended period, remove the batteries to prevent leakage.
7. Кыйынчылыктарды
If you encounter issues with your remote control, refer to the following troubleshooting steps:
| Көйгөй | Мүмкүн себеп | Чечим |
|---|---|---|
| Алыстан жооп бербей жатат | Өлүк же туура эмес орнотулган батарейкалар. | Батареяларды жаңы AAA щелочтуу батареялары менен алмаштырыңыз, туура полярдуулукту камсыз кылыңыз. |
| Алыстан жооп бербей жатат | Пульт менен проектордун ортосундагы тоскоолдук. | Ensure a clear line of sight to the projector's IR receiver. |
| Алыстан жооп бербей жатат | Projector does not have an infrared (IR) function. | Confirm that your projector supports IR remote control. This remote is designed for IR-enabled devices. |
| Чектелген диапазон же үзгүлтүктүү жооп | Алсыз батарейкалар же тоскоолдуктар. | Replace batteries. Minimize sources of strong light or electronic interference. |
8. Техникалык шарттар
| Өзгөчөлүк | Деталь |
|---|---|
| Бренд | РЕТРОСУН |
| Элемент моделинин номери | Universal Replacement Remote Control (Compatible with Agreago Projector and others) |
| Түс | Кара |
| Элемент Салмагы | 1.06 унция (болжол менен 30 грамм) |
| Пакеттин өлчөмдөрү | 5.43 x 1.5 x 0.63 дюйм (13.8 x 3.8 x 1.6 см) |
| Өзгөчө өзгөчөлүк | Эргономикалык дизайн |
| Колдоого алынган түзмөктөрдүн максималдуу саны | 1 (controls one projector at a time) |
| Шайкеш түзмөктөр | Projectors (specific models listed in Section 2) |

Image: The remote control shown with its key dimensions (length, width, thickness) indicated for reference.
9. Кепилдик жана колдоо
Кепилдик жөнүндө маалымат же техникалык колдоо алуу үчүн, сураныч, продуктунун таңгагын караңыз же түздөн-түз өндүрүүчүгө кайрылыңыз. Сатып алуунун далили катары сатып алуу дүмүрчөгүңүздү сактап коюңуз.


