1. Киришүү
Welcome to the world of exceptional home espresso with your new Krups Precision Manual Espresso Machine with Grinder. This manual provides detailed instructions for setting up, operating, and maintaining your machine to ensure you enjoy perfectly balanced and aromatic coffee every time. With its integrated conical grinder, intuitive controls, and professional steam nozzle, you are equipped to craft a wide range of coffee beverages, from rich espressos to creamy lattes.
2. Маанилүү коопсуздук нускамалары
Сураныч, шайманды колдонуудан мурун бардык нускамаларды кылдат окуп чыгыңыз. Бул колдонмону келечекте маалымат алуу үчүн сактаңыз.
- Always connect the appliance to a grounded electrical outlet.
- Шайманды, электр шнурын же сууга же башка суюктукка чөмүлбөңүз.
- Балдар шайман менен ойнобосун текшериңиз.
- Unplug the appliance from the outlet when not in use, before cleaning, and during assembly or disassembly of parts.
- Эч кандай шайманды зымы же сайы бузулган, же шайман иштебей калгандан кийин же кандайдыр бир түрдө бузулгандан кийин иштетпеңиз.
- ысык беттерге тийбегиле. Туткаларды же туткаларды колдонуңуз.
- Өндүрүүчүлөр сунуштаган аксессуарларды гана колдонуңуз.
- Сыртта колдонбоңуз.
- Ыстык газ же электр мешине же ысытылган мештин жанына коюуга болбойт.
- Always ensure the water tank is filled to the appropriate level before brewing.
- Exercise extreme caution when using the steam wand as hot steam can cause burns.
3. Пакеттин мазмуну
Your Krups Precision Manual Espresso Machine XP801T10 comes with the following items:
- Krups Precision Manual Espresso Machine with Integrated Grinder
- Кофе Тamper
- Stainless Steel Milk Pitcher
- 58мм Портафильтр
- 4 Pressurized Filters (single and double shot)
- Non-Pressurized Filters (single and double shot)
- Cup Support
- Dosing Ring/Funnel
- Фильтр картридж
- Тазалоо комплекти

Figure 3.1: A comprehensive display of the 10 included barista accessories: stainless steel milk pitcher, tamper, 58mm portafilter, filter cartridge, dosing ring, 4 pressurized filters, and cup support.
4. Продукт бүтүп калдыview
Familiarize yourself with the components of your espresso machine.

Figure 4.1: The Krups Precision Manual Espresso Machine, showcasinанын кооз дизайны жана түшүнүктүү башкаруу панели.
Негизги компоненттер:
- Интеграцияланган конус формасындагы майдалагыч: Located at the top, with 30 adjustable grind settings for optimal freshness.
- буурчак хоппер: Holds up to 250g of coffee beans.
- Суу сактагыч: Removable, with a capacity of 3.5 liters.
- Башкаруу панели: Intuitive interface with buttons for power, cup selection, pre-infusion, temperature, and drink types (Espresso, Lungo, Americano, Hot Water, Steam).
- Басым өлчөгүч: Displays brewing pressure, indicating the 'Optimal Zone' for perfect extraction.
- 58mm Portafilter: Professional-grade portafilter for consistent results.
- Буу таякчасы: Professional-quality nozzle for frothing milk.
- Тамчылатма табак: Оңой тазалоо үчүн алынуучу.

Figure 4.2: An illustration of the espresso machine with its key dimensions, indicating a 3.5L water reservoir and a 250g bean hopper.
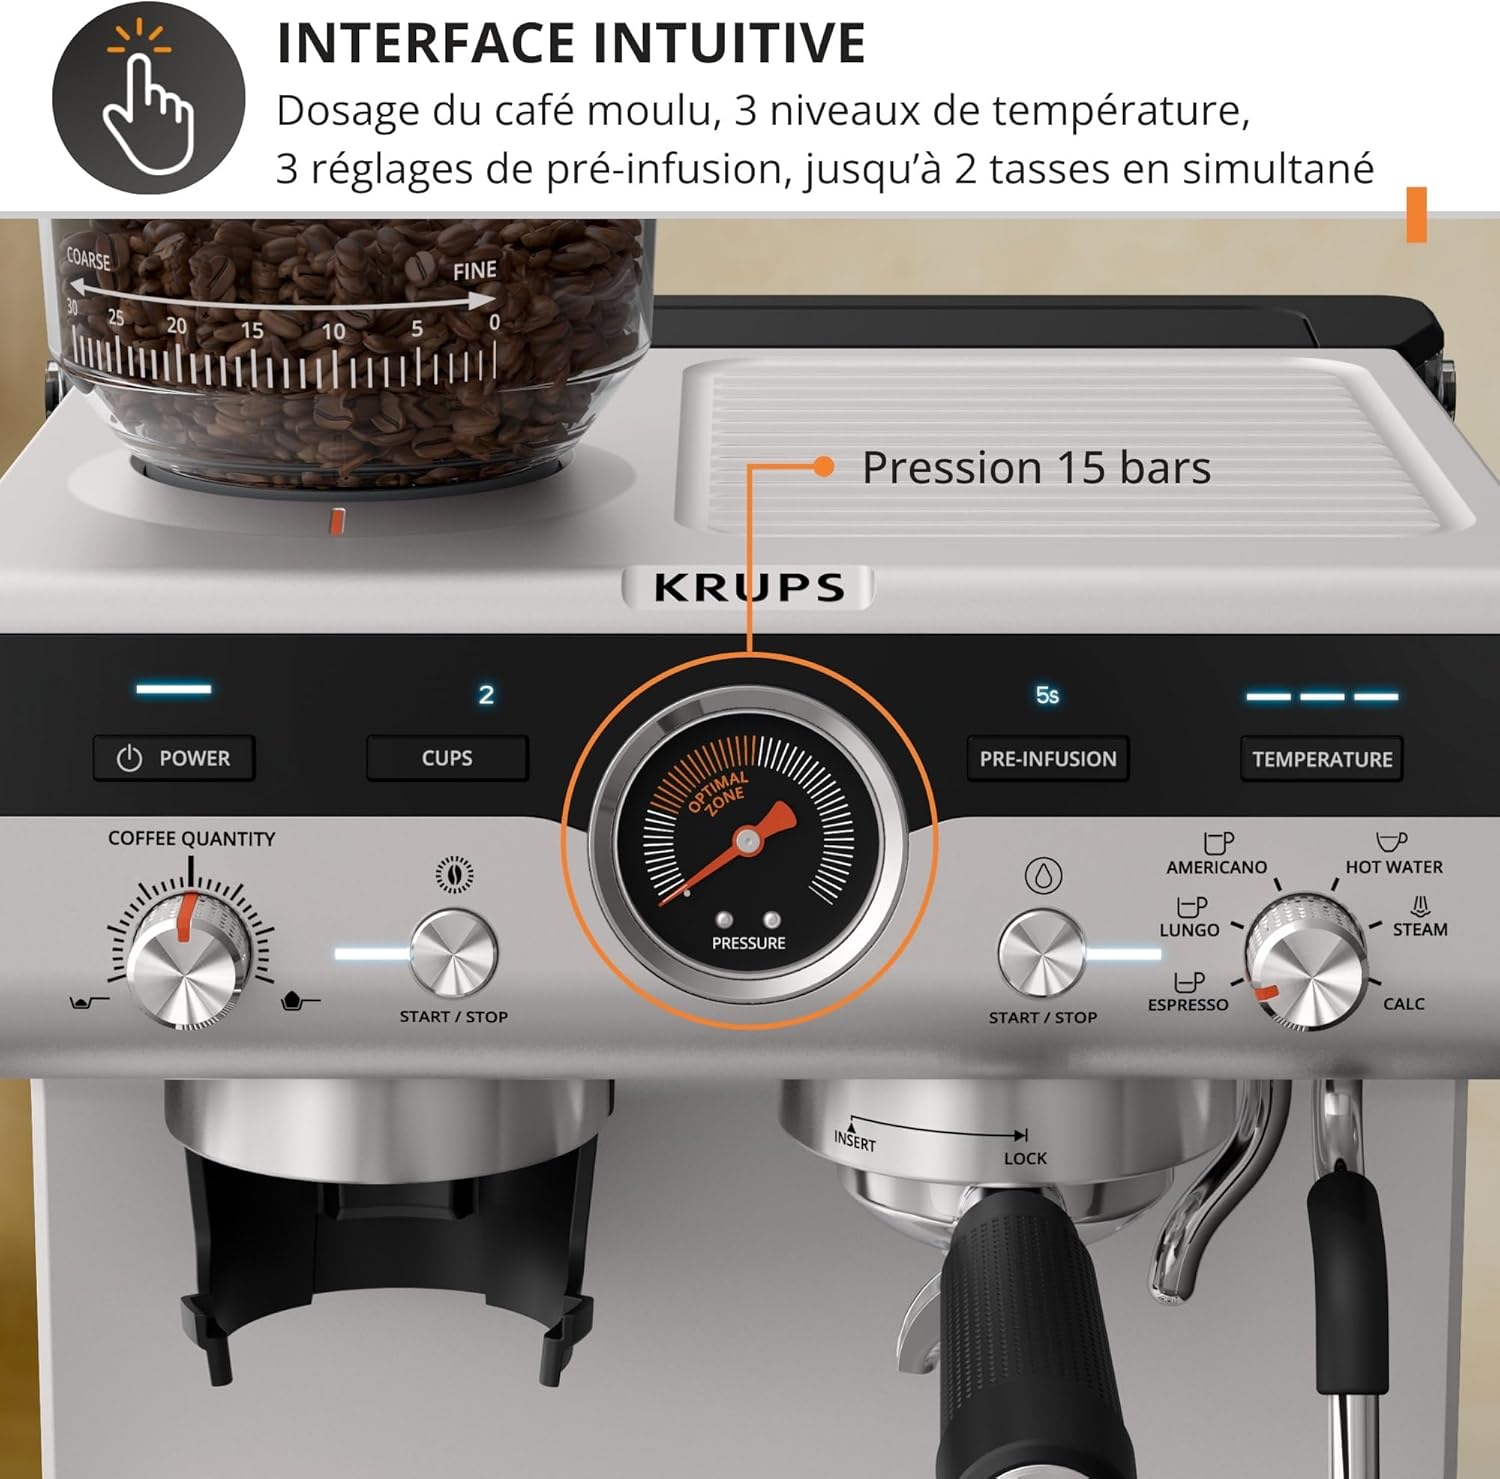
Figure 4.3: The intuitive control panel featuring a pressure gauge in the 'Optimal Zone', along with buttons for power, cups, pre-infusion, temperature, and drink selection.
5. Орнотуу
5.1 Пакеттен чыгаруу жана жайгаштыруу
- Бардык таңгактоочу материалдарды жана аксессуарларды кылдаттык менен алып салыңыз.
- Машинаны туруктуу, жалпак, ысыкка чыдамдуу бетке, суу булактарынан жана жылуулуктан алыс коюңуз.
- Машинанын айланасында желдетүү жана суу резервуарына жана буурчак бункерине кирүү үчүн жетиштүү орун бар экендигин текшериңиз.
5.2 Initial Cleaning and Priming
- Wash the water tank, portafilter, filters, milk pitcher, and drip tray with warm soapy water, then rinse thoroughly.
- Fill the water tank with fresh, cold water and place it back into the machine.
- Машинаны жерге туташтырылган электр розеткасына сайыңыз.
- Turn on the machine using the Power button. The machine will begin to heat up.
- Run a few cycles of hot water through the portafilter (without coffee) and the steam wand to prime the system and rinse any manufacturing residues.
6. Иштөө нускамалары
6.1 Кофе майдалоо
- Ensure the bean hopper is filled with fresh coffee beans.
- Adjust the grind setting using the dial on the bean hopper. There are 30 precise settings, from coarse to fine. For espresso, a fine grind is typically recommended.
- Place the portafilter with the desired filter basket (single or double shot) under the grinder outlet.
- Press the grind button to dispense freshly ground coffee into the portafilter. Adjust the grinding time or quantity knob to achieve the desired dose.

Figure 6.1: Close-up of the integrated conical grinder, highlighting the 30 adjustable grind settings from coarse to fine, allowing precise customization of coffee intensity.
6.2 Тampкофе
- Майдалагандан кийин, камтылган t колдонуңузamper to press the coffee grounds firmly and evenly into the portafilter. This creates a compact puck for optimal extraction.
- Портафильтрдин четиндеги ашыкча кофе калдыктарын сүртүңүз.
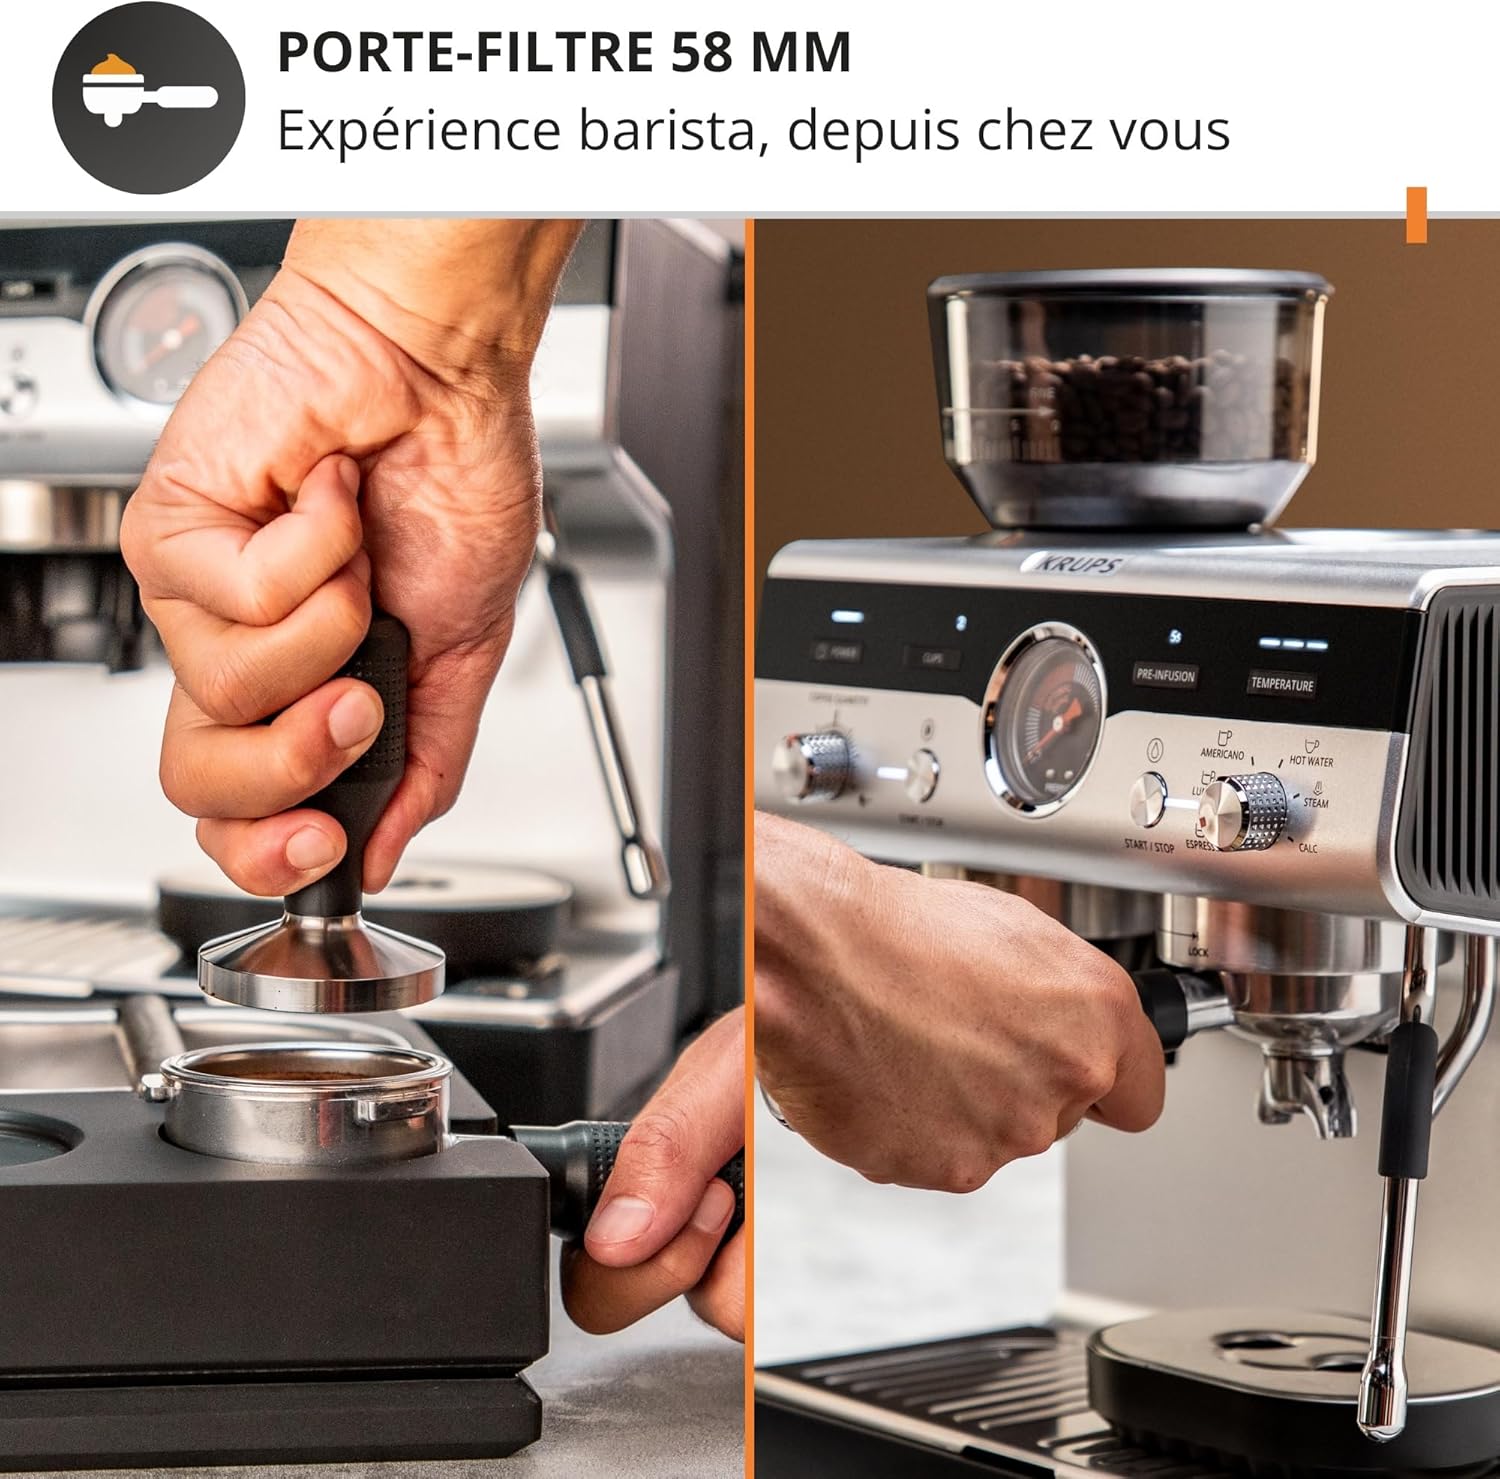
Figure 6.2: Demonstration of tamping freshly ground coffee into the 58mm portafilter and locking it into the machine, essential steps for barista-quality espresso.
6.3 Brewing Espresso and Other Drinks
- Insert the portafilter into the group head and lock it into place by turning it to the right.
- Place one or two cups on the drip tray beneath the portafilter spouts.
- Select your desired drink: Espresso, Lungo, or Americano. The machine offers three pre-infusion settings to enhance aroma and three temperature settings for optimal extraction.
- Press the Start/Stop button for the selected drink. The machine will begin brewing. Monitor the pressure gauge to ensure it stays within the 'Optimal Zone' for the best results.
- To dispense hot water for tea or other beverages, select the 'Hot Water' function.

Figure 6.3: Visual representation of the four pre-programmed drink options available: Espresso, Americano, Long Coffee, and Hot Water, catering to various preferences.
6.4 Бууга бышырылган сүт
- Fill the stainless steel milk pitcher with cold milk (dairy or non-dairy).
- Буу таякчасын тамчылаткыч табакчанын үстүнө коюп, конденсацияланган сууну тазалоо үчүн буу клапанын кыска убакытка ачыңыз. Клапанды жабыңыз.
- Буу таякчасынын учун сүттүн бетинин астына малыңыз.
- Open the steam valve fully. Lower the pitcher slightly to introduce air for frothing, then raise it to heat the milk.
- Once the milk reaches the desired temperature and texture, close the steam valve and remove the pitcher.
- Жарнама менен буу таякчасын дароо сүртүңүзamp сүт калдыктары кургап калбаш үчүн кездеме.
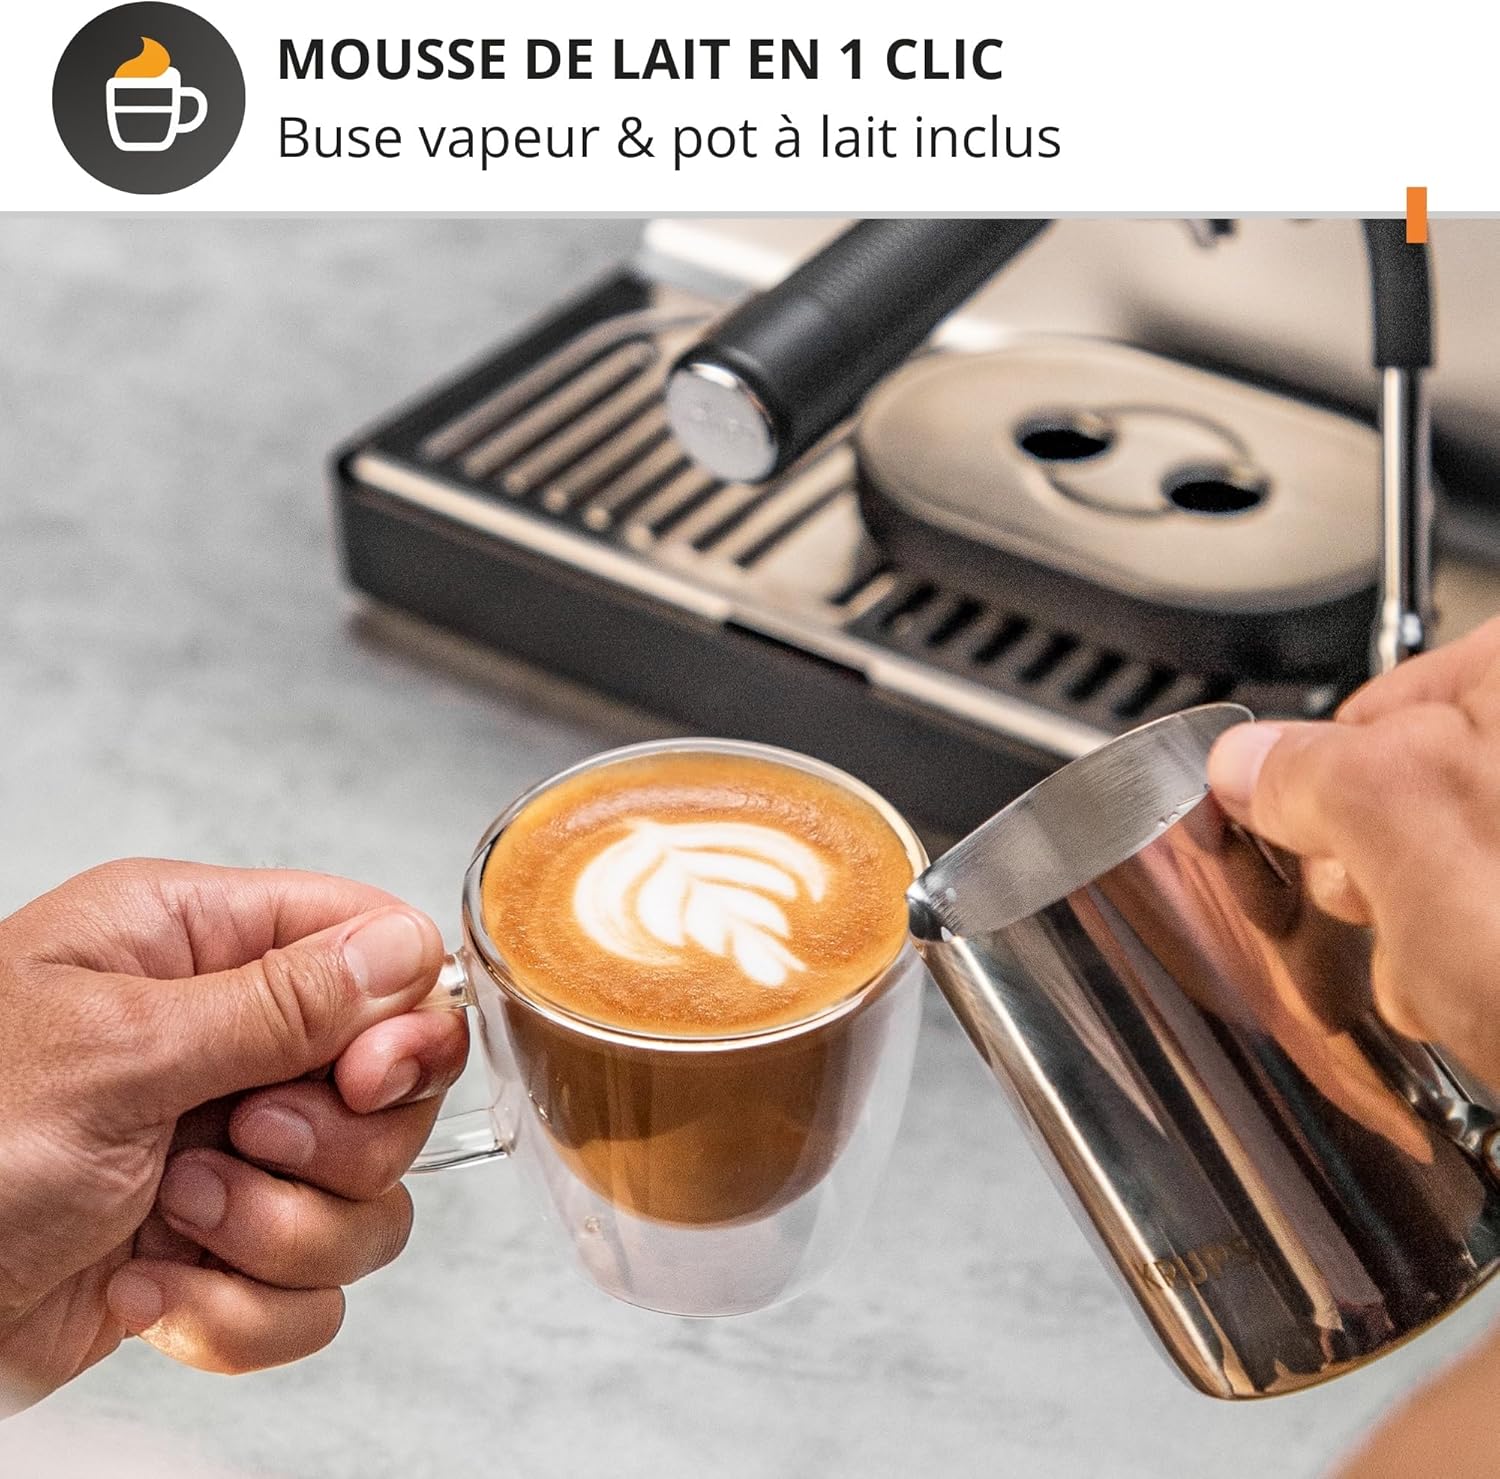
Figure 6.4: A user frothing milk using the professional steam wand, preparing milk for lattes and cappuccinos, demonstrating the machine's milk texturing capabilities.
7. Техникалык тейлөө
7.1 Күнүмдүк тазалоо
- Portafilter жана чыпка себеттери: After each use, remove the portafilter, discard the coffee puck, and rinse the portafilter and filter basket under hot water.
- Буу таякчасы: Сүттү буулагандан кийин дароо буу таякчасын жарнама менен сүртүңүзamp cloth. Periodically, remove the tip and clean any milk residue with a small brush.
- Тамчылатма табак: Empty and rinse the drip tray daily or when the indicator shows it is full.
- Сырткы: Машинанын сыртын жумшак менен сүртүңүз, гamp кездеме. Абразивдүү тазалагычтарды же тазалоочу жайларды колдонбоңуз.
7.2 Тазалоо
The machine will indicate when descaling is required (CALC light). Descaling removes mineral buildup and ensures optimal performance and longevity of your machine.
- Refer to the specific descaling instructions in your full product manual or on the manufacturer's website for the recommended descaling solution and procedure.
- Typically, this involves mixing a descaling solution with water in the reservoir and running it through the machine's brew head and steam wand.
- Always follow with several rinses of fresh water to remove any descaling solution residue.
7.3 Фильтр картридждерин алмаштыруу
The included filter cartridge helps reduce impurities in the water. Replace it regularly as indicated by the machine or every 2-3 months, depending on water hardness and usage.
8. Кыйынчылыктарды
| Көйгөй | Мүмкүн себеп | Чечим |
|---|---|---|
| Кофе берилбейт. | Суу резервуары бош; машина даярдалган эмес; өтө майдаланган кофе же тampөтө катуу; бүтөлгөн чыпка. | Суу куюлган бактын майын толтуруңуз; машинаны майлаңыз; майдалоо жөндөөсүн жеamping pressure; clean filter. |
| Кофе өтө алсыз же суулуу. | Coffee too coarsely ground; not enough coffee; insufficient tamping; water temperature too low. | Майдалоону майдалоочу жөндөөнү коюңуз; кофенин дозасын көбөйтүңүз;amp more firmly; check temperature settings. |
| Coffee is too bitter or burnt. | Coffee too finely ground; too much coffee; water temperature too high; over-extraction. | Adjust grind to coarser setting; reduce coffee dose; check temperature settings; shorten brew time. |
| Буу таякчасы буу чыгарбайт. | Steam wand clogged; machine not heated to steam temperature. | Clean steam wand tip; wait for machine to reach steam temperature (indicator light). |
| Машина суу агып жатат. | Water tank not properly seated; drip tray full; seals or gaskets worn. | Ensure water tank is correctly placed; empty drip tray; contact customer support if issue persists. |
9. Техникалык шарттар
| Өзгөчөлүк | Деталь |
|---|---|
| Бренд | КРУПС |
| Модель номери | XP801T10 |
| Түс | Кара/дат баспас болот |
| Продукциянын өлчөмдөрү (L x W x Y) | 31.2 x 33.4 x 41.3 см |
| Салмагы | 10.5 килограмм |
| Сыйымдуулугу (Суу багы) | 3.5 литр |
| Тtage | 230V |
| Материал | Дат баспаган болот |
| Өзгөчөлүктөр | Integrated Grinder, Milk Frother, Intuitive Control Surface, Thermoblock System, Accessories Included |
| Кофе кайнаткыч түрү | Эспрессо машинасы |
| Продукт үчүн атайын колдонуу | Espresso, Lungo, Americano, Tea, Latte, Cappuccino |
10. Кепилдик жана колдоо
Your Krups Precision Manual Espresso Machine XP801T10 is covered by a manufacturer's warranty. Please refer to the warranty card included in your product packaging for specific terms and conditions, including the warranty period and coverage details.
For technical support, spare parts, or service inquiries, please contact Krups customer service. Contact information can typically be found on the official Krups webсайтында же продукт документациясында.
Before contacting support, please have your model number (XP801T10) and proof of purchase readily available.


