1. Киришүү
Thank you for choosing the ORION Cobalt CPE120 Active Down-Firing Subwoofer. This unit is designed to provide powerful, deep bass in a compact, space-saving enclosure, enhancing your vehicle's audio system. This manual provides essential information for proper installation, operation, and maintenance of your subwoofer.
The CPE120 features a built-in amplifier, eliminating the need for a separate external amplifier. Its design focuses on delivering robust bass performance while maintaining a slim profile suitable for various vehicle interiors, including under seats or in trunks.

Image 1.1: ORION Cobalt CPE120 12-inch active down-firing subwoofer enclosure with included remote bass knob.
2. Коопсуздук маалыматы
Please read all instructions carefully before installation and use. Failure to follow these guidelines may result in damage to the product, vehicle, or personal injury.
- Кесиптик орнотуу сунушталат: Installation of car audio equipment can be complex. If you are unsure about any part of the installation process, seek assistance from a qualified professional.
- Батареяны ажыратыңыз: Кыска туташууларды жана электр коркунучтарын болтурбоо үчүн ар кандай электр иштерин баштоодон мурун, унаанын терс батарея терминалын сууруп салыңыз.
- Туура зымдар: Ensure all wiring is correctly connected and insulated to prevent short circuits and potential fire hazards. Use appropriate gauge wires as specified in the installation section.
- Коопсуз орнотуу: Mount the subwoofer securely to prevent it from shifting during vehicle movement, which could cause injury or damage.
- Тоскоолдуктан качуу: Do not install the subwoofer in a location that obstructs the driver's view, interferes with vehicle controls, or impedes airbag deployment.
- Вентиляция: Ensure adequate ventilation around the subwoofer's amplifier section to prevent overheating.
- Үн деңгээли: Үндүн катуулугун узак убакыт бою сактоо угууга зыян келтириши мүмкүн. Үндү коопсуз жана ыңгайлуу деңгээлге коюңуз.
3. Пакеттин мазмуну
Пакетте бардык буюмдар бар экенин текшериңиз:
- ORION Cobalt CPE120 Active Down-Firing Subwoofer Enclosure
- Remote Bass Knob with Cable
- High-Level Input Harness (if applicable, for direct speaker wire connection)
- Power Wiring Kit (typically sold separately, but essential for installation)
- Колдонуучунун Колдонмосу (бул документ)
4. Негизги өзгөчөлүктөрү
- Интеграцияланган Ampөмүр берүүчү: Built-in 2000W peak power (500W RMS) amplifier for clear and powerful bass reproduction.
- 12 дюймдук ылдый күйгүзүүчү сабвуфер: Optimized for deep bass response and efficient use of space.
- Compact Enclosure: Slim profile (21" x 7" x 14") designed for installation in tight spaces such as under seats or in vehicle trunks.
- Ар тараптуу киргизүүлөр: Features both High-Level (speaker level) and Low-Level (RCA) inputs for compatibility with various head units.
- Жөнгө салынуучу кроссовер: Low Pass Crossover (LPF) adjustable from 50Hz to 200Hz to fine-tune bass frequencies.
- Бас жогорулатуу: Adjustable bass boost from 0 to +12dB for enhanced low-frequency impact.
- Фазаны көзөмөлдөө: Switchable phase (0°/180°) to optimize bass integration with existing speakers.
- Алыскы басс баскычы: Included wired remote for convenient adjustment of bass level from the driver's seat.
- Туруктуу курулуш: Constructed with a sealed MDF enclosure, spun aluminum cone, EPDM rubber surround, and copper-wound Kapton voice coil for enhanced sound quality and longevity.
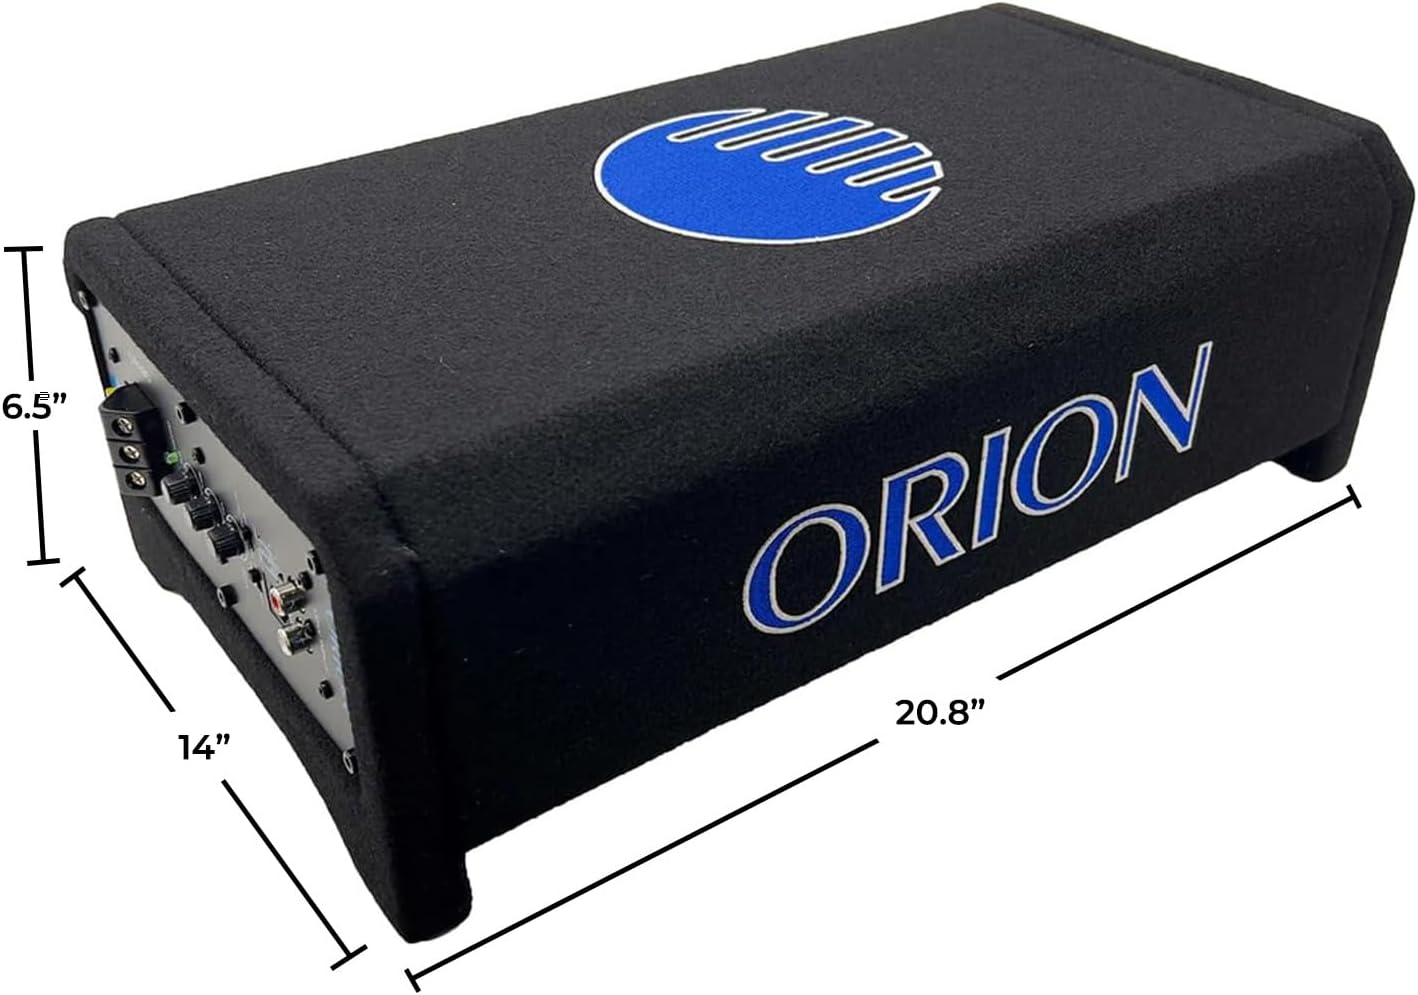
Image 4.1: Dimensions of the ORION Cobalt CPE120 subwoofer enclosure.
5. Орнотуу жана орнотуу
5.1. Жайгаштыруу
The compact design of the CPE120 allows for flexible placement. Common locations include:
- Underneath a car seat (ensure adequate clearance and ventilation).
- In the trunk of a sedan.
- Behind or under the rear seat of a truck or SUV.
Ensure the subwoofer is securely mounted to prevent movement. Consider the proximity to the vehicle's battery for power wiring and the head unit for signal wiring.
5.2. Зымдарды туташтыруу
Кандайдыр бир туташтырууларды жасоодон мурун, унааңыздын аккумуляторунун терс (-) терминалын ажыратыңыз.
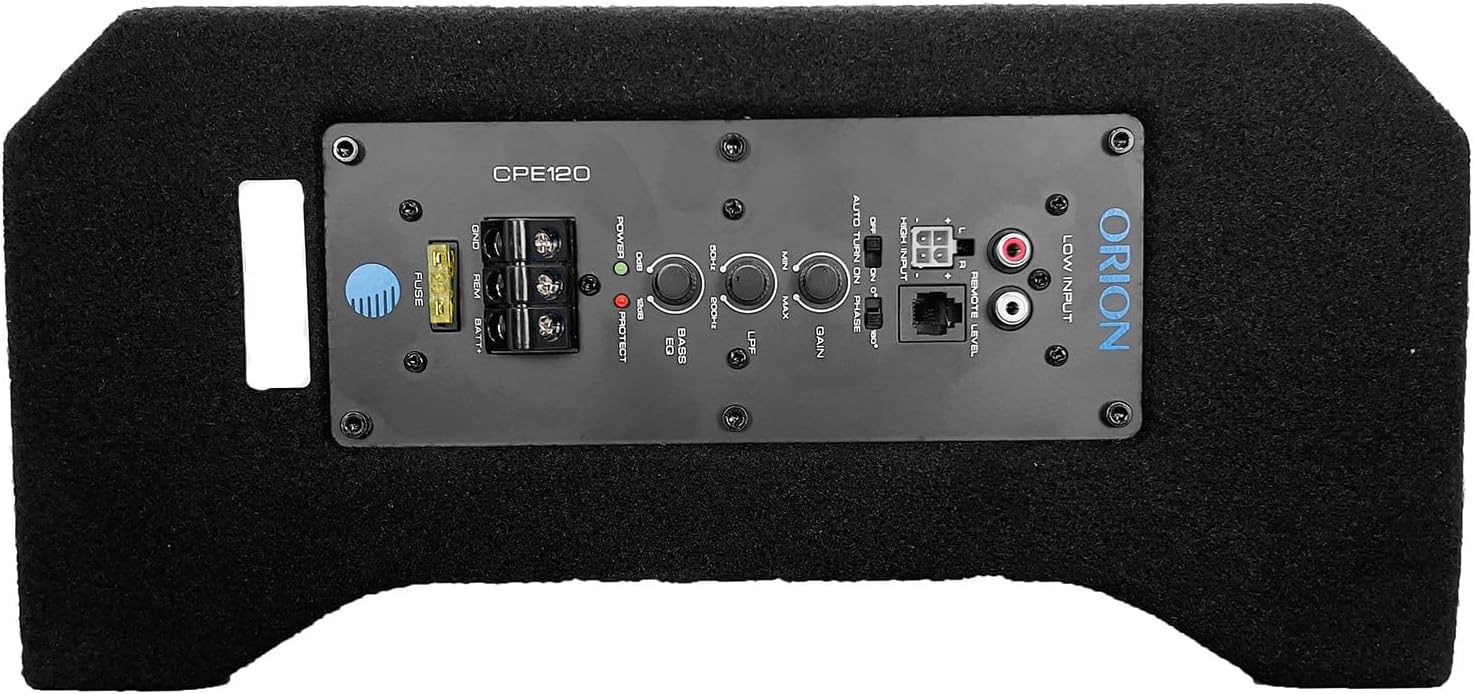
Image 5.1: Control panel with wiring terminals and adjustment knobs.
- Күч (BATT+): Connect a suitable gauge power wire (e.g., 8 AWG or 4 AWG depending on total system power) directly from the vehicle's positive battery terminal to the BATT+ terminal on the subwoofer. Install an in-line fuse holder (with an appropriate fuse, typically 40A-60A) as close to the battery as possible (within 18 inches).
- Жер (GND): Connect a short (less than 3 feet) and equally suitable gauge ground wire from the GND terminal on the subwoofer to a clean, unpainted metal surface on the vehicle's chassis. Ensure a good electrical connection by scraping away any paint or rust.
- Алыстан күйгүзүү (REM): Connect a remote turn-on wire from your head unit's remote output (usually a blue/white wire) to the REM terminal on the subwoofer. This wire tells the subwoofer to turn on and off with your head unit. If your head unit does not have a remote output, you may use the "Auto Turn On" feature (see Section 6.1).
- Аудио киргизүү:
- Төмөн деңгээл киргизүү (RCA): If your head unit has RCA pre-outs, connect RCA cables from the head unit's subwoofer or full-range outputs to the "LOW INPUT" RCA jacks on the subwoofer.
- Жогорку деңгээлдеги киргизүү (динамик деңгээли): If your head unit does not have RCA outputs, use the included high-level input harness. Connect the speaker wires from your head unit's rear speakers (or full-range speakers) to the corresponding wires on the high-level input harness. Plug the harness into the "HIGH INPUT" connector on the subwoofer.
- Деңгээлди алыстан башкаруу: Connect the remote bass knob cable to the "REMOTE LEVEL" port on the subwoofer. Mount the remote knob in an accessible location for easy adjustment.
After all connections are made, reconnect the negative battery terminal.
6. Иштетүү жана тууралоо
The control panel on the subwoofer allows for fine-tuning of the audio output. Refer to Image 5.1 for control locations.
6.1. Башкаруу панелинин функциялары
- FUSE: Main power fuse for protection. Replace only with a fuse of the same rating.
- GND, REM, BATT+: Power and remote turn-on terminals (as described in Section 5.2).
- POWER/PROTECT LED:
- Green (POWER): Indicates the subwoofer is powered on and operating normally.
- Red (PROTECT): көрсөтөт amplifier is in protection mode due to overheating, short circuit, or low voltage. Turn off the system and troubleshoot.
- AUTO TURN ON (ON/OFF): This switch enables or disables the automatic turn-on feature. When set to "ON" and using high-level inputs, the subwoofer will detect an audio signal and turn on automatically, eliminating the need for a remote turn-on wire. If using a remote turn-on wire, set this to "OFF".
- ФАЗА (0°/180°): Adjusts the phase of the subwoofer output. If the bass sounds weak or out of sync with your main speakers, try switching the phase. One setting will typically sound better than the other.
- LPF (Low Pass Filter) (50Hz-200Hz): This knob controls the upper frequency limit of the subwoofer. Set it to allow only low frequencies to pass through to the subwoofer. A common starting point is around 80-100Hz, but adjust to blend smoothly with your main speakers.
- BASS EQ (0-+12dB): This control boosts the bass output at a specific frequency. Use sparingly to avoid distortion.
- GAIN (MIN/MAX): This control matches the output level of your head unit to the input sensitivity of the subwoofer's amplifier. Start with the gain at minimum, then slowly increase it until the bass output is balanced with your main speakers without distortion. Do not use the gain control as a volume knob.
- ЖОГОРКУ КИРИШҮҮ: Connector for the high-level input harness.
- ТӨМӨН КИРИШҮҮ: RCA jacks for low-level input.
- REMOTE LEVEL: Port for connecting the wired remote bass knob.
6.2. Remote Bass Knob

Image 6.1: Remote bass level control knob.
The remote bass knob provides convenient control over the subwoofer's output level from your driving position. This allows for quick adjustments to the bass intensity without needing to access the subwoofer's control panel.
7. Техникалык тейлөө
- Тазалоо: Use a soft, dry cloth to clean the enclosure. Do not use harsh chemicals or abrasive cleaners.
- Текшерүүлөр: Мезгил-мезгили менен бардык зымдарды байланыштарды текшерип туруңуз, алар бекем жана коррозиядан таза.
- Вентиляция: камсыз кылуу amplifier section of the subwoofer remains unobstructed to allow for proper heat dissipation.
- Сактагычты алмаштыруу: If the fuse blows, replace it only with a fuse of the exact same type and rating (e.g., 40A). Using a fuse with a higher rating can cause serious damage or fire.
8. Кыйынчылыктарды
| Көйгөй | Мүмкүн себеп | Чечим |
|---|---|---|
| Сабвуферден үн чыкпайт |
|
|
| Алсыз же бурмаланган бас |
|
|
| Сабвуфер ысып кетет |
|
|
Note on Tuning: Some users have found that maximizing the gain and bass EQ, while keeping the LPF at minimum, can yield optimal results for this unit. Experiment with settings to achieve your preferred sound.
9. Техникалык шарттар
| Модель аты | CPE120 |
| Динамик түрү | Активдүү ылдый атуу сабвуфери |
| Вуфердин диаметри | 12 дюйм |
| Эң жогорку кубаттуулук | 2000 Ватт |
| RMS Power Output | 500 Ватт |
| Импеданс | 4 Ом |
| Frequency Response | (Not explicitly stated, but LPF 50Hz-200Hz implies operating range) |
| Low Pass Crossover (LPF) | 50Гц - 200Гц |
| Bass Boost | 0 ден + 12dB чейин |
| Монтаж түрү | Under Seat / Trunk |
| Коргоочу материал | MDF (Орто тыгыздыктагы ДВП) |
| Конус материалы | Айланган алюминий |
| Курчап турган материал | EPDM резина |
| Үн катушкасы | Copper-wound Kapton |
| Продукциянын өлчөмдөрү (D x W x Y) | 14" x 21" x 7" |
| Элемент Салмагы | 28.9 фунт |
| Башкаруу ыкмасы | Remote / On-unit controls |
| Байланыш технологиясы | Coaxial (for RCA inputs) |
10. Кепилдик жана колдоо
10.1. Кепилдик маалыматы
The ORION Cobalt CPE120 is covered by a 1 жылдык өндүрүүчү чектелген кепилдик. This warranty covers defects in materials and workmanship under normal use. It does not cover damage resulting from improper installation, accident, misuse, abuse, neglect, unauthorized modification, or normal wear and tear.
Кепилдик дооматтары үчүн сатып алганыңыздын далилин сактап коюңуз.
10.2. Кардарларды колдоо кызматы
For technical assistance, warranty inquiries, or further information, please contact ORION customer support. Refer to the ORION official webакыркы байланыш маалыматы үчүн сайтка же сатып алуу документтериңизге кайрылыңыз.
Сиз да зыярат кылсаңыз болот ORION Store on Amazon кошумча продукт маалымат жана ресурстар үчүн.


