1. Киришүү
Thank you for choosing the Gree Aovia 12000 BTU Portable Air Conditioner. This manual provides essential information for the safe and efficient operation, installation, and maintenance of your new appliance. Please read it thoroughly before use and keep it for future reference.
This compact unit combines efficiency, technology, and modern design, offering a range of features for comfort and practicality:
- Компакт дизайн: Occupies less space, ideal for any environment.
- Санариптик дисплей: Shows operation mode, temperature, and protection codes clearly and intuitively.
- Тез муздатуу: Ensures a cool environment in a short time.
- Кургатуу: Improves air quality by removing excess humidity.
- 3 Fan Speed Options: Customize air distribution according to your needs.
- Dual Drain Outlet Design: Facilitates installation and management of condensed water.
- Төмөн ызы-чуу деңгээли: Operates quietly to avoid disturbance.
- Таймер функциясы: Program the unit to turn on and off at your convenience.
- Уйку режими: Ideal for peaceful sleep with automatic temperature adjustments.
- Anti-Corrosion Protection: Ensures greater product durability and resistance.
2. Коопсуздук нускамалары
Please read and follow these safety precautions carefully to prevent accidents and ensure optimal performance.
- Always use the appliance on a stable, level surface.
- Аба кирүүчү же чыгуучу тешиктерди жаппаңыз. Түзмөктүн айланасында кеминде 20 см (8 дюйм) боштук калтырыңыз.
- кубат менен камсыз кылуу Voltage specified on the rating label (127V).
- Түзмөктү нымдуу кол менен же суунун жанында иштетпеңиз.
- Тазалоодон же тейлөөдөн мурун блокту розеткадан сууруп алыңыз.
- Иштеп жаткан учурда балдарды жана үй жаныбарларын аппараттан алыс кармаңыз.
- Аба чыгаруучу тешиктерге нерселерди салбаңыз.
- Электр зымы бузулган болсо, коркунучту болтурбоо үчүн аны өндүрүүчү, анын тейлөө агенти же ушуга окшогон квалификациялуу адамдар алмаштырышы керек.
3. Продукциянын компоненттери
3.1 Негизги блок
The following images illustrate the main unit from different angles.

3.1-сүрөт: Фронт view of the Gree Aovia portable air conditioner, showing the air outlet louvers and Gree logo.

3.2-сүрөт: Бурчтуу алдыңкы view of the Gree Aovia portable air conditioner, highlighting the side air intake and front panel.
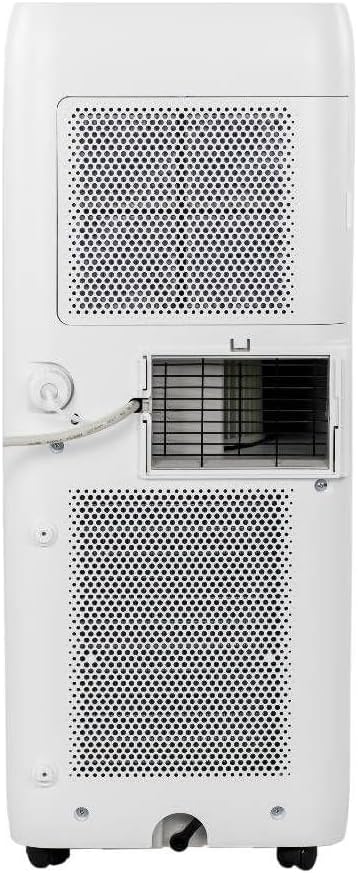
3.3-сүрөт: Арткы view of the Gree Aovia portable air conditioner, showing the exhaust outlet, air filters, and power cord connection.
3.2 Башкаруу панели
The control panel is located on the top of the unit for easy access to all functions.

3.4-сүрөт: Close-up of the top control panel with digital display and buttons for Mode, Timer, Sleep, Fan, and temperature adjustment.
3.3 Алыстан башкаруу
Пульт алыстан ыңгайлуу иштөөгө мүмкүндүк берет.

3.5-сүрөт: The remote control for the Gree Aovia portable air conditioner, featuring buttons for power, cool, dry, fan speed, and fan only.
3.4 Орнотуу комплекти
The unit comes with an installation kit for easy setup.
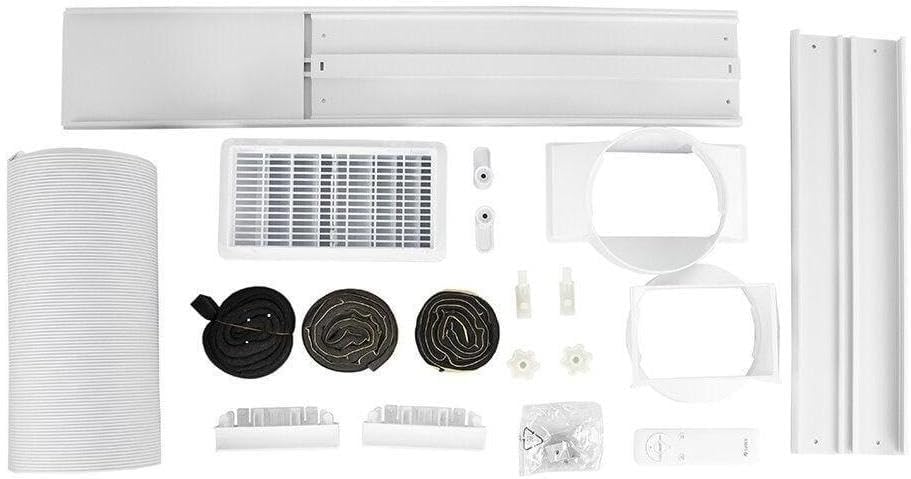
3.6-сүрөт: Contents of the installation kit, including the exhaust hose, window sealing plate, and various connectors.
4. Орнотуу боюнча колдонмо
Follow these steps for proper installation of your portable air conditioner.
4.1 Пакеттен чыгаруу
- Кондиционерди таңгагынан кылдаттык менен чыгарыңыз.
- Бардык таңгактоочу материалдарды алып салыңыз жана эч бир компоненттин жоголуп кетпегенин текшериңиз.
- Keep the packaging for future storage or transportation.
4.2 Орнотуу
Choose a suitable location for your air conditioner.
- Place the unit on a firm, level surface to minimize noise and vibration.
- Түзмөктүн айланасында абанын жакшы айланышы үчүн кеминде 20 см (8 дюйм) боштук бар экенин текшериңиз.
- Position the unit near a window or opening for the exhaust hose.
4.3 Window Kit and Exhaust Hose Installation
The exhaust hose expels hot air outside, which is crucial for effective cooling.

4.1-сүрөт: Portable air conditioner positioned near a window with the exhaust hose connected to the window sealing plate.
- Чыгаруучу шланг туташтыргычын аппараттын артындагы аба чыгуучу тешикке бекитиңиз.
- Assemble the window sealing plate and adjust it to fit your window opening.
- Чыгаруучу түтүктүн экинчи учун терезенин пломбалоочу пластинасына туташтырыңыз.
- Ensure the window is securely closed around the sealing plate to prevent hot air from re-entering the room.
4.4 Drainage Setup
The unit features a dual drain outlet for condensed water management.
- For continuous drainage (recommended in high humidity), connect a drain hose (not always included) to the continuous drain port and lead it to a floor drain or bucket.
- For manual drainage, the internal water tank will collect condensate. The unit will stop operating when the tank is full, and an indicator light will illuminate. Drain the water manually from the lower drain port.
5. Operating the Air Conditioner
Learn how to use the various functions of your Gree Aovia portable air conditioner.
5.1 Күйгүзүү/өчүрүү
- басыңыз КҮЙГҮЗҮҮ/ӨЧҮРҮҮ аппаратты күйгүзүү же өчүрүү үчүн башкаруу панелиндеги же алыстан башкаруудагы баскыч.
5.2 Режимди тандоо
басыңыз РЕЖИМ button on the control panel or remote control to cycle through the available modes:
- Муздак режим: Бөлмөнү муздатуу үчүн. жардамы менен температураны тууралаңыз + жана - баскычтар.
- Күйөрман режими: Circulates air without cooling. Select fan speed using the Күйөрмандардын ылдамдыгы баскычы.
- Кургак (нымсыздандыруу) режими: Бөлмөдөгү нымдуулукту азайтат. желдеткич ылдамдыгы, адатта, бул режимде белгиленет.
5.3 Температураны жөндөө
- In Cool Mode, use the + or - buttons on the control panel or remote control to set your desired temperature.
5.4 желдеткич ылдамдыгын тандоо
- басыңыз Күйөрмандардын ылдамдыгы button to choose between Low, Medium, and High fan speeds.
5.5 Таймер функциясы
- басыңыз ТАЙМЕР button to set a time for the unit to automatically turn on or off. Use the + жана - каалаган убакытты тууралоо үчүн баскычтар.
5.6 Уйку режими
- Иштетүү УЙКУ mode for quiet operation and automatic temperature adjustments during sleep.
6. Техникалык тейлөө
Үзгүлтүксүз техникалык тейлөө кондиционериңиздин узак иштөөсүн жана натыйжалуулугун камсыздайт.
6.1 Фильтрди тазалоо
The unit is equipped with anti-dust filters that should be cleaned regularly.
- Тазалоодон мурун блокту өчүрүп, розеткадан сууруп алыңыз.
- Locate and remove the air filters from the back of the unit.
- Wash the filters with warm, soapy water. Rinse thoroughly and allow them to air dry completely before reinserting.
- Clean the filters every two weeks or more frequently depending on usage and air quality.
6.2 Сууну агызуу
- If using manual drainage, drain the collected water when the 'Full Water' indicator illuminates. Place a shallow pan under the drain port and remove the drain plug.
- For continuous drainage, ensure the drain hose is free of kinks and properly positioned.
6.3 Сактоо
- Before storing, ensure all water is drained from the unit.
- Clean the filters and allow them to dry.
- Агрегатты салкын, кургак жерде, эң жакшысы баштапкы таңгагында сактаңыз.
7. Кыйынчылыктарды
Эгерде сиз кондиционериңиз менен көйгөйлөргө туш болсоңуз, төмөнкү кеңири таралган көйгөйлөрдү жана чечимдерди караңыз.
| Көйгөй | Мүмкүн себеп | Чечим |
|---|---|---|
| Түзмөк күйбөйт | No power supply; Power cord not plugged in; Water tank full | Розетканы текшериңиз; Электр шнурун сайыңыз; Суу куюлган бак |
| Натыйжалуу муздатуу эмес | Windows/doors open; Air filter dirty; Exhaust hose not properly installed; Room too large | Close windows/doors; Clean air filter; Ensure exhaust hose is sealed; Use in appropriate room size |
| Суунун агып чыгышы | Drain plug loose; Unit not level; Continuous drain hose kinked | Secure drain plug; Place unit on a level surface; Straighten drain hose |
| Адаттан тышкаркы ызы -чуу | Агрегат тегиз эмес; Вентилятордогу тоскоолдук; Бош калган бөлүктөрү | Ensure unit is level; Check for obstructions; Contact service if noise persists |
| Дисплейде ката коддору | Өзгөчө ички ката | Толук колдонмодогу конкреттүү ката кодун караңыз (эгерде бар болсо) же кардарларды колдоо кызматына кайрылыңыз. |
8. Техникалык шарттар
Technical details for the Gree Aovia 12000 BTU Portable Air Conditioner.
- Бренд аты: Gree
- Модел маалыматы: GPC12AP-A6NNA1A (008483_01)
- Муздатуу кубаттуулугу: 12000 BTU
- Муздаткыч түрү: R-32
- Тtage: 127 вольт
- Ватттагы кубаттуулук: 1540 ватт
- Жылдык энергия керектөө: Жылына 759 киловатт саат
- Натыйжалуулугу: A Rating
- Ызы-чуу деңгээли: 55 децибел
- Продукциянын өлчөмдөрү: 28.6P x 32L x 70A centimeters (28.6 x 32 x 70 cm)
- Салмагы: 22.5 килограмм
- Орнотуу түрү: Portable
- Өзгөчөлүктөр: Алыстан башкарылат
- Чыпка түрү: Чаңга каршы
- Башкаруу панелинин түрү: Mechanical, Electronic
- Түсү: Ак
9. Кепилдик жана колдоо
For warranty information, technical support, or service inquiries, please refer to the warranty card included with your product or contact the manufacturer's customer service. Keep your purchase receipt as proof of purchase.


