1. Киришүү
This manual provides essential information for the safe and efficient use of your new AEG TO63IQ0BIB 60cm Induction Hob. Please read these instructions carefully before installation and use, and keep them for future reference. This induction hob features three cooking zones, including a flexible bridge function, PowerBoost, a pause function, and the Hob2Hood system for automatic ventilation control.
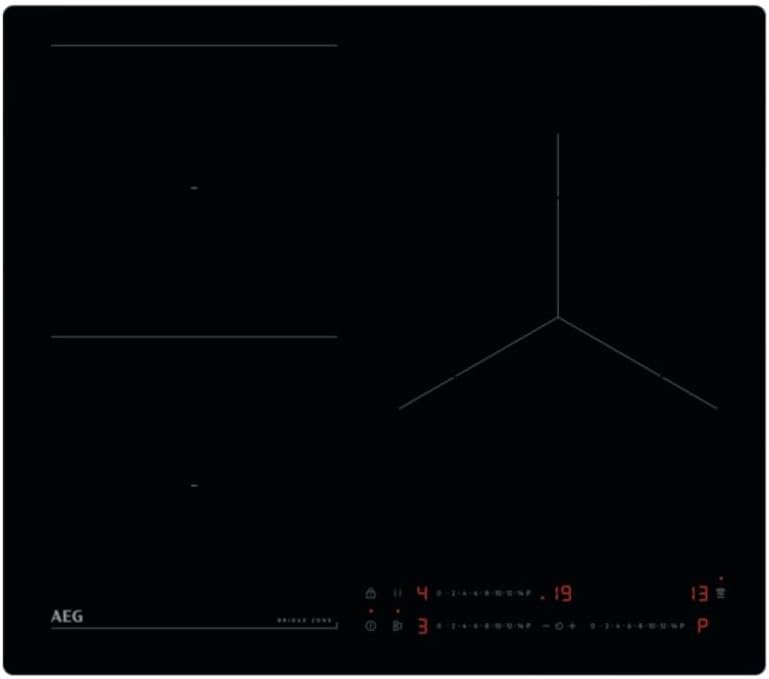
Бул сүрөт үстүн көрсөтөт view of the AEG TO63IQ0BIB induction hob. It features a sleek black frameless glass ceramic surface. On the left, two rectangular cooking zones are visible, designed for the FlexiPowder bridge function. On the right, a larger, circular cooking zone is present. Below the cooking zones, the touch control panel is visible, showing power level indicators, a timer display, and various function icons including PowerBoost and Pause.
2. Коопсуздук маалыматы
Always prioritize safety when operating electrical appliances. Failure to follow these instructions may result in electric shock, fire, or injury.
- Электр байланышы: Ensure the hob is correctly installed by a qualified electrician in accordance with local regulations. The power supply must match the specifications of the appliance.
- Ысык беттер: Although induction hobs heat cookware directly, the hob surface can become hot from residual heat. Avoid touching hot surfaces.
- Ылайыктуу идиш: Use only ferromagnetic cookware suitable for induction cooking. Non-induction cookware will not heat.
- Балдар жана үй жаныбарлары: Балдарды жана үй жаныбарларын шайманды иштетип жатканда жана ал муздаганда алыс кармаңыз.
- Тазалоо: Disconnect the appliance from the power supply before cleaning. Do not use abrasive cleaners or steam cleaners.
- Вентиляция: Орнотуу нускамаларында көрсөтүлгөндөй шаймандын айланасында жетиштүү желдетүүнү камсыз кылыңыз.
3. Орнотуу жана орнотуу
The AEG TO63IQ0BIB induction hob is designed for flush-mounted installation. Professional installation is highly recommended to ensure proper electrical connection and fit.
3.1 Пакеттен чыгаруу
Плитаны таңгагынан этияттык менен чыгарыңыз. Ташуу учурунда кандайдыр бир бузулууларды текшериңиз. Таңгактоочу материалдарды келечектеги ташуу же тейлөө үчүн сактап коюңуз.
3.2 Орнотуу
The hob must be installed into a countertop opening that meets the specified dimensions. Ensure sufficient clearance for ventilation beneath the appliance.
3.3 Электрдик туташуу
This appliance requires a dedicated electrical circuit. The electrical connection must be performed by a qualified technician, adhering to all local electrical codes and regulations. Refer to the wiring diagram provided with the appliance for specific connection details.
4. Иштөө нускамалары
Familiarize yourself with the touch control panel for efficient operation of your induction hob.
4.1 Күйгүзүү/өчүрүү
- Күйгүзүү үчүн: Негизги кубат белгисине тийиңиз.
- Өчүрүү үчүн: Негизги кубат белгисине тийип, дисплей өчмөйүнчө кармап туруңуз.
4.2 Бышыруу зонасын тандоо жана кубаттуулукту жөндөө
- Каалаган бышыруу зонасына ылайыктуу идиштерди кой.
- Touch the control for the specific cooking zone.
- Use the independent slider control (0-14) to set the desired power level. Slide your finger along the scale or touch the specific point.
4.3 Bridge Function (FlexiPowder)
The bridge function allows two cooking zones to be combined into a larger single zone, ideal for griddles or large pots.
- Activate the two adjacent zones you wish to bridge.
- Touch the bridge function symbol (often indicated by two linked rectangles).
- Adjust the power level for the combined zone using its dedicated slider.
4.4 PowerBoost функциясы
The PowerBoost feature provides a rapid burst of heat for quick boiling or searing.
- Select a cooking zone and set a power level.
- Touch the PowerBoost symbol (often 'P' or a similar icon). The zone will operate at maximum power for a limited time.
4.5 Тыныгуу функциясы
The pause function temporarily reduces all active cooking zones to a low keep-warm setting, allowing you to briefly step away without turning off the hob.
- Touch the pause symbol (often two vertical bars). All active zones will switch to a low power setting.
- Touch the pause symbol again to resume cooking at the previous power settings.
4.6 Таймер функциясы
The individual timer allows you to set a cooking duration for each zone.
- Каалаган бышыруу зонасын тандаңыз.
- Touch the timer symbol.
- Use the +/- controls or slider to set the desired cooking time.
- Таймердин убактысы бүткөндө зона автоматтык түрдө өчөт.
4.7 Hob2Hood системасы
The Hob2Hood feature automatically controls a compatible cooker hood based on the hob's cooking activity.
- Ensure your cooker hood is Hob2Hood compatible and correctly paired with the hob.
- When cooking starts, the hob will send signals to the hood to adjust the extraction rate automatically.
- Manual override is possible on the cooker hood if desired.
5. Техникалык тейлөө жана тазалоо
Regular cleaning and maintenance will prolong the life and appearance of your induction hob.
- Күнүмдүк тазалоо: After each use, allow the hob to cool. Wipe the glass ceramic surface with a damp кездеме жана бир аз өлчөмдө жумшак жуучу каражат. Таза чүпүрөк менен кылдат кургатуу.
- Кежир тактар: Күйүп кеткен тамак же өжөр тактар үчүн атайын керамикалык плита кыргычты же тазалагычты колдонуңуз. Продукт нускамаларын кылдаттык менен аткарыңыз.
- Абразивтерден качыңыз: Do not use abrasive sponges, scouring pads, or harsh chemical cleaners, as these can scratch or damage the hob surface.
- Башкаруу панели: Жарнама менен акырын башкаруу панелин сүртүңүзamp кездеме. Конфорканы иштетүүдөн мурун анын кургак экенин текшериңиз.
6. Кыйынчылыктарды
Эгерде сиз плитаңызда көйгөйлөргө туш болсоңуз, тейлөө кызматына кайрылуудан мурун төмөнкү кеңири таралган көйгөйлөрдү жана чечимдерди карап чыгыңыз.
| Көйгөй | Мүмкүн себеп | Чечим |
|---|---|---|
| Конфорка күйбөйт. | Электр энергиясы жок; башкаруу панели кулпуланган. | Check circuit breaker. Ensure the child lock is not active. |
| Бышыруу зонасы жылытылбайт. | Incorrect cookware; cookware not centered; zone not activated. | Use induction-compatible cookware. Center the pot. Activate the zone and set power. |
| Дисплейде "E" же ката коду көрсөтүлөт. | Ички күнөө; ашыкча ысып кетүү. | Turn off the hob, wait a few minutes, then restart. If the error persists, contact service. |
| Иш учурунда адаттан тыш үндөр. | Normal induction hum; fan noise. | Light humming or buzzing is normal for induction technology. The cooling fan may also produce noise. |
7. Техникалык шарттар
Detailed technical specifications for the AEG TO63IQ0BIB Induction Hob.
| Өзгөчөлүк | Спецификация |
|---|---|
| Бренд | AEG |
| Модель номери | TO63IQ0BIB |
| Продукциянын өлчөмдөрү (D x W x Y) | 20.08" x 22.83" x 1.93" (51см x 58см x 4.9см) |
| Элемент Салмагы | 26.7 фунт (12.1 кг) |
| Жылытуу элементтери | 3 Induction Zones (2 x 21 cm, 1 x 28 cm) |
| Башкаруу түрү | Touch and Slider |
| Power Source | Electric (Induction) |
| Жылыткыч бетинин материалы | Айнек керамикалык |
| Материал | Температуралуу айнек |
| Өзгөчөлүктөр | FlexiPowder (Bridge Function), Hob2Hood System, PowerBoost, Pause Function, Individual Timer, Safety Lock |
8. Кепилдик жана колдоо
Your AEG TO63IQ0BIB Induction Hob comes with a manufacturer's warranty. Please refer to the warranty card included with your appliance for specific terms and conditions, including coverage duration and what to do in case of a claim.
For technical assistance, spare parts, or service requests, please contact AEG customer support. Have your model number (TO63IQ0BIB) and serial number ready when contacting support.
You can find contact information for AEG customer service on the official AEG webсайтында же продуктуңуз менен бирге берилген документтерде.


