1. Киришүү
Thank you for choosing the Riflewell 6.0 Cu ft Large Digital Safe Box. This manual provides essential information for the proper setup, operation, and maintenance of your new safe. Please read these instructions carefully before use to ensure optimal security and functionality.
2. Коопсуздук маалыматы
- Always store emergency keys outside the safe, in a secure and easily accessible location known only to trusted individuals.
- Do not store the user manual or any key codes inside the safe.
- Keep the safe out of reach of children to prevent unauthorized access.
- Ensure the safe is placed on a stable, level surface or securely mounted to a wall/floor.
- This safe is designed for security and storage of valuables. It is not rated as fireproof or waterproof.
3. Пакеттин мазмуну
Пакетиңизде бардык буюмдар бар экенин текшериңиз:
- 1 x Riflewell 6.0 Cu ft Digital Safe Box
- 4 x Өзгөчө кырдаал ачкычтары
- 6 x Кеңейтүүчү бурамалар
- 1 x USB Type-C кабели
- 4 x Non-slip Pads
- 1 x User Manual
4. Продукт бүтүп калдыview
The Riflewell 6.0 Cu ft Large Digital Safe Box offers enhanced security features and ample storage for your valuables. It features a dual-door design, digital keypad access, and a robust construction.
Негизги өзгөчөлүктөрү:
- Тышкы Өлчөмдөр: 13.8"D x 13.81"W x 25.5"H
- Сыйымдуулугу: Approximately 6.0 Cubic Feet
- Кулпу түрү: Electronic Combination Lock with Emergency Key Access
- Материал: Reinforced Low Carbon Alloy Steel
- Коопсуздук: Pry-resistant thickened door, five solid live bolts, micro-slit design.
- Ыңгайлуулугу: Dual door design, deposit slot, internal LED lights, mute function, universal emergency power jack (USB Type-C).
- Ойготкуч системасы: Dual alarm for incorrect password attempts and violent vibrations.
Visual Overview:

Сүрөт 1: Алдыңкы view of the Riflewell 6.0 Cu ft Large Digital Safe Box.

Figure 2: Illustration of the three methods to open the safe: digital password, emergency key combined with password, and USB power with password.

Figure 3: Depiction of the anti-theft locking system and the mute function feature.
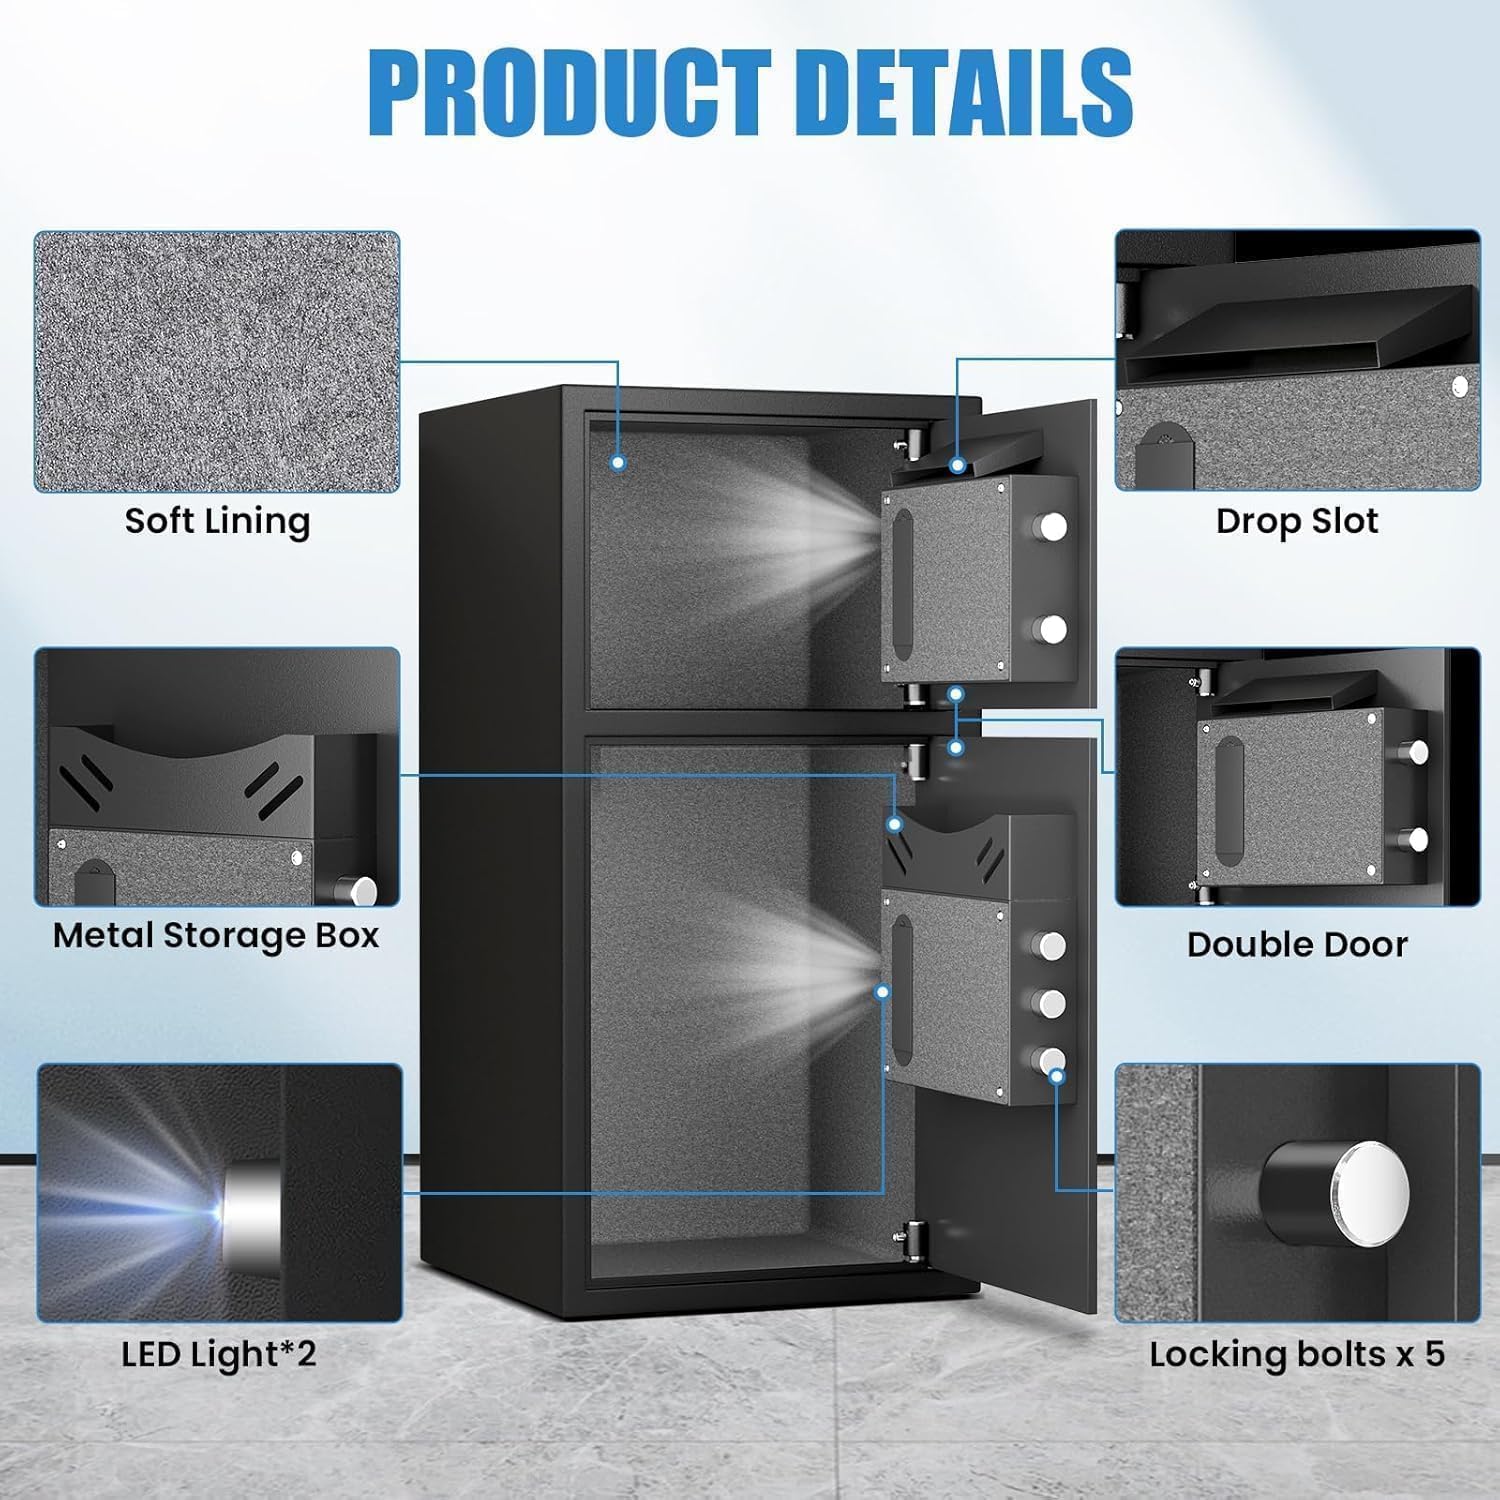
4-сүрөт: Детальдуу view of internal components including soft lining, drop slot, metal storage box, double door, LED lights, and locking bolts.

Figure 5: Dimensions of the safe and examples of items that can be stored, such as medicine, pistols, documents, money, cameras, and jewelry.
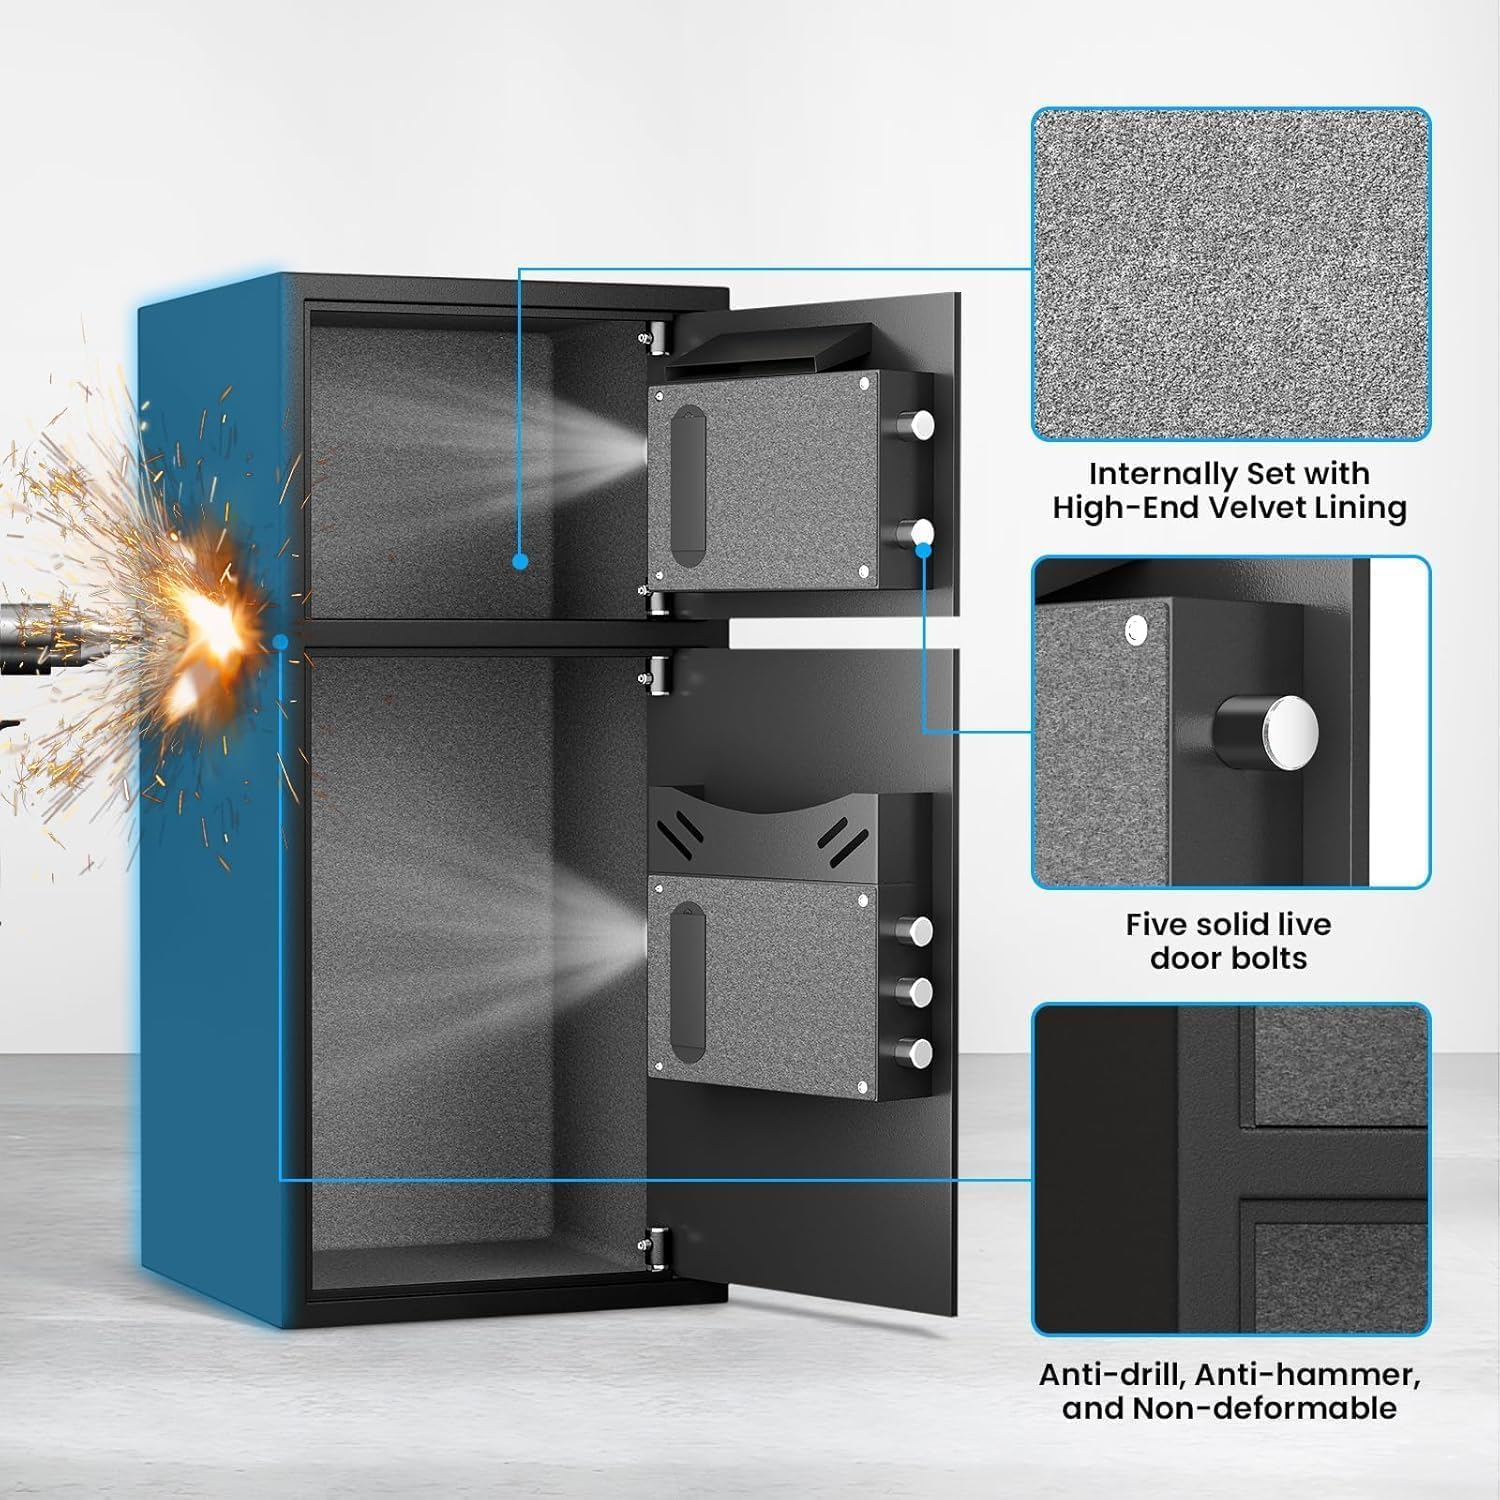
Figure 6: Close-up of the internal velvet lining, five solid live door bolts, and the anti-drill, anti-hammer, and non-deformable construction.
Продукт видеосу бүттүview:
Видео 1: 360 градус view of the safe, showcasing its exterior and general design.
5. Орнотуу
5.1 Initial Opening (First Time Use)
For the first time opening, use the emergency keys provided:
- Locate the emergency keyhole cover on the digital keypad panel.
- Жабыгын акырын алып салыңыз.
- Insert one of the emergency keys into the keyhole.
- Turn the key counter-clockwise to its limit.
- While holding the key, rotate the knob on the keypad clockwise to open the door.
- Repeat for the second door if applicable.
5.2 Батареяны орнотуу
The digital keypad requires 4 AA alkaline batteries (not included). Do not use lithium or rechargeable batteries.
- Open the safe door using the emergency key (refer to 5.1).
- Батарея бөлүмүн эшиктин ички бетинен табыңыз.
- Батарея уясынын капкагын ачыңыз.
- Туура полярдуулукту (+/-) камсыз кылуу менен 4 AA батарейкасын салыңыз.
- Батарея уясынын капкагын жабыңыз.
5.3 Setting User Passwords
You can set a primary user password and a secondary password for each compartment.
To set the first user password (3-8 digits):
- With the safe door open, press the red 'SETTING BUTTON' located on the inside of the door. You will hear a beep.
- On the digital keypad, input your desired 3-8 digit password.
- Press the '#' button to confirm. The safe will beep to indicate successful programming.
To set the second user password (3-8 digits):
- With the safe door open, press '0' twice on the digital keypad.
- Then, short press the red 'SETTING BUTTON' on the inside of the door. You will hear a beep.
- On the digital keypad, input your desired 3-8 digit password.
- Press the '#' button to confirm. The safe will beep to indicate successful programming.
Video 2: Demonstrates the initial opening of the safe and the process of setting user passwords for the electronic panel.
6. Операция
6.1 Сейфти ачуу
Using the Digital Keypad:
- Input your programmed 3-8 digit password.
- '#' баскычын басыңыз.
- Within 5 seconds, rotate the knob clockwise to open the door.
Өзгөчө кырдаал ачкычын колдонуу:
This method is used if you forget your password or if the batteries are depleted.
- Remove the emergency keyhole cover.
- Insert an emergency key and turn it counter-clockwise to its limit.
- While holding the key, rotate the knob clockwise to open the door.
Using USB Cable for Emergency Power:
If batteries are dead and emergency keys are not immediately available, you can power the keypad externally.
- Connect the USB Type-C cable to the emergency power jack on the keypad.
- Connect the other end of the USB cable to a power source (e.g., power bank, USB adapter).
- The keypad will power on. Input your programmed 3-8 digit password.
- '#' баскычын басыңыз.
- Within 5 seconds, rotate the knob clockwise to open the door.
6.2 Депозиттик слотту колдонуу
The top compartment features a deposit slot, allowing you to insert money or small documents without fully opening the safe door. Simply slide items into the slot, and they will drop into the top compartment.
6.3 Үнсүз кылуу функциясы
To operate the safe silently, activate the mute function:
- In standby mode, press the '*' button on the keypad.
- The safe will enter mute mode, and all keypress sounds and alarm sounds will be suppressed.
- To deactivate mute mode, press the '*' button again.
6.4 Кош сигнализация системасы
The safe is equipped with a dual alarm system for enhanced security:
- Туура эмес сырсөз ойготкуч: If three consecutive incorrect passwords are entered, the alarm will sound for 50 seconds, and the keypad will be temporarily disabled. Input the correct password to stop the alarm.
- Дирилдөө сигналы: If the safe experiences violent vibrations or is shaken, the alarm will sound for 50 seconds. Input the correct password to stop the alarm. To activate the vibration alarm mode, short press the '#' button in standby mode.
Video 3: Demonstrates the alarm function of the electronic panel safe, including wrong password and vibration alerts.
7. Монтаждоо боюнча нускамалар
For added security, the safe can be mounted to a wall or floor using the provided expansion screws.
- Choose a suitable location for mounting. Ensure the surface is solid and can support the weight of the safe.
- Open the safe door and locate the pre-drilled holes (4 on the back, 2 on the bottom).
- Position the safe in the desired location and mark the drilling points through the pre-drilled holes.
- Drill pilot holes into the wall or floor at the marked points.
- Сейфти бургуланган тешиктер менен тегиздеңиз.
- Insert the expansion screws through the safe's holes and into the drilled holes.
- Tighten the screws securely to fasten the safe in place.

Figure 7: Shows the pre-drilled mounting holes on the back and bottom of the safe for secure installation.
8. Техникалык тейлөө
- Батареяны алмаштыруу: Replace batteries annually or when the low battery indicator appears. Always use 4 new AA alkaline batteries.
- Тазалоо: Сейфтин сыртын жумшак, d менен тазалаңызamp кездеме. Абразивдүү тазалагычтардан же эриткичтерден качыңыз.
- Ачкыч сактоочу жай: Ensure emergency keys are stored in a safe, separate location from the safe itself.
9. Кыйынчылыктарды
- Баскычтоп жооп бербей жатат: Check battery levels. Replace with new AA alkaline batteries if needed. Use the USB emergency power or emergency key to open.
- Door not opening after correct password: Ensure the knob is rotated clockwise within 5 seconds after entering the password. If the issue persists, use the emergency key.
- Alarm triggers unexpectedly: The alarm activates after three incorrect password attempts or violent vibrations. Enter the correct password to disarm. If the vibration alarm is too sensitive, ensure the safe is on a stable surface and not easily disturbed.
- Lost Emergency Keys/Forgot Password: If you have lost your emergency keys and forgotten your password, contact Riflewell customer service for assistance.
10. Техникалык шарттар
| Өзгөчөлүк | Спецификация |
|---|---|
| Бренд | Riflewell |
| Модель номери | KL-65D-XIN |
| Продукциянын өлчөмдөрү | 13.8"D x 13.81"W x 25.5"H |
| Кубаттуулугу | 6.5 Cubic Feet (Note: Product title indicates 6.0 Cu ft) |
| Кулпу түрү | Электрондук айкалыштырылган кулпу |
| Материал | Төмөн көмүртектүү болот |
| Элемент Салмагы | 39.5 фунт |
| Өзгөчө өзгөчөлүк | Сигнал системасы |
| Монтаж түрү | Туруктуу, үстөл |
11. Кепилдик жана колдоо
Riflewell is committed to providing excellent customer service. Your safe comes with:
- A lifetime warranty.
- 24 саат онлайн кардарларды тейлөө.
- 90-day unconditional returns.
- Lifetime key matching service.
If you encounter any problems with your safe or require assistance, please do not hesitate to contact Riflewell customer service. Our experienced team is ready to respond and resolve your issues within 24 hours.


