1. Киришүү
Thank you for choosing the Leadfan Car Radio. This 10.1-inch HD touchscreen stereo is designed to upgrade your Honda Odyssey (2005-2010) with modern features including Wireless CarPlay, Android Auto, GPS Navigation, Bluetooth, Wi-Fi, Steering Wheel Control (SWC), and Backup Camera support. This manual provides detailed instructions for installation, operation, and maintenance to ensure optimal performance and user experience.
Шайкештик Эскертүү: This unit is not suitable for cars equipped with J.B.L/BO-SE premium audio, OEM cameras, or large screens. Please verify your vehicle's model, year, and center console shape/size before installation.
2. Коопсуздук маалыматы
- Always disconnect the car battery's negative terminal before beginning any electrical installation to prevent short circuits and damage.
- Электрдик коркунучтарды болтурбоо үчүн бардык зымдарды туташтыруу коопсуз жана тийиштүү түрдө изоляциялангандыгын текшериңиз.
- Use appropriate tools for trim removal to prevent damage to your vehicle's interior.
- Do not obstruct any airbags or safety features when routing cables or installing components.
- Эгерде сиз орнотуунун кандайдыр бир кадамдары боюнча күмөн санасаңыз, адиске кайрылыңыз.
- Never operate the device in a way that distracts you from driving. Always prioritize road safety.
3. Пакеттин мазмуну
Пакетиңизде бардык буюмдар бар экенин текшериңиз:
- 10.1 дюймдук унаа стерео блогу
- Электр кабели
- RCA кабели
- USB кабели (x2)
- GPS антеннасы
- Арткы View Кирүү кабели
- Bluetooth антеннасы
- Камера
- Микрофон
- User Manual
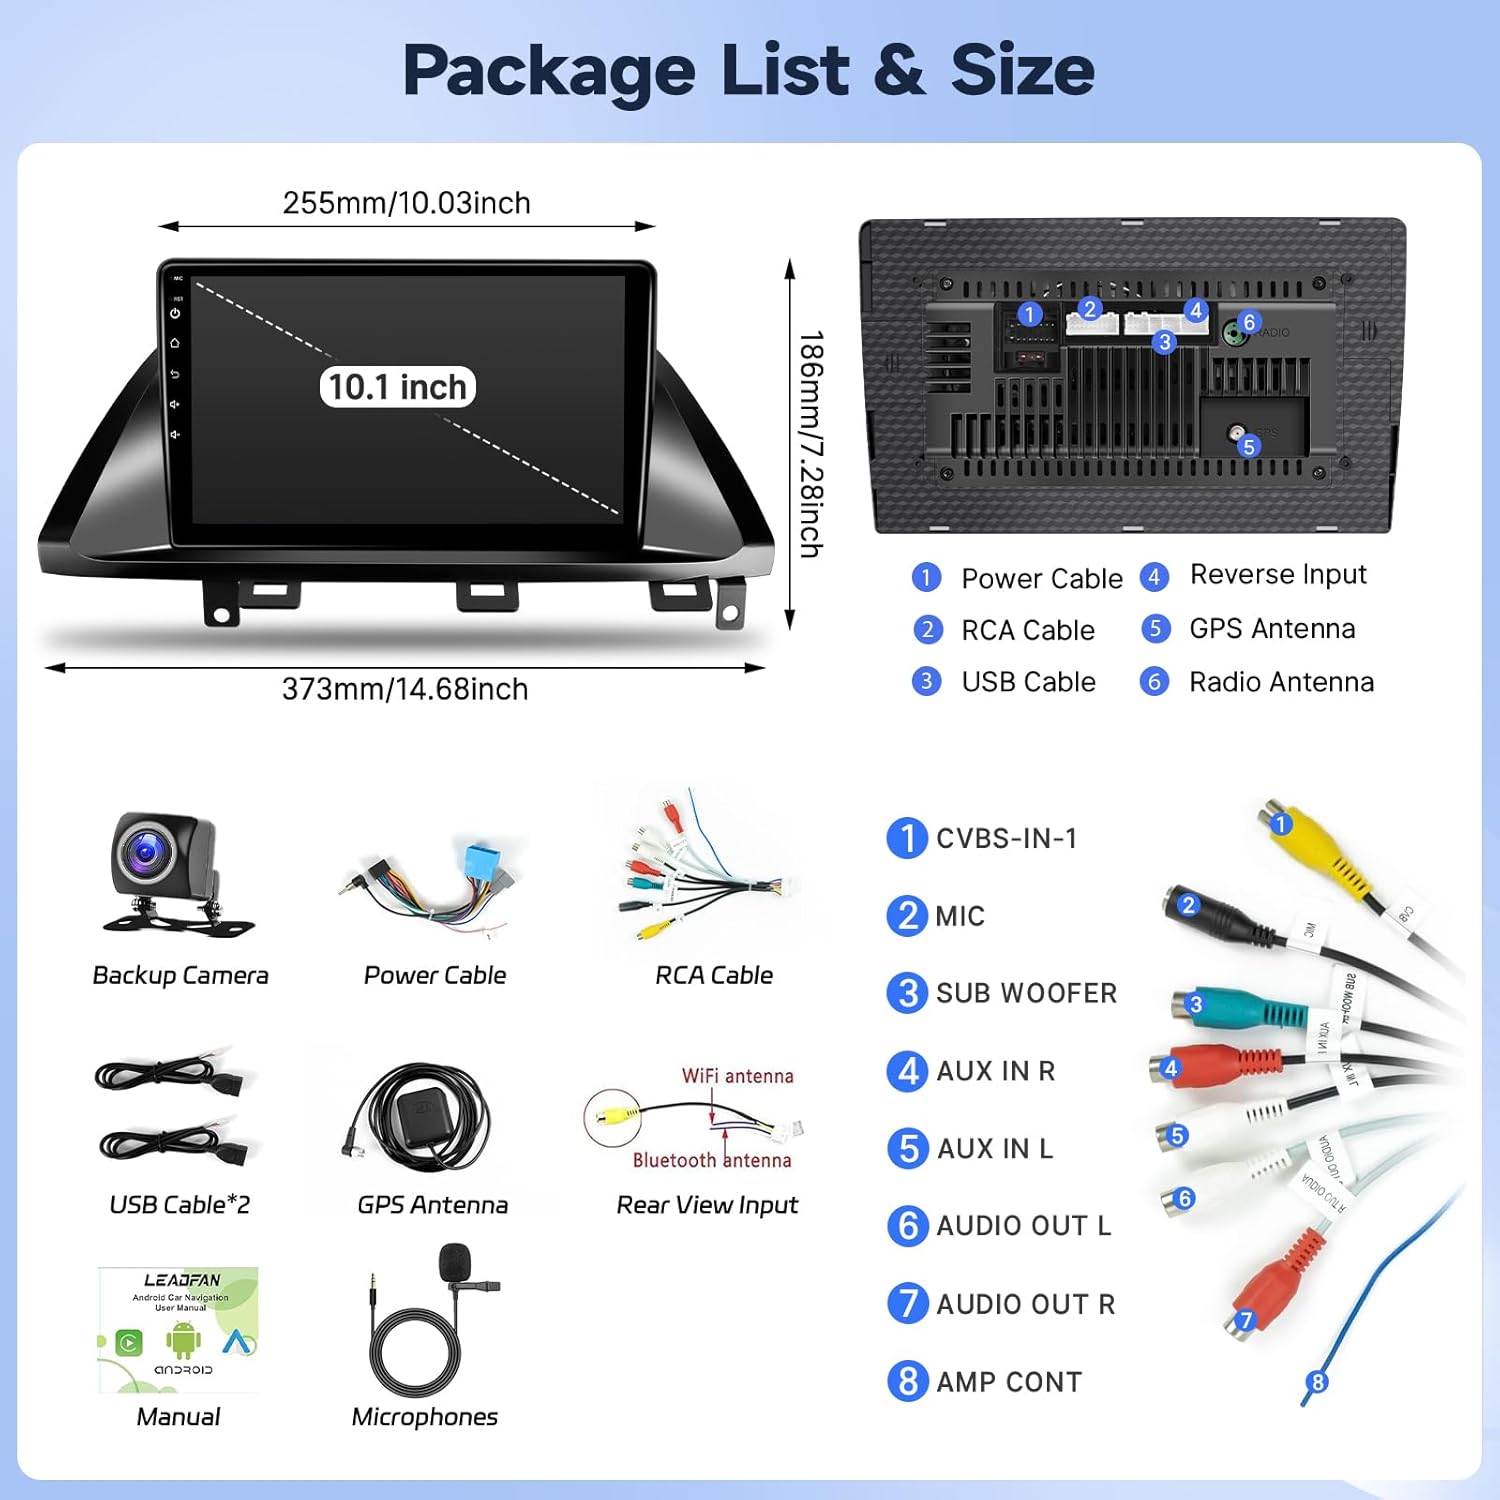
Image: The package includes the 10.1-inch head unit, power cables, RCA cables, USB cables, GPS antenna, rear view input cable, Bluetooth antenna, backup camera, microphone, and user manual. Dimensions of the unit are also shown.
4. Орнотуу боюнча колдонмо
This section provides a step-by-step guide for installing your new car radio. It is recommended to watch the full installation video before starting.
Video: Full installation guide for the car stereo radio compatible with Honda Odyssey 2005-2010. This video demonstrates the complete process from disassembly to final testing.
4.1. Disassembly (Trim Removal)
- Carefully remove the center stack trim using plastic trim removal tools. Start from the driver's side, gently leveraging until the clips release.
- Work your way across to the passenger side, releasing one clip at a time.
- Once the trim is loose, disconnect the light switch, hazard switch, and AC controls by pressing the release tabs on their connectors.
4.2. Disassembly (Radio Removal)
- Remove the Philips screws holding the factory radio unit in place. There are screws on the outside and one deeper down.
- To clear the shifter, pry open the small slot next to the shifter using a small tool or screwdriver. Push down the release mechanism inside the slot.
- With the release mechanism engaged, move the shifter from Park (P) all the way down to '1'. Ensure the parking brake is engaged to prevent the car from moving.
- Carefully pull out the radio unit. Disconnect all electrical connectors from the back of the unit by pressing their release tabs.
4.3. Initial Wiring & Screen Preparation
Before installing the new screen into the dashboard, perform initial wiring on a workbench.
- Refer to the provided wiring diagrams in the user manual.
- Connect the main power harness to the back of the new head unit. Ensure it clicks securely.
- Connect the RCA cluster cable to the corresponding ports on the head unit.
- Plug in the two USB ports and the GPS antenna.
- If using an external microphone, connect it to the designated port.
- Connect the brown "BACK" wire from the main harness to the red wire of the rearview camera cable. This signals the unit to switch to the camera view артка кайтканда.
4.4. Screen Installation & Testing
- Connect the prepared new head unit to the car's original wiring harnesses.
- Turn the car's ignition to the ON position (do not start the engine).
- Test the touchscreen functionality, audio output, and basic app navigation.
- Shift the car into Reverse (R) to test the backup camera display.
- If all functions work correctly, proceed to secure the unit.
4.5. Арткыview Camera Wiring & Routing
To ensure the backup camera functions correctly and cables are neatly hidden:
- Route the long rearview camera cable from the head unit along the driver's side, under the weather strips of the A-pillar and side pillars, towards the rear of the vehicle.
- Ensure the cable does not obstruct any side curtain airbags.
- At the rear, open the tailgate trim panels.
- Locate the license plate lights. Remove one of the light housings.
- Drill a small hole next to the license plate light opening to pass the camera cable through.
- Connect the camera's yellow RCA cable to the main rearview кабель.
- Splice the camera's red power wire to the green wire of the reverse light connector. Use a quick splice connector for a secure connection.
- Mount the camera securely near the license plate light, ensuring a clear view.
- Seal any drilled holes with silicone to prevent water intrusion.
- Бардык трим панелдерин кайра орнотуңуз.
5. Иштөө нускамалары
Video: This video demonstrates the main functions and user interface of the car stereo unit.
5.1. Негизги функциялар
- Сенсордук экран: The 10.1-inch HD touchscreen offers responsive control for all functions.
- Зымсыз CarPlay & Android Auto: Connect your iPhone or Android phone wirelessly to access navigation, music, calls, and other apps directly on the car stereo. Android phones also support wired connection.
- Күзгү шилтемеси: Mirror your smartphone screen to the head unit. Supports wireless connection for iOS and wireless/wired for Android.
- Bluetooth 5.1: Enjoy hands-free calling and audio streaming with clear and stable sound.
- Wi-Fi: Connect to a Wi-Fi hotspot to download apps, stream music, and browse online content.
- GPS навигациясы: Utilize built-in GPS with support for both offline and online maps for convenient navigation.
- FM радиосу: Сүйүктүү радиостанцияларыңызды күүлүңүз.
- EQ Орнотуулары: Customize audio output with various equalizer settings to match your preferences.
- Бөлүнгөн экран: Use two applications simultaneously on the screen for enhanced multitasking.
5.2. Рулду башкаруу элементтери (SWC)
To enable your vehicle's existing steering wheel controls:
- багыттоо Settings > Car Settings > General.
- Тандоо SWC түрү жана тандаңыз Learning Type.
- киргизиңиз SWC Setting Interface.
- On the screen, select a function (e.g., Volume+). The system will prompt you to press the corresponding button on your steering wheel.
- Press and hold the desired steering wheel button until the screen confirms it has learned the function.
- Repeat this process for all desired steering wheel buttons (Volume-, Next, Previous, Mode, etc.).
5.3. Камдык камеранын иштеши
When the vehicle is shifted into reverse gear, the 10.1-inch screen will automatically display the 1080p high-definition rearview camera feed. You can adjust settings for the rearview камера:
- багыттоо Settings > Car Settings > General.
- Которуу Reverse Lines on or off to display or hide the parking guidelines.
- Эгерде арткыview image appears upside down, adjust the Арткы күзгү setting to correct the orientation.
6. Техникалык тейлөө
- Сенсордук экранды жумшак, түксүз чүпүрөк менен таза кармаңыз. Абразивдүү тазалоочу каражаттардан алыс болуңуз.
- Regularly check all wiring connections to ensure they remain secure.
- Keep the unit's software updated to ensure optimal performance and access to the latest features.
- Аппаратты экстремалдык температурага же түз күн нуруна узак убакытка калтыруудан сактаңыз.
7. Кыйынчылыктарды
- Кубат жок: Check battery connections and ensure all power cables are securely plugged into the head unit and vehicle harness. Verify the car's fuse.
- Үн жок: Check speaker connections. Ensure the volume is not muted or set to zero. Verify EQ settings.
- Сенсордук экран жооп бербейт: Try restarting the unit. If the issue persists, perform a factory reset (refer to device settings).
- CarPlay/Android Auto туташпай жатат: Ensure Bluetooth and Wi-Fi are enabled on both the phone and the head unit. For Android Auto, try a wired connection.
- Камдык камера көрүнбөйт: Check the camera's power and video signal connections. Ensure the reverse detection wire is correctly spliced to the reverse light's positive wire.
- Рулдун башкаруу элементтери иштебейт: Ensure SWC wiring is correct. Re-enter the SWC learning interface in settings and re-map the buttons.
8. Техникалык шарттар
| Өзгөчөлүк | Деталь |
|---|---|
| Операция системасы | Android 11 |
| Процессор | 4-өзөктүү |
| Эстутум (RAM + ROM) | 2 ГБ RAM + 32 ГБ ROM |
| Дисплей өлчөмү | 10.1 дюйм |
| Screen Resolution | 1280 x 720 |
| Байланыш | Bluetooth 5.1, USB, Wi-Fi |
| Өзгөчөлүктөр | Android Auto, CarPlay, Touchscreen, GPS Navigation, Split Screen, SWC |
| Карта түрү | Түндүк Америка |
| Аудио чыгаруу режими | Стерео |
| Монтаж түрү | Куралдар тактасы |
| Элемент Салмагы | 3.3 фунт |
| Пакеттин өлчөмдөрү | 16 x 12 x 4 дюйм |
9. Кепилдик жана колдоо
Your Leadfan Car Radio comes with comprehensive support:
- 30 күндүк акысыз кайтаруу: For any issues or dissatisfaction.
- 12 айлык алмаштыруу: For quality issues.
- Өмүр бою техникалык колдоо: Professional assistance available within 24 hours.
Техникалык колдоону кантип алса болот:
- Amazon'догу продукт баракчасына өтүңүз.
- Click on "Sold by Nideo" (or the current seller's name).
- Click "Ask a question" to contact customer service.
- Provide photos or videos of the problem for faster resolution.

Image: Visual guide on how to access technical support through the Amazon seller page.


