1. Киришүү
Сатып алганыңыз үчүн рахматasing the vidaXL Black Oak TV Stand with LED Lights. This manual provides essential information for the safe assembly, operation, and maintenance of your new TV stand. Please read these instructions carefully before beginning assembly and retain them for future reference.

Image 1.1: The vidaXL Black Oak TV Stand with LED Lights in a typical living room setup.
2. Коопсуздук маалыматы
- Чийип калбашы үчүн ар дайым продуктуну жумшак, таза бетке чогултуңуз.
- Ensure all parts are present and undamaged before assembly. Do not proceed if any parts are missing or broken.
- Use only the provided hardware. Substituting parts may compromise the structural integrity of the stand.
- Бурамаларды ашыкча тартпаңыз, анткени бул материалга зыян келтириши мүмкүн.
- Чогуу учурунда муунуп калуу коркунучун болтурбоо үчүн кичинекей бөлүктөрүн балдардан алыс кармаңыз.
- Position the TV stand on a level, stable surface to prevent tipping.
- Do not exceed the maximum weight capacity of the stand. Refer to the 'Specifications' section for details.
- For LED lights, ensure the power supply is compatible with local electrical standards.
3. Пакеттин мазмуну
Before assembly, verify that all components listed below are included in your package. If any items are missing or damaged, please contact customer support.
- TV Cabinet Panels (various sizes)
- Hardware Pack (screws, dowels, hinges, cam locks, etc.)
- LED Strip Lights with Power Adapter
- Көрсөтмө (бул документ)

Сүрөт 3.1: Мисample of TV stand panels, illustrating the material and design elements.
4. Орнотуу жана чогултуу
Assembly is required for this TV stand. It is recommended that two adults perform the assembly. Please follow the steps carefully.
4.1. Керектүү куралдар
- Филлипс баш бурагычы
- Балка (милдеттүү эмес, дюбель үчүн)
4.2. Чогултуу кадамдары
- Бөлүктөрдү таңгактан чыгаруу жана аныктоо: Carefully unpack all components and lay them out on a clean, soft surface. Refer to the parts list in your hardware pack to identify each piece.
- Негизги структураны чогултуу: Begin by connecting the side panels to the bottom panel using the provided dowels and cam locks. Ensure the cam locks are securely tightened.
- Install Internal Dividers and Shelves: Insert the internal divider panels and shelves into their designated slots. Secure them with cam locks or screws as indicated in the detailed assembly diagram.
- Арткы панелди тиркөө: Carefully align and attach the back panel to the assembled structure. Use the small nails or screws provided to secure it. Ensure any cable management cutouts are correctly positioned.
- Mount Door Hinges: Attach the hinges to the doors and the corresponding cabinet sections using the provided screws. Adjust hinges as necessary for proper door alignment.
- Эшиктерди орнотуу: Mount the doors onto the hinges. Test the doors to ensure they open and close smoothly.
- Attach LED Strip Lights: Carefully adhere the LED strip lights into the designated groove within the open compartment. Ensure the strip is clean and dry before application.
- LED кубатын туташтырыңыз: Connect the LED strip to the power adapter and plug it into a suitable power outlet.

Сүрөт 4.1: Интерьер view of the TV stand, illustrating storage and hinge placement.
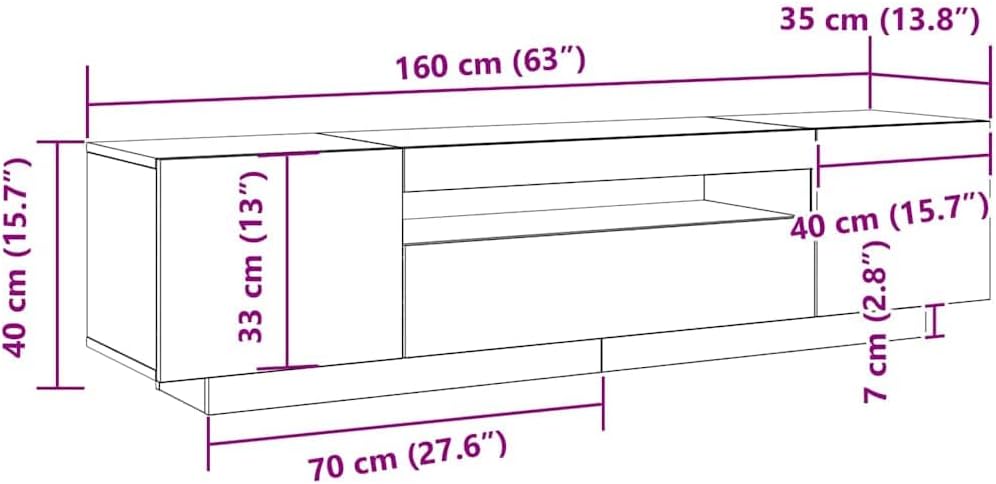
Image 4.2: Dimensional diagram of the TV stand for planning placement.
5. Колдонуу боюнча нускамалар (LED чырактары)
The integrated LED strip lights provide ambient lighting for your living space.
- Күйгүзүү/өчүрүү: Plug the LED power adapter into a wall outlet to turn on the lights. Unplug to turn off.
- Түс өзгөртүү: If your LED strip includes a remote control (sold separately or included depending on package), use it to cycle through available colors and lighting modes.

Image 5.1: The TV stand with its LED lights activated.
6. Техникалык тейлөө
Сыналгы стендиңиздин узак мөөнөттүү жана сырткы көрүнүшүн камсыз кылуу үчүн, төмөнкү тейлөө көрсөтмөлөрүн аткарыңыз:
- Тазалоо: Беттерди жумшак менен сүртүңүз, гamp кездеме. Абразивдүү тазалагычтардан же катаал химиялык заттардан алыс болуңуз, бул финишке зыян келтирет.
- Чаңдандыруу: Дайыма чаңды кургак, жумшак чүпүрөк менен сүртүп туруңуз.
- Төгүлүүлөр: Так калбашы же жыгачтын капталына зыян келтирбеши үчүн төгүлгөн нерселерди дароо тазалаңыз.
- LED жарыктары: Ensure the LED strip and power adapter are kept dry. Do not attempt to repair damaged LED strips; contact customer support for replacement.
- Аппараттык камсыздоо: Мезгил-мезгили менен бардык бурамалар менен арматураларды текшерип туруңуз, алар бекем бойдон калууда. Керек болсо кайра тартыңыз.
7. Кыйынчылыктарды
| Көйгөй | Мүмкүн себеп | Чечим |
|---|---|---|
| Стенд титиреп турат | Бошогон бурамалар же тегиз эмес пол. | Check and tighten all assembly screws. Ensure the stand is on a level surface. Use furniture pads if needed. |
| Эшиктер туура тегиз эмес | Илниктер туура туураланган эмес. | Adjust the screws on the hinges to align the doors. Refer to the hinge manufacturer's instructions if available. |
| LED жарыктары күйбөйт | Power adapter unplugged, faulty outlet, or damaged LED strip. | Ensure the power adapter is securely plugged into a working outlet. Test the outlet with another device. If the issue persists, contact customer support. |
8. Техникалык шарттар
- Бренд: vidaXL
- Модель номери: 861103
- Продукциянын өлчөмдөрү (L x W x Y): 62.99 x 13.78 x 15.75 дюйм (160 x 35 x 40 см)
- Элемент Салмагы: Болжол менен 65.7 фунт (29.86 килограмм)
- Материал: Engineered wood with matte black oak finish
- Ассамблея талап кылынат: Ооба
- Жарыктандыруу: Integrated LED strip lights
9. Кепилдик жана колдоо
vidaXL products are manufactured with quality and durability in mind. For specific warranty details, please refer to the warranty card included with your purchase or visit the official vidaXL website. If you encounter any issues or require assistance, please contact vidaXL customer support through their official channels.
Байланыш маалыматы: Please refer to the contact details provided on the vidaXL webсайт же сатып алуу документтери.


