1. Киришүү
This manual provides detailed instructions for the safe and effective operation of your TOOLTOP ET120M 120MHz Handheld Digital Oscilloscope. Please read this manual thoroughly before using the device to ensure proper functionality and to prevent damage.
2. Коопсуздук маалыматы
Always observe the following safety precautions when using the ET120M oscilloscope:
- Аппаратты нымдуу жерде иштетпеңиз же damp шарттар.
- Зонддорду туташтыруудан же ажыратуудан мурун, түзмөктүн өчүрүлгөнүн текшериңиз.
- Берилген аксессуарларды же бекитилген алмаштыруучуларды гана колдонуңуз.
- Do not attempt to open or modify the device; refer all servicing to qualified personnel.
- Аппаратты күчтүү электромагниттик талаалардан алыс кармаңыз.
3. Пакеттин мазмуну
Төмөндө тизмеленген нерселердин баары пакетиңизде бар экенин текшериңиз:
- TOOLTOP ET120M Handheld Digital Oscilloscope
- 100MHz Oscilloscope Probe
- USB заряддоо кабели
- User Manual
- Кездеме сумка

3.1-сүрөт: Пакеттин мазмуну
4. Продукт бүтүп калдыview
4.1. Түзмөктүн өзгөчөлүктөрү
The TOOLTOP ET120M is a compact and portable handheld digital oscilloscope designed for various electrical testing and repair applications. Key features include:
- 120MHz analog bandwidth and 500MS/s real-time sampылдамдыгы.
- 2.4-inch 320x240 clear color LCD screen.
- Integrated square wave signal output (1kHz, 10KHz, 100KHz, 1MHz).
- 12 types of automatic parameter measurements (Vpp, Vrms, Vavg, Vp, Vmax, Vmin, F, T, T+, T-, Du+, Du-).
- Three scan modes: Auto, Normal, and Single.
- Ability to store 2500 DSO waveforms with thumbnail browsing.
- Built-in rechargeable lithium battery for up to 6 hours of continuous use.
- Durable design with a silicone protective cover.

4.1-сүрөт: Негизги өзгөчөлүктөр бүттүview
4.2. Компонентти идентификациялоо
Familiarize yourself with the main components and controls of the ET120M oscilloscope:

Сүрөт 4.2: Алдыңкы View of ET120M Oscilloscope
- Дисплей экраны: 2.4-inch LCD for waveform display and menu navigation.
- Input BNC Connector: For connecting the oscilloscope probe.
- Башкаруу баскычтары: Including MENU, F1, F2, SAVE, AC/DC, 1X/10X, 50%, TRIG, EDGE, STOP, AUTO, and directional/OK buttons for navigation and settings adjustment.
- USB порт: Аппаратты заряддоо үчүн.
5. Орнотуу
5.1. Баштапкы заряддоо
Before first use, fully charge the built-in lithium battery using the provided USB charging cable and a standard USB power adapter (not included). The charging indicator will show the charging status.
5.2. Зонд байланышы
Connect the oscilloscope probe to the BNC input connector on the top of the device. Ensure the connection is secure. Set the probe attenuation switch (if applicable) to the desired setting (e.g., 1X or 10X) and match this setting on the oscilloscope via the 1X/10X button.
6. Иштөө нускамалары
6.1. Күйгүзүү/өчүрүү
Press and hold the power button (usually located on the side or top) to turn the device on or off.
6.2. Basic Waveform Acquisition
After powering on, connect the probe to the circuit under test. The oscilloscope will display the waveform. Use the directional buttons to navigate menus and adjust settings.
6.3. Waveform Acquisition Modes
ET120M үч сканерлөө режимин колдойт:
- Авто: Automatically adjusts time base and vertical amplitude for a stable waveform display. Press the АВТО button for one-key waveform adaptation.
- Кадимки: Displays a waveform only when a trigger condition is met.
- Бойдок: Captures and displays a single waveform when a trigger condition is met, then stops.

Figure 6.1: Auto Waveform Adaptation
6.4. Parameter Measurement
The device can automatically measure 12 different waveform parameters. Access these measurements through the menu system. Parameters include Peak-to-Peak Voltage (Vpp), Root Mean Square Voltage (Vrms), Average Voltage (Vavg), Peak Voltage (Vp), Maximum Voltage (Vmax), Minimum Voltage (Vmin), Frequency (F), Period (T), Positive Pulse Width (T+), Negative Pulse Width (T-), Positive Duty Cycle (Du+), and Negative Duty Cycle (Du-).
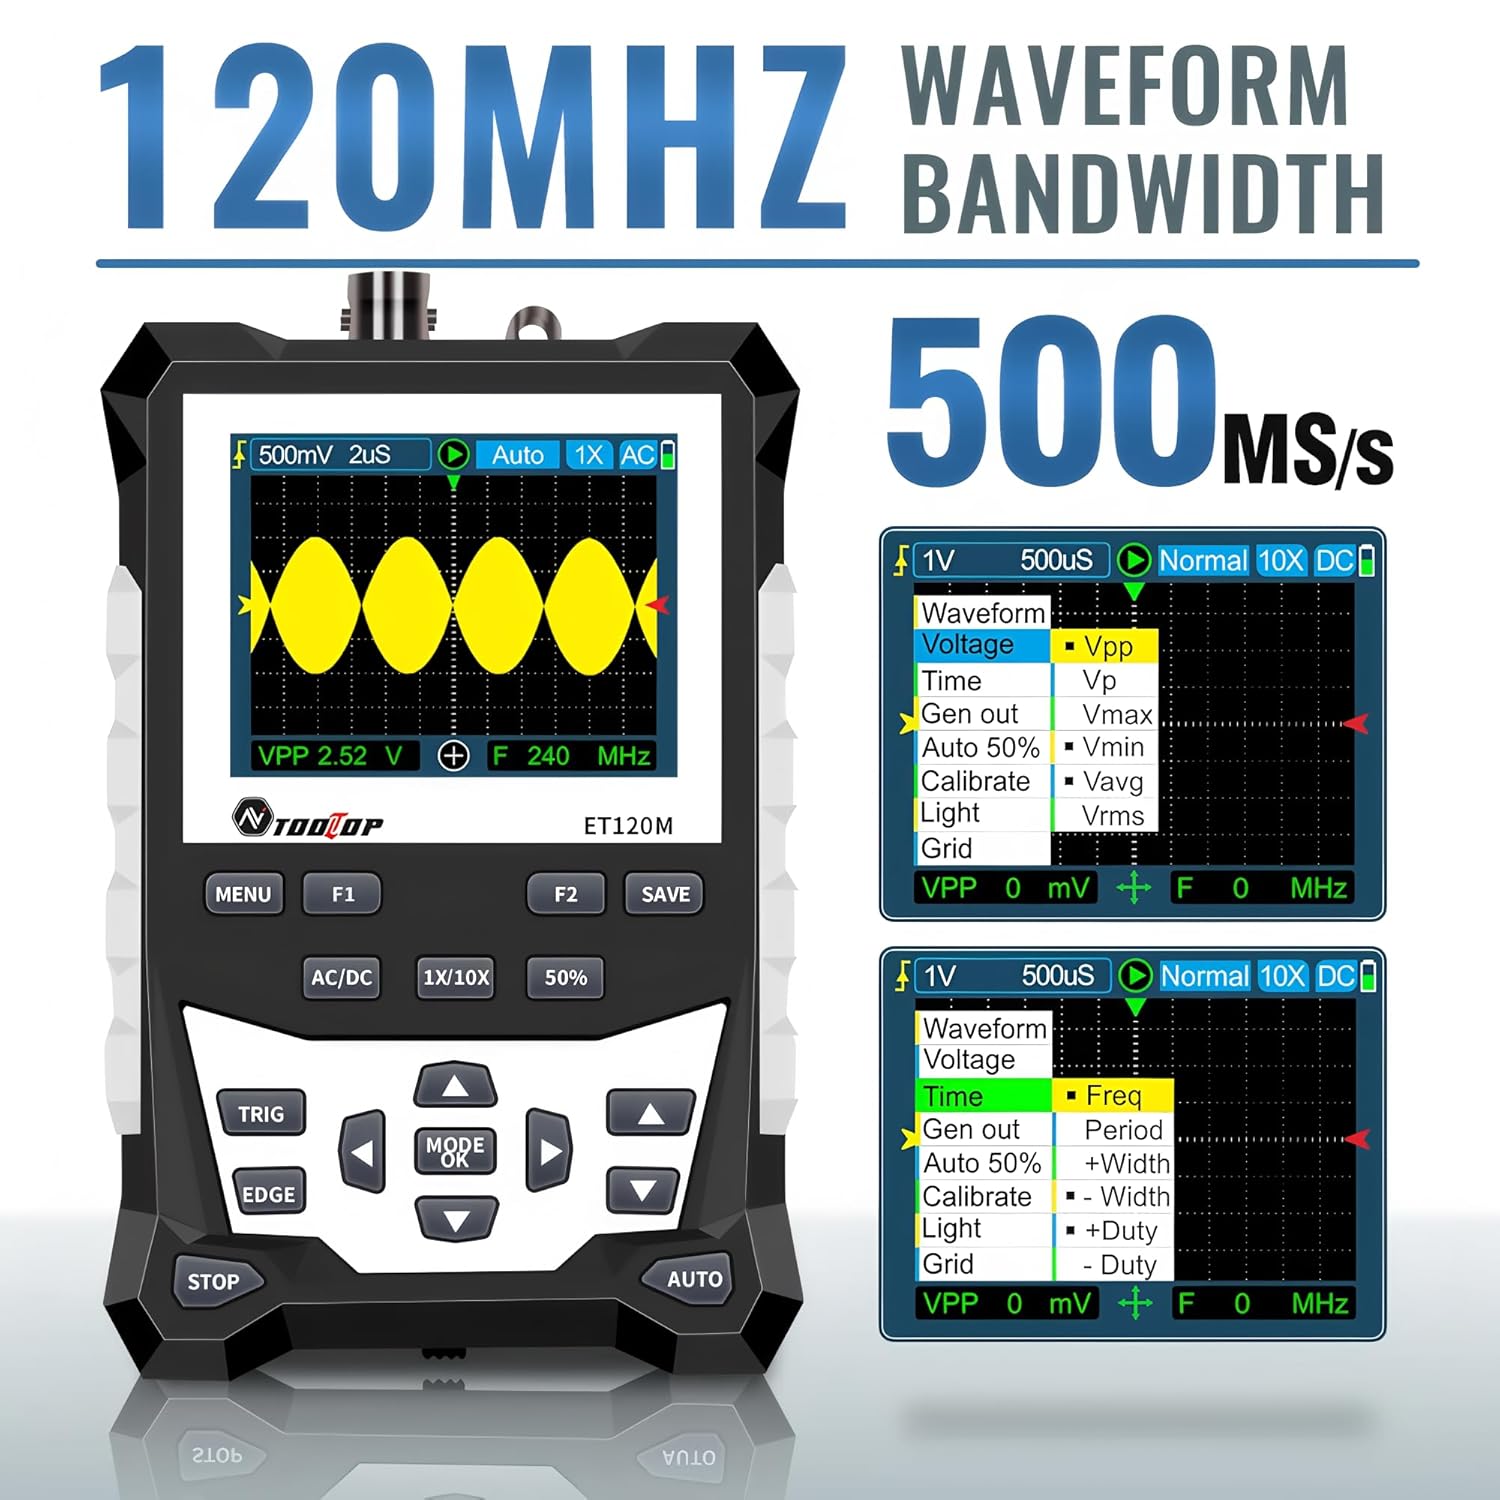
Figure 6.2: Automatic Measurement Functions
6.5. Square Wave Signal Output
The ET120M can generate square wave signals at specific frequencies. Navigate to the signal output function in the menu to select between 1kHz, 10KHz, 100KHz, and 1MHz output frequencies. This feature is useful for testing circuits.

Figure 6.3: Square Wave Signal Output Function
6.6. Waveform Storage and Recall
The device can store up to 2500 DSO waveforms. Use the САКТОО button to store the current waveform. Stored waveforms can be browsed via thumbnails for easy recall and analysis.

Figure 6.4: Waveform Storage and Browsing
6.7. Adjusting Waveform Parameters
You can manually adjust various waveform display parameters to fine-tune your measurements:
- Убакыт базасы: Adjusts the horizontal scale (time per division).
- Amplitude (Vertical Sensitivity): Adjusts the vertical scale (volts per division).
- Триггер эңкейиши: Sets the trigger to rising or falling edge.
- Триггер деңгээли: Көлөмдү коётtage level at which the waveform is triggered.

Figure 6.5: Adjusting Waveform Display Parameters
7. Техникалык тейлөө
7.1. Тазалоо
Түзмөктү тазалоо үчүн жумшак, кургак чүпүрөктү колдонуңуз. Өтө кир болсо, бир аз сүртүңүз.amp Аппараттын ичине суюктуктун кирбешин камсыз кылуу үчүн жумшак жуугуч каражаты бар чүпүрөктү колдонсо болот. Абразивдүү тазалоочу каражаттарды же эриткичтерди колдонбоңуз.
7.2. Сактоо
When not in use for extended periods, store the oscilloscope in a cool, dry place, away from direct sunlight and extreme temperatures. It is recommended to store it in the provided cloth bag to protect it from dust and scratches.
7.3. Батареяга кам көрүү
To prolong battery life, avoid fully discharging the battery frequently. If storing for a long time, charge the battery to approximately 50% every few months.
8. Кыйынчылыктарды
If you encounter issues with your ET120M oscilloscope, refer to the following common problems and solutions:
- Түзмөк күйбөйт: Ensure the battery is charged. Connect the USB charging cable and try again.
- Эч кандай толкун формасы көрсөтүлгөн жок: Check probe connection. Ensure the probe is properly connected to the circuit under test. Adjust vertical sensitivity and time base settings. Try the AUTO function.
- Туруксуз толкун формасы: Adjust the trigger level and trigger slope. Ensure the trigger mode is appropriate for the signal.
- Туура эмес өлчөөлөр: Verify probe attenuation setting (1X/10X) matches the device setting. Perform a probe compensation if necessary (refer to advanced operation in a full manual).
For persistent issues, contact TOOLTOP customer support.
9. Техникалык шарттар
9.1. Жалпы спецификациялар
| Дисплей | 320x240 LCD screen |
| Дисплей аймагы | 50мм x 40мм |
| Арткы жарык | White, brightness adjustable |
| Импеданс | x1: 1MΩ / x10: 10MΩ |
| Батарея | 18650 lithium battery (built-in) |
| Автоматтык өчүрүү | 15 мүнөт операция жок |
| Толкун формасын сактоо | 2500 DSO толкун формалары |
| Өлчөмү | 124мм x 80мм x 35мм |
| Иштөө шарттары | 0°C ~ +40°C; <75%RH |
| Сактоо шарттары | -10°C ~ +60°C; <90%RH |
9.2. Осциллографтын спецификациялары
| Аналогдук өткөрүү жөндөмдүүлүгү | 120 МГц |
| Максималдуу реалдуу убакыт Sampling Rate | 500MSps |
| Vertical Resolution | 8 бит |
| Vertical Accuracy | ± (5% + 0.2 див) |
| Auto Zero Reference | DC өлчөө учурунда |
| Триггер деңгээли | ±3.8div (ар бир кадам үчүн 0.1div) |
| Trigger Position | ±6div (ар бир кадам үчүн 0.1div) |
| Курсор функциясы | ΔV, Δt, 1/Δt |
| Сызыктуу эместик | ±1 бит |
| Кошуу ыкмасы | DC/AC |
| Division Vertical | ±3.8 Horizontal: 12 |
| Убакыт базалык диапазону | 6ns / div ~ 50s / div |
| Убакыт базасынын тактыгы | ±(0.01%+0.1бөлүм) |
| сканерлөө абалы | Auto/Single/Normal |
| Trigger Slope | Көтөрүү / түшүү |
| Record Length | 12div |
| Авто Конфигурация | Automatically set time base and vertical ampжарыктык |
| Автоматтык өлчөө функциялары | Vpp, Vrms, Vavg, Vp, Vmax, Vmin, F, T, T+, T-, Du+, Du- |
| Вертикалдык сезгичтик диапазону | x1: 50mV/div ~ 10V/div; x10: 500mV/div ~ 100V/div |
10. Кепилдик жана колдоо
For warranty information or technical support, please refer to the documentation provided with your purchase or contact TOOLTOP customer service directly. Keep your purchase receipt as proof of purchase.


