Introduction
Сатып алганыңыз үчүн рахматasing the Argon Audio TT MK2 Turntable. This manual provides essential information for the safe and optimal operation, setup, and maintenance of your new turntable. Please read this manual thoroughly before using the product and retain it for future reference.
The Argon Audio TT MK2 is designed to deliver high-fidelity audio playback from your vinyl records, featuring a built-in phono pre-amplifier, an Audio Technica AT3600 cartridge, and dual-speed control for 33 and 45 RPM records.
Маанилүү коопсуздук нускамалары
Электр тогуна урунуу, өрт чыгуу же шаймандын бузулуу коркунучун азайтуу үчүн төмөнкү коопсуздук чараларын сактаңыз:
- Бул шайманды жамгырга же нымга тийгизбеңиз.
- Ваза сыяктуу суюктуктар толтурулган нерселерди шаймандын үстүнө койбоңуз.
- Эч кандай желдетүүчү тешиктерди жаап албаңыз. Өндүрүүчүнүн көрсөтмөлөрүнө ылайык орнотуу.
- Радиаторлор, жылуулук регистрлери, мештер же башка аппараттар (анын ичинде) сыяктуу жылуулук булактарынын жанына орнотпоңуз ampкөтөргүчтөр) жылуулукту пайда кылуучу.
- Электр зымын басып же кысылып калуудан, айрыкча, сайгычтардан, ыңгайлуу идиштерден жана шаймандан чыккан жеринен сактаңыз.
- Өндүрүүчү тарабынан көрсөтүлгөн тиркемелерди/аксессуарларды гана колдонуңуз.
- Чагылган бороондо же узак убакыт бою колдонбогондо бул шайманды розеткадан ажыратыңыз.
- Бардык тейлөөлөрдү квалификациялуу тейлөө кызматкерлерине тапшырыңыз. Аппарат кандайдыр бир зыянга учураганда, мисалы, кубат берүүчү шнур же сайгыч бузулганда, суюктук төгүлгөндө же аппараттын ичине нерселер түшкөндө, аппарат жамгырга же нымдуулукка дуушар болгондо, нормалдуу иштебей калганда тейлөө талап кылынат. , же түшүрүлгөн.
Кутуда эмне бар
Carefully unpack all components and ensure all items are present before discarding packaging materials:
- Argon Audio TT MK2 Turntable Unit
- Audio Technica AT3600 Cartridge (pre-mounted)
- Dust Lid
- RCA кабели
- Кубаттуу адаптер
- Каршы салмак
- Конькиге каршы салмак
- Platter and Drive Belt
- Fet Mat

Image: The Argon Audio TT MK2 Turntable with its clear dust cover in place, showcasing its sleek black finish.
Орнотуу колдонмосу
1. Жайгаштыруу
Place the turntable on a stable, level surface away from direct sunlight, heat sources, and strong vibrations. Ensure there is enough space around the unit for ventilation and operation.
2. Табакты жана курду орнотуу
- Carefully place the metal platter onto the spindle.
- Locate the drive belt. Gently stretch the belt around the inner rim of the platter and hook it onto the motor pulley. Ensure the belt is not twisted.
- Табактын үстүнө кийиз килемди коюңуз.

Image: The Argon Audio TT MK2 Turntable with its dust cover removed, showing the platter and tonearm assembly.
3. Cartridge and Tonearm Setup
The Audio Technica AT3600 cartridge comes pre-mounted on the tonearm. Follow these steps to balance the tonearm and set the tracking force:
- Картриджден стилус коргоочусун алып салыңыз.
- Gently release the tonearm from its rest.
- Rotate the counterweight at the rear of the tonearm until the tonearm floats freely and is perfectly balanced horizontally.
- Once balanced, hold the counterweight steady and rotate the numbered ring on the front of the counterweight to "0".
- Rotate the entire counterweight (including the numbered ring) counter-clockwise until the desired tracking force is set. For the AT3600 cartridge, the recommended tracking force is typically 3.5 grams.

Сүрөт: жакын план view of the tonearm's counterweight and anti-skate mechanism, showing the numerical scale for adjustment.
4. Конькиге каршы жөнгө салуу
Attach the anti-skate weight to the small loop on the tonearm and hang it over the second groove of the anti-skate support rod. This helps prevent the stylus from skipping inwards.
5. Аудио системага туташуу
The TT MK2 features a built-in phono pre-amplifier, allowing direct connection to powered speakers or an amplifier's line-level input. If your amplifier has a dedicated "Phono" input, you can bypass the internal pre-amp.
- Connect the supplied RCA cable from the "RCA OUT" jacks on the rear of the turntable to the corresponding input on your amplifier or powered speakers (e.g., "AUX", "LINE IN").
- Locate the "RIAA" switch on the rear of the turntable.
- Set the switch to "ON" if connecting to a line-level input (e.g., AUX, CD) on your amplifier or directly to powered speakers. This activates the internal phono pre-ampөмүрлүү.
- Set the switch to "OFF" if connecting to a dedicated "Phono" input on your amplifier. This bypasses the internal phono pre-amplifier, as your amplifier will provide the necessary RIAA equalization.

Image: The rear panel of the Argon Audio TT MK2 Turntable, showing the RCA output jacks, the RIAA (Phono/Line) switch, and the DC 12V power input.
6. Power Connection
Connect the supplied power adapter to the "DC IN 12V" port on the rear of the turntable, then plug the adapter into a wall outlet.
Иштөө нускамалары
1. Күйгүзүү / Өчүрүү
Use the power switch located on the rear panel to turn the turntable ON or OFF.
2. Ойнотуу ылдамдыгын тандоо
The TT MK2 supports two playback speeds: 33 1/3 RPM for LPs and 45 RPM for singles. Use the speed selection knob on the top right of the turntable to switch between "33" and "45".
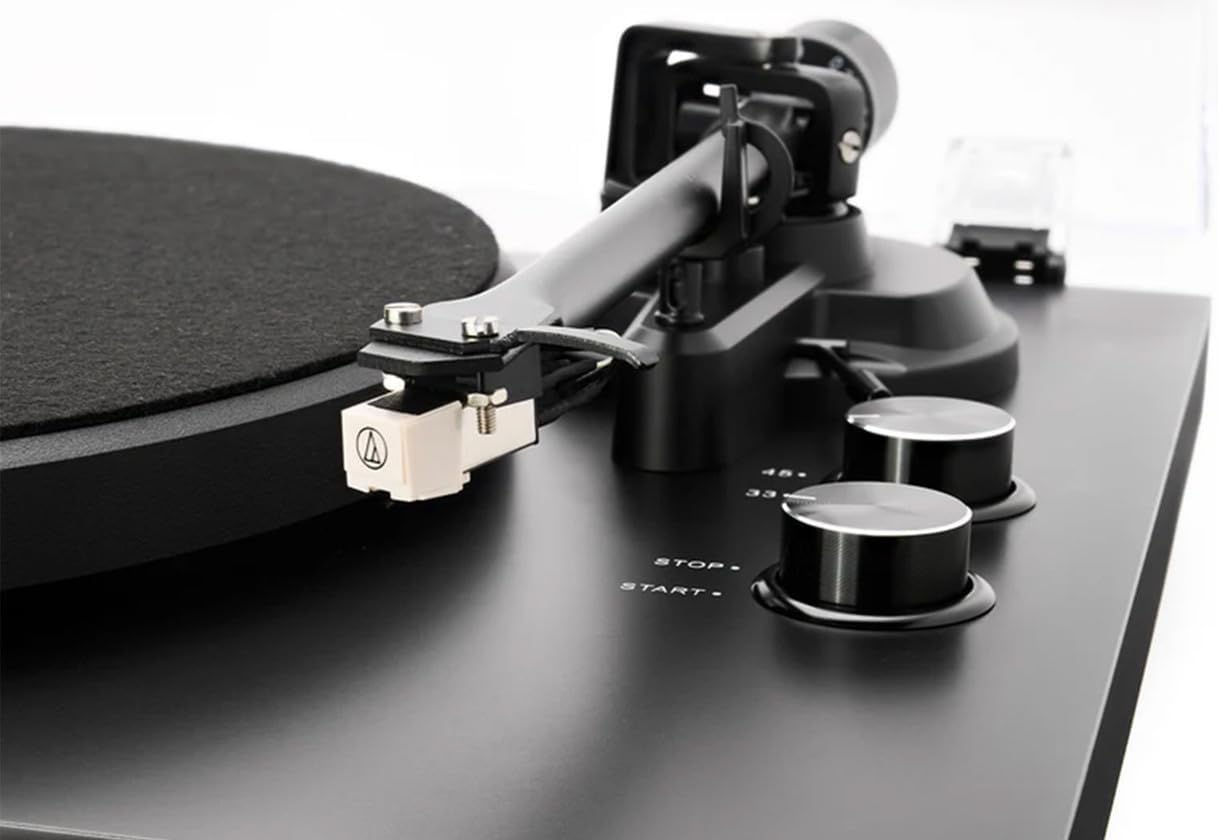
Image: A close-up of the Audio Technica AT3600 cartridge mounted on the tonearm, alongside the "STOP" and "START" buttons and the 33/45 RPM speed selection knob.
3. Жазууну ойнотуу
- Place a record on the platter, ensuring it is centered.
- Select the correct speed (33 or 45 RPM) using the speed knob.
- Press the "START" button. The platter will begin to rotate.
- Коюу рычагын колдонуп, колду акырын көтөрүңүз.
- Тонеармды жазуунун каалаган баштапкы оюкчасынын үстүнө жайгаштырыңыз.
- Стилусту пластинкага акырын түшүрүү үчүн кюинг рычагын акырын түшүрүңүз.
4. Ойноону токтотуу
- At the end of a record, the tonearm will not automatically return. Gently lift the tonearm using the cueing lever.
- Return the tonearm to its rest and secure it with the tonearm clip.
- Press the "STOP" button to halt platter rotation.
- Carefully remove the record.
Техникалык тейлөө
1. Cleaning the Stylus
The stylus (needle) should be cleaned regularly to ensure optimal sound quality and prevent damage to your records. Use a soft brush designed for stylus cleaning, brushing gently from back to front (away from the cantilever).
2. Cleaning Records
Always handle records by their edges. Use a carbon fiber brush or a dedicated record cleaning solution and cloth to remove dust and debris before each play.
3. Айлануучу табакты тазалоо
Wipe the turntable chassis and dust cover with a soft, dry, lint-free cloth. For stubborn marks, a slightly damp кездемени, андан кийин кургак чүпүрөктү колдонсо болот. Катуу химиялык заттарды же абразивдүү тазалоочу каражаттарды колдонуудан алыс болуңуз.
4. Чаң капкагын кам көрүү
The dust cover protects your turntable from dust. When not in use, keep the dust cover closed. Clean it gently with a soft, damp cloth to avoid scratching the acrylic surface.
Проблемаларды чечүү
If you experience issues with your Argon Audio TT MK2 Turntable, please consult the following table before contacting support:
| Көйгөй | Мүмкүн себеп | Чечим |
|---|---|---|
| Үн жок же өтө төмөн |
|
|
| Distorted or muffled sound |
|
|
| Тарелка айланбай жатат |
|
|
| Speed issues (too fast/slow) |
|
|
Техникалык шарттар
| Өзгөчөлүк | Деталь |
|---|---|
| Модель аты | TT MK2 |
| Бренд | Аргон аудио |
| Өлчөмдөрү (W x D x H) | 42 x 35 x 12 см |
| Элемент Салмагы | 4.5 кг |
| Материал | Engineered Wood, Aluminium |
| Түс | Кара |
| Картридж | Audio Technica AT3600 (pre-fitted) |
| Фоно алдын алаamp | Built-in, switchable (RIAA ON/OFF) |
| Айлануу ылдамдыктары | 33 1/3 RPM, 45 RPM (electronic speed selection) |
| Байланыш | RCA чыгаруу |
| Камтылган компоненттер | Turntable, Audio Technica AT3600 Cartridge, Dust Lid, RCA Cable, Power Adapter |
| Өндүрүүчү | Аргон аудио |
| Келип чыккан өлкө | Дания |
Кепилдик жана колдоо
Argon Audio products are designed and manufactured to the highest quality standards. This product is covered by a manufacturer's warranty. Please refer to the warranty card included with your product or visit the official Argon Audio webдеталдуу кепилдик шарттары жана шарттары үчүн сайт.
For technical support, troubleshooting assistance beyond this manual, or warranty claims, please contact your authorized Argon Audio dealer or Argon Audio customer service directly. Contact information can typically be found on the Argon Audio webсайт.


