1. Киришүү
This manual provides essential instructions for the safe and efficient operation of your Gevi 10-Cup Drip Coffee Maker with Built-in Burr Grinder. Please read all instructions carefully before first use and retain for future reference.
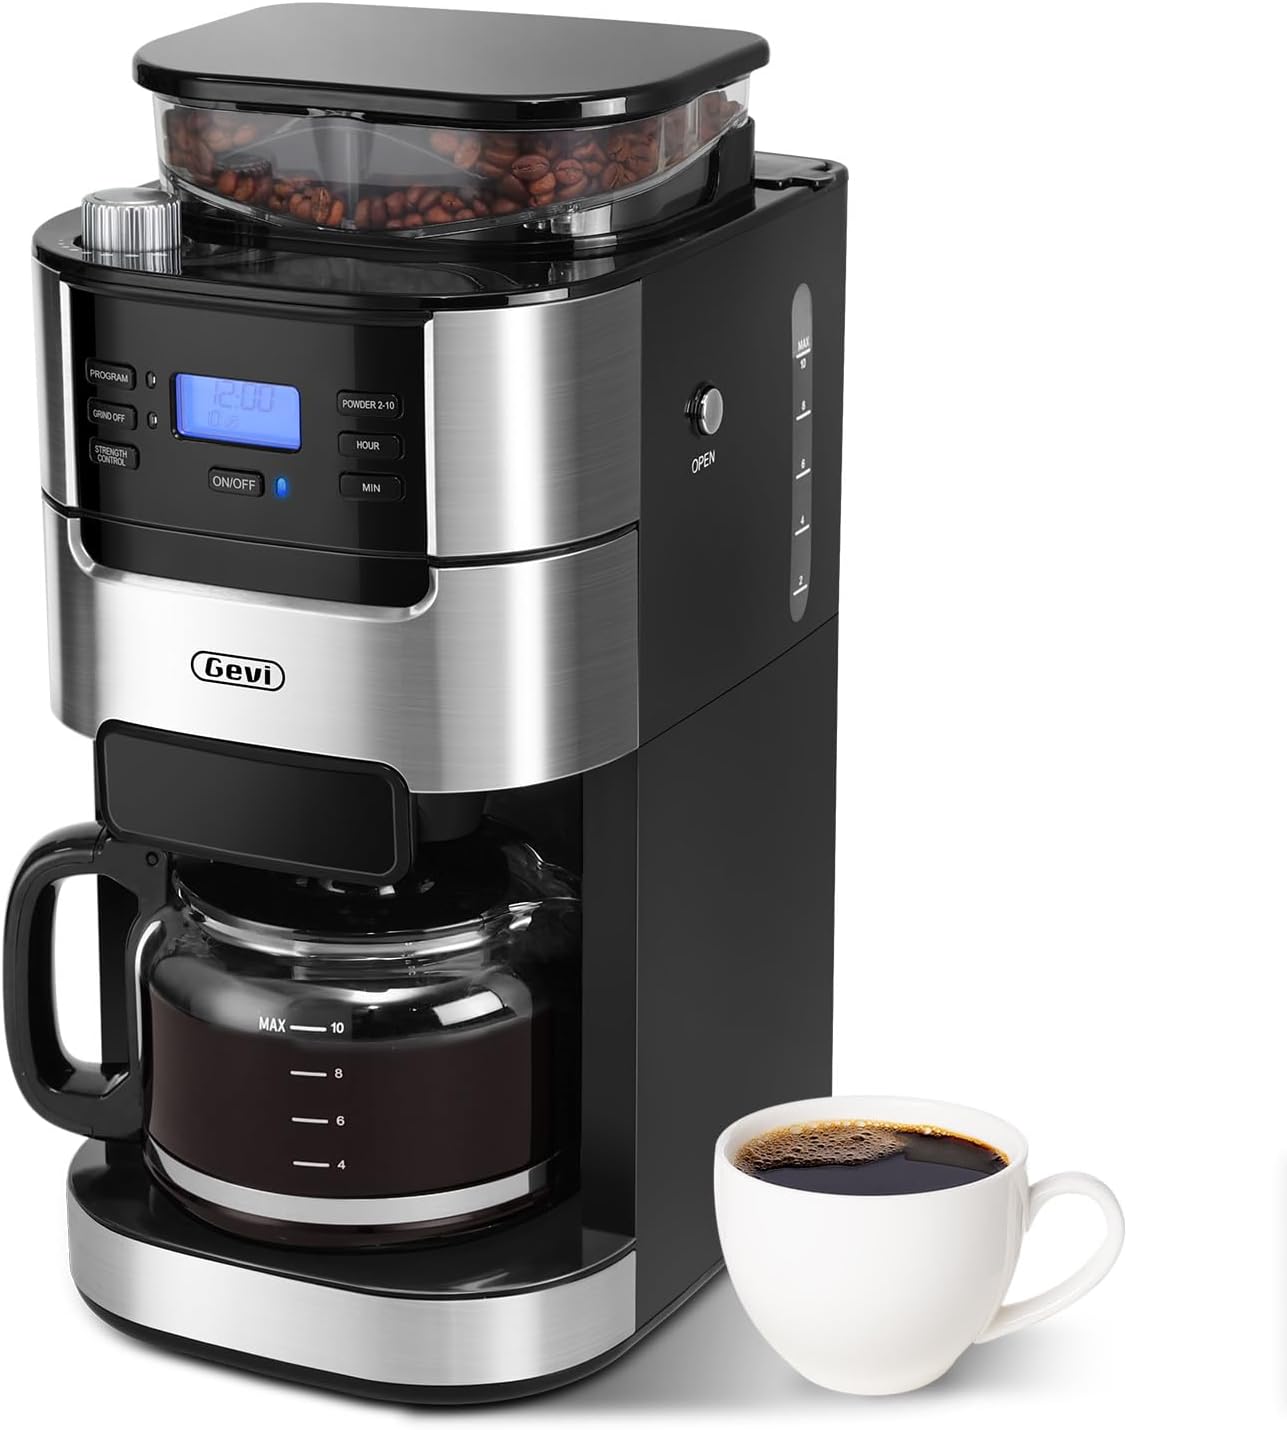
Image 1: Gevi 10-Cup Drip Coffee Maker, front view with a cup of coffee.
2. Маанилүү коопсуздук нускамалары
Электр шаймандарын колдонууда өрт, электр тогуна урунуу жана/же адамдардын жаракат алуу коркунучун азайтуу үчүн негизги коопсуздук чараларын дайыма сактоо керек, анын ичинде төмөнкүлөр:
- Бардык нускамаларды окуңуз.
- ысык беттерге тийбеңиз. Туткаларды же туткаларды колдонуңуз.
- Өрттөн, электр тогунун соккусунан жана адамдардын жаракат алуусунан коргоо үчүн шнурду, вилкаларды же шайманды сууга же башка суюктукка салбаңыз.
- Кандайдыр бир шайманды балдар же алардын жанында колдонуп жатканда, катуу көзөмөл керек.
- Колдонбогондо жана тазалоодон мурун розеткадан ажыратыңыз. Тетиктерди кийүүдөн же чечүүдөн мурун жана шайманды тазалоодон мурун муздатыңыз.
- Эч бир шайманды зымы же сайы бузулган же шайман иштебей калгандан кийин же кандайдыр бир түрдө бузулгандан кийин иштетпеңиз. Текшерүү, оңдоо же тууралоо үчүн шайманды жакынкы ыйгарым укуктуу тейлөө мекемесине кайтарыңыз.
- Шаймандын өндүрүүчүсү сунуш кылбаган кошумча тиркемелерди колдонуу өрткө, электр шокуна же адамдардын жаракат алышына алып келиши мүмкүн.
- Сыртта колдонбоңуз.
- Шнур столдун же столдун четине илинип калышына же ысык беттерге тийбеңиз.
- Ыстык газ же электр мешине же ысытылган мештин жанына коюуга болбойт.
- Ар дайым алгач сайгычка сайыңыз, андан кийин шнурду розеткага сайыңыз. Өчүрүү үчүн каалаган башкарууну "өчүрүү" абалына буруңуз, андан кийин розеткадан сайгычты чыгарыңыз.
- Шайманды максаттуу колдонуудан башка максатта колдонбоңуз.
- Капкак кайнатуу циклдери учурунда алынса, күйүп кетиши мүмкүн.
- Графини бул шайман менен колдонуу үчүн жасалган. Аны эч качан бийиктикте колдонууга болбойт.
- Ысык кумураны муздак же нымдуу бетке койбоңуз.
- Жарака кеткен графинди же туткасы бош же алсыраган графинди колдонбоңуз.
- Карафанды тазалагычтар, болоттон жасалган жүн же башка абразивдүү материалдар менен тазалабаңыз.
- Ensure the water tank is filled with purified water and boiled at least one cycle before brewing coffee for the first time.
- To avoid damage to the grinder, no coffee powder or any liquid is allowed in the bean box.
- When the machine is finished making coffee, the coffee residue in the funnel and filter should be removed to avoid accumulation of coffee powder and clogging the grinding bean cavity.
3. Продукциянын компоненттери
Familiarize yourself with the parts of your Gevi coffee maker:
- Башкаруу панели менен негизги блок
- Built-in Burr Grinder (Bean Box)
- 1.5L Water Tank (with MAX 10-cup indicator)
- Айнек кофе кайнаткыч (графин)
- Туруктуу чыпка
- Тамчылатып токтотуучу чыпкалоочу кыстарма
- Кашык
- Тазалоочу щетка
- Чыпка шакеги

Image 2: Included accessories: Permanent Filter, Filter Insert with Drip Stop, Glass Coffee Pot, Scoop, Filter Ring.
4. Setup and First-Time Use
4.1 Кутудан чыгаруу жана жайгаштыруу
- Carefully remove all packaging materials and the coffee maker from the box.
- Place the coffee maker on a stable, flat, and spacious surface. Ensure adequate clearance around the unit for proper ventilation.
- Жарнама менен кофе кайнаткычтын сыртын сүртүңүзamp кездеме.
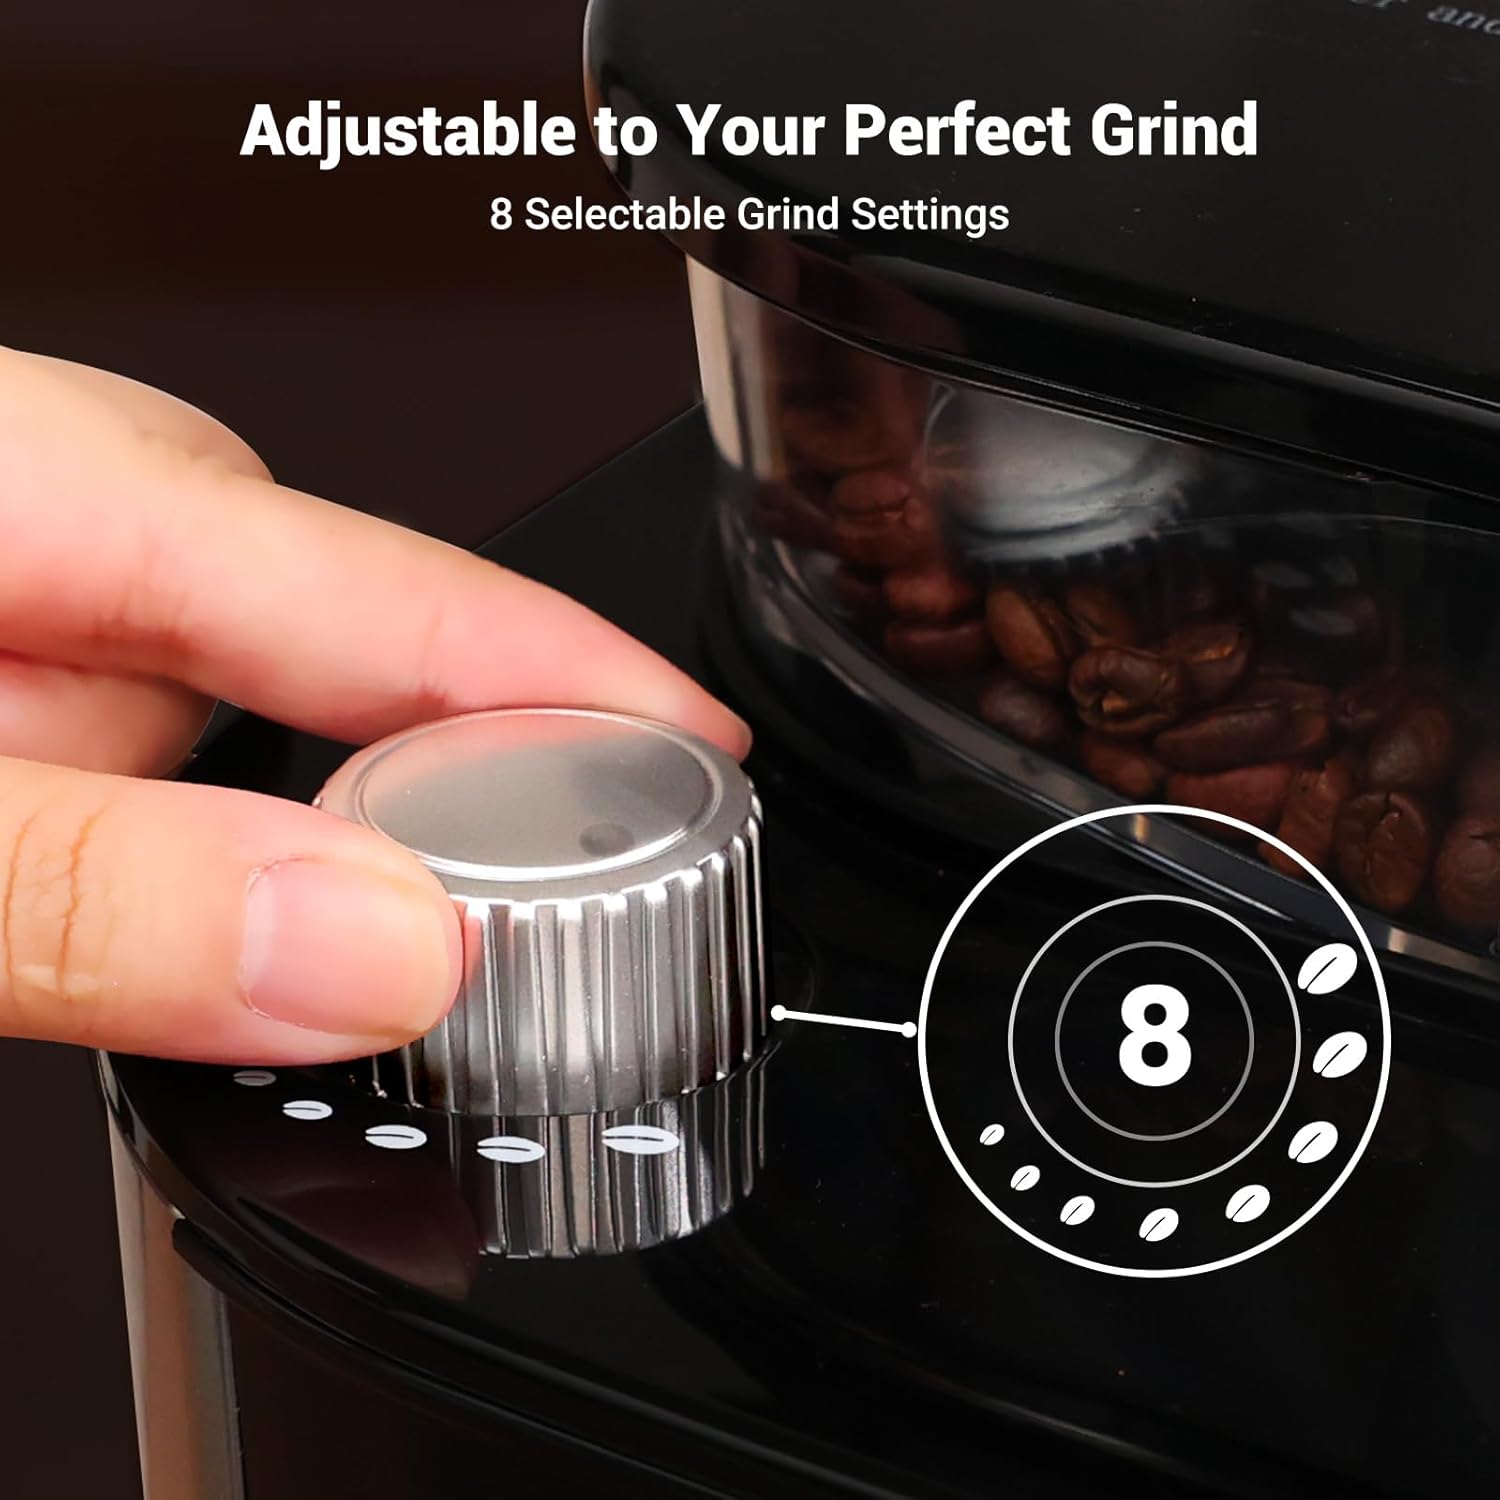
Image 3: The coffee maker's compact design fits well on countertops. Dimensions: 12.36" (D) × 8.38" (W) × 16.93" (H).
4.2 Баштапкы тазалоо цикли
Before brewing coffee for the first time, it is recommended to run at least one full cycle with clean water to remove any manufacturing residues.
- Fill the glass carafe with clean water up to the "MAX 10" line.
- Open the water tank lid and carefully pour the water from the carafe into the water tank. Close the lid securely.
- Ensure the permanent filter is correctly placed in the filter basket.
- Бош айнек графинди жылыткыч табакка коюңуз.
- Электр шнурын жерге туташтырылган электр розеткасына сайыңыз. Дисплей күйөт.
- Press the "ON/OFF" button to start the brewing cycle. The machine will run a full cycle, heating and dispensing all the water.
- Once the cycle is complete, discard the water from the carafe. Your coffee maker is now ready for use.
5. Иштөө нускамалары
5.1 Adding Water and Coffee
- Fill the glass carafe with fresh, cold water to your desired number of cups (2-10).
- Open the water tank lid and pour the water into the tank. Ensure the water level does not exceed the "MAX 10" line.
- For whole beans: Open the bean box lid and add fresh coffee beans. Close the lid securely.
- For pre-ground coffee: Press the "GRIND OFF" button to disable the grinder. Open the filter basket and add your desired amount of pre-ground coffee into the permanent filter. Close the filter basket.

Image 4: Illustration of adding whole coffee beans to the grinder or pre-ground coffee to the filter basket.
5.2 Майдалоо деңгээлин жана кофенин күчтүүлүгүн орнотуу
- Rotate the grind regulator knob on top of the machine to select your desired coffee grind size (8 settings from fine to coarse).
- Press the "STRENGTH CONTROL" button to cycle through the available coffee strength options (Mild, Medium, Strong).
- Press the "POWDER 2-10" button to select the number of cups you wish to brew.

Image 5: Close-up of the grind setting knob, indicating 8 selectable grind settings.
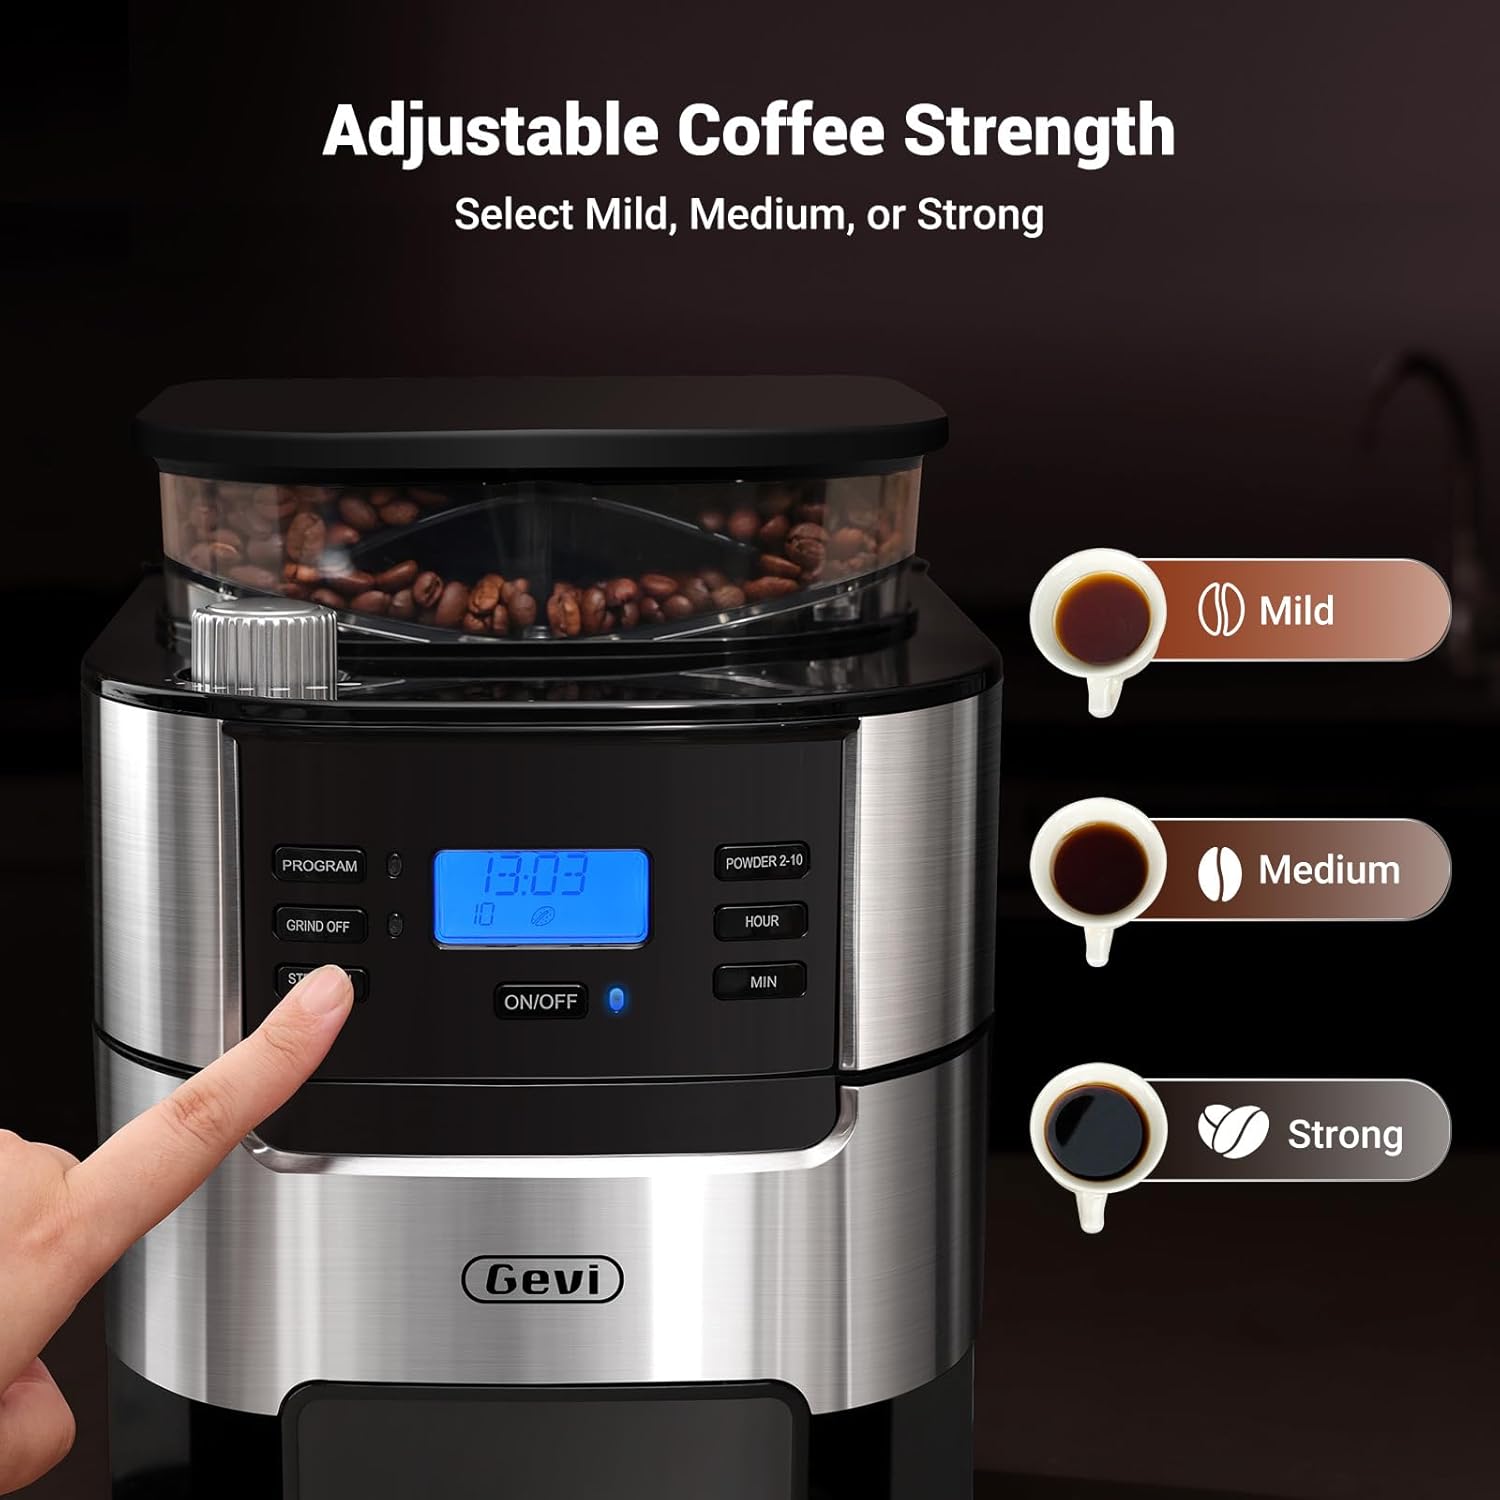
Image 6: The control panel highlighting the "STRENGTH CONTROL" button and the three brew strength options.
5.3 Таймерди программалоо
Кофе кайнаткыч автоматтык түрдө кофе кайнатуу үчүн 24 сааттык программалануучу таймер менен жабдылган.
- Set the current time using the "HOUR" and "MIN" buttons.
- "ПРОГРАММА" баскычын басыңыз. Дисплейде "ПРОГРАММА" көрсөтүлөт жана убакыт күйүп-өчүп турат.
- Use the "HOUR" and "MIN" buttons to set your desired brew start time.
- Press the "PROGRAM" button again to confirm. The display will show the current time, and the program indicator will remain lit.
- Кофе кайнаткыч белгиленген убакытта автоматтык түрдө демдеп баштайт.

Image 7: Visual representation of setting the 24-hour programmable timer for automatic morning coffee.
5.4 Starting the Brew Cycle
After setting your preferences, press the "ON/OFF" button to start brewing immediately or to activate the programmed brew cycle.
Image 8: Step-by-step visual guide for one-touch brewing, from adding water to enjoying coffee.
5.5 Keep-Warm Function
The coffee maker automatically keeps coffee warm at 167°F+ for up to 2 hours after brewing. You can adjust the warming time from 0-120 minutes in 15-minute intervals.
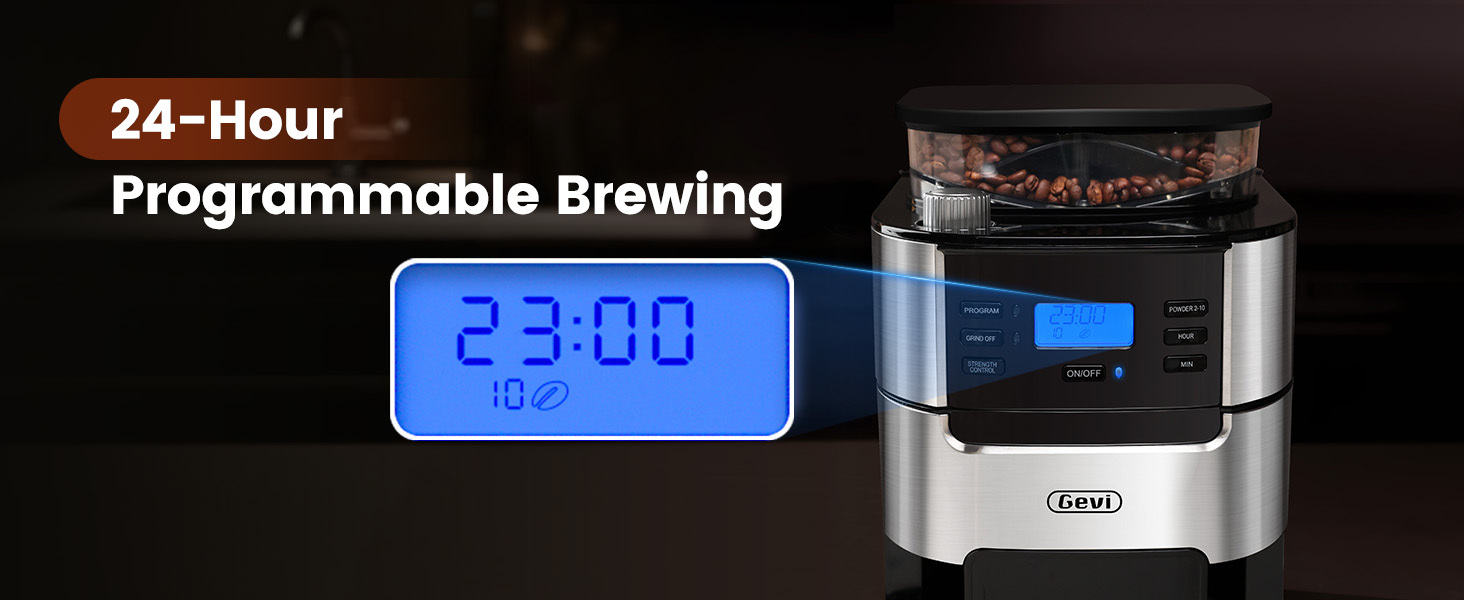
Image 9: The coffee maker's warming plate maintaining the temperature of brewed coffee.
6. Техникалык тейлөө жана тазалоо
Кофе кайнаткычыңыздын үзгүлтүксүз тазаланышы анын оптималдуу иштешин жана узак мөөнөттүү иштешин камсыздайт.
6.1 Күнүмдүк тазалоо
- After each use, press the "OPEN" button to remove the filter basket.
- Discard used coffee grounds from the permanent filter.
- Rinse the permanent filter and filter ring under running water. Use the provided cleaning brush to remove any stubborn coffee residue.
- Жарнама менен машинанын сыртын сүртүңүзamp кездеме. Кайра чогултуудан мурун бардык бөлүктөр кургак экенин текшериңиз.
6.2 Grinder Maintenance
To prevent clogging and maintain grinder efficiency, especially if not using the machine for several days:
- Remove the bean box lid.
- Carefully remove any remaining coffee beans from the bean box using the scoop or a spoon.
- буурчак кутусунун капкагын жабыңыз.
- Set the "POWDER 2-10" function to 10 cups.
- Press the "ON/OFF" button to run the grinder until it sounds empty, ensuring all residual grounds are cleared.
- Always ensure the bean box lid is securely closed to protect beans from ambient air and prevent water from entering the grinder during water tank refills.
- Do not adjust the grind size selector while the grinder is operating to prevent damage.
7. Кыйынчылыктарды
| Көйгөй | Мүмкүн себеп | Чечим |
|---|---|---|
| Coffee maker not turning on. | розеткага кошулбаган; күч уtage. | Кубат шнуру иштеп жаткан розеткага бекем сайылганын текшериңиз. Автоматтык өчүргүчтү текшериңиз. |
| Water leaking from the bottom. | Water tank overfilled; faulty water tank. | Do not exceed the MAX fill line in the water tank. If leaking persists, contact customer support. |
| Grinder is clogged or not grinding. | Coffee beans stuck; coffee powder accumulation. | Remove beans and clean the grinder cavity as per maintenance instructions. Do not add liquid to the bean box. |
| Кофенин даамы алсыз же өтө күчтүү. | Кофе менен суу катышы туура эмес; күчтүүлүк туура эмес коюлган. | Adjust the coffee quantity and strength control settings to your preference. |
| Coffee beans not feeding into grinder. | Beans stuck in hopper. | Gently shake the machine or use a non-sharp utensil to dislodge beans. Ensure the bean box lid is properly closed. |
8. Техникалык шарттар
- Бренд: Gevi
- Model Name: Drip Coffee Machine
- Item Model Number: DCMB0-BK0A1
- Capacity: 10-Cup (1.5L Water Tank)
- Түсү: Black
- Продукциянын өлчөмдөрү: 12.36"D x 8.38"W x 16.93"H
- Special Feature: Adjustable Brew Strength, Built-in Burr Grinder, Programmable Timer, Auto Keep-Warm
- Coffee Maker Type: Drip Coffee Machine
- Operation Mode: Fully Automatic
- Тtagд: 120 Вольт
- Human Interface Input: Buttons
- Coffee Input Type: Whole Bean
- Элемент Салмагы: 9.92 фунт
- UPC: 767791886977, 767791888223
9. Кепилдик жана колдоо
Your Gevi coffee maker comes with a 12-month warranty. For product support, troubleshooting assistance, or warranty claims, please contact Gevi customer service.
Refer to the official Gevi webБайланыш маалыматы үчүн сайтка же сатып алуу документтериңизге кайрылыңыз.

Image 10: Gevi's commitment to customer satisfaction, including a 12-month warranty and friendly services.


