1. Киришүү
This manual provides detailed instructions for the safe and efficient operation, installation, and maintenance of your AIRMSEN Countertop Dishwasher, Model TDQR09. Please read this manual thoroughly before using the appliance and retain it for future reference.
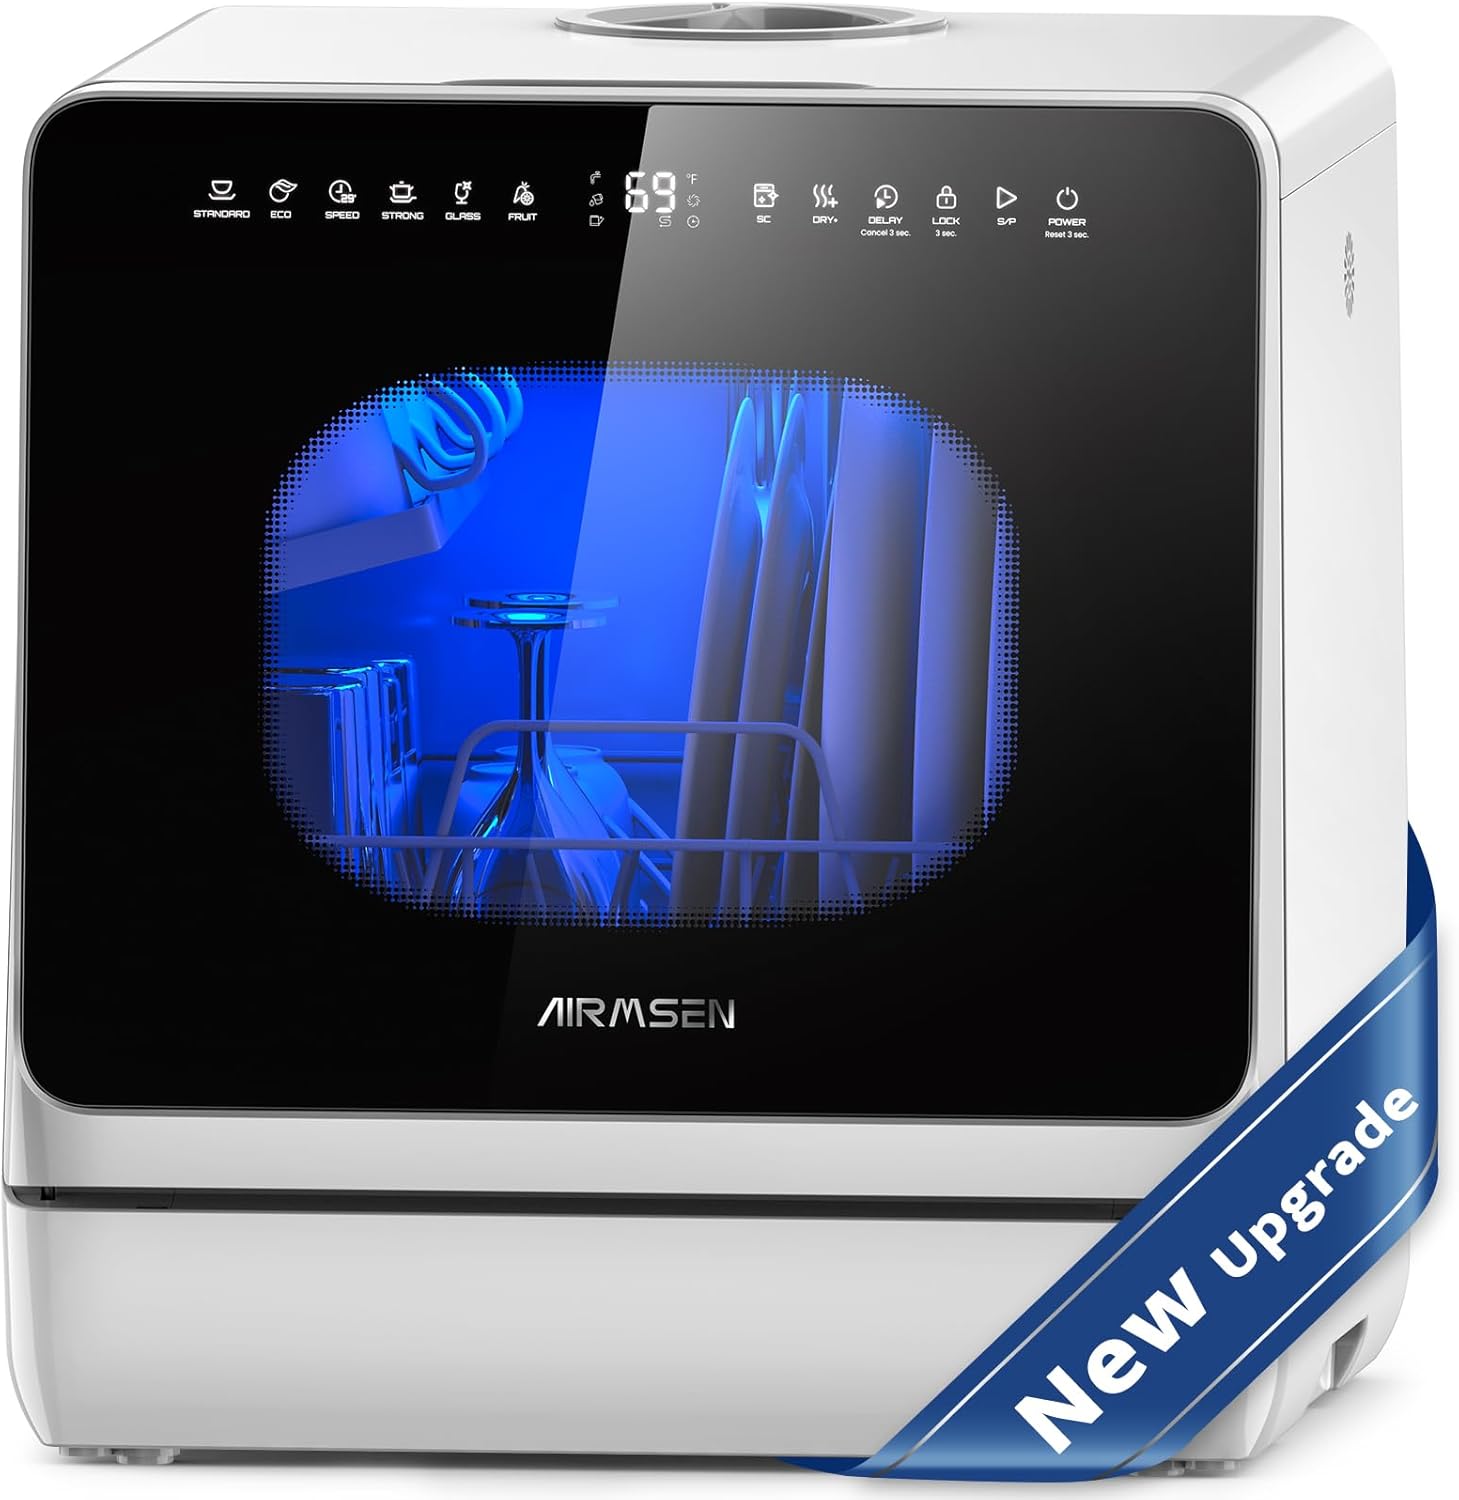
Image 1.1: The AIRMSEN Countertop Dishwasher TDQR09, a compact appliance designed for efficient dish cleaning.
2. Коопсуздук маалыматы
Идиш жуугучту колдонууда өрт, электр шок же жаракат алуу коркунучун азайтуу үчүн төмөнкү негизги сактык чараларын аткарыңыз:
- Идиш жуугуч машинаны колдонуудан мурун бардык нускамаларды окуп чыгыңыз.
- Идиш жуугучту өз функциясы үчүн гана колдонуңуз.
- Do not operate the dishwasher if it has a damaged power cord or plug, if it is not working properly, or if it has been dropped or damaged.
- Балдарды жуучу каражаттан жана чайкоочу каражаттан алыс кармаңыз.
- Балдардын идиш жуугучта же анын үстүндө ойношуна жол бербеңиз.
- Тазалоодон же тейлөөдөн мурун шайманды дайыма электр кубатынан ажыратыңыз.
- Идиш жуугуч туура жерге туташтырылганын текшериңиз.
- кылбаampбашкаруу элементтери менен.
- Идиш жуугуч машинада колдонууга сунушталган жуучу каражаттарды жана чайкоочу каражаттарды гана колдонуңуз.
- Do not wash plastic items unless they are marked "dishwasher safe" or equivalent.
- Колдонуу учурунда же андан кийин дароо жылытуу элементине тийбеңиз.
- Жуу цикли учурунда же андан кийин эшикти ачууда этият болуңуз, анткени ысык буу чыгып кетиши мүмкүн.
3. Продукт бүтүп калдыview
The AIRMSEN TDQR09 is a compact countertop dishwasher designed for small living spaces, apartments, and RVs. It features multiple wash programs, a built-in water tank, and an integrated water softener.
3.1 Негизги компоненттер
- Башкаруу панели: Touchscreen interface for program selection and function activation.
- Dish Racks: Designed to hold various dishware, including plates up to 10.24 inches. Includes tableware and cutlery baskets.
- Суу багы: 5-liter built-in tank for manual water filling.
- Spray куралдары: Dual 360° spray arms with 14 high-pressure jets for thorough cleaning.
- Фильтр системасы: Removable filter to capture food particles.
- Кир жуугучтар бөлүмү: For block, powder, or liquid detergent.
- Water Softener Compartment: For dishwasher salt.
- Inlet/Drain Hoses: For optional direct water connection.

Image 3.1: The compact size and internal capacity of the dishwasher, showing loaded dishes and cutlery.

Сүрөт 3.2: Детальдуу view of the removable filter, detergent compartment, integrated water softener, and faucet connection point.
4. Орнотуу жана орнотуу
4.1 Пакеттен чыгаруу
Carefully remove the dishwasher from its packaging. Inspect for any shipping damage. Retain packaging materials for future transport if needed. Remove any internal packing materials or tape.
4.2 Орнотуу
Place the dishwasher on a stable, level countertop or shelf. Ensure there is sufficient space around the unit for ventilation and door opening. The dimensions are approximately 16.85"W × 16.73"D × 18"H. If not connected to a faucet, ensure extra height above the unit for manual water filling.
4.3 Water Supply Modes
The dishwasher offers flexible water supply options:
- Кол менен толтуруу: Use the provided pitcher to fill the built-in 5-liter water tank. Stop adding water when the "Full Water Level" alert sounds. This mode requires no plumbing connection and is ideal for portability.
- Faucet Fill Using Hose: Connect the inlet hose to a faucet. This is suitable when the dishwasher is close to a sink.
- Direct Water Line Hook-Up: For a more permanent setup, connect the inlet hose to a dedicated G3/4 inch water line. An adapter may be required depending on your faucet type.

Image 4.1: Illustration of the three water supply methods: manual fill, faucet connection, and direct water line hook-up.
4.4 Дренаждык шланг туташтыруу
Connect the drain hose to a sink or a suitable drainage point. Ensure the hose is securely fastened and positioned to allow proper water drainage without kinks.
5. Иштөө нускамалары
5.1 Башкаруу панели
The dishwasher features an HD touchscreen panel for intuitive operation. Icons represent different programs and functions.

Image 5.1: The HD touchscreen panel displaying program icons and current status.
5.2 Идиштерди жүктөө
Arrange dishes in the racks, ensuring they do not block the spray arms. Plates up to 10.24 inches can be accommodated. Use the tableware and cutlery baskets for smaller items.
5.3 Жуучу каражатты кошуу
Open the detergent compartment and add the appropriate amount of dishwasher detergent (block, powder, or liquid). Close the compartment securely.
5.4 Adding Dishwasher Salt (Water Softener)
The integrated water softener requires dishwasher salt to prevent spots and limescale. Open the water softener compartment and fill with dishwasher salt as needed. The system has adjustable levels (H1-H7) to match your water hardness.

Image 5.2: Illustration of the adjustable soft water system and its benefits for dish cleanliness.
5.5 Программаны тандоо
Choose from 8 available wash programs:
- Standard (69 min): General daily wash.
- ECO (59 min): Energy and water-efficient wash.
- Speed (29 min): Бир аз кирдеген буюмдарды тез жуу.
- Strong (89 min): Intensive wash for heavily soiled dishes.
- Glass (50 min): Назик айнек идиштерди жумшак жуу.
- Fruit (19 min): For washing fruits and vegetables (no hot air drying).
- Self-Clean (79 min): For cleaning the dishwasher interior.
- Dry+ (72H): Adds extra hot air drying and air circulation.
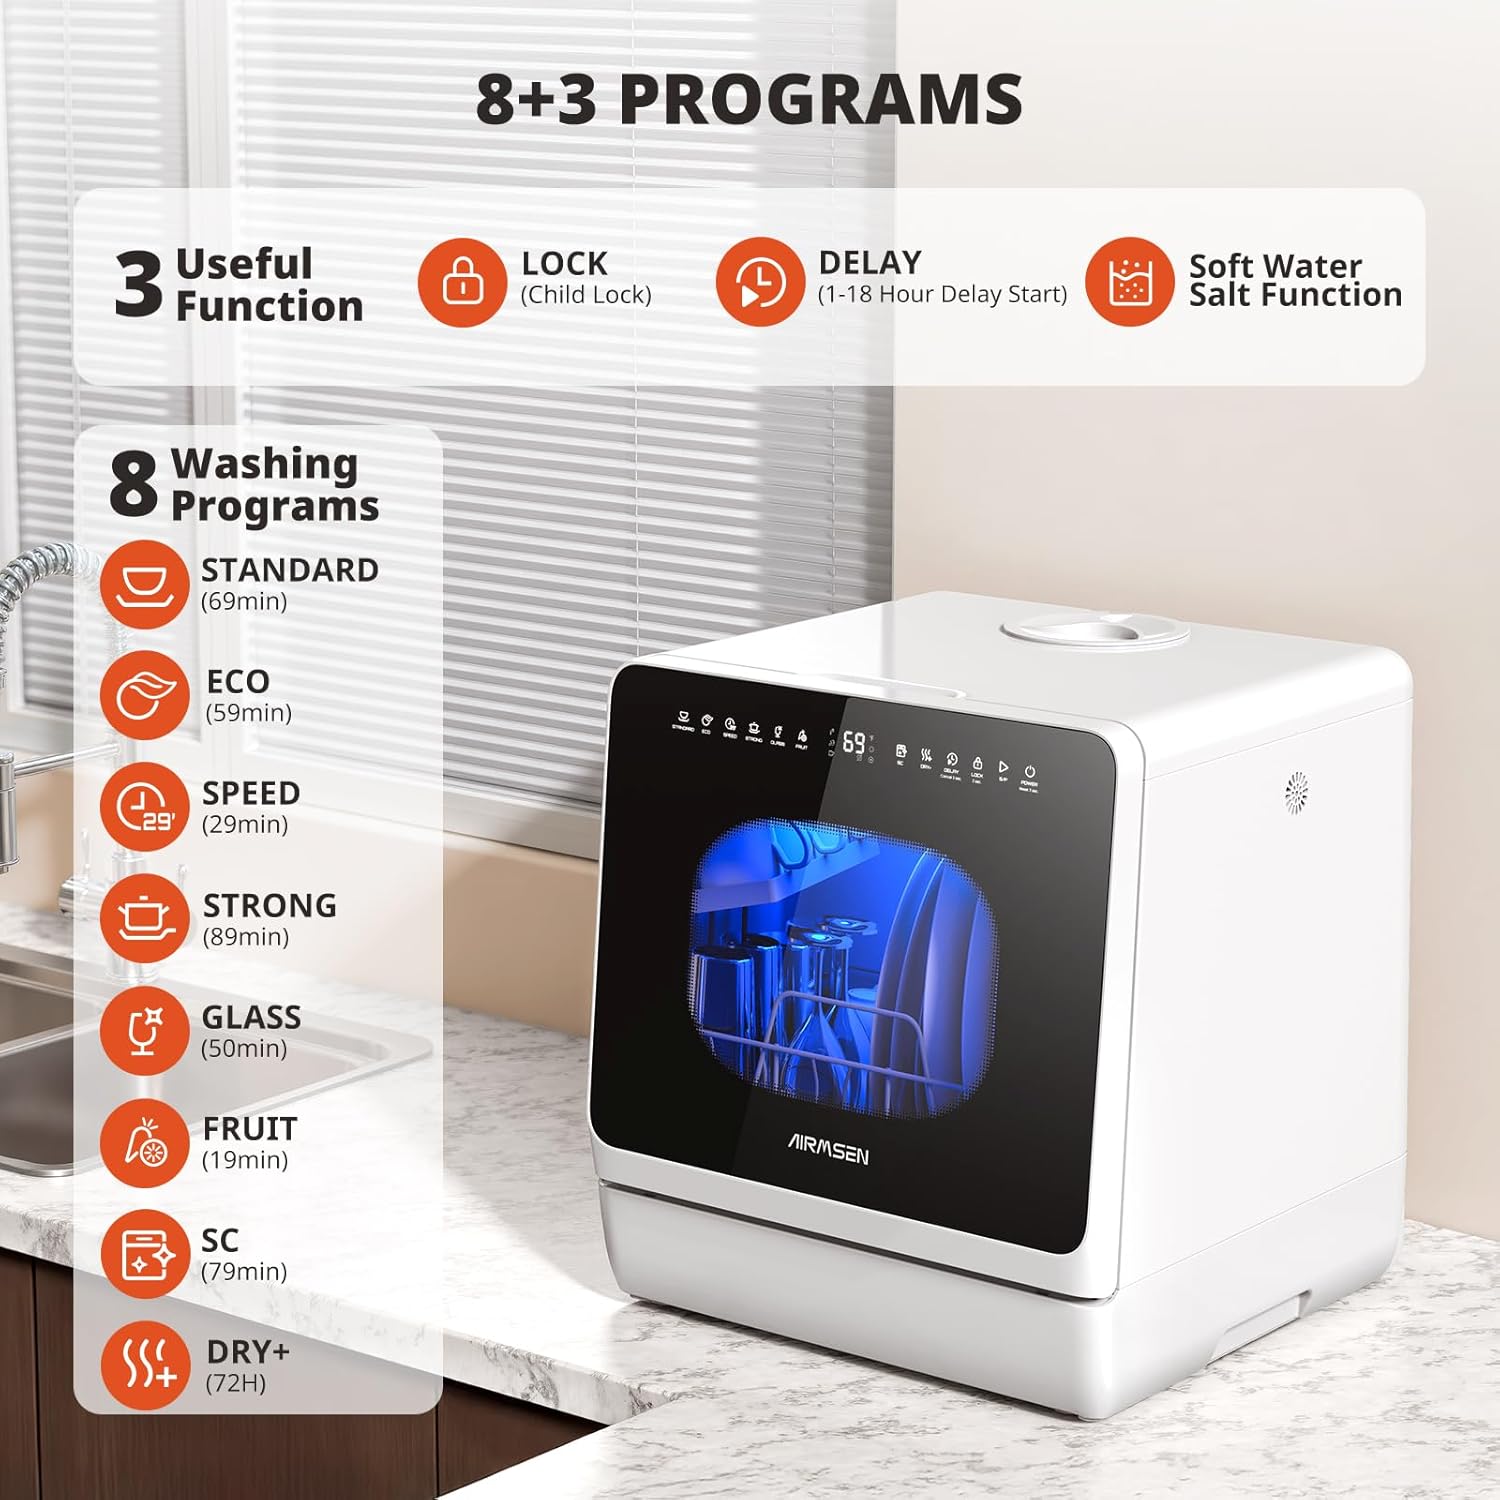
Сүрөт 5.3: Бүттүview of the 8 washing programs and 3 additional functions.
5.6 Using Extra Functions
- Балдар кулпусу: Кокусунан иштөөнүн алдын алуу үчүн иштетилет.
- Delay Start (1-18h): Жуу циклинин кечиктирилген баштоо убактысын коюуга мүмкүндүк берет.
- Ысык аба менен кургатуу: Automatically dries dishes for 1 hour after most cycles. DRY+ adds an extra hour of hot air drying and 72 hours of air circulation.

Image 5.4: Visual representation of the 1-18 hour delay start function.

Image 5.5: The Child Lock function prevents unintended operation.

Image 5.6: The PTC Hot Air Drying function for efficient dish drying and odor elimination.
5.7 Циклды баштоо
After loading dishes, adding detergent and salt, and selecting your desired program and functions, press the Start button to begin the wash cycle.
6. Техникалык тейлөө
Үзгүлтүксүз тейлөө идиш жуугуч машинаңыздын оптималдуу иштешин жана узак иштөөсүн камсыздайт.
6.1 Фильтрди тазалоо
The removable filter should be cleaned regularly to prevent food particle buildup. Remove the lower tray, then remove the filter by turning it. Rinse under running water to remove debris. Reinstall securely.
6.2 Бүркүтүүчү түтүктөрдү тазалоо
Periodically check the spray arms for blockages. Remove the lower tray to access the upper spray arm. Turn the large screw by hand to remove the upper spray arm. Clean any debris around the mounting area and use a toothpick to clear any clogged nozzles. Ensure nozzles face downwards upon reinstallation.

Image 6.1: The 360° Dual Spray Arms, which require periodic cleaning to maintain optimal performance.
6.3 Өзүн-өзү тазалоо режими
Use the "Self-Clean" program (79 minutes) to clean the dishwasher interior, keeping it fresh and odor-free.

Image 6.2: The dishwasher operating in Self-Cleaning Mode.
6.4 Тышкы тазалоо
Сырткы беттерин жумшак менен сүртүңүз, гamp кездеме. Абразивдүү тазалагычтарды же эриткичтерди колдонбоңуз.
7. Кыйынчылыктарды
| Көйгөй | Мүмкүн себеп | Чечим |
|---|---|---|
| Идиш жуугуч иштебейт. | Power cord not plugged in; door not fully closed; program not selected. | Ensure power is connected. Close the door firmly. Select a wash program. |
| Идиштер таза эмес. | Improper loading; spray arms blocked; insufficient detergent; clogged filter. | Reload dishes correctly. Clean spray arms and filter. Use appropriate detergent amount. |
| Upper spray arm not turning. | Debris buildup in the spray arm mechanism or clogged nozzles. | Remove the upper spray arm, clean any debris from the mounting area, and clear clogged nozzles with a toothpick. Reinstall ensuring smooth rotation. |
| Water spots on dishes. | Hard water; insufficient dishwasher salt. | Add dishwasher salt to the water softener compartment. Adjust water softener level if necessary. |
| Идиш жуугучтун агуусу. | Improper drain hose connection; door seal damaged. | Check drain hose for secure connection and kinks. Inspect door seal for damage. |
| Yellow water inside after first use. | Normal residue from food-grade resin in the built-in water softener from factory testing. | This is normal and safe. No action required. |
8. Техникалык шарттар
| Өзгөчөлүк | Деталь |
|---|---|
| Модель аты | TDQR09 |
| Бренд | AIRMSEN |
| Өлчөмдөрү (W x D x H) | 16.85" x 16.73" x 18" |
| Элемент Салмагы | 29 фунт |
| Тtage | 110 вольт |
| Суу резервуарынын сыйымдуулугу | 5 литр (1.3 галлон) |
| Сууну керектөө (бир циклге) | 1.3 галлон |
| Жылдык энергия керектөө | Жылына 105 киловатт саат |
| Ызы-чуу деңгээли | 50 децибел |
| Программалар | Standard, ECO, Speed, Strong, Glass, Fruit, Self-Clean, Dry+ |
| Өзгөчөлүктөр | 1-18H Delayed Start, Built-In Water Tank, Child Lock, Extra Dry, Integrated Water Softener |
| Материал | Polypropylene (PP), Stainless Steel, Tempered Double-Layer Glass |
| Сертификация | ETL, UL |
9. Кепилдик жана колдоо
For warranty information or technical support, please refer to the contact details provided with your purchase documentation. If you have any questions regarding the operation or maintenance of your AIRMSEN Countertop Dishwasher TDQR09, please contact AIRMSEN customer service.


